[K8S] Phần 4 - Cài đặt Storage cho K8S dùng longhorn
Lời tựa
Chào các bạn, trong phần trước mình đã có chia sẻ cách cài đặt và sử dụng nfs storage class trên K8S Cluster. Hôm nay mình sẽ tiếp tục hướng dẫn các bạn cài đặt và sử dụng longhorn storage với K8S. Nếu bạn nào chưa đọc phần trước thì các bạn có thể xem lại ở đây: https://viblo.asia/p/k8s-phan-3-cai-dat-storage-cho-k8s-dung-nfs-RnB5pAw7KPG
Update 2025
Mình bổ sung thêm video hướng dẫn chi tiết cách cài đặt longhorn trên k8s trên Youtube: https://www.youtube.com/watch?v=LN6UBqFoW7Y
Nếu thấy hữu ích thì giúp mình thêm một 👍️ và subscribe cho kênh YT của mình nhé! Cảm ơn các bạn.
Link các file sử dụng cho các đặt: https://github.com/rockman88v/vietdevops
Giới thiệu
Ý tưởng cài đặt longhorn hiểu đơn giản như sau:
- Bạn cấu hình cho longhorn biết thư mục mặc định lưu data của longhorn sẽ được dùng ở đâu trên Worker Node
- Longhorn sẽ chạy trên tất cả các Worker Node thỏa mãn điều kiện là có phân vùng lưu trữ như cấu hình bên trên
- Mỗi Worker Node sẽ được coi là một Node của longhorn, trên mỗi node này có thể có 1 hoặc nhiều Disk mà ta có thể cấu hình thêm sau khi đã cài đặt longhorn
Để cài đặt longhorn storage, mình đã chuẩn bị phân vùng /data có dung lượng 20GB trên tất cả các node của K8S như sau:
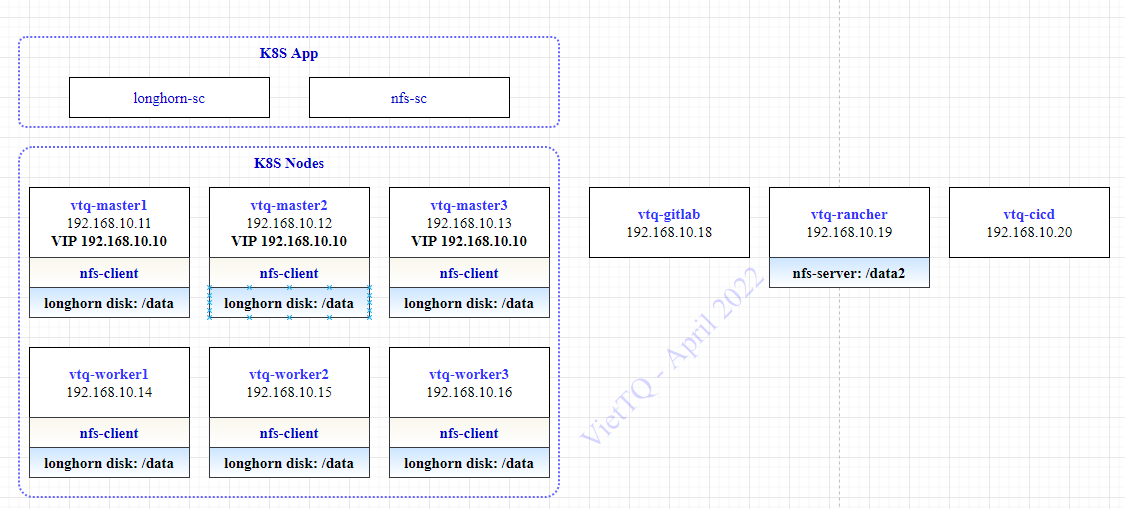
Ta sẽ có 2 phần:
- Longhorn storage: Là storage quản lý thiết bị lưu trữ, nó có vai trò giống như NFS Server vậy
- Longhorn storage class: Là một object trên K8S đảm nhiệm việc nhận các yêu cầu tạo Volume trên K8S (PV/PVC) sau đó kết nối với longhorn storage để tạo ra phân vùng lưu trữ trên thiết bị lưu trữ
Các bước thực hiện trong bài lab này như sau:
- Chuẩn bị phân vùng lưu dữ liệu trên các Worker Node-
- Cài đặt longhorn storage trên K8S dùng helm chart
- Cài đặt longhorn storage class trên K8S
- Test thử tạo PV/PVC và tạo Pod dùng longhorn storage class
Vẫn có một lưu ý nữa mình xin nhắc lại là việc cài đặt đều được thực hiện trên node vtq-cicd để quản lý tập trung các file cấu hình cài đặt được dễ dàng.
Cài đặt longhorn storage
Chuẩn bị phân vùng lưu trữ
Ta sẽ cài đặt thư mục mặc định lưu dữ liệu của longhorn là /data/longhorn-storage, do đó cần tạo thư mục nào trên các Worker Node:
sudo mkdir -p /data/longhorn-storage
Cài đặt longhorn storage
Do ở phần trước mình đã cài và cấu hình kubectl và helm trên node vtq-cicd rồi nên ở đây mình không cần thực hiện lại nữa. Giờ bắt tay vào cài longhorn thôi.
Đầu tiên là tạo thư mục lưu helm chart và các file cấu hình đã:
cd /home/sysadmin/kubernetes_installation
mkdir longhorn-storage
cd longhorn-storage
Khai báo repo và download helm chart của longhorn về:
helm repo add longhorn https://charts.longhorn.io
helm repo update
helm search repo longhorn
helm pull longhorn/longhorn --version 1.2.2
tar -xzf longhorn-1.2.2.tgz
Ở đây mình đang dùng bản 1.2.2 nhé, các bạn nếu cài version khác nên chú ý xem cấu hình có khác thì update tương ứng. Bản mới nhất tại thời điểm này là 1.24.
Sau bước trên mình đã down về và giải nén thư mục helm chart của longhorn ở thư mục /home/sysadmin/kubernetes_installation/longhorn-storage
Copy file value mặc định của helmchart ra ngoài để tùy biến theo môi trường của mình:
[sysadmin@vtq-cicd ~]$ cd /home/sysadmin/kubernetes_installation/longhorn-storage
[sysadmin@vtq-cicd longhorn-storage]$ cp longhorn/values.yaml values-longhorn.yaml
Sửa file values-longhorn.yaml và cập nhật một số tham số như sau:
Lưu ý ở đây mình chưa động gì tới haproxy với nginx-ingress nên để expose service ra bên ngoài thì trước mắt tạm thời sẽ dùng node port đã cho nó tiện 
service:
  ui:
    #type: ClusterIP
    type: NodePort
    nodePort: 30888
  manager:
    type: ClusterIP

defaultDataPath: /data/longhorn-storage/
replicaSoftAntiAffinity: true
storageMinimalAvailablePercentage: 15
upgradeChecker: false
defaultReplicaCount: 2
backupstorePollInterval: 500
nodeDownPodDeletionPolicy: do-nothing
guaranteedEngineManagerCPU: 15
guaranteedReplicaManagerCPU: 15

ingress:
  enabled: true
  ingressClassName: longhorn-storage-ingress
  host: longhorn-ui.viettq.com

namespaceOverride: "storage"
Thêm một lưu ý là phải cài thêm open-iscsi cho các Worker Node để nó có thể mount được phân vùng từ longhorn storage
sudo yum -y install iscsi-initiator-utils
Config xong rồi, cài lên thôi xem nó có chạy được không nào
[sysadmin@vtq-cicd longhorn-storage]$ helm install longhorn-storage -f values-longhorn.yaml longhorn --namespace storage
[sysadmin@vtq-cicd longhorn-storage]$ kubectl -n storage get pods
[sysadmin@vtq-master1 ~]$ kubectl -n storage get pods
NAME                                                         READY   STATUS    RESTARTS   AGE
csi-attacher-75588bff58-6rbff                                1/1     Running   0          2m46s
csi-attacher-75588bff58-qfz9f                                1/1     Running   0          2m46s
csi-attacher-75588bff58-t8lc8                                1/1     Running   0          2m46s
csi-provisioner-669c8cc698-shpgl                             1/1     Running   0          2m45s
csi-provisioner-669c8cc698-w4krd                             1/1     Running   0          2m45s
csi-provisioner-669c8cc698-whlfk                             1/1     Running   0          2m45s
csi-resizer-5c88bfd4cf-5p5jf                                 1/1     Running   0          2m45s
csi-resizer-5c88bfd4cf-bjlk5                                 1/1     Running   0          2m45s
csi-resizer-5c88bfd4cf-wv9sn                                 1/1     Running   0          2m45s
csi-snapshotter-69f8bc8dcf-gtxdk                             1/1     Running   0          2m44s
csi-snapshotter-69f8bc8dcf-mztht                             1/1     Running   0          2m44s
csi-snapshotter-69f8bc8dcf-z5r8w                             1/1     Running   0          2m44s
engine-image-ei-d4c780c6-kh2kj                               1/1     Running   0          2m57s
engine-image-ei-d4c780c6-pc6pl                               1/1     Running   0          2m57s
engine-image-ei-d4c780c6-zwxkw                               1/1     Running   0          2m57s
instance-manager-e-2d950b3b                                  1/1     Running   0          2m58s
instance-manager-e-519e9c3e                                  1/1     Running   0          2m51s
instance-manager-e-e19eb3c0                                  1/1     Running   0          2m54s
instance-manager-r-4c30dc6d                                  1/1     Running   0          2m54s
instance-manager-r-97096df4                                  1/1     Running   0          2m50s
instance-manager-r-989de97e                                  1/1     Running   0          2m57s
longhorn-csi-plugin-cjvrq                                    2/2     Running   0          2m44s
longhorn-csi-plugin-jgbm7                                    2/2     Running   0          2m44s
longhorn-csi-plugin-zmd4j                                    2/2     Running   0          2m44s
longhorn-driver-deployer-6d567db9f-8ldvh                     1/1     Running   0          23m
longhorn-manager-2wjqr                                       1/1     Running   0          3m12s
longhorn-manager-gnvg9                                       1/1     Running   1          3m12s
longhorn-manager-gpmpt                                       1/1     Running   1          3m13s
longhorn-ui-5dd96c9699-kzk9h                                 1/1     Running   0          23m
.
Úi chà chà, mượt quá ko thấy có lỗi gì cả nhỉ. Vất vả nãy giờ rồi, phải kiếm tí gì màu mè để up facebook khè sếp tí nào, thế thì phải vào web-ui của longhorn thôi, lúc này dùng tạm qua node port nhé: http://192.168.10.11:30888/

Rồi đẹp quá, giờ xem tiếp thông tin các node:
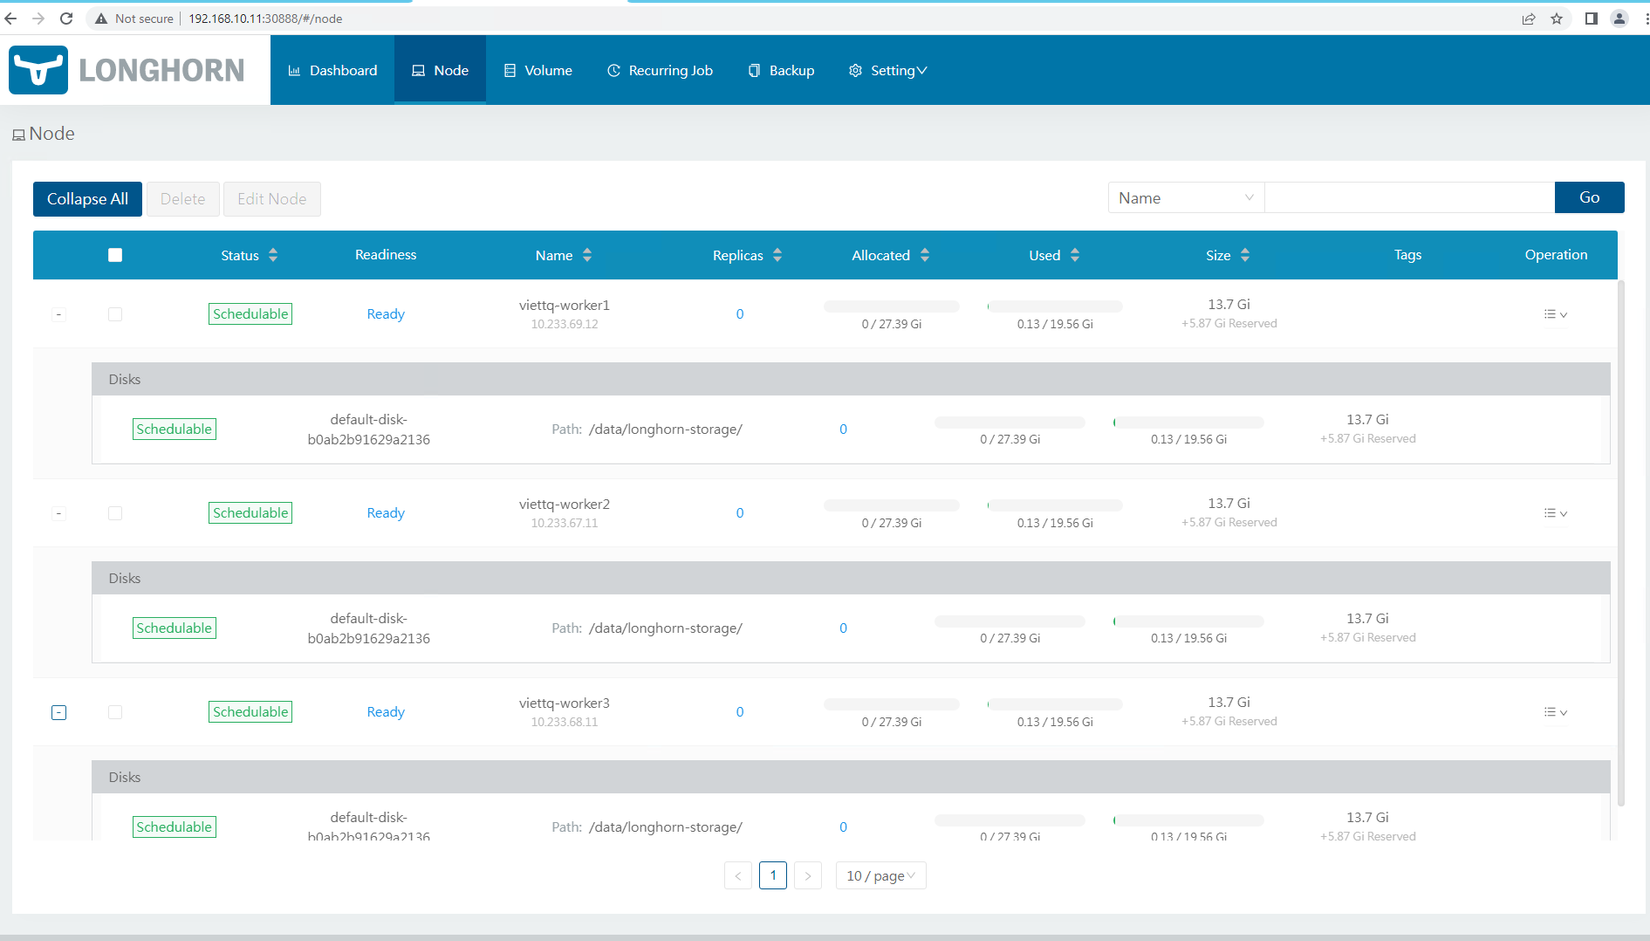 Đúng như đã đề cập ở đầu bài viết, longhorn storage được cài trên 3 Worker Node và trên mỗi node đều sử dụng một Disk mặc định ở phân vùng /data/longhorn-storage
Cài đặt longhorn storage class trên K8S
Tới đây lại phải nhớ trong đầu là ta sẽ phải tạo 2 loại storage class ứng với 2 loại reclaim policy là delete và retain. Ta tạo 2 file config như sau:
longhorn-storageclass-delete.yaml
kind: StorageClass
apiVersion: storage.k8s.io/v1
metadata:
  name: longhorn-storage-delete
  annotations:
    storageclass.kubernetes.io/is-default-class: "true"
provisioner: driver.longhorn.io
allowVolumeExpansion: true
reclaimPolicy: Delete
volumeBindingMode: Immediate
parameters:
  numberOfReplicas: "2"
  staleReplicaTimeout: "2880"
  fromBackup: ""
  fsType: "ext4"
longhorn-storageclass-retain.yaml
kind: StorageClass
apiVersion: storage.k8s.io/v1
metadata:
  name: longhorn-storage-retain
provisioner: driver.longhorn.io
allowVolumeExpansion: true
reclaimPolicy: Retain
volumeBindingMode: Immediate
parameters:
  numberOfReplicas: "2"
  staleReplicaTimeout: "2880"
  fromBackup: ""
  fsType: "ext4"
Cài đặt 2 storage class này thôi:
[sysadmin@vtq-cicd longhorn-storage]$ kubectl apply -f longhorn-storageclass-delete.yaml
storageclass.storage.k8s.io/longhorn-storage-delete created
[sysadmin@vtq-cicd longhorn-storage]$ kubectl apply -f longhorn-storageclass-retain.yaml
storageclass.storage.k8s.io/longhorn-storage-retain created
[sysadmin@vtq-cicd longhorn-storage]$ kubectl get sc
NAME                                PROVISIONER                             RECLAIMPOLICY   VOLUMEBINDINGMODE   ALLOWVOLUMEEXPANSION   AGE
longhorn (default)                  driver.longhorn.io                      Delete          Immediate           true                   35m
longhorn-storage-delete (default)   driver.longhorn.io                      Delete          Immediate           true                   8s
longhorn-storage-retain             driver.longhorn.io                      Retain          Immediate           true                   4s
viettq-nfs-delete                   viettq-nfs-storage-delete-provisioner   Delete          Immediate           true                   3h17m
viettq-nfs-retain                   viettq-nfs-storage-retain-provisioner   Delete          Immediate           true                   3h17m
Tới đây là đã hoàn thành cài đặt longhorn và storage class trên K8S sẵn sàng cho workload rồi ^^!
Test thử tạo PV/PVC và tạo Pod dùng longhorn storage class
Mình sẽ tạo 2 PVC và 2 pod sử dụng 2 PVC này, mỗi PVC dùng một storage class của longhorn:
longhorn-pvc-delete.yaml
apiVersion: v1
kind: PersistentVolumeClaim
metadata:
  name: longhorn-pvc-delete
spec:
  accessModes:
    #- ReadWriteOnce
    - ReadWriteMany
  storageClassName: longhorn-storage-delete
  resources:
    requests:
      storage: 2Gi
longhorn-pvc-retain.yaml
apiVersion: v1
kind: PersistentVolumeClaim
metadata:
  name: longhorn-pvc-retain
spec:
  accessModes:
    - ReadWriteOnce
  storageClassName: longhorn-storage-retain
  resources:
    requests:
      storage: 2Gi
test-pod-longhorn-delete.yaml
kind: Pod
apiVersion: v1
metadata:
  name: pod-longhorn-delete
spec:
  volumes:
        - name: longhorn-pvc-delete
          persistentVolumeClaim:
            claimName: longhorn-pvc-delete
  containers:
    - name: my-container
      volumeMounts:
        - name: longhorn-pvc-delete # This is the name of the volume we set at the pod level
          mountPath: /var/simple # Where to mount this directory in our container

      # Now that we have a directory mounted at /var/simple, let's
      # write to a file inside it!
      image: alpine
      command: ["/bin/sh"]
      args: ["-c", "while true; do date >> /var/simple/file.txt; sleep 5; done"]
test-pod-longhorn-retain.yaml
kind: Pod
apiVersion: v1
metadata:
  name: pod-longhorn-retain
spec:
  volumes:
        - name: longhorn-pvc-retain
          persistentVolumeClaim:
            claimName: longhorn-pvc-retain
  containers:
    - name: my-container
      volumeMounts:
        - name: longhorn-pvc-retain # This is the name of the volume we set at the pod level
          mountPath: /var/simple # Where to mount this directory in our container

      # Now that we have a directory mounted at /var/simple, let's
      # write to a file inside it!
      image: alpine
      command: ["/bin/sh"]
      args: ["-c", "while true; do date >> /var/simple/file.txt; sleep 5; done"]
Tạo xong các file yaml thì tạo trước 2 PVC và xem kết quả:
[sysadmin@vtq-cicd example]$ kubectl apply -f longhorn-pvc-delete.yaml
persistentvolumeclaim/longhorn-pvc-delete created
[sysadmin@vtq-cicd example]$ kubectl apply -f longhorn-pvc-retain.yaml
persistentvolumeclaim/longhorn-pvc-retain created
[sysadmin@vtq-cicd example]$ kubectl get pvc
NAME                  STATUS   VOLUME                                     CAPACITY   ACCESS MODES   STORAGECLASS              AGE
longhorn-pvc-delete   Bound    pvc-71b628cc-8492-44b6-a857-2fa6a2f0531a   2Gi        RWX            longhorn-storage-delete   30s
longhorn-pvc-retain   Bound    pvc-b5beccd7-e6be-40b7-972b-44ab8f7400de   2Gi        RWO            longhorn-storage-retain   8s
Như vậy 2 PVC đều đã được longhorn storage class cấp PV cho rồi (STATUS là Bound). Giờ mình tạo tiếp 2 Pod dùng 2 PVC bên trên:
[sysadmin@vtq-cicd example]$ kubectl apply -f test-pod-longhorn-delete.yaml
pod/pod-longhorn-delete created
[sysadmin@vtq-cicd example]$ kubectl apply -f test-pod-longhorn-retain.yaml
pod/pod-longhorn-retain created
[sysadmin@vtq-cicd example]$ kubectl get pods
NAME                           READY   STATUS    RESTARTS   AGE
pod-longhorn-delete            1/1     Running   0          85s
pod-longhorn-retain            1/1     Running   0          81s
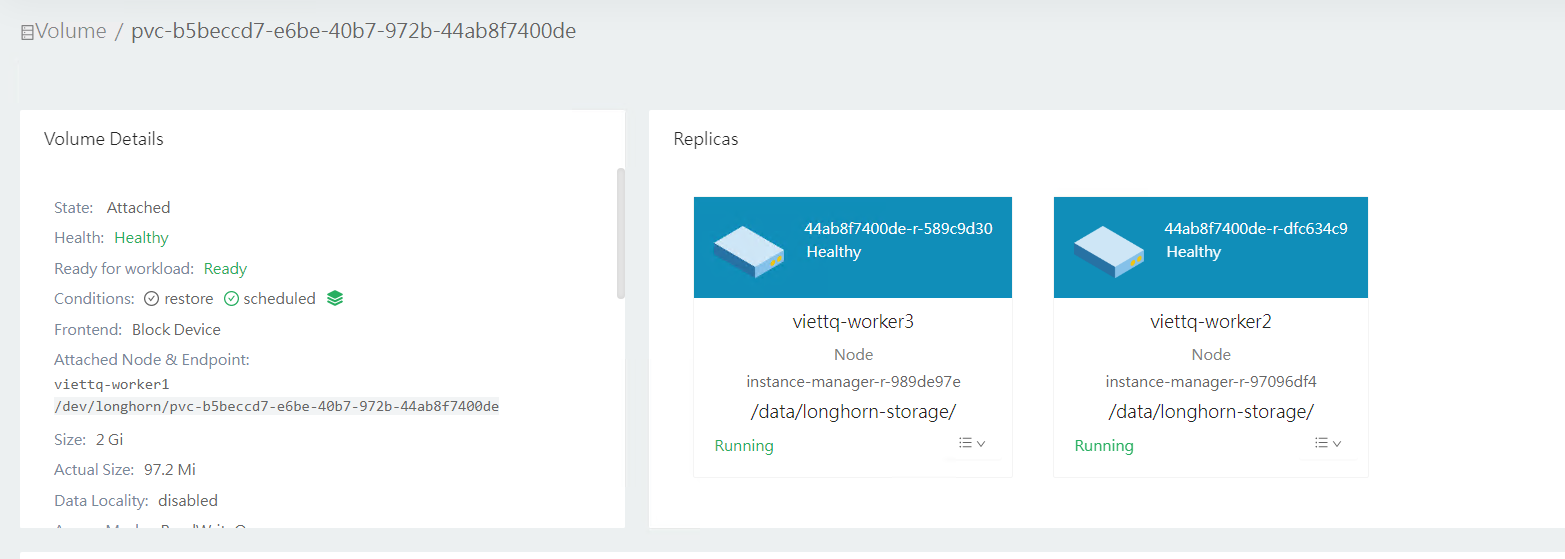
Kiểm tra trên giao diện của Longhorn để thấy phân vùng được tạo và được replicas theo cấu hình đã tạo (2 replicas):
Tới đây mình đã hoàn thành cài đặt longhorn storage trên Kubernetes Cluster và tạo các longhorn storage class. Trong phần tiếp theo mình sẽ tiếp tục chia sẻ hướng dẫn cài đặt các thành phần khác của Kubernetes như Monitoring, Logging.. Cảm ơn bạn đã đọc tới đây và hẹn gặp lại ở phần tiếp theo!
All rights reserved
