[K8S basic] Làm việc với Node trên k8s
Bài đăng này đã không được cập nhật trong 2 năm
Giới thiệu
Xin chào các bạn. Qua bài tổng quan về K8S và hướng dẫn cài lab k8s thì cơ bản chúng ta đã hoàn thành xong phần khởi động rồi. Từ bài này trở đi mình sẽ giới thiệu với các bạn làm quen với các tài nguyên trên k8s và các thao tác với chúng (tạo - sửa - xóa ..).
Trong bài này mình sẽ hướng dẫn mọi người một số thao tác cơ bản với node trên k8s. Lưu ý là hầu hết mọi thao tác của chúng ta đều thực hiện qua lệnh kubectl.
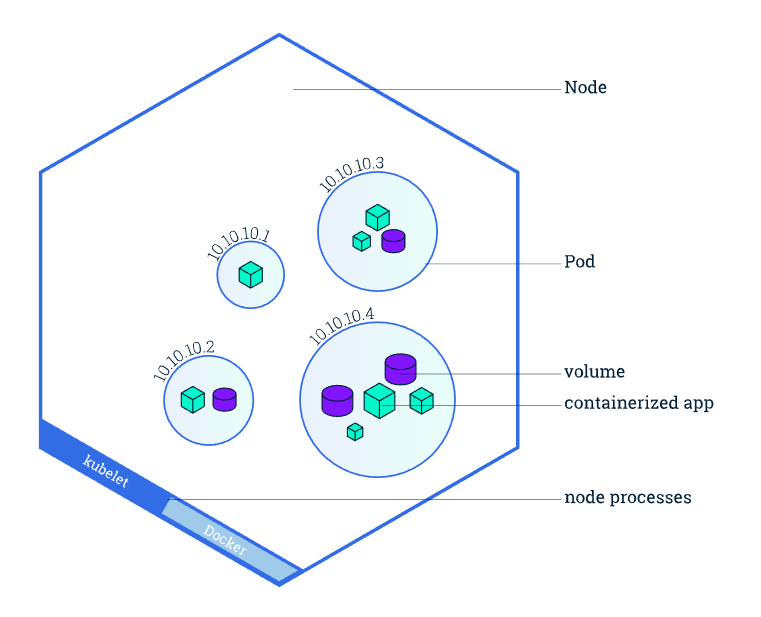
Đến đây thì các bạn chắc cũng đã nhớ chức năng của master node và worker node rồi. Trong quá trình triển khai và vận hành ứng dụng lên k8s thì thường các bạn chỉ chủ yếu làm việc với phần Worker Node thôi, vì nó là node chạy chính các workload của chúng ta.
Mục tiêu
Qua bài này, các bạn sẽ hiểu và thực hiện được các tác vụ:
- Kiểm tra danh sách và thông tin node trên k8s
- Kiểm tra work load của node
- Các thao tác với label: Xem, gán, xóa label cho node
- Thủ tục thêm/xóa node khỏi cluster
Kiểm tra thông tin của node
Danh sách node
Thao tác đầu tiên và cơ bản nhất với node đó là liệt kê danh sách node của cluster bằng lệnh:
kubectl get nodes
Kết quả trả về là một số thông tin cơ bản:
NAME             STATUS   ROLES                  AGE   VERSION
viettq-master1   Ready    control-plane,master   15d   v1.20.7
viettq-master2   Ready    control-plane,master   15d   v1.20.7
viettq-master3   Ready    control-plane,master   15d   v1.20.7
viettq-worker1   Ready    <none>                 15d   v1.20.7
viettq-worker2   Ready    <none>                 15d   v1.20.7
viettq-worker3   Ready    <none>                 15d   v1.20.7
Trong đó:
- NAME: Là định danh node trong cluster
- STATUS: Trạng thái quản lý của node.
- ROLES: Vai trò của node trong cluster. Như bên trên ta thấy rõ 3 node là role master, 3 node còn lại là woker node (role=none)
- AGE: Thời gian từ lúc setup hệ thống đến giờ
- VERSION: Phiên bản của k8s đang cài đặt
Các bạn cũng có thể xem thêm nhiều thông tin hơn về node bằng cách thêm chỉ định "-owide" vào sau câu lệnh bên trên:
[sysadmin@vtq-cicd ~]$ kubectl get nodes -owide
NAME             STATUS   ROLES                  AGE   VERSION   INTERNAL-IP     EXTERNAL-IP   OS-IMAGE                KERNEL-VERSION                CONTAINER-RUNTIME
viettq-master1   Ready    control-plane,master   15d   v1.20.7   192.168.10.11   <none>        CentOS Linux 7 (Core)   3.10.0-1160.45.1.el7.x86_64   docker://20.10.10
viettq-master2   Ready    control-plane,master   15d   v1.20.7   192.168.10.12   <none>        CentOS Linux 7 (Core)   3.10.0-1160.45.1.el7.x86_64   docker://20.10.10
viettq-master3   Ready    control-plane,master   15d   v1.20.7   192.168.10.13   <none>        CentOS Linux 7 (Core)   3.10.0-1160.45.1.el7.x86_64   docker://20.10.10
viettq-worker1   Ready    <none>                 15d   v1.20.7   192.168.10.14   <none>        CentOS Linux 7 (Core)   3.10.0-1160.45.1.el7.x86_64   docker://20.10.10
viettq-worker2   Ready    <none>                 15d   v1.20.7   192.168.10.15   <none>        CentOS Linux 7 (Core)   3.10.0-1160.45.1.el7.x86_64   docker://20.10.10
viettq-worker3   Ready    <none>                 15d   v1.20.7   192.168.10.16   <none>        CentOS Linux 7 (Core)   3.10.0-1160.45.1.el7.x86_64   docker://20.10.10
Ta sẽ thấy thêm các trường thông tin, trong đó:
- INTERNAL-IP: Đây là IP mà các node sẽ dùng giao tiếp với nhau
- CONTAINER-RUNTIME: Thông tin về CRI đang sử dụng ở đây là Docker phiên bản 20.10.10
Thao tác với node bằng label
Khi làm việc với k8s thì hầu hết các resource trên k8s đều được gán các labels. Các lables này khá quan trọng, và rất tiện lợi trong việc quản lý tài nguyên.
Việc gán lables cho node giống như việc chúng ta tạo ra các nhóm Node có những đặc tính giống nhau để sau này chúng ta sẽ có kế hoạch deploy ứng dụng lên các nhóm node tương ứng cho phù hợp.
Để xem thông tin các label đang được gán cho node ta thực hiện lệnh sau:
kubectl get nodes --show-labels
Và kết quả:
NAME             STATUS   ROLES                  AGE   VERSION   LABELS
viettq-master1   Ready    control-plane,master   15d   v1.20.7   beta.kubernetes.io/arch=amd64,beta.kubernetes.io/os=linux,kubernetes.io/arch=amd64,kubernetes.io/hostname=viettq-master1,kubernetes.io/os=linux,node-role.kubernetes.io/control-plane=,node-role.kubernetes.io/master=
viettq-master2   Ready    control-plane,master   15d   v1.20.7   beta.kubernetes.io/arch=amd64,beta.kubernetes.io/os=linux,kubernetes.io/arch=amd64,kubernetes.io/hostname=viettq-master2,kubernetes.io/os=linux,node-role.kubernetes.io/control-plane=,node-role.kubernetes.io/master=
viettq-master3   Ready    control-plane,master   15d   v1.20.7   beta.kubernetes.io/arch=amd64,beta.kubernetes.io/os=linux,kubernetes.io/arch=amd64,kubernetes.io/hostname=viettq-master3,kubernetes.io/os=linux,node-role.kubernetes.io/control-plane=,node-role.kubernetes.io/master=
viettq-worker1   Ready    <none>                 15d   v1.20.7   beta.kubernetes.io/arch=amd64,beta.kubernetes.io/os=linux,kubernetes.io/arch=amd64,kubernetes.io/hostname=viettq-worker1,kubernetes.io/os=linux
viettq-worker2   Ready    <none>                 15d   v1.20.7   beta.kubernetes.io/arch=amd64,beta.kubernetes.io/os=linux,kubernetes.io/arch=amd64,kubernetes.io/hostname=viettq-worker2,kubernetes.io/os=linux
viettq-worker3   Ready    <none>                 15d   v1.20.7   beta.kubernetes.io/arch=amd64,beta.kubernetes.io/os=linux,kubernetes.io/arch=amd64,kubernetes.io/hostname=viettq-worker3,kubernetes.io/os=linux
Ta cũng có thể liệt kê danh sách node có gán một label nào đó bằng cú pháp: kubect get node -l "[label-name]:[value]". Lưu ý [value] là optional, có thể gán label name mà không cần value.
Câu lệnh sau liệt kê danh sách các node có gán label là "node-role.kubernetes.io/master" mà không quan tâm value được gán là gì:
[sysadmin@vtq-cicd ~]$ kubectl get nodes -l "node-role.kubernetes.io/master"
NAME             STATUS   ROLES                  AGE   VERSION
viettq-master1   Ready    control-plane,master   15d   v1.20.7
viettq-master2   Ready    control-plane,master   15d   v1.20.7
viettq-master3   Ready    control-plane,master   15d   v1.20.7
Để gán thêm một label cho node thì ta thực hiện như sau: kubectl label node [node-name] "[label]=[value]":
kubectl label nodes viettq-worker1 "type=worker"
Sau đó kiểm tra bằng cách liệt kê danh sách node theo labels:
[sysadmin@vtq-cicd ~]$ kubectl get nodes -l  "type=worker"
NAME             STATUS   ROLES    AGE   VERSION
viettq-worker1   Ready    <none>   15d   v1.20.7
Đã có gán label thì chắc chắc phải có cách để remove label rồi. Để xóa một label các bạn thực hiện như sau:
[sysadmin@vtq-cicd ~]$ kubectl label nodes viettq-worker1 type-
node/viettq-worker1 labeled
Và kết quả kiểm tra danh sách node theo label đó không còn:
[sysadmin@vtq-cicd ~]$ kubectl get nodes -l  "type=worker"
No resources found
Thông tin node
Để xem thông tin chi tiết của 1 node ta thực hiện theo cú pháp: kubect describe node [node-name]
kubectl describe node viettq-worker1
Kết quả:
Name:               viettq-worker1
Roles:              <none>
Labels:             beta.kubernetes.io/arch=amd64
                    beta.kubernetes.io/os=linux
                    kubernetes.io/arch=amd64
                    kubernetes.io/hostname=viettq-worker1
                    kubernetes.io/os=linux
Annotations:        flannel.alpha.coreos.com/backend-data: {"VtepMAC":"fe:08:be:bf:66:d7"}
                    flannel.alpha.coreos.com/backend-type: vxlan
                    flannel.alpha.coreos.com/kube-subnet-manager: true
                    flannel.alpha.coreos.com/public-ip: 192.168.10.14
                    kubeadm.alpha.kubernetes.io/cri-socket: /var/run/dockershim.sock
                    node.alpha.kubernetes.io/ttl: 0
                    volumes.kubernetes.io/controller-managed-attach-detach: true
CreationTimestamp:  Sun, 11 Sep 2022 23:26:11 -0400
Taints:             <none>
Unschedulable:      false
Lease:
  HolderIdentity:  viettq-worker1
  AcquireTime:     <unset>
  RenewTime:       Tue, 27 Sep 2022 04:32:07 -0400
Conditions:
  Type                 Status  LastHeartbeatTime                 LastTransitionTime                Reason                       Message
  ----                 ------  -----------------                 ------------------                ------                       -------
  NetworkUnavailable   False   Thu, 22 Sep 2022 06:18:23 -0400   Thu, 22 Sep 2022 06:18:23 -0400   FlannelIsUp                  Flannel is running on this node
  MemoryPressure       False   Tue, 27 Sep 2022 04:32:08 -0400   Sun, 11 Sep 2022 23:26:11 -0400   KubeletHasSufficientMemory   kubelet has sufficient memory available
  DiskPressure         False   Tue, 27 Sep 2022 04:32:08 -0400   Sun, 11 Sep 2022 23:26:11 -0400   KubeletHasNoDiskPressure     kubelet has no disk pressure
  PIDPressure          False   Tue, 27 Sep 2022 04:32:08 -0400   Sun, 11 Sep 2022 23:26:11 -0400   KubeletHasSufficientPID      kubelet has sufficient PID available
  Ready                True    Tue, 27 Sep 2022 04:32:08 -0400   Sun, 11 Sep 2022 23:26:42 -0400   KubeletReady                 kubelet is posting ready status
Addresses:
  InternalIP:  192.168.10.14
  Hostname:    viettq-worker1
Capacity:
  cpu:                12
  ephemeral-storage:  49250820Ki
  hugepages-1Gi:      0
  hugepages-2Mi:      0
  memory:             7990044Ki
  pods:               110
Allocatable:
  cpu:                11900m
  ephemeral-storage:  45389555637
  hugepages-1Gi:      0
  hugepages-2Mi:      0
  memory:             7625500Ki
  pods:               110
System Info:
  Machine ID:                 d8edd44e2e834dc39a04c19e8f8a27ea
  System UUID:                66094D56-3CCB-1B4C-7B0B-D9497945986B
  Boot ID:                    34783693-16cb-4e4e-8e13-a974d4923cb7
  Kernel Version:             3.10.0-1160.45.1.el7.x86_64
  OS Image:                   CentOS Linux 7 (Core)
  Operating System:           linux
  Architecture:               amd64
  Container Runtime Version:  docker://20.10.10
  Kubelet Version:            v1.20.7
  Kube-Proxy Version:         v1.20.7
PodCIDR:                      10.233.69.0/24
PodCIDRs:                     10.233.69.0/24
Non-terminated Pods:          (10 in total)
  Namespace                   Name                                                          CPU Requests  CPU Limits  Memory Requests  Memory Limits  AGE
  ---------                   ----                                                          ------------  ----------  ---------------  -------------  ---
  default                     debug                                                         0 (0%)        0 (0%)      0 (0%)           0 (0%)         22h
  default                     http-pod                                                      0 (0%)        0 (0%)      0 (0%)           0 (0%)         104m
  fleet-system                fleet-agent-55bfc495bd-48qrm                                  0 (0%)        0 (0%)      0 (0%)           0 (0%)         15d
  ingress                     apple-app                                                     0 (0%)        0 (0%)      0 (0%)           0 (0%)         14d
  kube-system                 kube-flannel-gfg9f                                            150m (1%)     300m (2%)   64M (0%)         500M (6%)      15d
  kube-system                 kube-proxy-gqrq6                                              0 (0%)        0 (0%)      0 (0%)           0 (0%)         4d22h
  kube-system                 nginx-proxy-viettq-worker1                                    25m (0%)      0 (0%)      32M (0%)         0 (0%)         15d
  kube-system                 nodelocaldns-2zxvj                                            100m (0%)     0 (0%)      70Mi (0%)        170Mi (2%)     15d
  storage                     nfs-storage-delete-nfs-client-provisioner-5b7c76bb6-w28cz     0 (0%)        0 (0%)      0 (0%)           0 (0%)         15d
  storage                     nfs-storage-retain-nfs-client-provisioner-5f8d88b89d-d8bqx    0 (0%)        0 (0%)      0 (0%)           0 (0%)         15d
Allocated resources:
  (Total limits may be over 100 percent, i.e., overcommitted.)
  Resource           Requests        Limits
  --------           --------        ------
  cpu                275m (2%)       300m (2%)
  memory             169400320 (2%)  678257920 (8%)
  ephemeral-storage  0 (0%)          0 (0%)
  hugepages-1Gi      0 (0%)          0 (0%)
  hugepages-2Mi      0 (0%)          0 (0%)
Events:              <none>
Trong số thông tin thu được có một số thông tin quan trọng liên quan tới trạng thái của node (Conditions):
Conditions:
  Type                 Status  LastHeartbeatTime                 LastTransitionTime                Reason                       Message
  ----                 ------  -----------------                 ------------------                ------                       -------
  NetworkUnavailable   False   Thu, 22 Sep 2022 06:18:23 -0400   Thu, 22 Sep 2022 06:18:23 -0400   FlannelIsUp                  Flannel is running on this node
  MemoryPressure       False   Tue, 27 Sep 2022 04:32:08 -0400   Sun, 11 Sep 2022 23:26:11 -0400   KubeletHasSufficientMemory   kubelet has sufficient memory available
  DiskPressure         False   Tue, 27 Sep 2022 04:32:08 -0400   Sun, 11 Sep 2022 23:26:11 -0400   KubeletHasNoDiskPressure     kubelet has no disk pressure
  PIDPressure          False   Tue, 27 Sep 2022 04:32:08 -0400   Sun, 11 Sep 2022 23:26:11 -0400   KubeletHasSufficientPID      kubelet has sufficient PID available
  Ready                True    Tue, 27 Sep 2022 04:32:08 -0400   Sun, 11 Sep 2022 23:26:42 -0400   KubeletReady                 kubelet is posting ready status
Ý nghĩa các thông số này như sau:
- MemoryPressure: True nếu node bị cao tải memory (RAM)
- DiskPressure: True nếu node bị đầy ổ cứng
- PIDPressure: True nếu node có quá nhiều process
- Ready: True nếu node vẫn đang hoạt động và được quản lý bởi kubelet
Ngoài ra ta có xem được các pod nào đang chạy trên node này trong mục "Non-terminated Pods":
Non-terminated Pods:          (10 in total)
  Namespace                   Name                                                          CPU Requests  CPU Limits  Memory Requests  Memory Limits  AGE
  ---------                   ----                                                          ------------  ----------  ---------------  -------------  ---
  default                     debug                                                         0 (0%)        0 (0%)      0 (0%)           0 (0%)         22h
  default                     http-pod                                                      0 (0%)        0 (0%)      0 (0%)           0 (0%)         104m
  fleet-system                fleet-agent-55bfc495bd-48qrm                                  0 (0%)        0 (0%)      0 (0%)           0 (0%)         15d
  ingress                     apple-app                                                     0 (0%)        0 (0%)      0 (0%)           0 (0%)         14d
  kube-system                 kube-flannel-gfg9f                                            150m (1%)     300m (2%)   64M (0%)         500M (6%)      15d
  kube-system                 kube-proxy-gqrq6                                              0 (0%)        0 (0%)      0 (0%)           0 (0%)         4d22h
  kube-system                 nginx-proxy-viettq-worker1                                    25m (0%)      0 (0%)      32M (0%)         0 (0%)         15d
  kube-system                 nodelocaldns-2zxvj                                            100m (0%)     0 (0%)      70Mi (0%)        170Mi (2%)     15d
  storage                     nfs-storage-delete-nfs-client-provisioner-5b7c76bb6-w28cz     0 (0%)        0 (0%)      0 (0%)           0 (0%)         15d
  storage                     nfs-storage-retain-nfs-client-provisioner-5f8d88b89d-d8bqx    0 (0%)        0 (0%)      0 (0%)           0 (0%)         15d
Add/Remove node
Add thêm node vào k8s cluster
Ở đây mình chỉ nói về ý tưởng chứ không trình bày chi tiết. Về cơ bản node cần add cũng phải cài đặt và cấu hình đầy đủ các thành phần cần thiết cho k8s như:
- OS + network
- Disable swap
- Disable SELinux (hoặc set Permissive mode)
- Cấu hình firewall
- Cài đặt CRI (docker/containerd..)
- Cài đặt các thành phần của kubernetes: kubeadm, kubelete..
- Join node vào cluster
Để join node vào cluster thì trước hết ta phải tạo lệnh join từ master node:
[sysadmin@viettq-master1 ~]$ kubeadm token create --print-join-command
kubeadm join 127.0.0.1:6443 --token 4cw865.7x4smy5tjx7gx18e     --discovery-token-ca-cert-hash sha256:4bf22869f13024bb7b6b915845a0eff50244255765dc81a08cb99ffa9c1523c4
Kết quả ra một câu lệnh của kubeadm. Ta sẽ chạy lệnh này trên node cần add để join vào cluster, vậy là xong 
Remove node khỏi k8s cluster
Việc remove node khỏi cluster phức tạp hơn một chút. Bởi node khi đó có thể đang có workload do đó thủ tục để remove node sẽ như sau:
- Cordon nodes: Để đảm bảo không có pod mới nào được lên lịch thực hiện trên node này nữa
kubectl cordon [node-name]
- Drain node: Sẽ thực hiện move hết những Pod đang chạy trên node này để giải phóng node
kubectl drain --ignore-daemonsets --force [node-name]
- Delete node: Sau bước trên thì node đã không còn Pod nào đang chạy nữa (trừ các pod mặc định của control plane). Do đó ta có thể xóa nó bằng lệnh:
kubectl delete node [node-name]
Ở nội dung basic nên phần add/remove Node mình giới thiệu tổng quan chứ không hướng dẫn chi tiết đỡ mất thời gian của các bạn. Mình sẽ bài viết riêng về phần này cho các bạn nào quan tâm
Như vậy các bạn đã làm quen với một số thao tác cơ bản với node trên k8s. Trong bài tiếp theo chúng ta sẽ tiếp tục làm quen với một resource nữa của k8s là Pods.
Cảm ơn các bạn đã theo dõi. Nếu thấy hay và bổ ích thì cho mình một Upvote vào bài viết nhé!
All rights reserved
