[iOS][Swift][iOS 9] Ứng dụng Contacts Framework
Bài đăng này đã không được cập nhật trong 4 năm
Mở đầu
Vào một ngày đẹp trời, tôi được cho 1 con iPhone lock Nhật. Dùng sim ghép cũng ổn, đầy đủ 3G, nghe gọi OK. Ngon rồi. Nhưng khi có ai đó gọi cho tôi, thì nó không hiển thị tên như đã lưu mà chỉ hiển thị số.

Hóa ra là vì cái iPhone này lock Nhật, mà các số điện thoại tôi chỉ lưu 09xxx, thế là nó auto hiểu là +819xxx, trong khi số đang gọi đến là +849xxx. Nguyên nhân đã có, fix thì dễ thôi, chỉ cần đổi sdt từ 09 sang thành +84 là xong. Nhưng tôi có đến hơn 100 contacts

Thôi thì nhân dịp iOS9 deprecated Address Book framework để dọn đường cho việc giới thiệu 2 framework mới, Contacts và ContactsUI, làm 1 bài nghiên cứu xem nó có gì hay ho không vậy. Trong bài post này, tôi sẽ không support cho các bạn nào muốn hỗ trợ cả iOS từ 9 trở xuống (sử dụng Address Book) vì đơn giản máy tôi là iOS 9, thế nhé.
Let's Begin
Tất nhiên, mục đích phụ trong bài viết này là giới thiệu về Contacts và ContactsUI, tuy nhiên mục đích chính vẫn là sửa cái máy của tôi, nên tôi sẽ thực hiện ứng dụng chuyển toàn bộ số điện thoại trong điện thoại của tôi sang định dạng mà tôi mong muốn.
TL;DR
Đây là nơi tôi sẽ trình bày xem Contacts và ContactsUI nó là cái gì, thực hiện chức năng gì, nhưng thôi, nó quá mất thời gian nên bạn có thể đọc nó kỹ hơn ở đây Contacts và đây ContactsUI nhưng tóm lại thì bạn chỉ cần nhớ đây là 2 Framework để giúp bạn làm việc với các contacts trong danh bạ của bạn, vậy thôi

Coding
Lan man đủ rồi, bắt đầu thôi. Đầu tiên, để chắc ăn tôi sẽ hiển thị danh sách các danh bạ có trong máy trước.
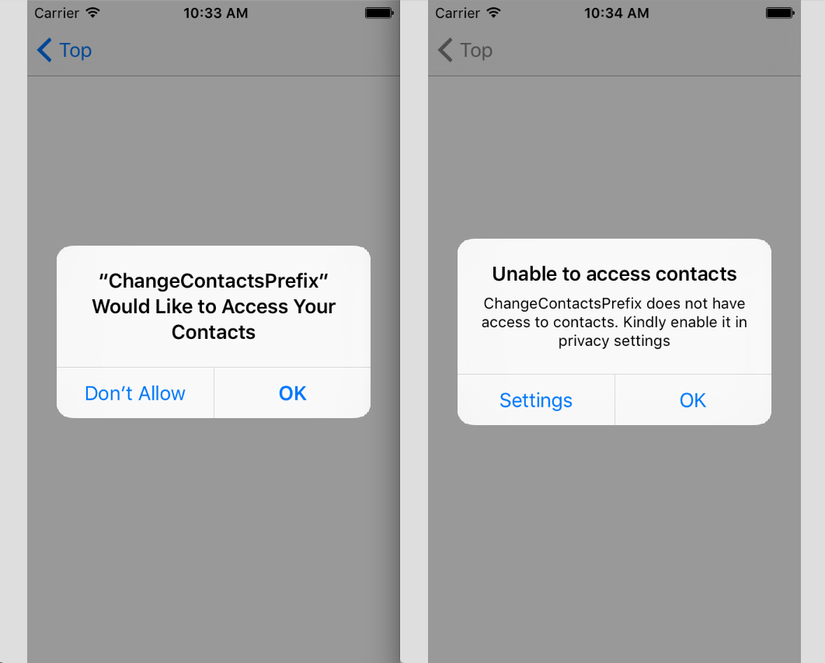
Và thủ tục hành chính đầu tiên, như mọi khi, chúng ta sẽ thực hiện việc check privacy và yêu cầu người dùng cấp quyền truy cập Contacts
func requestContacts(completion: GetContactsCompleteHandle) {
        switch CNContactStore.authorizationStatusForEntityType(CNEntityType.Contacts) {
        case .Denied, .Restricted:
            let settingURL = NSURL(string: UIApplicationOpenSettingsURLString)!
            if UIApplication.sharedApplication().canOpenURL(settingURL) {
                UtilManager.showAlert(title: kCantAccessContactAlertTitle, message: kCantAccessContactAlertMessage,
                    okButtonTitle: "Settings", okButtonAction: {
                    UIApplication.sharedApplication().openURL(settingURL)
                    }, cancelButtonTitle: "OK", cancelButtonAction: {
                })
            } else {
                UtilManager.showAlert(title: kCantAccessContactAlertTitle,
                                      message: kCantAccessContactAlertMessage,
                                      okButtonTitle: "OK", okButtonAction:nil,
                                      cancelButtonTitle: nil, cancelButtonAction: nil)
            }
            break
        case .NotDetermined:
            CNContactStore().requestAccessForEntityType(CNEntityType.Contacts, completionHandler: { (granted, error) in
                if !granted {
                    // user click cancel :(
                } else {
                    //do somthing
                }
            })
        case .Authorized:
        // Do something
            break
        }
    }
}
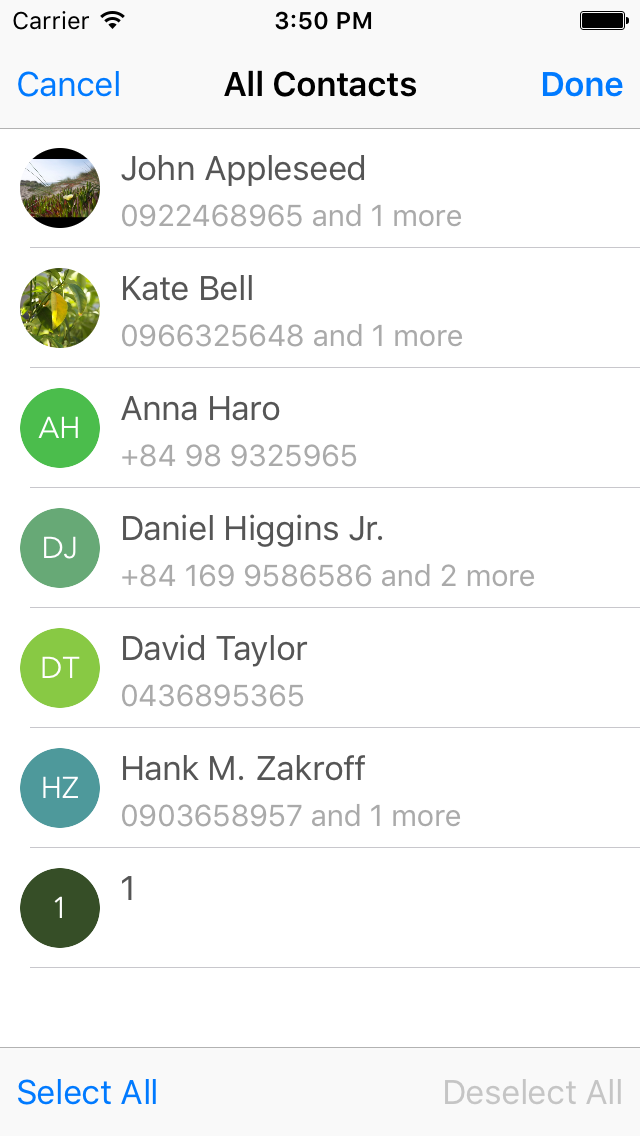
OK, đã xong phần thủ tục, tiếp theo chúng ta sẽ lấy contact list từ Contact của hệ thống ra. Ở đây, chúng ta sẽ có 2 cách với các ưu nhược điểm khác nhau
- Cách 1 : Sử dụng luôn CNContactPickerViewController của Apple
Ưu điểm : tiện lợi, gọi phát dùng luôn
    let contactPicker = CNContactPickerViewController()
    contactPicker.delegate = self
    contactPicker.predicateForEnablingContact = NSPredicate(format: "predicate format")
    presentViewController(contactPicker, animated: true, completion: nil)
mọi xử lý đều có sẵn delegate để sử dụng
@available(iOS 9.0, *)
public protocol CNContactPickerDelegate : NSObjectProtocol {

    /*!
     * @abstract Invoked when the picker is closed.
     * @discussion The picker will be dismissed automatically after a contact or property is picked.
     */
    optional public func contactPickerDidCancel(picker: CNContactPickerViewController)

    /*!
     * @abstract Singular delegate methods.
     * @discussion These delegate methods will be invoked when the user selects a single contact or property.
     */
    optional public func contactPicker(picker: CNContactPickerViewController, didSelectContact contact: CNContact)
    optional public func contactPicker(picker: CNContactPickerViewController, didSelectContactProperty contactProperty: CNContactProperty)

    /*!
     * @abstract Plural delegate methods.
     * @discussion These delegate methods will be invoked when the user is done selecting multiple contacts or properties.
     * Implementing one of these methods will configure the picker for multi-selection.
     */
    optional public func contactPicker(picker: CNContactPickerViewController, didSelectContacts contacts: [CNContact])
    optional public func contactPicker(picker: CNContactPickerViewController, didSelectContactProperties contactProperties: [CNContactProperty])
}
Nhược điểm :
Chúng ta sẽ không thể custom được mọi thứ theo ý thích, thậm chí nếu người dùng muốn lựa chọn tất cả contact, họ chỉ có 1 việc duy nhất để làm là bấm chọn từng contact một.

Rồi, rồi, thế này thì khác gì lúc ta chưa bắt đầu, reject luôn và ngay, chuyển sang cách 2 thôi
- Cách 2 : Tự lấy list contact rồi hiển thị theo ý thích
Cách 2 sẽ xử lý được nhược điểm của cách 1, đi kèm với nó là thời gian, công sức bỏ ra cũng phải tương xứng với ý thích. Tuy nhiên tự do muôn năm, tôi sẽ dùng cách này

Đầu tiên, query xem có bao nhiêu Contact nào, lấy hết ra thôi
    private func getContacts(completion: GetContactsCompleteHandle) {
        var contactList = [CNContact]()
        let contactFetchRequest = CNContactFetchRequest(keysToFetch: self.allowedContactKeys)
        do {
            try self.contactsStore.enumerateContactsWithFetchRequest(contactFetchRequest) { (contact, stop) in
                contactList.append(contact)
            }
            completion(contacts: contactList, error: nil)
        } catch let error as NSError {
            completion(contacts: [], error: error)
        }
    }

    private var allowedContactKeys: [CNKeyDescriptor] {
        return [CNContactNamePrefixKey,
                CNContactGivenNameKey,
                CNContactMiddleNameKey,
                CNContactFamilyNameKey,
                CNContactOrganizationNameKey,
                CNContactImageDataKey,
                CNContactThumbnailImageDataKey,
                CNContactImageDataAvailableKey,
                CNContactPhoneNumbersKey,
                CNContactFormatter.descriptorForRequiredKeysForStyle(.FullName)]
Show it all
Việc lấy list danh bạ đã ok, chúng ta cùng chuyển sang việc chính thôi. Chỉnh sửa nội dung của contact
Về cơ bản, Apple tách việc xem, lấy thông tin contact và việc sửa contact thành 2 phần tách biệt nhau. CNContact chỉ chuyên dùng cho việc xem thông tin, còn để sửa đổi nó, bạn cần phải sử dụng CNMutableContact. Bạn có thể tạo mới một CNMutableContact hoặc copy nó từ một CNContact có sẵn
let mutableContact = contact.mutableCopy() as! CNMutableContact
Việc lưu thay đổi cũng được thực hiện rất dễ dàng
let saveRequest = CNSaveRequest()
let mutableContact = contact.mutableCopy() as! CNMutableContact
// chỉnh sửa contact ở đây
saveRequest.updateContact(mutableContact)
do {
    let contactStore = CNContactStore()
    try contactStore.executeSaveRequest(saveRequest)
    // Show success alert
    dispatch_async(dispatch_get_main_queue()) {
        let successAlert = UIAlertController(title: "Contact Saved", message: nil, preferredStyle: .Alert)
        successAlert.addAction(UIAlertAction(title: "OK", style: .Cancel, handler: nil))
        self.presentViewController(successAlert, animated: true, completion: nil)
        let appDelegate = UIApplication.sharedApplication().delegate as! AppDelegate
        appDelegate.updateContactList()
    }
} catch {
    // Show failure alert
    dispatch_async(dispatch_get_main_queue()){
        let failureAlert = UIAlertController(title: "Could Not Save Contact", message: "An unknown error occurred", preferredStyle: .Alert)
        failureAlert.addAction(UIAlertAction(title:"OK", style: .Cancel, handler: nil))
        self.presentViewController(failureAlert, animated: true, completion: nil)
    }
}
Done, cùng xem kết quả thôi
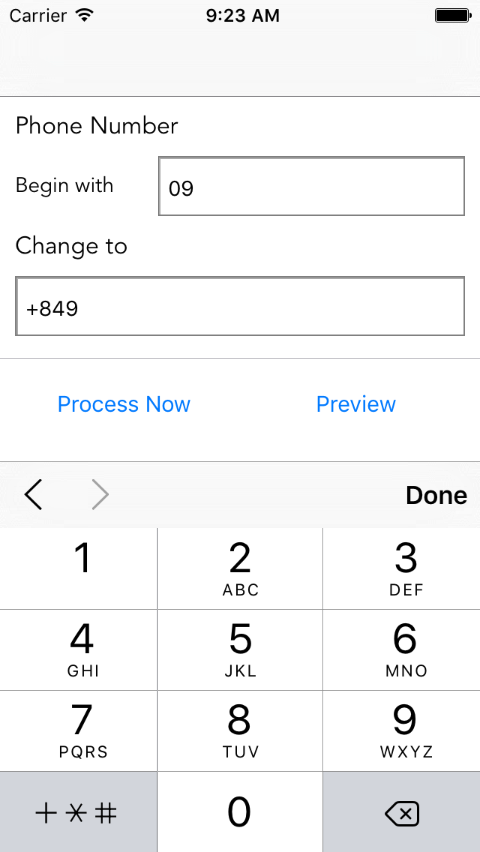
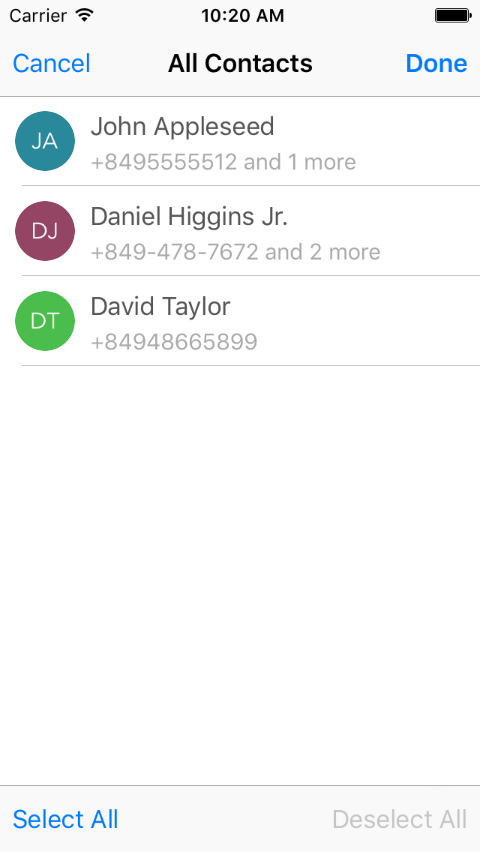
Tất cả các contact đã được chuyển từ đầu 09 sang +849. Với các đầu số khác, các bạn chỉ cần làm tương tự là xong. Bài toán đã được giải quyết
Kết
Trên đây, qua việc biến một việc đơn giản nhưng phải thao tác nhiều lần thành 1 việc phức tạp và mất thời gian hơn rất nhiều, tôi đã tiện tay giới thiệu luôn cho các bạn về Contacts và ContactsUI. Nếu bạn có chỗ nào không hiểu thì
Tất nhiên, mục đích phụ trong bài viết này là giới thiệu về
ContactsvàContactsUI, tuy nhiên mục đích chính vẫn là sửa cái máy của tôi, nên tôi sẽ không support đâu.

Còn nếu bạn cũng gặp trường hợp như tôi khi dùng iPhone Lock + bạn ngại code, download cái này về và chạy thôi. Goodluck.
All rights reserved
