Hướng dẫn Spring Boot + Redis
Bài đăng này đã không được cập nhật trong 6 năm
Nguồn: loda.me
Giới thiệu
Redis là 1 hệ thống lưu trữ key-value in-memory rất mạnh mẽ và phổ biến hiện nay.
Redis nổi bật bởi việc hỗ trợ nhiều cấu trúc dữ liệu khác nhau (hash, list, set, sorted set, string), giúp việc thao tác với dữ liệu cực kì nhanh và thuận tiện.
Các hệ thống ngày nay luôn tìm cách tối ưu performance và Redis gần như là một mảnh ghép không thể thiếu trong đó. Hôm nay chúng ta sẽ cùng tìm hiểu cách kết nối ứng dụng Spring Boot với Redis.
Cài đặt
Chúng ta sử dụng Maven, và yêu cầu các dependencies sau:
pom.xml
<dependencies>

    <!--spring mvc, rest-->
    <dependency>
        <groupId>org.springframework.boot</groupId>
        <artifactId>spring-boot-starter-web</artifactId>
    </dependency>

    <dependency>
      <groupId>org.springframework.data</groupId>
      <artifactId>spring-data-redis</artifactId>
    </dependency>

    <dependency>
      <groupId>io.lettuce</groupId>
      <artifactId>lettuce-core</artifactId>
      <version>5.1.3.RELEASE</version>
    </dependency>
</dependencies>
Trong đó, spring-data-redis là thư viện của Spring giúp chúng ta thao tác với Redis dễ dàng hơn.
Còn lettuce-core là một thư viện mã nguồn mở, giúp kết nối tới Redis một cách thread-safe bằng nhiều hình thức như synchronous, asynchronous and reactive usage.
Trong bài này chúng ta sẽ cấu hình cho spring-data-redis sử dụng lettuce kết nối tới Redis. Còn chi tiết về letture sẽ được đề cập ở một bài viết khác.
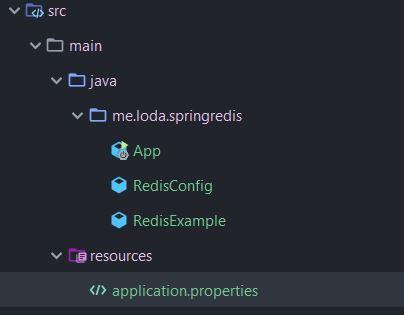
Cấu trúc thư mục bao gồm:

Implement
Cấu hình Redis
Bài viết giả định bạn đã cài đặt Redis, để kết nối tới Redis, bạn cần cung cấp địa chỉ host và port cho lettuce.
Cách dễ nhất là ghi nó ở file application.properties trong thư mục resources:
application.properties
redis.host=localhost
redis.port=6379
Sau đó, Tạo file RedisConfig.java để cấu hình mọi thứ liên quan tới Redis.
import org.springframework.beans.factory.annotation.Value;
import org.springframework.boot.context.properties.EnableConfigurationProperties;
import org.springframework.context.annotation.Bean;
import org.springframework.context.annotation.Configuration;
import org.springframework.context.annotation.Primary;
import org.springframework.data.redis.connection.RedisConnectionFactory;
import org.springframework.data.redis.connection.RedisStandaloneConfiguration;
import org.springframework.data.redis.connection.lettuce.LettuceConnectionFactory;
import org.springframework.data.redis.core.RedisTemplate;

@Configuration
public class RedisConfig {
    @Value("${redis.host}")
    private String redisHost;

    @Value("${redis.port}")
    private int redisPort;


    @Bean
    public LettuceConnectionFactory redisConnectionFactory() {
        // Tạo Standalone Connection tới Redis
        return new LettuceConnectionFactory(new RedisStandaloneConfiguration(redisHost, redisPort));
    }

    @Bean
    @Primary
    public RedisTemplate<Object, Object> redisTemplate(RedisConnectionFactory redisConnectionFactory) {
        // tạo ra một RedisTemplate
        // Với Key là Object
        // Value là Object
        // RedisTemplate giúp chúng ta thao tác với Redis
        RedisTemplate<Object, Object> template = new RedisTemplate<>();
        template.setConnectionFactory(redisConnectionFactory);
        return template;
    }
}
Chúng ta cần sử dụng lettuce để kết nối tới Redis, nên tôi tạo ra bean LettuceConnectionFactory và Spring Data sẽ tự động nhận vào cấu hình của mình.
Trong ví dụ này, chúng ta làm việc với Redis Standalone RedisStandaloneConfiguration. Còn nếu bạn muốn cấu hình với Redis Cluster thì cũng tương tự bằng class RedisClusterConfiguration.
Đối tượng để thao tác với Redis chính là
RedisTemplate.
Ở đây tôi cấu hình cho RedisTemplate nhận key là Object và value cũng là Object luôn. Để chúng ta có thể lưu bất kỳ key-value nào xuống Redis.
Chạy thử
Chúng ta tạo ra một class RedisExample implements CommandLineRunner để chạy một ví dụ:
import org.springframework.beans.factory.annotation.Autowired;
import org.springframework.boot.CommandLineRunner;
import org.springframework.data.redis.core.RedisTemplate;
import org.springframework.stereotype.Component;

@Component
public class RedisExample implements CommandLineRunner {
    @Autowired
    private RedisTemplate template;

    @Override
    public void run(String... args) throws Exception {
        // Set giá trị của key "loda" là "hello redis"
        template.opsForValue().set("loda","hello world");

        // In ra màn hình Giá trị của key "loda" trong Redis
        System.out.println("Value of key loda: "+template.opsForValue().get("loda"));
    }
}
Chạy Spring App:
import org.springframework.boot.SpringApplication;
import org.springframework.boot.autoconfigure.SpringBootApplication;

@SpringBootApplication
public class App {
    public static void main(String[] args) {
        SpringApplication.run(App.class, args);
    }
}
Khi chạy thử, màn hình sẽ in ra kết quả.
Value of key loda: hello world
Vậy là chúng ta đã kết nối thành công tới Redis và lưu một cặp key-value vào trong đó.
Redis operations
Quay trở lại ví dụ ở trên:
template.opsForValue().set("loda","hello world");
.opsForValue() được gọi là Redis Operations.
Spring Data hỗ trợ chúng ta thao tác với Redis thông qua các Operations như sau:
opsForValue(): Kiểu Key-Value thông thường. Với Value là 1 giá trị String tùy ý.opsForHash(): Tương ứng với cấu trúc Hash trong Redis. Value là một Object có cấu trúcopsForList(): Tương ứng với cấu trúc List trong Redis. Value là một list.opsForSet(): Tương ứng với cấu trúc Set trong Redis.opsForZSet(): Tương ứng với cấu trúc ZSet trong Redis.
Ví dụ với List:
@Component
public class RedisExample implements CommandLineRunner {
    @Autowired
    private RedisTemplate template;

    @Override
    public void run(String... args) throws Exception {
        listExample();
    }

    public void valueExample(){
        // Set giá trị của key "loda" là "hello redis"
        template.opsForValue().set("loda","hello world");

        // In ra màn hình Giá trị của key "loda" trong Redis
        System.out.println("Value of key loda: "+template.opsForValue().get("loda"));
    }

    public void listExample(){
        // Tạo ra một list gồm 2 phần tử
        List<String> list = new ArrayList<>();
        list.add("Hello");
        list.add("redis");

        // Set gia trị có key loda_list
        template.opsForList().rightPushAll("loda_list", list);
//        template.opsForList().rightPushAll("loda_list", "hello", "world");

        System.out.println("Size of key loda: "+template.opsForList().size("loda_list"));
    }
}
Kết quả in ra màn hình khi chạy:
Size of key loda: 2
Kết
Tới đây các bạn có thể dễ dàng thao tác với các kiểu cấu trúc trong Redis thông qua RedisTemplate.
Như mọi khi, toàn bộ code mẫu đều được up tại GITHUB
<i class="fab fa-github"></i>All rights reserved