Hướng dẫn convert TF Lite không vấp lỗi :D
Bài đăng này đã không được cập nhật trong 5 năm
Mở đầu
Để hỗ trợ các nhà phát triển dễ dàng deploy ứng dụng AI lên thiết bị IoT, mobile ... tensorflow đã phát triển bộ công cụ convert tflite và optimization model để giảm kích thước model và cải thiện tốc độ inference. Bài viết này, mình chia sẻ cách convert model tensorflow sang tflite và một số điểm dễ mắc phải dẫn đến kết quả convert sai.
Các nội dung chính:
- TF Lite tối ưu cho các thiết bị phần cứng thấp
- Convert TFlite
- Test inference tflite model
TF Lite tối ưu cho các thiết bị phần cứng thấp
- TF Lite sử dụng format FlatBuffers cho phép: truy cập vào dữ liệu tuần tự mà không cần phân tích cú pháp, tốc độ đọc nhanh, hỗ trợ đa nền tảng ....
- TF Lite kết hợp pruning và lượng tử hóa giúp kích cỡ model giảm đi đáng kể, tốc độ inference cũng tăng lên
- TF Lite kết hợp lượng tử hóa tương thích data type cho cả vi điều khiển 8 bit, 16 bit
(Mình sẽ bổ sung chi tiết hơn sau nếu rảnh =)), giờ vào luôn phần trọng tâm =)))
Convert model tensorflow 2 sang tflite
Quan sát sơ đồ convert tflite
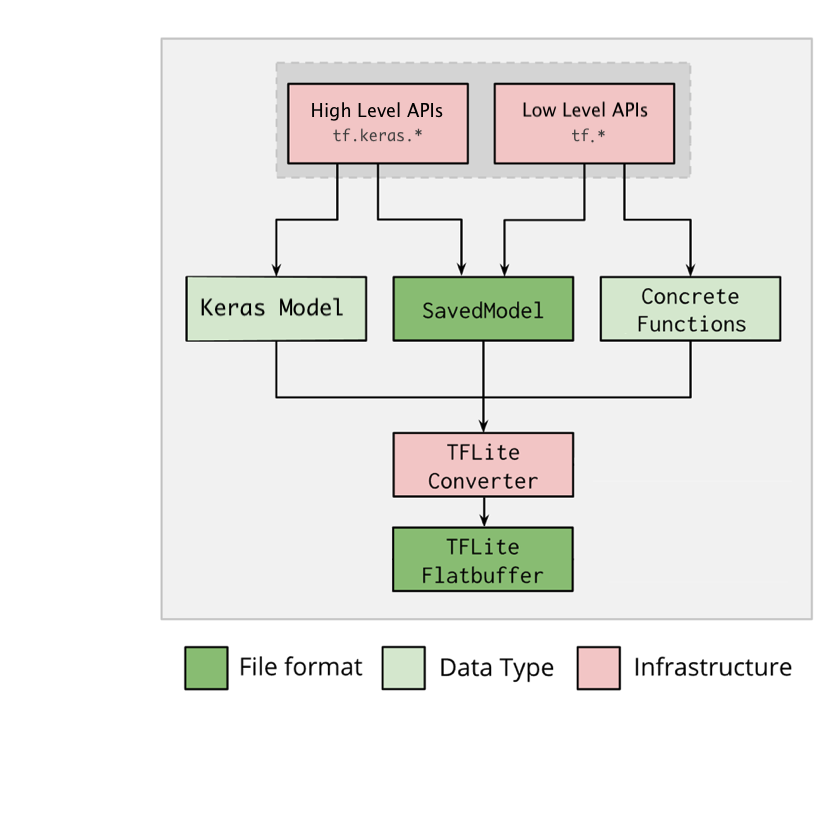
Giải thích một chút:
Phần đầu vào của bộ convert gồm 3 dạng model:
- File đuôi .h5 được build từ tf.keras
- File save_model
- Concrete Function là hàm chức năng được build từ tf.function. Một số hàm chức năng bạn muốn build dưới dạng TF Graph để tận dụng lợi thế là đóng gói được và tận dụng sức mạnh GPU-Khi đó bạn sẽ sử dụng đến Concrete Function
Nhận xét:
- Như vậy bộ convert này không hỗ trợ model h5 xây dựng bằng keras.* - Đây là một lỗi mình đã mắc phải do không đọc kĩ, mình tìm cách convert file model h5 (build bằng keras.*) và kết quả là false.
- Tiếp theo, bộ convert không hỗ trợ convert trực tiếp từ save_model TF Graph mà convert từ save_model của TF Lite Graph. Đây là lỗi thứ 2. Khi mình thử pretrain trong model zoo của tensorflow2, trong đó có sẵn save_model TF Graph, mình sử dụng luôn để convert sang TF Lite và kết quả cũng false
- Convert xong thấy model sai input, output, ngay cả khi bạn thấy đã cài đặt môi trường đúng, nhưng kết quả convert vẫn sai. Thì đó là lỗi môi trường nhé, chi tiết nhỏ rất khó phát hiện.
Thực hành:
1. Convert Keras Model (file .h5)
import tensorflow as tf
keras_model = tf.keras.models.load_model("model.h5")
converter = tf.lite.TFLiteConverter.from_keras_model(keras_model)
# converter.optimizations = [tf.lite.Optimize.DEFAULT] # sử dụng optimization nếu cần tối ưu thêm
tflite_model = converter.convert()
with open('model.tflite', 'wb') as f:
  f.write(tflite_model)
Đoạn code trên rất đơn giản, cũng không có gì để nói nhiều. Điều đáng chú ý là dòng code:
converter.optimizations = [tf.lite.Optimize.DEFAULT]
optimizations là phương thức trong TFLiteConverter giúp tối ưu model về một mặt nào đó (không gian lưu trữ, tốc độ tính toán) bằng lượng tử hóa. Tuy nhiên cũng có mặt hại là nó sẽ làm giảm độ chính xác của mô hình. Vậy sau khi áp dụng optimizations, bạn nên kiểm tra lại độ chính xác của mô hình để đánh giá xem có nên sử dụng mô hình đó trong thực tế không.
2. Convert Saved_model
Vì Saved_model của bộ convert là dạng TF Lite Graph nên bước đầu tiên là chúng ta cần convert file checkpoint sang Saved_model TF Lite Graph
Code thực hiện trên colab:
Clone bộ tensorflow api về máy
!git clone https://github.com/tensorflow/models.git
!cd /content/drive/My\ Drive/models/research/
Setup môi trường:
!protoc object_detection/protos/*.proto --python_out=.
# !cp object_detection/packages/tf2/setup.py .
!python setup.py build
!python setup.py install
Tải một bộ pretrain và giải nén:
!wget http://download.tensorflow.org/models/object_detection/tf2/20200711/ssd_mobilenet_v2_fpnlite_320x320_coco17_tpu-8.tar.gz
!tar -xf ssd_mobilenet_v2_fpnlite_320x320_coco17_tpu-8.tar.gz
Convert checkpoint sang Saved_model TF Lite Graph:
!python object_detection/export_tflite_graph_tf2.py \
    --pipeline_config_path "/content/drive/My Drive/ssd_mobilenet_v2_fpnlite_320x320_coco17_tpu-8/pipeline.config" \
    --trained_checkpoint_dir "/content/drive/My Drive/ssd_mobilenet_v2_fpnlite_320x320_coco17_tpu-8/checkpoint"\
    --output_directory "/content/drive/My Drive/ssd_mobilenet_v2_fpnlite_320x320_coco17_tpu-8"
Đến đây, bạn sẽ thấy folder saved_model xuất hiện trong thư mục "ssd_mobilenet_v2_fpnlite_320x320_coco17_tpu/" chính là folder saved_mode TF Lite Graph
Bước cuối, convert Saved_model TF Lite Graph sang .tflite:
import tensorflow as tf

converter = tf.lite.TFLiteConverter.from_saved_model("/content/drive/My Drive/ssd_mobilenet_v2_fpnlite_320x320_coco17_tpu-8/saved_model")
tflite_model = converter.convert()

with open('/content/drive/My Drive/ssd_mobilenet_v2_fpnlite_320x320_coco17_tpu-8/model.tflite', 'wb') as f:
  f.write(tflite_model)
Chạy xong chúng ta thấy "model.tflite" chính là file chúng ta cần.
Bây giờ thì kiểm tra thử input, output nào:
import tensorflow as tf
interpreter = tf.lite.Interpreter(model_path="model.tflite")
interpreter.allocate_tensors()
input_details = interpreter.get_input_details()
output_details = interpreter.get_output_details()

print("input details", input_details)
print("ouput details", output_details)
Kết quả:
input details [{'name': 'serving_default_input:0', 'index': 0, 'shape': array([  1, 320, 320,   3], dtype=int32),....
ouput details [{'name': 'StatefulPartitionedCall:0', 'index': 0, 'shape': array([ 0], dtype=int32), ....
Có cái gì đấy sai sai. tại sao output_shape lại là 0. Trong khi đó, pretrain là object_detection ssd_mobilenet.... cơ mà. Môi trường colab thì chuẩn rồi, các bước cần thực hiện thì doc cũng ghi rõ hết rồi. Chả là bộ convert chưa thực sự ổn định cho tensorflow2 nên các bản vá chưa cập nhật hết trên phiên bản tensorflow ổn định. Để khắc phục, bạn cần cài thêm tf-nightly để có bản cập nhật mới.
!pip install tf-nightly
Sau đó, chạy lại đoạn convert Saved_model TF Lite Graph sang .tflite Test thử input, output của model.tflite:
input details [{'name': 'serving_default_input:0', 'index': 0, 'shape': array([  1, 320, 320,   3],....
ouput details [{'name': 'StatefulPartitionedCall:3', 'index': 333, 'shape': array([ 1, 10,  4],....
Có vẻ đúng rồi :v. Mình test thử trên 1 data_sample xem thế nào:
import tensorflow as tf
import numpy as np

interpreter = tf.lite.Interpreter(model_path="model.tflite")
interpreter.allocate_tensors()
input_details = interpreter.get_input_details()
output_details = interpreter.get_output_details()

input_data = np.random.rand(1, 224, 224, 3).astype(np.float32)
interpreter.set_tensor(input_details[0]['index'], input_data)
interpreter.invoke()

boxes = interpreter.get_tensor(output_details[0]['index'])[0]
print(boxes)
Output:
[[-0.01534593  0.02838141  0.99685085  1.0171802 ]
 [ 0.1800842   0.05123451  0.966951    0.7591779 ]
 [ 0.01378332  0.08405441  0.4445706   0.9546034 ]
 [ 0.05725643  0.46103552  0.9452232   1.1069726 ]
 [ 0.01255077  0.67478615  1.045289    1.0662615 ]
 [ 0.01674342  0.83467627  0.5265476   1.0017366 ]
 [ 0.12729597 -0.10699835  1.17206     0.91766524]
 [ 0.5263704   0.01309906  0.82459176  0.11854754]
 [ 0.75449264  0.4692044   1.0052952   0.58510554]
 [ 0.7506213   0.4150514   1.0170349   0.5427492 ]]
Vậy là model.tflite đã hoạt động, mình test thực tế và show kết quả ở phần dưới
3. Convert concrete functions sang tflite
import tensorflow as tf
# tạo một concrete functions
class Squared(tf.Module):
  @tf.function
  def __call__(self, x):
    return tf.square(x)
model = Squared()
concrete_func = model.__call__.get_concrete_function()
# convert concrete functions
converter = tf.lite.TFLiteConverter.from_concrete_functions([concrete_func])
tflite_model = converter.convert()

with open('model.tflite', 'wb') as f:
  f.write(tflite_model)
Toàn bộ code convert tflite bạn có thể lấy ở đây : https://colab.research.google.com/drive/1eD2gtSBYgIQrfj3ZuSQHcy6Py_mv3HP3?usp=sharing, bạn thay đổi đường dẫn file cho phù hợp rồi chạy từ trên xuống dưới là xong 
TF lite Object Dectection trên Raspberry pi 3
Môi trường mình cài đặt:
- python-opencv 4.2.0 (thời gian cài đặt ~4h)
- tensorflow 2.4.0 (mình đã build sẵn bản cài đặt wheel, nếu bạn nào cần bản này thì comment, mình share cho. Chứ build từ đầu thì mất 1 ngày =)))
Code:
import tensorflow as tf
import numpy as np
import picamera
import time
import cv2
import io


def main():
  interpreter = Interpreter(model_path="model.tflite")
  interpreter.allocate_tensors()
  _, height, width, _ = interpreter.get_input_details()[0]['shape']
  print(height, width)
  input_details = interpreter.get_input_details()
  output_details = interpreter.get_output_details()
  print(output_details)

  with picamera.PiCamera(resolution=(640, 480), framerate=5) as camera:
    try:
      stream = io.BytesIO()
      for _ in camera.capture_continuous(
          stream, format='jpeg', use_video_port=True):
        stream.seek(0)
        image = Image.open(stream).convert('RGB').resize((width, height),
                                                         Image.ANTIALIAS)
        image = cv2.resize(np.array(image), (height,width))
        input_data = image.reshape((1, height, width, 3)).astype(np.float32)
        start_time = time.time()
        interpreter.set_tensor(input_details[0]['index'], input_data)
        interpreter.invoke()

        boxes = interpreter.get_tensor(output_details[0]['index'])
        classes = interpreter.get_tensor(output_details[1]['index'])
        scores = interpreter.get_tensor(output_details[2]['index'])

        for i, box in enumerate(boxes[0]):
          if scores[0][i] > 0.6:
            class_name = classes[0][i]
            ymin = int(max(1,(box[0] * height)))
            xmin = int(max(1,(box[1] * width)))
            ymax = int(min(height,(box[2] * height)))
            xmax = int(min(width,(box[3] * width)))
            cv2.rectangle(image, (xmin, ymin), (xmax, ymax), (255,0,0), 2)

        elapsed_ms = (time.time() - start_time) * 1000
        print(elapsed_ms)
        stream.seek(0)
        stream.truncate()

        cv2.imshow("abc", image[:,:,::-1])
        cv2.waitKey(1)
    finally:
        pass


if __name__ == '__main__':
  main()
Đây là 1 đoạn video demo, inference time khoảng 300ms nhanh gấp 2-3 lần so với model gốc, tốc độ này trên raspberry pi là quá tốt rồi.
Mời các bạn xem link: https://drive.google.com/file/d/1Pjm5nhR_HK_qTAUeTcKKCFvs7E0X8ba3/view?usp=sharing
Kết luận
Convert model sang tflite là một giải pháp vô cùng tốt cho việc deploy ứng dụng AI lên các thiết bị cấu hình thấp.
Hi vọng bài viết mang lại thông tin hữu ích cho mọi người. Nếu mọi người có câu hỏi hoặc đóng góp gì hãy comment cho mình biết.
Cảm ơn mọi người đã đọc bài!
All rights reserved
