Hierarchical Dependency Injectors trong Angular 4
Bài đăng này đã không được cập nhật trong 4 năm
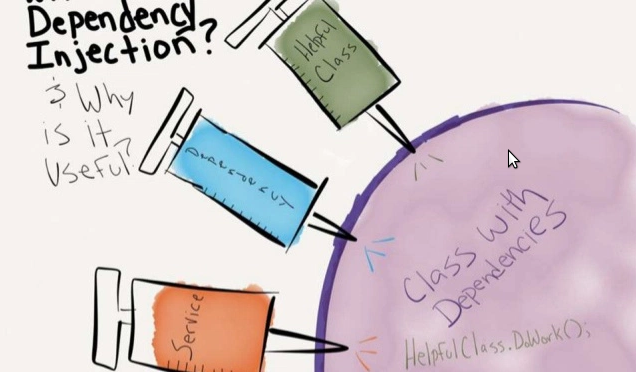
Dependency Injection là gì?
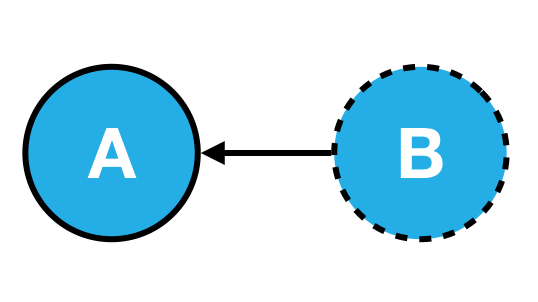
Khi module A trong một ứng dụng cần một module B để chạy, thì khi đó module B là một dependency của module A.
Và hiểu đơn giản thì Dependency Injection là cách design codes sao cho nó có thể "tiêm" các đối tượng dependency của một đối tượng vào trong đối tượng đó.
Dependency injection là một design pattern quan trọng trong một ứng dụng. Angular có riêng cho mình một framework dependency injection, và bạn thực sự không thể xây dựng một ứng dụng Angular mà không có nó. Nó được sử dụng rất rộng rãi mà hầu hết mọi người chỉ gọi nó với cái tên DI.
Hãy đến với một ví dụ dưới đây để có thể hiểu rõ hơn nhé. Ví dụ ta có một class là EmailSender có nhiệm vụ là gửi email, EmailService và GoogleMailService (kế thừa từ EmailService) chứa các cài đặt và kết nối đến các dịch vụ email.
class GoogleMailService extends EmailService { }

class EmailSender {
  emailService: EmailService;

  constructor() {
    this.emailService = new GoogleMailService("APIKEY12345678910");
  }

  sendEmail(mail: Mail) {
    this.emailService.sendEmail(mail);
  }
}
emailSender = new EmailSender();
emailSender.sendEmail(mail);
Hãy xem xét kĩ để nhận ra một số nhược điểm của đoạn codes trên:
- Không linh hoạt:
Khó có thể tái sử dụng lại được khi chúng ta có cấu hình khác.
GoogleMailServiceđang được fix cứng với vai trò là dịch vụ gửi mail. Vậy chúng ta sẽ sử dụng class này thế nào khi mà muốn sử dụng một email provider khác? - Khó test:
Gọi
sendEmail(email)sẽ gửi một email thật đến một địa chỉ email thật sử dụng một external service mà chúng ta không kiểm soát được. Vậy làm thế nào chúng ta có thể test việcsendMailcó thực sự gửi một email? - Khó maintain:
Nếu chúng ta thay đổi API key, chúng ta cần chắc chắn nó được thay đổi trên tất cả các instance mà chúng ta sử dụng
GoogleMailService. Thậm chí nếu chúng ta đặt API key vào biến global, và nếu nhưGoogleMailServicethay đổi cách xác thực, giả sử kết hợp sử dụng username/password chẳng hạn, thì sẽ khó để maintain đoạn codes này.
Đoạn codes ở trên cho ta thấy sự kết nối chặt chẽ giữa class EmailSender và GoogleMailService. Nó làm cho codes không linh hoạt, khó test và maintain.
Chúng ta phải thừa nhận là class EmailSender cần có GoogleMailService để hoạt động. Vậy GoogleMailService là một dependency của EmailSender. Hãy thử thay đổi đoạn codes trên, sử dụng DI để có thể làm cho nó dễ tái sử dụng, dễ test và dễ maintain nhé.
class GoogleMailService extends EmailService { }

class EmailSender {
  emailService: EmailService;

  constructor(emailService: EmailService) {
    this.emailService = emailService;
  }

  sendEmail(mail: Mail) {
    this.emailService.sendEmail(mail);
  }
}
emailSender = new EmailSender(new GoogleMailService());
emailSender.sendEmail(mail);
Đoạn codes thay đổi này sử dụng DI đã khắc phục được những nhược điểm nói trên:
-
Linh hoạt, dễ tái sử dụng: Bây giờ chúng ta có thể tái sử dụng được
EmailSendervới một email service khác. Ví dụ, nếu chúng ta muốn sử dụngYahooMailServicethay vìGoogleMailService, chúng ta chỉ cần tạo ra một instance củaYahooMailServicevà sau đó truyền vào constructor củaEmailSenderlà xong ^^:emailSender = new EmailSender(new YahooMailService()); -
Dễ test: Bây giờ chúng ta đã có thể dễ dàng test
EmailSenderhơn rồi. Chúng ta có thể tạo ra một dummy class không thực sự gửi một email thật, tuy nhiên giúp ta kiểm tra xem hàmsendEmailcó thực sự được gọi hay chưa, ví dụ như:MockedEmailService extends EmailService { mailSent: boolean = false; sendEmail(mail: Mail) { this.mailSent = true; } } let mockService = MockedEmailService() emailSender = new EmailSender(mockService); if (mockService.mailSent === true) { ... } -
Dễ maintain: Kể từ khi
EmailSenderkhông còn đảm nhận nhiệm vụ tạo ra instance cho email service, khiGoogleMailServicecó những yêu cầu cấu hình mới, nó sẽ không làm ảnh hưởng đến classEmailSender. Miễn làGoogleMailServiceimplement hàmsendEmail, nó được khởi tạo hay cấu hình ra sao thìEmailSendersẽ không còn phải bận tâm nữa.
Đó, qua những cải tiến đoạn codes trên với DI ta có thể thấy được là sử dụng DI sẽ có ưu điểm vượt trội hơn nhiều đúng không nào.
Trong Angular 4, DI gồm 3 thành phần cơ bản:
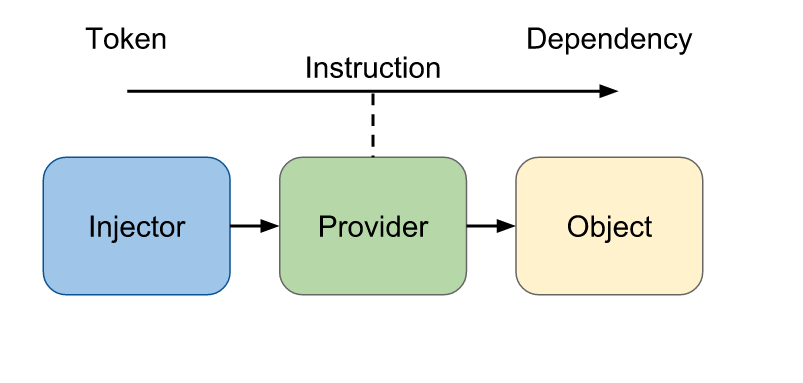
- Injector: Một đối tượng injector sẽ đưa ra các API cho chúng ta để tạo các instance của dependencies
- Provider: Nó giống như một công thức để nói với injector cách tạo ra một instance của một dependency. Một provider lấy một token và map nó với một hàm factory để tạo ra một object
- Dependency: là kiểu mà một object nên được tạo ra.
Phần tiếp theo, chúng ta cùng tìm hiểu về hệ thống Hierarchical Dependency Injectors trong Angular 4 nha.
Hệ thống Hierarchical Dependency Injection
Trong angular 4, các dependency được đăng ký trong một tập Providers sử dụng một tập token-provider. Component inject các dependencies vào trong hàm khởi tạo sử dụng token. Injector sẽ tìm kiếm một provider trong tập Providers sử dụng token. Nếu như provider được tìm thấy, nó sẽ được khởi tạo và inject vào trong component. Còn nếu không tìm thấy, nó sẽ tiếp tục request tới injector của component cha, và cứ tiếp tục như vậy cho đến khi tìm thấy provider hoặc là vượt quá top level injector của injector tree.
Nếu không thể tìm thấy provider cho dependency, sẽ có một lỗi xảy ra "EXCEPTION: Error in Component class – inline template caused by No provider for Service!".
Để hiểu rõ hơn về cách hệ thống hierarchical dependency injection hoạt động ra sao, hãy cùng đến với một demo nho nhỏ dưới đây nhé.
 Trong demo trên, bạn có thể thấy cách click vào link
 Regenerate, nó sẽ gọi tới một hàm trong service, làm cho giá trị ID trong mỗi instance của các component thay đổi. Phương pháp này giúp ta có thể thấy được chính xác các instance của service được share giữa các component trong hệ thống. Hãy phân tích kĩ hơn các thành phần để hiểu rõ hơn nhé.
Ở đây, ta tạo một IdService có nhiệm vụ tạo ra các giá trị ID thay đổi mỗi khi click Regenerate.
# id.service.ts
import { Injectable } from '@angular/core';

@Injectable()
export class IdService {
  id: string;

  constructor() {
    this.regenerate();
  }

  regenerate(): void {
    this.id = this.generateUUID();
  }

  private generateUUID(): string {
    return 'xxxxxxxx-xxxx-4xxx-yxxx-xxxxxxxxxxxx'.replace(/[xy]/g, function(c) {
        var r = Math.random()*16|0, v = c === 'x' ? r : (r&0x3|0x8);
        return v.toString(16);
    });
  }
}
Mỗi khi link Regenerate được click, method regenerate() sẽ được gọi, và nó làm thay đổi giá trị của thuộc tính id.
AppComponent sẽ giống như sau:
# app.component.ts
import {Component} from "@angular/core";

import {IdService} from "./id.service";
import {SharedComponent} from "./shared.component";
import {IsolatedComponent} from "./isolated.component";
import {IndividualComponent} from "./individual.component";

@Component({
    selector: 'my-app',
    styles: [`
        .subpanel {
            font-family: "Courier New", Courier, monospace;
            font-size: 0.9em;
            display: flex;
            flex-direction: column;
            margin: 20px;
            padding: 10px;
        }
    `],
    template: `
        <h2>Angular 2 Dependency Injection demo</h2>

        <h3>These two child components share same service instance</h3>
        <shared class="subpanel"></shared>
        <shared class="subpanel"></shared>

        <h3>These share same instance, but isolated from the one above</h3>
        <isolated class="subpanel"></isolated>

        <h3>These each have their own service instance</h3>
        <individual class="subpanel"></individual>

    `,
    providers: [IdService]
})
export class AppComponent { }
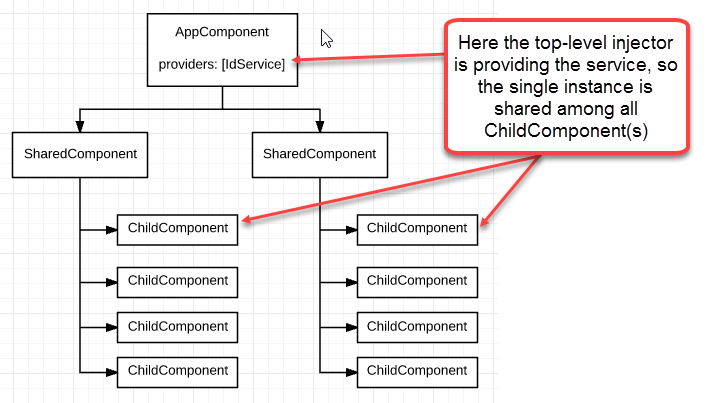
Phần đầu của demo
Phần đầu của demo chứa 2 instance của một component gọi là SharedComponent, mỗi instance chứa 4 instance của component con ChildComponent.
ChildComponent:
# child.component.ts
import {Component} from "@angular/core";
import {IdService} from "./id.service";

@Component( {
    selector: 'child',
     styles: [`
        span {
            margin-left: 10px;
            margin-right: 10px;
        }
    `],
   template: `
        <div>
          <span><a href="#" (click)="idService.regenerate()">Regenerate</a></span>
          <span>{{idService.id}}</span>
        </div>
    `
})
export class ChildComponent {

    constructor(
        private idService: IdService
    ) {}
}
SharedComponent:
# shared.component.ts
import {Component} from "@angular/core";

@Component({
	selector: 'shared',
	template: `
        <child></child>
        <child></child>
        <child></child>
        <child></child>
    `
})
export class SharedComponent { }
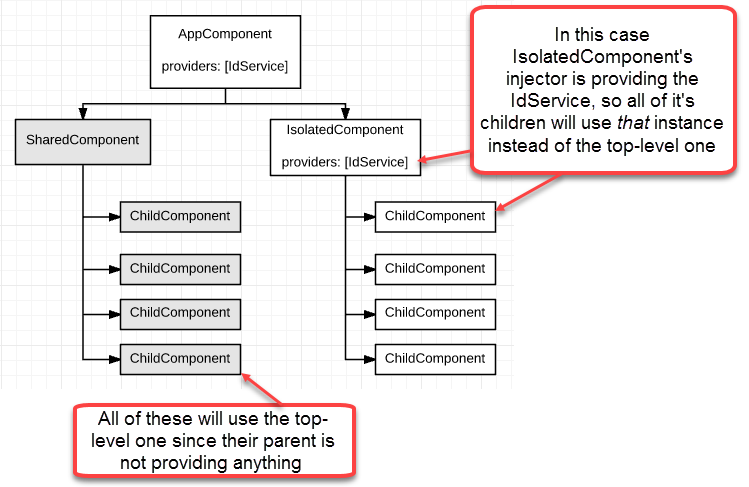
Trong demo, khi click vào bất kì link Regenerate nào trong phần đầu tiên, giá trị ID của chúng đều thay đổi giống nhau hết. Đó là bởi vì mỗi instance của ChildComponent được inject với một class IdService, nhưng SharedComponent (component cha) không hề config injector để provide nó, vì vậy Angular sẽ di chuyển lên cây component để tìm kiếm một component nào đó có một provider được định nghĩa và cuối cùng đã tìm thấy nó ở top-level component (AppComponent). Angular đã tạo một single instance của service ở top-level và chia sẻ giữa tất cả các instance của ChildComponent ở đây.
Phần giữa của demo
IsolatedComponent:
# isolated.component.ts
import {Component} from "@angular/core";

import {IdService} from "./id.service";

@Component({
    selector: 'isolated',
    template: `
        <child></child>
        <child></child>
        <child></child>
        <child></child>
    `,
    providers: [IdService]
})
export class IsolatedComponent { }
Điểm khác biệt ở phần này so với phần trên đó là injector của IsolatedComponent đã provide IdService, do vậy tất cả các ChildComponent sẽ sử dụng instance này của IdService thay vì instance của nó ở top-level. Điều này giải thích vì sao các ChildComponent ở phần này đều có chung ID nhưng khác so với ID ở phần trên.
Phần cuối của demo
Ở đây, ta sẽ tạo 2 component là IndividualChildComponent và IndividualComponent:
IndividualChildComponent:
# individual-child.component.ts
import {Component} from "@angular/core";

import {IdService} from "./id.service";

@Component({
    selector: 'individual-child',
    styles: [`
        span {
            margin-left: 10px;
            margin-right: 10px;
        }
    `],
    template: `
        <div>
          <span><a href="#" (click)="idService.regenerate()">Regenerate</a></span>
          <span>{{idService.id}}</span>
        </div>
    `,
    providers: [IdService]
})
export class IndividualChildComponent {

    constructor(
        private idService: IdService
    ) {}
}
IndividualComponent:
# individual.component.ts
import {Component} from "@angular/core";

@Component({
	selector: 'individual',
	template: `
        <individual-child></individual-child>
        <individual-child></individual-child>
        <individual-child></individual-child>
        <individual-child></individual-child>
    `,
})
export class IndividualComponent { }
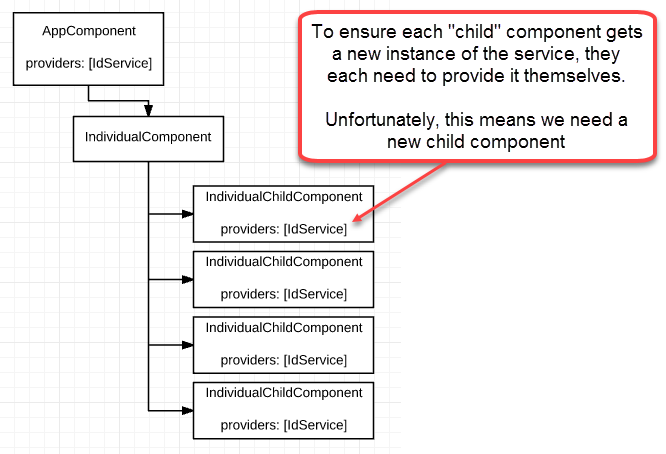
Ở trường hợp này, bởi vì mỗi injector của IndividualChildComponent đều provide IdService nên mỗi IndividualChildComponent sẽ sử dụng một instance khác nhau của IdService. Đó là lý do, mỗi khi click vào 1 link Regenerate, nó sẽ tạo ra một ID khác với những ID còn lại.
Kết luận: Trên đây, mình đã giới thiệu qua về Dependency Injection và cách Hierarchical Dependency Injectors hoạt động trong Angular 4. Bạn có thể tham khảo codes demo tại đây Stackblitz. Hi vọng nó sẽ giúp ích cho bạn trong những projects đang và sẽ thực hiện.
Tài liệu tham khảo
All rights reserved
