Getting Start with PyTorch
Bài đăng này đã không được cập nhật trong 7 năm
In my previous articles, I talked about Khmer word segmentation. However, in this article, I am going to prepare my machine for PyTorch development environment. You may wonder what/why is PyTorch? and why now?
What is PyTorch?
PyTorch is an open source deep learning which developed by Facebook AI research team. Where it is a Python package that provides two high-level features:
- Tensor computation (like NumPy) with strong GPU acceleration
- Deep neural networks built on a tape-based autograd system
Why is PyTorch now?
Early this month, I have join a "PyTorch Scholarship Challenge" hosted by Facebook which I need to complete a PyTorch course at Udacity in 2 months. In that course, I will learn the basics of deep neural networks and how to build various models using PyTorch where at the end of the course I need to build a model that identifies the species of flowers from images. Therefore I need to postpone my research Khmer Word segmentation and try to challenge myself to learn PyTorch in 2 months.

Set up PyTorch
I have just finished the intro to Neural Networks where we learn the concepts behind deep learning and how we train deep neural networks with backpropagation. In that section, we mostly learn the theory and formula only and for PyTorch we are going to learn it from next week. So let's set up Pytorch on our machine and learn some of its basic syntaxes in advance.
The best way of install PyTorch is install it via Anaconda as it will provide you all of the PyTorch dependencies in one, sandboxed install, including Python.
Let's install Anaconda:
# The version of Anaconda may be different depending on when you are installing
curl -O https://repo.anaconda.com/archive/Anaconda3-5.2.0-MacOSX-x86_64.sh
sh Anaconda3-5.2.0-MacOSX-x86_64.sh
# and follow the prompts. The defaults are generally good.
Then we can install PyTorch via Anaconda as easy as the following conda command:
conda install pytorch torchvision -c pytorch
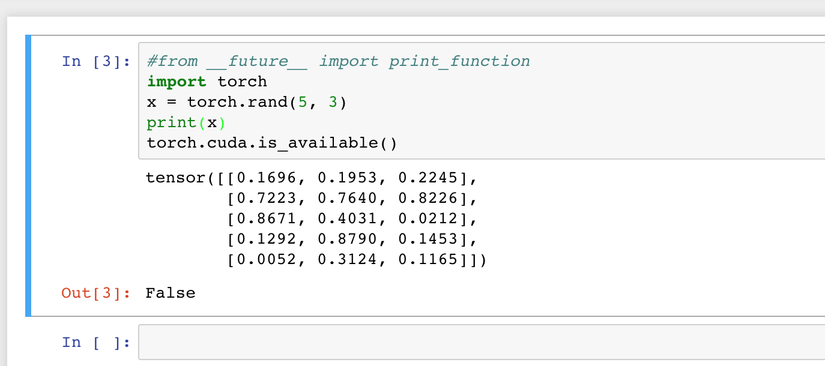
Let's verify the installation by running sample PyTorch code.
import torch
x = torch.rand(5, 3)
print(x)
torch.cuda.is_available()
And it should display out put similar to this:

PyTorch bacis fun
-
empty: to create an uninitialized matrix.
x = torch.empty(5,3) print(x) -
rand: to construct a rand matrix.
ran = torch.rand(5,3) print(ran) -
zeros: to init matrix of zero.
x = torch.zeros(5,3, dtype=torch.long) print(x) -
tensor: to contruct matrix direct from data
x = torch.tensor([5.5, 3]) print(x) -
size: to check matrix size.
x.size() -
addition operation
a = torch.rand(2,2)
b = torch.rand(2,2)
print(a)
print(b)
 #syntax 1
print(a+b)
 #syntax 2
print(torch.add(a,b))

result = torch.empty(2,2)
print(result)
print(torch.add(a,b, out=result))
print(result)
Cool, now we are ready for next step. 
Resources
- Udacity course https://www.udacity.com/course/deep-learning-pytorch--ud188
- Code: https://github.com/RathanakSreang/PyTorchScholarshipLesson/blob/master/Hello World.ipynb
- https://pytorch.org/
- Anaconda
What Next
Up next, we will learn PyTorch bacis and how to build the deep learning model from Python. Then I am going to share what I have learn into my next article. So don't forget to follow me :#)
All rights reserved