Digit Recognizer with PyTorch
Bài đăng này đã không được cập nhật trong 7 năm
In my previous article, we introduce ourselves to some Pytorch methods. This article, we are going use Pytorch that we have learn to recognize digit number in MNIST dataset. What is MNIST? MNIST ("Modified National Institute of Standards and Technology") is the de facto “hello world” dataset of computer vision. Since its release in 1999, this classic dataset of handwritten images has served as the basis for benchmarking classification algorithms.
Our goal is to write our own model and train it. Then we will our trained model to identify digits from a dataset of tens of thousands of handwritten images. Finaly, we can benchmark our model by submitting its predicted result in Kaggle's digit recognizer competition. Now, let's get started.
Prepare Dataset
First we need to load needed libraries for this task.
import torch #for building NN model
import torchvision
import numpy as np
#pandas for reading data from file
import pandas as pd
#train_test_split for seperaring train, test dataset for validating our model accuracy during train
from sklearn.model_selection import train_test_split
We assume that we already download train.csv, test.csv from Kaggle's digit recognizer and put it in folder input/. Next, we can load the data and analize it.
# load the train dataset
dataset = pd.read_csv(r"input/train.csv",dtype = np.float32)
print(dataset.shape)
dataset.head()

As you can see in pic above we have 42000 rows and 785 columns where first column is label since it is a training dataset. So we have 784 or (28 * 28) input features to train on our model. Then we can exract and clear the train data for our model.
# get array of labels
labels = dataset.label.values
# get all features values in table except label
features = dataset.loc[:,dataset.columns != "label"].values
# print(features[0])
features = features/255 # normalization
# print(features[0])

# train test split. Size of train data is 80% and size of test data is 20%.
features_training, features_test, labels_training, label_test = train_test_split(features,
                                                                             labels,
                                                                             test_size = 0.2)

print(type(features_training))
print(type(labels_training))
print(type(features_test))
print(type(label_test))
#<class 'numpy.ndarray'>
#<class 'numpy.ndarray'>
#<class 'numpy.ndarray'>
#<class 'numpy.ndarray'>
Now we get all the data we need to train and test our model. However, we build the model using Pytorch where it can work on its tensor type only. Therefore, we need to transform our numpy array Pytorch tensor, luckily Pytorch has a function to do just this job.
#conver numpy array to torch tensor
featuresTraining = torch.from_numpy(features_training)
#Note: we convert our label with type torch.LongTensor because in a lost function it request label to have data type as torch.LongTensor
labelsTraining = torch.from_numpy(labels_training).type(torch.LongTensor)
featuresTest = torch.from_numpy(features_test)
labelTest = torch.from_numpy(label_test).type(torch.LongTensor)
print(type(featuresTraining))
print(type(labelsTraining))
print(type(featuresTest))
print(type(labelTest))
#<class 'torch.Tensor'>
#<class 'torch.Tensor'>
#<class 'torch.Tensor'>
#<class 'torch.Tensor'>
With Pytorch's TensorDataset, DataLoader, we can wrapping features and its labels so we can easily loop to get the train data and its label during training.
# batch_size
batch_size = 100 #size of data per iteration
# Dataset wrapping tensors train and test sets with its labels
train = torch.utils.data.TensorDataset(featuresTraining,labelsTraining)
test = torch.utils.data.TensorDataset(featuresTest,labelTest)
# Pytorch data loader
# Data loader. Combines a dataset and a sampler, and provides single- or multi-process iterators over the dataset.
train_loader = torch.utils.data.DataLoader(train, batch_size = batch_size, shuffle = False)
test_loader = torch.utils.data.DataLoader(test, batch_size = batch_size, shuffle = False)
Visualize the data
Let's get data in a iteration.
import matplotlib.pyplot as plt
%matplotlib inline
# obtain one batch of training data
dataiter = iter(train_loader)
images, labels = dataiter.next()
# convert tensor to numpy array so we can plot it.
images = images.numpy()
print(images[0].shape)
# (784,)
As we can see our images is a flatted 1d array, we need to reshape it into (28 * 28) so that we can plot into our graph.
# plot the images in the batch, along with the corresponding labels
fig = plt.figure(figsize=(25, 4))
for idx in np.arange(20):
    ax = fig.add_subplot(2, 20, idx+1, xticks=[], yticks=[])
    ax.imshow(images[idx].reshape(28,28), cmap='gray')
    ax.set_title(str(labels[idx].item()))

Build a model
Let's load needed libraries.
# nn module: https://pytorch.org/docs/stable/nn.html
import torch.nn as nn
# get already build functions such as: relu, ...
import torch.nn.functional as F
To build our own pytorch model, we can create a class and inherit from pytorch nn.Module. Then we can override two functions __init__, forward where we can define our own definetion.
class Net(nn.Module):
    def __init__(self):
        #
        super(Net, self).__init__()
        ...

     def forward(self, x):
        ...
Let draff our model. We are going to build a Artificial Neural Networks (ANN). ANN are multi-layer fully-connected neural nets that look like the figure below. For our ANN, they consist of:
- an input layer: it will take 784(28*28) input values and output 512.
- a hidden layer: it take output(512) of input layer and return its own output(still 512). (* Feel free to add more hidden layers)
- dropout layers: we drop 20% of our input features during train(for train only) to prevents overfitting of data
- an output layer: it will take the output of last hidden layer and return output 10 which represented of digit numbers(0,1,2,3,4,5,6,7,8,9)
# define the NN architecture
class Net(nn.Module):
    def __init__(self):
        super(Net, self).__init__()
        # number of hidden nodes in each layer (512)
        hidden_1 = 512
        hidden_2 = 512
        # linear layer (784 -> hidden_1)
        self.fc1 = nn.Linear(28 * 28, hidden_1)
        # linear layer (n_hidden -> hidden_2)
        self.fc2 = nn.Linear(hidden_1, hidden_2)
        # linear layer (n_hidden -> 10)
        self.fc3 = nn.Linear(hidden_2, 10)
        # dropout layer (p=0.2)
        # dropout prevents overfitting of data
        self.dropout = nn.Dropout(0.2)

    def forward(self, x):
        # flatten image input
        x = x.view(-1, 28 * 28)
        # add hidden layer, with relu activation function
        x = F.relu(self.fc1(x))
        # add dropout layer
        x = self.dropout(x)
        # add hidden layer, with relu activation function
        x = F.relu(self.fc2(x))
        # add dropout layer
        x = self.dropout(x)
        # add output layer
        x = self.fc3(x)
        return x

# initialize the NN
model = Net()
print(model)

#Net(
#  (fc1): Linear(in_features=784, out_features=512, bias=True)
#  (fc2): Linear(in_features=512, out_features=512, bias=True)
#  (fc3): Linear(in_features=512, out_features=10, bias=True)
#  (dropout): Dropout(p=0.2)
#)
Now our model is build. Let choose loss and optimization functions for our model. There are many loss(L1Loss, MSELoss, CrossEntropyLoss, ...) and optimizer (Adam, SGD, ...) functions. However, we choose CrossEntropyLoss as our loss funcation since it's categorical clasification task and we use SGD (stochastic gradient descent) as our optimizer. But you can choose other function and optimizer.
# loss function (categorical cross-entropy)
criterion = nn.CrossEntropyLoss()

# optimizer (stochastic gradient descent) and learning rate = 0.01
optimizer = torch.optim.SGD(model.parameters(), lr=0.01)
Train the model
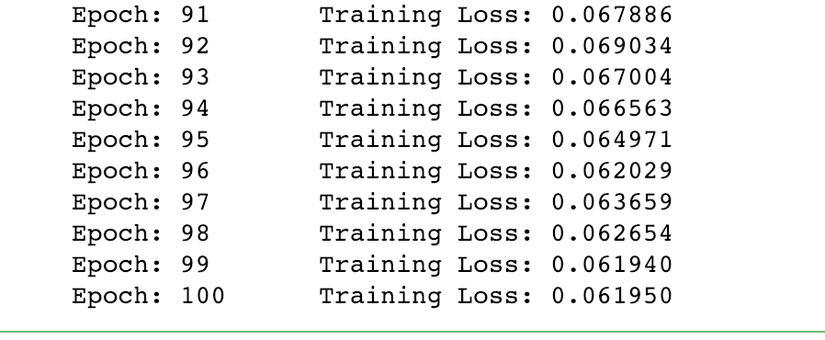
It's time to train our model. There is some point that we need to aware of before start train our model such as a number of epochs, and make sure we set our model to training mode by model.train(). For the number of epochs, there are many questions have been asked about selecting the best number of epochs. But for now, we need to turn manually.
# number of epochs to train the model
n_epochs = 100

model.train() # prep model for training

for epoch in range(n_epochs):
    # monitor training loss
    train_loss = 0.0

    for data, target in train_loader:
        # clear the gradients of all optimized variables
        optimizer.zero_grad()
        # forward pass: compute predicted outputs by passing inputs to the model
        output = model(data)
        # calculate the loss
        loss = criterion(output, target)
        # backward pass: compute gradient of the loss with respect to model parameters
        loss.backward()
        # perform a single optimization step (parameter update)
        optimizer.step()
        # update running training loss
        train_loss += loss.item()*data.size(0)

    # print training statistics
    # calculate average loss over an epoch
    train_loss = train_loss/len(train_loader.dataset)

    print('Epoch: {} \tTraining Loss: {:.6f}'.format(
        epoch+1,
        train_loss
        ))

Then we should save our model, so we can load it for use later.
# save model
torch.save(model.state_dict(), 'model.pt')
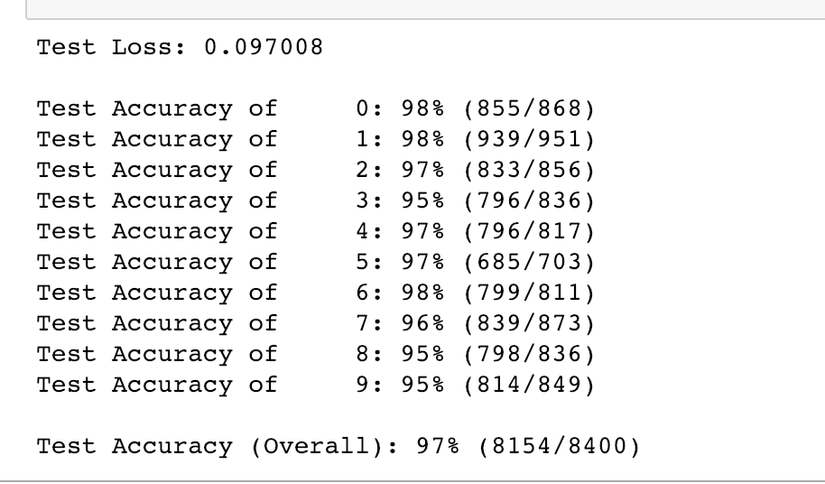
After train completed, we can check our model accuracy with our featuresTest, labelsTest.
# initialize lists to monitor test loss and accuracy
test_loss = 0.0
class_correct = list(0. for i in range(10))
class_total = list(0. for i in range(10))

model.eval() # prep model for evaluation

for data, target in test_loader:
    # forward pass: compute predicted outputs by passing inputs to the model
    output = model(data)
    # calculate the loss
    loss = criterion(output, target)
    # update test loss
    test_loss += loss.item()*data.size(0)
    # convert output probabilities to predicted class
    _, pred = torch.max(output, 1)
    # compare predictions to true label
    correct = np.squeeze(pred.eq(target.data.view_as(pred)))
    # calculate test accuracy for each object class
    for i in range(batch_size):
        label = target.data[i]
        class_correct[label] += correct[i].item()
        class_total[label] += 1

# calculate and print avg test loss
test_loss = test_loss/len(test_loader.dataset)
print('Test Loss: {:.6f}\n'.format(test_loss))

for i in range(10):
    if class_total[i] > 0:
        print('Test Accuracy of %5s: %2d%% (%2d/%2d)' % (
            str(i), 100 * class_correct[i] / class_total[i],
            np.sum(class_correct[i]), np.sum(class_total[i])))
    else:
        print('Test Accuracy of %5s: N/A (no training examples)' % (classes[i]))

print('\nTest Accuracy (Overall): %2d%% (%2d/%2d)' % (
    100. * np.sum(class_correct) / np.sum(class_total),
    np.sum(class_correct), np.sum(class_total)))

Let's plot the result of our prediction.
# obtain one batch of test images
dataiter = iter(test_loader)
images, labels = dataiter.next()

# get sample outputs
output = model(images)
# convert output probabilities to predicted class
_, preds = torch.max(output, 1)
# prep images for display
images = images.numpy()

# plot the images in the batch, along with predicted and true labels
fig = plt.figure(figsize=(25, 4))
for idx in np.arange(40):
    ax = fig.add_subplot(2, 40/2, idx+1, xticks=[], yticks=[])
    ax.imshow(images[idx].reshape(28,28), cmap='gray')
    ax.set_title("{} ({})".format(str(preds[idx].item()), str(labels[idx].item())),
                 color=("green" if preds[idx]==labels[idx] else "red"))
- With 10 epochs

- With 100 epochs

As you can see in above pics, our model predicted well after we train it with 100 epochs.
Test the model
Now, let put our model to the test. We are going to load train.csv from kaggle competition and use our model to predict it. Then we submit our prediction to kaggle to check the score of our model.
# test_model.ipynb
# load the train dataset
dataset = pd.read_csv(r"input/test.csv",dtype = np.float32)
print(dataset.shape)
dataset.head()

In out test dataset, we have 28000 rows and 784 columns since it doesn't include label. Let extract our test features and convert it to torch tensor.
test_features = dataset.values
test_features = test_features/255 # normalization
#print(test_features[0])
testFeatures = torch.from_numpy(test_features)
Since we save our model in train section, in pytorch we can load it back with ease.
model.load_state_dict(torch.load('model.pt'))
Next, let's use our model to prediect the result. You need to make sure turn our model to eval mode model.eval(). We can start our prediction and obtain the result in out predefine numpy array. Where we save it into csv file later.
result = np.zeros(len(testFeatures))
# print(len(result))
model.eval() # prep model for evaluation
for idx, data in enumerate(testFeatures):
    output = model(data)
    # convert output probabilities to predicted class
    _, pred = torch.max(output, 1)
    result[idx] = pred.numpy()[0]

# # write result into file "submission.csv"
# print(np.dstack((np.arange(1, result.size+1),result))[0])
np.savetxt("input/submission.csv", np.dstack((np.arange(1, result.size+1),result))[0],
           "%d,%d", header="ImageId,Label", comments="")
Finally, we can submit our result to kaggle via comman and make sure you in right folder.
kaggle competitions submit -c digit-recognizer -f submission.csv -m "Second submittion"

Yaa! Let's check our result.


Ya, we got 0.96814 and rank 2102. Not bad for beginer. 
Maybe you can help improve the model.
Resources
- Source code: https://github.com/RathanakSreang/PyTorchScholarshipLesson/tree/master/hand-written-digit
- https://www.kaggle.com/c/digit-recognizer
- https://pytorch.org/docs/stable/nn.html
- https://pytorch.org/docs/stable/data.html
- https://github.com/udacity/deep-learning-v2-pytorch/blob/master/convolutional-neural-networks/mnist-mlp/mnist_mlp_exercise.ipynb
What next?
We just finish building an ANN model using Pytorch to recognize hand written digit with 0.96814 scores on kaggle. However, there are many network architecture that you can use for this task such as Convolutional neural network(CNN). So it's your turn to try to solve this task with different network and share your result in the comment below.
I cannot wait to see what score will you obtain. 
All rights reserved