Điều chỉnh thuộc tính adjustViewBounds của ImageView API Level 17 và thấp hơn với AdjustableImageView
Bài đăng này đã không được cập nhật trong 10 năm
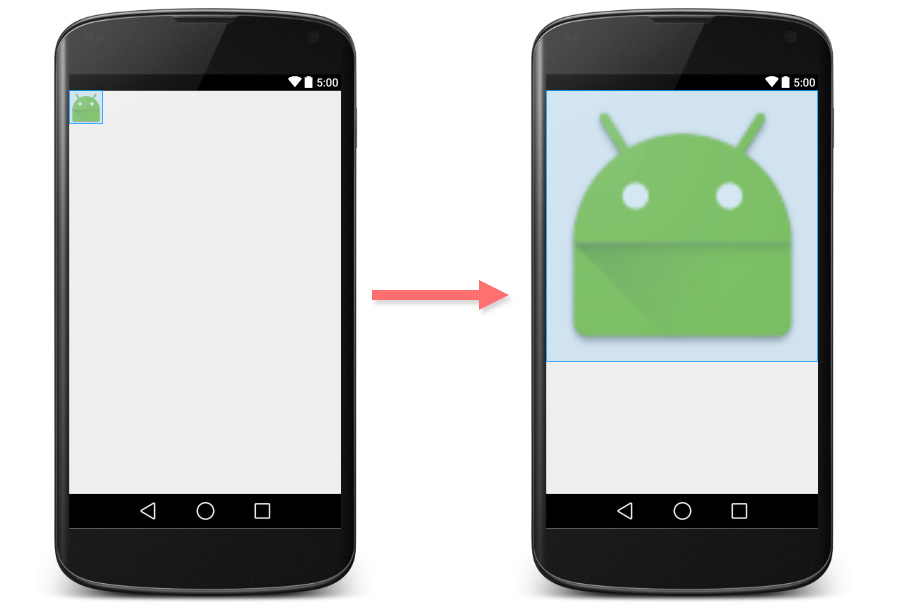
Một yêu cầu mà hầu hết các ứng dụng đơn lẻ đó là: "Tôi muốn mở rộng việc hiển thị của ImageView để tương ứng với độ lớn của layout bao ngoài nó" Như thế này:
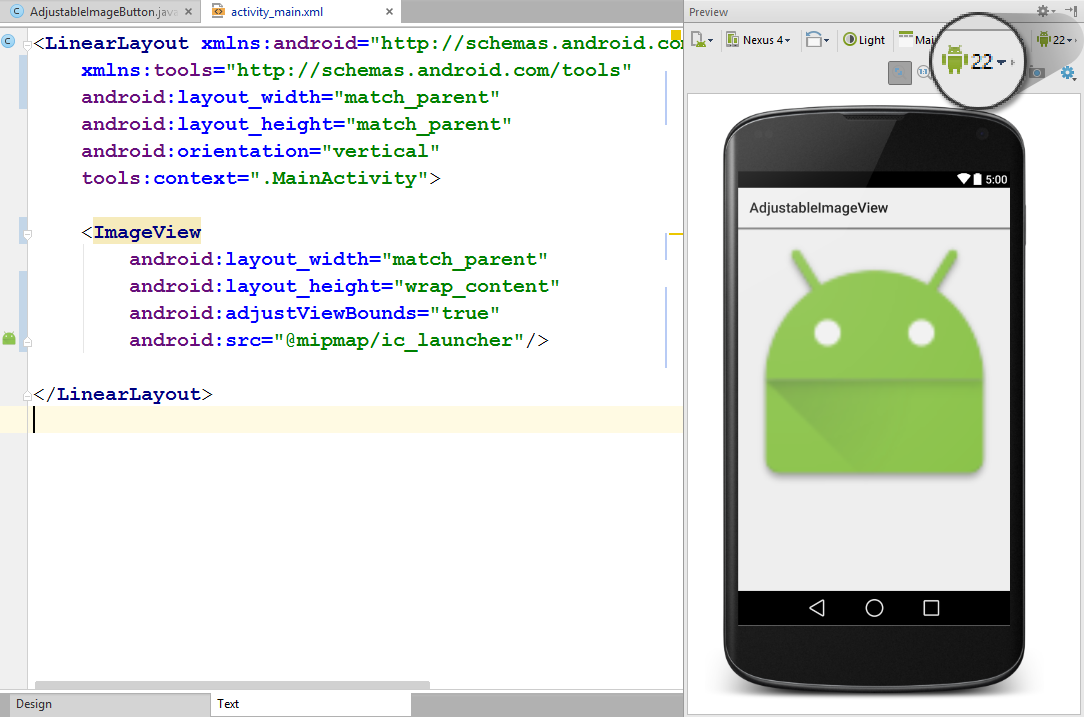
Trên thực tế ImageView đã có sẵn tính năng này. Bạn có thể thiết lập đơn giản bằng cách cài đặt thuộc tính android:adjustViewBounds là true và đó là tất cả.
<ImageView
    android:layout_width="match_parent"
    android:layout_height="wrap_content"
    android:adjustViewBounds="true"
    android:src="@mipmap/ic_launcher" />
Dưới đây là kết quả.
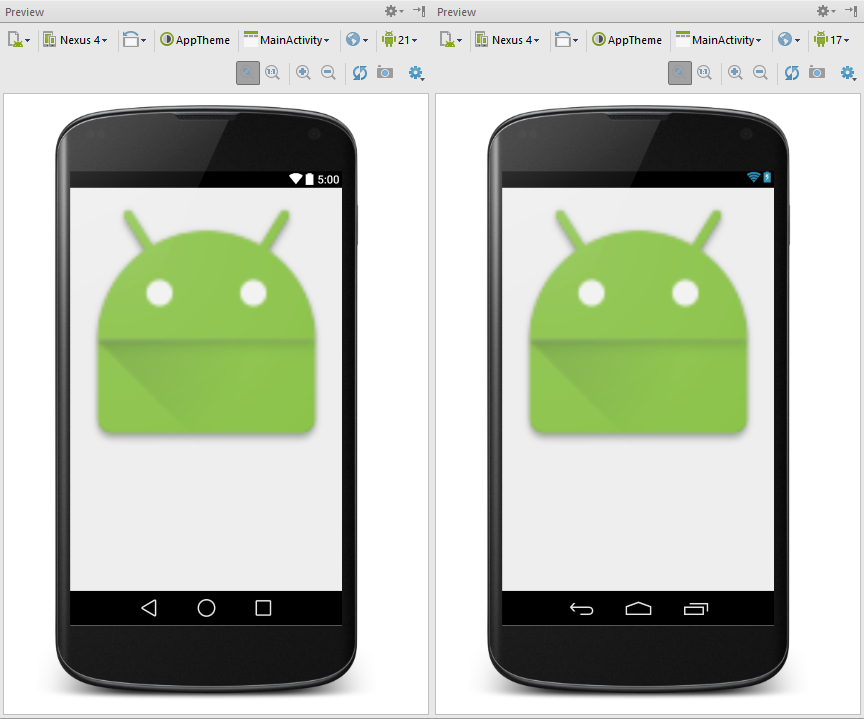
Tất cả mọi thứ sẽ hoạt động tốt? Câu trả lời là không phải. Nếu trong tab Preview của Android Studio của bạn để API Level 17 hoặc dưới 17, bạn sẽ thấy vùng hiển thị của ImageView sẽ bị thay đổi.
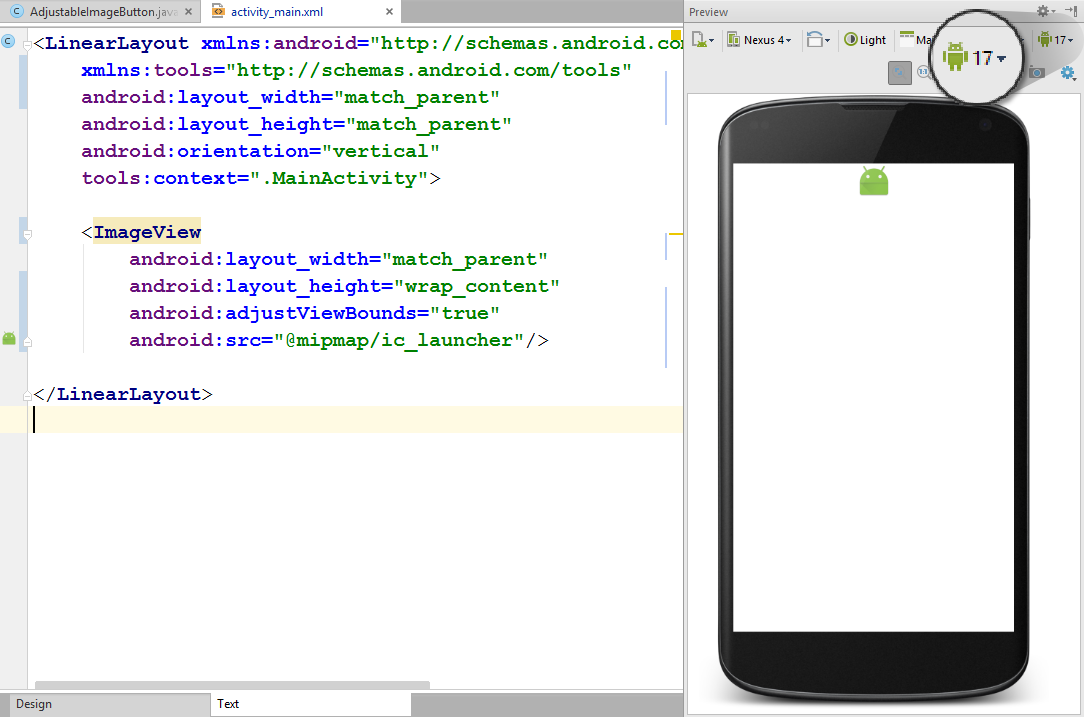
Đây không phải là một lỗi mà nó là một sự thay đổi cách xử lý đúng đắn đã được ghi lại trong các tài liệu của Google về Andoid API
Note: If the application targets API level 17 or lower, adjustViewBounds will allow the drawable to shrink the view bounds, but not grow to fill available measured space in all cases. This is for compatibility with legacy MeasureSpec and RelativeLayout behavior.
Nó có nghĩa rằng trong API Level 17 trở xuống, chiều rộng tối đa và chiều cao tối đa được giới hạn kích thước của hình ảnh được định nghĩa trong android:src . Kết quả là, nó sẽ xảy ra như hình trên.
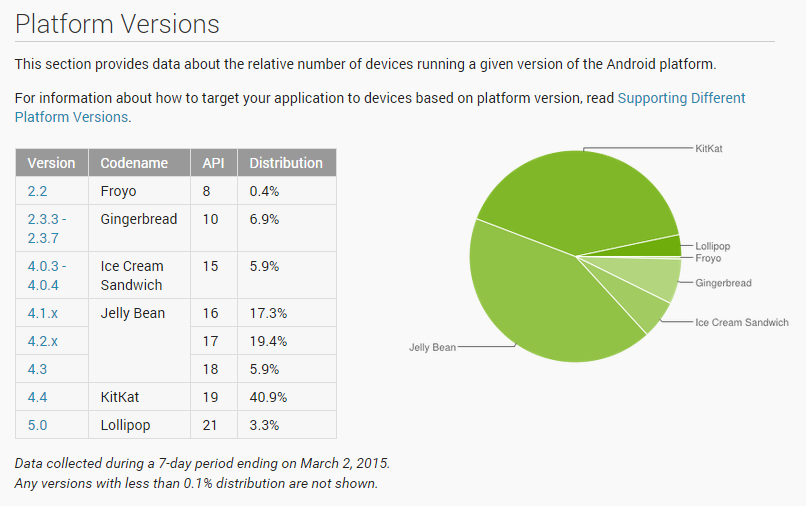
Nếu để ý một chút trong báo cáo về thị phần các phiên bản Android chúng ta sẽ thấy phần trăm của các thiết bị đang chạy Android API Level 17 và thấp hơn chiếm tới gần 50% thị phần.
Việc cài đặt minSdkVersion lên 18 chỉ để né tránh vấn đề này không phải là một giải pháp tốt.
Có một cách tốt hơn là thay đổi một chút trong source code của ImageView để cung cấp hành động đối với API Level từ 18 trở lên và sử dụng thay thế cho một ImageView bình thường. Và dưới đây là một chỉnh sửa của ImageView để thực hiện công việc đó:
import android.content.Context;
import android.graphics.drawable.Drawable;
import android.util.AttributeSet;
import android.view.ViewGroup;
import android.view.ViewParent;
import android.widget.ImageView;

/**
 * Created by nuuneoi on 2/17/15 AD.
 */
public class AdjustableImageView extends ImageView {

    boolean mAdjustViewBounds;

    public AdjustableImageView(Context context) {
        super(context);
    }

    public AdjustableImageView(Context context, AttributeSet attrs) {
        super(context, attrs);
    }

    public AdjustableImageView(Context context, AttributeSet attrs, int defStyleAttr) {
        super(context, attrs, defStyleAttr);
    }

    @Override
    public void setAdjustViewBounds(boolean adjustViewBounds) {
        mAdjustViewBounds = adjustViewBounds;
        super.setAdjustViewBounds(adjustViewBounds);
    }

    @Override
    protected void onMeasure(int widthMeasureSpec, int heightMeasureSpec) {
        Drawable mDrawable = getDrawable();
        if (mDrawable == null) {
            super.onMeasure(widthMeasureSpec, heightMeasureSpec);
            return;
        }

        if (mAdjustViewBounds) {
            int mDrawableWidth = mDrawable.getIntrinsicWidth();
            int mDrawableHeight = mDrawable.getIntrinsicHeight();
            int heightSize = MeasureSpec.getSize(heightMeasureSpec);
            int widthSize = MeasureSpec.getSize(widthMeasureSpec);
            int heightMode = MeasureSpec.getMode(heightMeasureSpec);
            int widthMode = MeasureSpec.getMode(widthMeasureSpec);

            if (heightMode == MeasureSpec.EXACTLY && widthMode != MeasureSpec.EXACTLY) {
                // Fixed Height & Adjustable Width
                int height = heightSize;
                int width = height * mDrawableWidth / mDrawableHeight;
                if (isInScrollingContainer())
                    setMeasuredDimension(width, height);
                else
                    setMeasuredDimension(Math.min(width, widthSize), Math.min(height, heightSize));
            } else if (widthMode == MeasureSpec.EXACTLY && heightMode != MeasureSpec.EXACTLY) {
                // Fixed Width & Adjustable Height
                int width = widthSize;
                int height = width * mDrawableHeight / mDrawableWidth;
                if (isInScrollingContainer())
                    setMeasuredDimension(width, height);
                else
                    setMeasuredDimension(Math.min(width, widthSize), Math.min(height, heightSize));
            } else {
                super.onMeasure(widthMeasureSpec, heightMeasureSpec);
            }
        } else {
            super.onMeasure(widthMeasureSpec, heightMeasureSpec);
        }
    }

    private boolean isInScrollingContainer() {
        ViewParent p = getParent();
        while (p != null && p instanceof ViewGroup) {
            if (((ViewGroup) p).shouldDelayChildPressedState()) {
                return true;
            }
            p = p.getParent();
        }
        return false;
    }
}
Cách hoạt động của lớp đã cài đặt trên rất đơn gian. Nó sẽ tính toán chiều cao tương ứng trong trường hợp chiều rộng bị cố định và ngược lại bên trong phương thức onMeasure . Trong trường hợp này đối tượng AdjustableImageView được đặt bên trong một layout Container không có khả năng scroll, chiều rộng và chiều cao sẽ được giới hạn trong không gian còn trống của layout bao ngoài nó. Nếu không, nó sẽ được mở rộng mà không gặp phải bất kỳ một sự giới hạn nào.
Để sử dụng lớp vừa mới cài đặt, chỉ cần thay đổi ImageView thành com.inthecheesefactory.thecheeselibrary.widget.AdjustableImageView trong file xml quy định giao diện.
<com.inthecheesefactory.thecheeselibrary.widget.AdjustableImageView
    android:layout_width="match_parent"
    android:layout_height="wrap_content"
    android:adjustViewBounds="true"
    android:src="@mipmap/ic_launcher" />
Vậy là xong!
Làm mọi việc dễ dàng hơn với thư viện AdjustableImageView.
Chúng tội việc việc tạo ra một lớp, sao chép code, định dạng lại code, rồi kiếm tra xem mọi thứ đã đúng chưa v..v.. là một công việc vô cùng nhàm chán.
Bây giờ thì mọi thứ đã dễ dàng hơn cả chục lần khi chúng tôi đã làm những điều đó cho bạn. Nó hiện tại đang được đặt trên jcenter. Khi nào bạn muốn cài đặt cho project của bạn, AdjustableImageView và AdjustableImageButton đã sẵn sàng cho bạn. Mã nguồn của thư viện này được lưu trữ trên GitHub, nếu quan tâm xin bạn xem và cho ý kiến.
Dưới đây là khai báo trong gradle, bạn chỉ cần thêm vào file build.gradle
dependencies {
    compile 'com.inthecheesefactory.thecheeselibrary:adjustable-imageview:1.0.0'
}
Vậy là AdjustableImageView và AdjustableImageButton đã sẵn sàng để sử dụng bên trong package com.inthecheesefactory.thecheeselibrary.widget.*.
Chỉ cần thay thế ImageView và ImageButton với những class được cung cấp bởi thư viện.
<LinearLayout xmlns:android="http://schemas.android.com/apk/res/android"
    xmlns:tools="http://schemas.android.com/tools" android:layout_width="match_parent"
    android:layout_height="match_parent"
    android:orientation="vertical"
    tools:context=".MainActivity">

    <ScrollView
        android:layout_width="match_parent"
        android:layout_height="match_parent"
        android:fillViewport="true">

        <LinearLayout android:layout_width="match_parent"
            android:layout_height="match_parent"
            android:orientation="vertical">

            <com.inthecheesefactory.thecheeselibrary.widget.AdjustableImageView
                android:layout_width="match_parent"
                android:layout_height="wrap_content"
                android:adjustViewBounds="true"
                android:src="@mipmap/ic_launcher"/>

            <com.inthecheesefactory.thecheeselibrary.widget.AdjustableImageView
                android:layout_width="match_parent"
                android:layout_height="wrap_content"
                android:adjustViewBounds="true"
                android:src="@mipmap/ic_launcher"/>
        </LinearLayout>

    </ScrollView>

</LinearLayout>
Kết quả là, ImageView hiển thị một cách hoàn hảo và không còn phục thuộc vào version API mà ứng dụng đang chạy.
Đây là một ví dụ tốt để lý giải tại sao chúng ta nên cài đặt nhiều nền tảng SDK trong máy và không phải chỉ SDK mới nhất. Vì nếu bạn muốn cho Android Studio xem trước bố cục của bạn với phiên bản Android cụ thể, bạn cần phải cài đặt nền tảng SDK cho phiên bản đó hoặc nó sẽ không được liệt kê như là một sự lựa chọn trong cửa sổ Preview. Theo như đề nghị của tôi, bạn nên cài đặt các Platform SDK từ API Level 14 trở lên. Sẽ mất một số lớn không gian ổ cứng, nhưng những gì mà bạn nhận được trở lại là xứng đáng.
Nguồn tham khảo: Correct the ImageView's adjustViewBounds behaviour on API Level 17 and below with AdjustableImageView
All rights reserved
