Chuẩn bị dữ liệu với Tensorflow Dataset
Bài đăng này đã không được cập nhật trong 6 năm
Lời mở đầu
Vào một ngày đẹp trời nào đó, khi đang train thử một model, tôi có dùng câu lệnh nvidia-smi -l để check xem gpu máy mình có đang hoạt động hay không và chợt nhận ra có gì đó sai sai. GPU máy tôi đang không hoạt động hiệu quả.
Ví dụ minh họa:
 Như bạn thấy ở trên, GPU Memory Usage gần full 11gb nhưng Volatile GPU-Util lại chỉ có 0%.
Vậy tại sao lại xảy ra vấn đề này và cách giải quyết như thế nào. To be ... 
I. Nguyên nhân
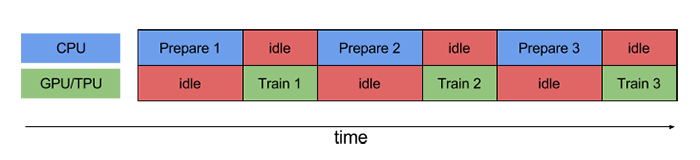
Nếu bạn thấy GPU Util nhỏ hơn 80% thì đây là dấu hiệu của việc load data đang có vấn đề (input pipeline bottleneck). Nói chung là GPU phải ngồi đợi CPU load xong dữ liệu, mà việc đợi như thế này ngốn khá nhiều thời gian.
II. Cách giải quyết
Điều mà bạn muốn bây giờ là CPU cứ việc chuẩn bị dữ liệu trong khi đó GPU cứ việc train. Nói chung là tiến trình song song, ở đây gọi là (prefetching):
 Nhưng mà, mà, mà, lỡ tiến trình chuẩn bị batch lâu hơn tiến trình train model thì chẳng phải GPU mãi chết đứng, cứ phải đợi thằng CPU xử lý xong batch sau như hòn vọng phu sao
Thực ra nếu vọc lại quá trình xử lý dữ liệu mà ta đang làm là xử lý tuần tự, tức là batch này xong thì mới đến batch sau. Vậy ta có thể tăng tốc việc chuẩn bị batch bằng cách chạy song song các tiến trình tiền xử lý:
 Tương tự ta còn có thể chạy song song I/O (input/output):
 Dài dòng đủ rồi, vào việc chính nào, như tiêu đề để tránh khỏi bị bottleneck ở đầu vào nên tôi dùng Tensorflow Dataset API để xử lý dữ liệu.
Tensorflow Dataset API
The tf.data API enables you to build complex input pipelines from simple, reusable pieces.
For example, the pipeline for an image model might aggregate data from files in a distributed file system, apply random perturbations to each image, and merge randomly selected images into a batch for training.
The pipeline for a text model might involve extracting symbols from raw text data, converting them to embedding identifiers with a lookup table, and batching together sequences of different lengths.
The tf.data API makes it possible to handle large amounts of data, read from different data formats, and perform complex transformations.
Trên đây là lời giới thiệu của TensorFlow khi bạn bắt đầu tìm hiểu cách tạo 1 TensorFlow input pipeline. Tóm gọn lại là cái API này hỗ trợ cho dữ liệu ảnh và dữ liệu text, có thể xử lý dữ liệu lớn, đọc được nhiều format khác nhau, bla...bla...
tf.dataAPI giới thiệu 1 abtract class Dataset tf.data.Dataset chứa một hoặc nhiều công cụ hỗ trợ xử lý dữ liệu. Ví dụ: trong 1 image pipeline, 1 điểm dữ liệu chứa 1 cặp tensors: image và label.
Có 2 cách khác nhau để tạo 1 tập dữ liệu:
- build từ source như raw data lưu ở trong ổ cứng (images) hay raw data trong 1 hoặc nhiều file (text)
- build từ 1 hoặc nhiều
tf.data.Datasetobjects.
Vì mình đang tham khảo cách tạo 1 input pipeline trên TensorFlowDoc nên mạn phép viết bài có cấu trúc giống hoặc gần giống (vì có thể ngắn hơn) 
Basic mechanics
Giả sử ta có 1 bộ dữ liệu là 1 tập ảnh chẳng hạn, tôi đang code trên ubuntu nên nhờ lib os mà extract ra 1 list đường dẫn ảnh
all_image_paths
'../input/train_images/1.jpg',
'../input/train_images/2.jpg',
'../input/train_images/3.jpg',
'../input/train_images/4.jpg',
'../input/train_images/5.jpg',
Khi có 1 list đường dẫn ảnh, tôi dùng hàm from_tensor_slices() để tạo 1 Dataset objects
Example 1
dataset = tf.data.Dataset.from_tensor_slices(all_image_paths)
print(dataset)
<TensorSliceDataset shapes: (), types: tf.string>
Example 2
dataset = tf.data.Dataset.from_tensor_slices([8, 3, 0, 8, 2, 1])
print(dataset)
<TensorSliceDataset shapes: (), types: tf.int32>
Ngoài hàm from_tensor_slices(), ta còn có thể sử dụng hàm from_tensors(). Điểm khác nhau của 2 hàm này là from_tensors() trả về dataset chứa duy nhất 1 phần tử, ngược lại from_tensor_slices() trả về dataset chứa nhiều phần tử.
dataset = tf.data.Dataset.from_tensors([1, 2, 3])
print(dataset)
<TensorDataset shapes: (3,), types: tf.int32>
Nếu dữ liệu của bạn có format TFRecord, bạn có thể dùng tf.data.TFRecorDataset()
Sau khi đã có cho mình 1 Dataset object, bạn có thể tùy chỉnh, biến đổi, tạo thành 1 bộ dữ liệu mới nhờ các phương thức của Dataset object như Dataset.map(), Dataset.batch(), ... Nếu bạn muốn check dữ liệu có thể wrap dataset với hàm iter() bởi Dataset object là 1 Python iterable
print(elem.numpy() for elem in dataset)
print(next(iter(dataset)).numpy())
Dataset structure
Phần này mình nói qua thôi, bởi không quan trọng cho lắm (aka với mình), bạn dùng hàm Dataset.element_spec có thể quan sát type của mỗi phần tử trong 1 dataset
dataset1 = tf.data.Dataset.from_tensor_slices(tf.random.uniform([4, 10]))
# dữ liệu có shape [4, 10] == 4 phần tử có shape (10,)
print(dataset1.element_spec)
TensorSpec(shape=(10,), dtype=tf.float32, name=None) # 1 điểm dữ liệu
Có các dạng cấu trúc dữ liệu sau: tf.TypeSpec, tf.Tensor, tf.sparse.SparseTensor, tf.RaggedTensor, tf.TensorArray, tf.data.Dataset.
Reading input data
Như tiêu đề, dùng tf.data.Dataset để transform các dạng dữ liệu.
- Với numpy arrays: nếu bạn có thể load tất cả dữ liệu đầu vào mà không bị lỗi là thiếu memory thì xin chúc mừng, bạn chỉ cần đơn giản convert thành dạng
tf.Tensorobject là xong. VD:
train_dataset = tf.data.Dataset.from_tensor_slices((train_examples, train_labels))
test_dataset = tf.data.Dataset.from_tensor_slices((test_examples, test_labels))
- Với python generator: không khuyến khích dùng do khó scale. Đầu vào 1 hàm generator (not iterator), cho phép tái sử dụng generator nhìu lần . VD:
Đây là 1 hàm generator
def count(stop):
    i = 0
    while i<stop:
        yield i
        i += 1
print(count(5))
<generator object count at 0x7f188c0a2ac0>
Đây là ví dụ về việc muốn tái sử dụng lại generator thì phải duplicate generator
y = FunctionWithYield()
y, y_backup = tee(y)
for x in y: print(x)
for x in y_backup: print(x)
Nhưng chúng ta đang sử dụng tf dataset api. Ở đây chúng ta có hàm Dataset.from_generator() chuyên nhận generator
@staticmethod
from_generator(
    generator, output_types, output_shapes=None, args=None
)
# args: param truyền vào generator nếu có, nói chung là cái stop ở hàm count() trên kia
# output_types: cần vì tf.data build tf.Graph và các cạnh của graph đòi hỏi tf.dtype
# output_shapes: không cần nhưng khuyến khích thêm bởi nhiều operation của tensorflow không hỗ trợ unknown rank (rank là bậc của tensor như scalar, vector, matrix)
ds_counter = tf.data.Dataset.from_generator(count, args=[25], output_types=tf.int32, output_shapes = (), )
print(ds_counter)
<FlatMapDataset shapes: (), types: tf.int32>
1 VD nữa về keras ImageDataGenerator trong tensorflow guide
Down về bộ dữ liệu hoa
flowers = tf.keras.utils.get_file('flower_photos','https://storage.googleapis.com/download.tensorflow.org/example_images/flower_photos.tgz',untar=True)

Downloading data from https://storage.googleapis.com/download.tensorflow.org/example_images/flower_photos.tgz
228818944/228813984 [==============================] - 113s 0us/step
Tạo 1 generator từ bộ dữ liệu trên
img_gen = tf.keras.preprocessing.image.ImageDataGenerator(rescale=1./255, rotation_range=20)
Convert về tf dataset
ds = tf.data.Dataset.from_generator(img_gen.flow_from_directory, args=[flowers], output_types=(tf.float32, tf.float32), output_shapes=([32,256,256,3], [32,5]))
print(ds)
<FlatMapDataset shapes: ((32, 256, 256, 3), (32, 5)), types: (tf.float32, tf.float32)>

# or without output_shapes

ds = tf.data.Dataset.from_generator(img_gen.flow_from_directory, args=[flowers], output_types=(tf.float32, tf.float32))
print(ds)
<FlatMapDataset shapes: (<unknown>, <unknown>), types: (tf.float32, tf.float32)>
- Với TFRecord data:
Đầu tiên ta cần hiểu 1 chút tfrecord data format: là 1 format đơn giản chứa các bản ghi là những chuỗi binary, nói đơn giản nhưng lúc convert data sang tfrecord format cũng khá mệt  . Ok chỉ cần biết thế thôi, class mà chúng ta sử dụng là
 tf.data.TFRecordDataset
tf.data.TFRecordDataset(filenames, compression_type=None, buffer_size=None, num_parallel_reads=None)
# filenames: 1 tensor tên file ([filename]) hoặc tf.data.Dataset chứa nhiều tên file
# compression_type: định dạng file
# buffer_size: số bytes thông qua read buffer
# num_parallel_reads: số files đọc song song
Mình lấy VD của tensorflow guide đi. First, download bộ dữ liệu French Street Name Signs
fsns_test_file = tf.keras.utils.get_file("fsns.tfrec", "https://storage.googleapis.com/download.tensorflow.org/data/fsns-20160927/testdata/fsns-00000-of-00001")

Downloading data from https://storage.googleapis.com/download.tensorflow.org/data/fsns-20160927/testdata/fsns-00000-of-00001
7905280/7904079 [==============================] - 4s 1us/step
Convert TFRecord to TFRecordDataset
dataset = tf.data.TFRecordDataset(filenames = [fsns_test_file])
print(dataset)
<TFRecordDatasetV2 shapes: (), types: tf.string>
Để kiểm tra dữ liệu chúng ta dùng serialized tf.train.Example (cái này thường đi cùng với TFRecord để dễ decode numpy)
raw_example = next(iter(dataset))
parsed = tf.train.Example.FromString(raw_example.numpy())

print(parsed.features.feature['image/text'])
bytes_list{value: "Rue Perreyon"}
- Với dữ liệu là text:
tf.data.TextLineDatasetsẽ giúp bạn trích xuất từng dòng trong 1 hoặc nhiều file text.
tf.data.TextLineDataset(filenames, compression_type=None, buffer_size=None, num_parallel_reads=None)
VD: tôi có 1 file.txt
I use Tensorflow
You use PyTorch
Both are great
Đọc file này = API
dataset = tf.data.TextLineDataset("file.txt")
print(dataset)
<TextLineDatasetV2 shapes: (), types: tf.string>
print(next(iter(data)))
<tf.Tensor: shape=(), dtype=string, numpy=b'I use Tensorflow'>
Để shuffle các line nếu đọc từ nhiều file khác nhau, ta có thể dùng Dataset.interleave
files_ds = tf.data.Dataset.from_tensor_slices(file_paths) # file_paths: 1 líst các file
lines_ds = files_ds.interleave(tf.data.TextLineDataset, cycle_length=3)
print(lines_ds)
<InterleaveDataset shapes: (), types: tf.string>
Nếu bạn gặp phải header hay comment khi đọc trong file thì có thể sử dụng Dataset.skip() hoặc Dataset.filter(). Ví dụ cụ thể bạn có thể tham khảo trên guide của tensorflow (bởi nó dài)
- Với dữ liệu CSV: nếu không sợ tràn ram thì bạn có thể dùng
Dataset.from_tensor_slices, do ví dụ cũng dài nên bạn thông cảm tham khảo trong guide của tensorflow.
tf.data cung cấp nhiều phương thức trích xuất bản ghi từ 1 hoặc nhiều file CSV có định dạng chuẩn RFC 4180.
experimental.make_csv_dataset đọc file csv, hỗ trợ đọc theo cột, shuffle, batch dữ liệu, v.v...
Tương tự, experimental.CsvDataset cũng là class đọc file csv, nhưng không hỗ trợ đọc theo cột.
- Với 1 sets files: nghĩa là mỗi file là 1 điểm dữ liệu, thường thì ta dùng thư viện glob để đọc file recursive. Trong API, có thể dùng
Dataset.list_files, cụ thể tôi dùng bộ dữ liệu hoa ở trên
Ở đây ví dụ đầu tôi thử dùng glob
import pathlib
flowers_root = pathlib.Path(flowers_root)
print([item.name for item in flowers_root.glob("*")])
sunflowers
daisy
LICENSE.txt
roses
tulips
dandelion
Với kết quả tương tự cũng thu được khi dùng Dataset.list_files
import pathlib
flowers_root = pathlib.Path(flowers_root)
list_ds = tf.data.Dataset.list_files(str(flowers_root/'*'))
print([f.numpy() for f in list_ds.take(5)])
b'/home/username/.keras/datasets/flower_photos/roses'
b'/home/username/.keras/datasets/flower_photos/tulips'
b'/home/username/.keras/datasets/flower_photos/sunflowers'
b'/home/username/.keras/datasets/flower_photos/LICENSE.txt'
b'/home/username/.keras/datasets/flower_photos/daisy'
Batching dataset elements
Tiếp, khi bạn có một đống dữ liệu, bạn không thể nào cho tất cả vào model để train được mà cần phải chia ra thành từng batch một, ở đây tôi dùng Dataset.batch để chia ra data. Ví dụ
inc_dataset = tf.data.Dataset.range(100)
dec_dataset = tf.data.Dataset.range(0, -100, -1)
dataset = tf.data.Dataset.zip((inc_dataset, dec_dataset))
batched_dataset = dataset.batch(4) # mỗi batch bao gồm 4 điểm dữ liệu

# Lấy 4 batch
for batch in batched_dataset.take(4):
  print([arr.numpy() for arr in batch])
[array([0, 1, 2, 3]), array([ 0, -1, -2, -3])]
[array([4, 5, 6, 7]), array([-4, -5, -6, -7])]
[array([ 8,  9, 10, 11]), array([ -8,  -9, -10, -11])]
[array([12, 13, 14, 15]), array([-12, -13, -14, -15])]
Do nhiều khi dữ liệu không chia đều được, nên batch_dataset trả về để batch_size unknown
print(batched_dataset)
<BatchDataset shapes: ((None,), (None,)), types: (tf.int64, tf.int64)>
Bạn có thể dùng arg drop_remainder để bỏ đi batch cuối => thấy được batch_size
batched_dataset = dataset.batch(7, drop_remainder=True)
print(batched_dataset)
<BatchDataset shapes: ((7,), (7,)), types: (tf.int64, tf.int64)>
Từ từ, nếu các tensors đều có cùng size thì cách chia trên sẽ chả có vấn đề gì, nhưng thường thì dữ liệu trong nhiều bài toán khá là đa dạng, có chiều dài khác nhau. Thế nên API cung cấp cho chúng ta Dataset.padded_batch sẽ biến các tensors có độ dài khác nhau trong 1 batch thành có độ dài bằng nhau.
A = tf.data.Dataset.range(1, 5, output_type=tf.int32).map(lambda x: tf.fill([x], x))
for element in A.as_numpy_iterator():
    print(element)

B = A.padded_batch(4) # default value là 0
for element in B.as_numpy_iterator():
    print(element)
[1]
[2 2]
[3 3 3]
[4 4 4 4]

[[1 0 0 0]
 [2 2 0 0]
 [3 3 3 0]
 [4 4 4 4]]
Training workflows
tf.data cung cấp 2 cách để train batch qua nhiều epoch.
- Cách 1: Dùng
Dataset.repeat().
data_batches = data.batch(128).repeat(3)
- Cách 2: Custom hàm train
epochs = 3
dataset = data.batch(128)

for epoch in range(epochs):
    for batch in dataset:
        print(batch.shape)
    print("End of epoch: ", epoch)
Việc custom sẽ có lợi hơn, bạn biết đấy vì có nhiều model không chỉ cho chạy epoch là xong chuyện 
Trước khi tạo batch, ta cần shuffle dữ liệu bằng Dataset.shuffle
Preprocessing data
Sau khi đã biến đổi dữ liệu thành Dataset, có một hôm bạn muốn thêm thắt, sửa lại dữ liệu 1 chút, bạn không thể nào load lại đống dữ liệu rồi lại chuyển về tensorflow dataset nhỉ. Đừng lo, Tensorflow Dataset API có cung cấp hàm Dataset.map(f). Hàm này hoạt động ra sao ??
Chắc bạn cũng biết hàm map của python, đầu vào là 1 function và 1 list, mỗi phần tử của list sẽ trở thành param truyền vào function kia và trả về kết quả. Thì hàm Dataset.map(f) cũng có tác dụng tương tự với hàm map của python, hàm f sẽ nhận param là 1 tf.Tensor và trả về 1 tf.Tensor mới
VD:
import tensorflow as tf
dataset = tf.data.Dataset.range(3)

print([i.numpy() for i in dataset])
[0, 1, 2]

dataset = dataset.map(lambda x: x + 2)

print([i.numpy() for i in dataset])
[2, 3, 4]
Decoding image data and resizing it
Khi bạn train mô hình có đầu vào là ảnh, tensorflow sẽ cung cấp các hàm xử lý ảnh đơn giản cho bạn (resize, convert type, decode, ...). Còn muốn xử lý ảnh phức tạp hơn ---> OpenCV.
VD:
Mình sẽ dùng bộ dữ liệu hoa làm ví dụ test cho bạn
list_ds = tf.data.Dataset.list_files(str(flowers_root/'*/*'))
Mình lấy luôn ví dụ trên tensorflow guide, đỡ phải nghĩ . Tạo hàm xử lý ảnh với param là đường dẫn ảnh
def parse_image(filename):
    parts = tf.strings.split(filename, os.sep)
    label = parts[-2]

    # đọc file, image là một tensor có type string binary
    image = tf.io.read_file(filename)
    # decode từ tensor về ảnh (cũng là tensor nhưng có shape là w, h, 3)
    image = tf.image.decode_jpeg(image)
    # convert dtype từ uint8 -> float32
    image = tf.image.convert_image_dtype(image, tf.float32)
    # resize ảnh
    image = tf.image.resize(image, [128, 128])
    return image, label
Test thử với 1 ảnh trong bộ dữ liệu
file_path = next(iter(list_ds))
image, label = parse_image(file_path)

def show(image, label):
    plt.figure()
    plt.imshow(image)
    plt.title(label.numpy().decode('utf-8'))
    plt.axis('off')

show(image, label)

Áp dụng hàm parse_image cho tất cả phần tử trong bộ dữ liệu
images_ds = list_ds.map(parse_image)

for image, label in images_ds.take(2):
    show(image, label)
Applying arbitrary Python logic
Sử dụng TensorFlow có thể tăng hiệu suất xử lý ảnh nhưng việc gọi thư viện Python bên ngoài vào để hỗ trợ xử lý ảnh vẫn phải có bởi có 1 số thư viện hỗ trợ tốt hơn tensorflow nên bên tensorflow cũng cung cấp hàm tf.py_function.
VD:
Nếu bạn muốn áp dụng kỹ thuật xoay góc thì tf.image chỉ có tf.image.rot90 -> không hữu dụng chút nào nếu ảnh xoay 90 độ.
Vì vậy mình dùng bên thứ 3 là spicy
Dưới đây là ví dụ chỉ áp dụng thư viện spicy để xử lý ảnh
import scipy.ndimage as ndimage

def random_rotate_image(image):
    image = ndimage.rotate(image, np.random.uniform(-30, 30), reshape=False)
    return image
image, label = next(iter(images_ds))
image = random_rotate_image(image)
show(image, label)

Wrap hàm random_rotate_image với hàm tf.py_function
def tf_random_rotate_image(image, label):
    im_shape = image.shape
    [image,] = tf.py_function(random_rotate_image, [image], [tf.float32])
    image.set_shape(im_shape)
    return image, label
Time series windowing
Dữ liệu time series có dạng:
[0 1 2 3 4 5 6 7 8 9]
Như tiêu đề, đây là 1 trick để xử lý dạng dữ liệu time series, thay đổi vị trí, hay chuyển dịch sang trái-phải để thêm hoặc xóa dữ liệu. Ở đây tôi chỉ giới thiệu phương thức dùng batch để tách chuỗi như mong muốn, còn phương thức dùng window các bạn tham khảo thêm tensorflow guide.
# gen dữ liệu mẫu từ 0 đến 100
range_ds = tf.data.Dataset.range(100)
# tạo batch chứa 10 điểm dữ liệu
batches = range_ds.batch(10, drop_remainder=True)
for batch in batches.take(5):
  print(batch.numpy())
[0 1 2 3 4 5 6 7 8 9]
[10 11 12 13 14 15 16 17 18 19]
[20 21 22 23 24 25 26 27 28 29]
Biến đổi dữ liệu, shift 1 phần tử liên kết với phần tử trước hoặc sau
def dense_1_step(batch):
    return batch[:-1], batch[1:]

predict_dense_1_step = batches.map(dense_1_step)

for features, label in predict_dense_1_step.take(3):
    print(features.numpy(), " => ", label.numpy())
[0 1 2 3 4 5 6 7 8]  =>  [1 2 3 4 5 6 7 8 9]
[10 11 12 13 14 15 16 17 18]  =>  [11 12 13 14 15 16 17 18 19]
[20 21 22 23 24 25 26 27 28]  =>  [21 22 23 24 25 26 27 28 29]
Dựa trên trick này ta còn có thể dự đoán các điểm dữ liệu sau do dữ liệu time series có tính tuần tự, tăng lên và không giảm đi.
batches = range_ds.batch(15, drop_remainder=True)

def label_next_5_steps(batch):
    return (batch[:-5], batch[-5:])

predict_5_steps = batches.map(label_next_5_steps)

for features, label in predict_5_steps.take(3):
    print(features.numpy(), " => ", label.numpy())
[0 1 2 3 4 5 6 7 8 9]  =>  [10 11 12 13 14]
[15 16 17 18 19 20 21 22 23 24]  =>  [25 26 27 28 29]
[30 31 32 33 34 35 36 37 38 39]  =>  [40 41 42 43 44]
Resampling
Khi làm việc với bộ dữ liệu không cân bằng, giả dụ 1 bộ dữ liệu có 2 class A và B, bên A có 100 features trong khi bên B chỉ có 30. Chính vì vậy bạn cần resample bộ dữ liệu. tf.data cung cấp 2 cách để thực hiện.
- Datasets sampling
Sử dụng tf.data.experimental.sample_from_datasets
tf.data.experimental.sample_from_datasets(datasets, weights=None, seed=None)
# datasets: bộ dữ liệu
# weights: độ quan trọng của feature ảnh hưởng tới xác suất được lấy mẫu
# seed: nói chung liên quan đến cơ chế random (tôi không tìm hiểu sâu :()
- Rejection resampling
Hàm tf.data.experimental.sample_from_datasets có 1 vấn đề là nó cần tf.data.Dataset riêng của mỗi lớp, giả sử có 10 lớp thì muốn tăng dữ liệu thì hàm sample_from_datasets cần 10 bộ dữ liệu từ 10 lớp kể trên. Hàm Dataset.filter giải quyết vấn đề này nhưng kết quả sẽ bị lặp lại 2 lần.
Hàm data.experimental.rejection_resample nhận 1 dataset và tái cân bằng nó, trong khi chỉ load đúng 1 lần. Nói chung như tên, hàm này loại bỏ 1 vài yếu tố để tái cân bằng bộ dữ liệu, trái ngược với cách trên.
tf.data.experimental.rejection_resample(class_func, target_dist, initial_dist=None, seed=None)

def class_func(features, label):
    return label
Kết
Thực sự do mỏi tay quá nên tôi xin kết thúc ở đây, bài viết chưa được hoàn thiện, còn thiếu nhiều tình huống khác trong xử lý dữ liệu, nhưng cũng đem lại 1 cái nhìn cơ bản về API Dataset của Tensorflow. Chi tiết các bạn có thể tham khảo thêm các link dưới đây (do mình cũng tham khảo từ đó ra)
All rights reserved
