Call REST API Trong React Native (Source code và Demo)
Bài đăng này đã không được cập nhật trong 6 năm
Tương tác REST API là công việc diễn ra thường nhật với mỗi hệ thống dù nhỏ hay lớn, đa số chúng ta đều hiểu vai trò của nó. Back-end hiểu được client muốn gì ( Vui - Buồn - Giận hờn v.v..) cần phải có một "người chuyên chở" là API phải không nào?  . Bản thân mình cũng đã từng code Android nhận thấy rằng việc khai báo và implement service API tương đối lằng nhằng, vậy chúng ta cùng tìm hiểu phương pháp implement REST API trong React Native sẽ như thế nào các bạn nha? À nếu như ai đó tò mò vì sao mình nói trên Android native có phần rắc rối hơn thì mình sẽ nêu ở cuối bài các bạn nha.
1. Tạo một App đơn giản làm ví dụ
Mình rất muốn thông qua một ví dụ nhỏ để chúng ta dễ hình dung hơn.
Mô tả: Có một data chứa thông tin vài bộ phim, việc của app sẽ lấy dữ liệu này từ server. Khi user click vào 1 button sẽ show tên bộ film thứ 2. Về UI không bắt buộc phải thiết kế đẹp mắt hay gì, các bạn chỉ cần có 1 button (eg: Show Film at 2nd) như thế cũng được hoặc làm đẹp mắt như material design thì càng tốt.
Data film: Chuỗi JSON như sau
{
  "title": "The Basics - Networking",
  "description": "Your app fetched this from a remote endpoint!",
  "movies": [
    { "id": "1", "title": "Star Wars", "releaseYear": "1977" },
    { "id": "2", "title": "Back to the Future", "releaseYear": "1985" },
    { "id": "3", "title": "The Matrix", "releaseYear": "1999" },
    { "id": "4", "title": "Inception", "releaseYear": "2010" },
    { "id": "5", "title": "Interstellar", "releaseYear": "2014" }
  ]
}
Nếu bạn có data riêng thì hãy tận dụng nó vì dễ custom Object. Nhưng không đâu bạn, nếu như ở Android hay iOS chắc chắn bạn sẽ phải tạo ra 1 object single (Movie) để chứa thuộc tính như trong json và 1 object khác MovieListResponse để có các thuộc tính như data trên của mình. Trong React Native thuận lợi ở điểm này, chúng ta không phải làm những việc đó nữa.
Data film trên mình tận dụng trong documents của RA các bạn có thể dùng luôn cho tiện: https://facebook.github.io/react-native/movies.json
UI của mình như sau:
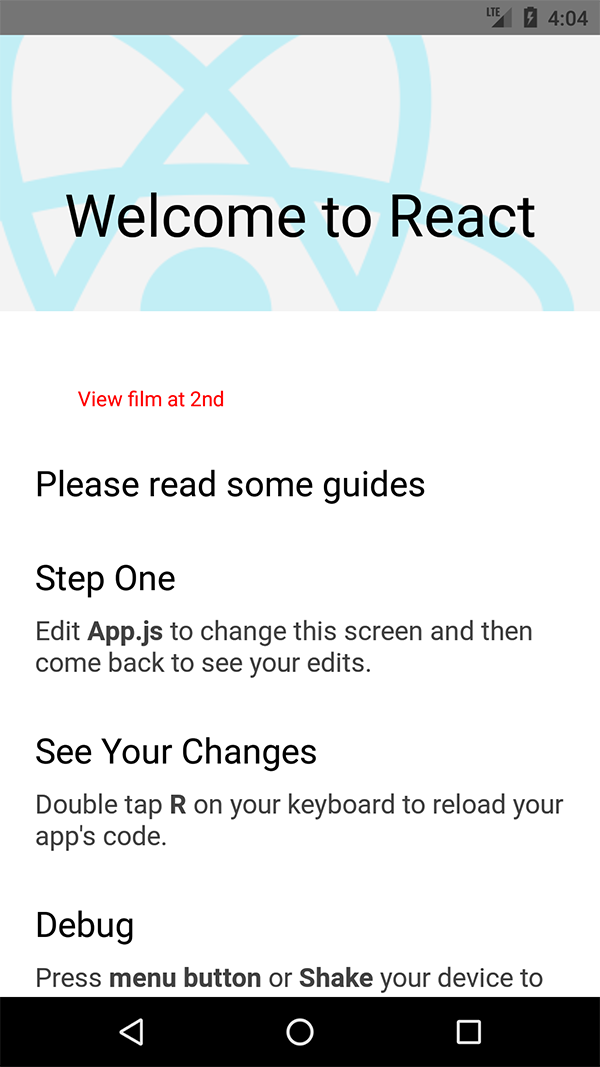
(Source code ở phía dưới)
2. Implement REST API
Rất đơn giản thôi các bạn, mình chỉ cần dùng method fetch('your_domain/api_service') như sau:
handlePress = async () => {
    fetch('https://facebook.github.io/react-native/movies.json')
      .then((response) => response.json())
      .then((responseJson) => {
   Alert.alert("The film at 2nd:  " + responseJson.movies[1].title);
      })
      .catch((error) => {
        console.error(error);
      });
  }
Chi tiết:
Bạn tạo Request tới server thông qua URL của api:
fetch('https://facebook.github.io/react-native/movies.json')
Nhận giá trị json trả về : then((response) => response.json())
Sử dụng giá trị vào việc cần làm:
then((responseJson) => {
   Alert.alert("The film at 2nd:  " + responseJson.movies[1].title);
      })
Xử lý lỗi nếu cần :
catch((error) => {
        console.error(error);
      });
Thông tin thêm:
Ở trên dành cho method GET
Bạn gọi method POST bằng cách:
fetch('https://mywebsite.com/endpoint/', {
  method: 'POST',
  headers: {
    Accept: 'application/json',
    'Content-Type': 'application/json',
  },
  body: JSON.stringify({
    firstParam: 'yourValue',
    secondParam: 'yourOtherValue',
  }),
});
Như các bạn thấy đó, chúng ta không phải tạo thêm 2 object như mình đề cập ở trên. Điều này giúp tiết kiệm thời gian và công sức hơn.
3. Hoàn thiện ứng dụng
Vậy là bạn đã có 1 cái khung cho ứng dụng nhỏ này rồi đó, bây giờ chúng ta hoàn thành UI và ghép phần implement vào để được ứng dụng hoàn chỉnh nhé.
Bạn thêm code này vào trong file App.js
App.js
import React, {Fragment, Component} from 'react';
import {
  TouchableOpacity,
  ActivityIndicator,
  Alert,
  SafeAreaView,
  StyleSheet,
  ScrollView,
  View,
  Text,
  StatusBar,
} from 'react-native';

import {
  Header,
  LearnMoreLinks,
  Colors,
  DebugInstructions,
  ReloadInstructions,
} from 'react-native/Libraries/NewAppScreen';

export default class App extends Component {
  handlePress = async () => {
    fetch('https://facebook.github.io/react-native/movies.json')
      .then((response) => response.json())
      .then((responseJson) => {
   Alert.alert("The film at 2nd:  " + responseJson.movies[1].title);
      })
      .catch((error) => {
        console.error(error);
      });
  }
  render(){
  return(
        <Fragment>

          <SafeAreaView>
            <ScrollView
              contentInsetAdjustmentBehavior="automatic"
              style={styles.scrollView}>
              <Header />
              {global.HermesInternal == null ? null : (
                <View style={styles.engine}>
                  <Text style={styles.footer}>Engine: Hermes</Text>
                </View>
              )}
              <View style={styles.body}>
              <TouchableOpacity onPress={this.handlePress.bind(this)}>
               <Text style={{paddingTop: 50, paddingLeft: 50, color: '#FF0000'}}> View film at 2nd </Text>
              </TouchableOpacity>
              <View style={styles.sectionContainer}>
                <Text style={styles.sectionTitle}>Please read some guides</Text>
              </View>

                <View style={styles.sectionContainer}>
                  <Text style={styles.sectionTitle}>Step One</Text>
                  <Text style={styles.sectionDescription}>
                    Edit <Text style={styles.highlight}>App.js</Text> to change this
                    screen and then come back to see your edits.
                  </Text>
                </View>
                <View style={styles.sectionContainer}>
                  <Text style={styles.sectionTitle}>See Your Changes</Text>
                  <Text style={styles.sectionDescription}>
                    <ReloadInstructions />
                  </Text>
                </View>
                <View style={styles.sectionContainer}>
                  <Text style={styles.sectionTitle}>Debug</Text>
                  <Text style={styles.sectionDescription}>
                    <DebugInstructions />
                  </Text>
                </View>
                <View style={styles.sectionContainer}>
                  <Text style={styles.sectionTitle}>Learn More</Text>
                  <Text style={styles.sectionDescription}>
                    Read the docs to discover what to do next:
                  </Text>
                </View>
              </View>
            </ScrollView>
          </SafeAreaView>
        </Fragment>

  );
}
}


const styles = StyleSheet.create({

  scrollView: {
    backgroundColor: Colors.lighter,

  },
  engine: {
    position: 'absolute',
    right: 0,
  },
  body: {
    backgroundColor:Colors.white,
  },
  sectionContainer: {
    marginTop: 32,
    paddingHorizontal: 24,
  },
  sectionTitle: {
    fontSize: 24,
    fontWeight: '600',
    color: Colors.black,
  },
  sectionDescription: {
    marginTop: 8,
    fontSize: 18,
    fontWeight: '400',
    color: Colors.dark,
  },
  highlight: {
    fontWeight: '700',
  },
  footer: {
    color: Colors.dark,
    fontSize: 12,
    fontWeight: '600',
    padding: 4,
    paddingRight: 12,
    textAlign: 'right',
  },
});
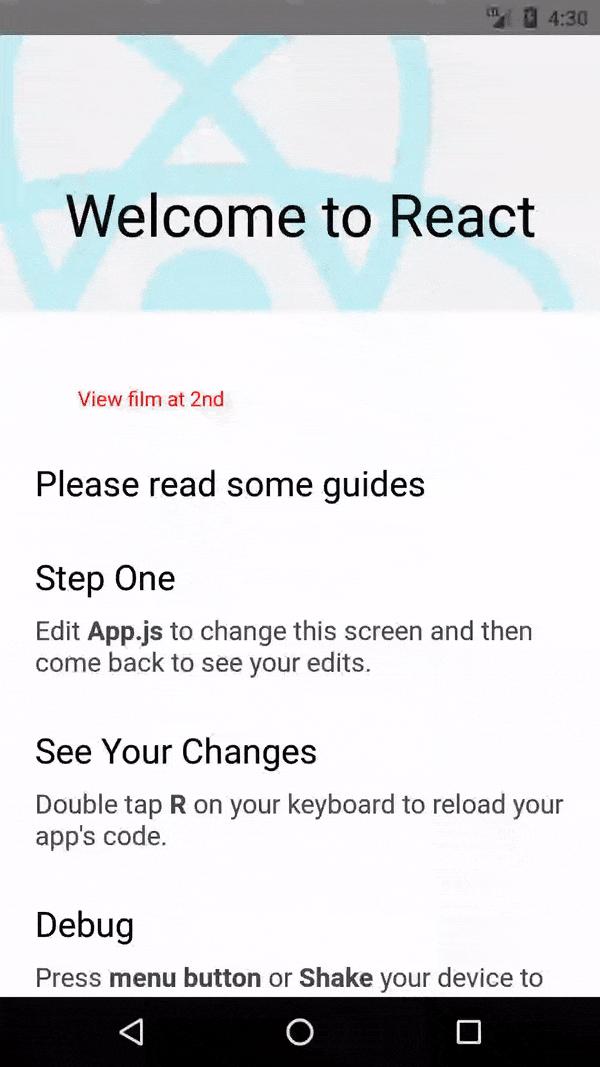
Kết quả chạy thử:
Lưu ý:
Bạn có thể gặp phải lỗi : Metro Bundler react native not working
Cách fix: bạn hãy chạy lệnh (trong root project) : **npm start **
Tiếp đến mới build lại project: react-native run-android
So sánh với cách implement REST API service trên Android:
Chắc hẳn ai đó từng làm về Android rồi sẽ thấy ngay được việc khởi tạo api service sẽ thường có các thư viện sau:
- Retrofit 2
- OKHttp3
- Rx Java
- Object model ( như mình nói ở trên)
Chỉ với việc tạo ra các class helper cho các libs trên thôi để tốn khá nhiều công sức rồi, lúc call api trong Activity hoặc Fragment thì code có thể dài gấp 2 - 3 lần ở mục số 2.
4. Tổng kết
Qua bài giới thiệu trên, mình hy vọng bạn có thể tự áp dụng cách implement REST API trong React Native một cách dễ dàng hơn. Mình rất vui khi biết bài viết này thực sự hữu ích cho bạn, nếu có thắc mắc bạn để lại comment để mình giúp nhé!
Bonus:
Ngoài cách dùng method FETCH như trên bạn có thể dùng 1 thư viện khác như : XMLHttpRequest API
Cách implement cũng khá đơn giản:
var request = new XMLHttpRequest();
request.onreadystatechange = (e) => {
  if (request.readyState !== 4) {
    return;
  }

  if (request.status === 200) {
    console.log('success', request.responseText);
  } else {
    console.warn('error');
  }
};

request.open('GET', 'https://mywebsite.com/endpoint/');
request.send();
All rights reserved
