Bắt đầu Học Android Với Việc Tạo App ToDoList (Phần 2)
Bài đăng này đã không được cập nhật trong 4 năm
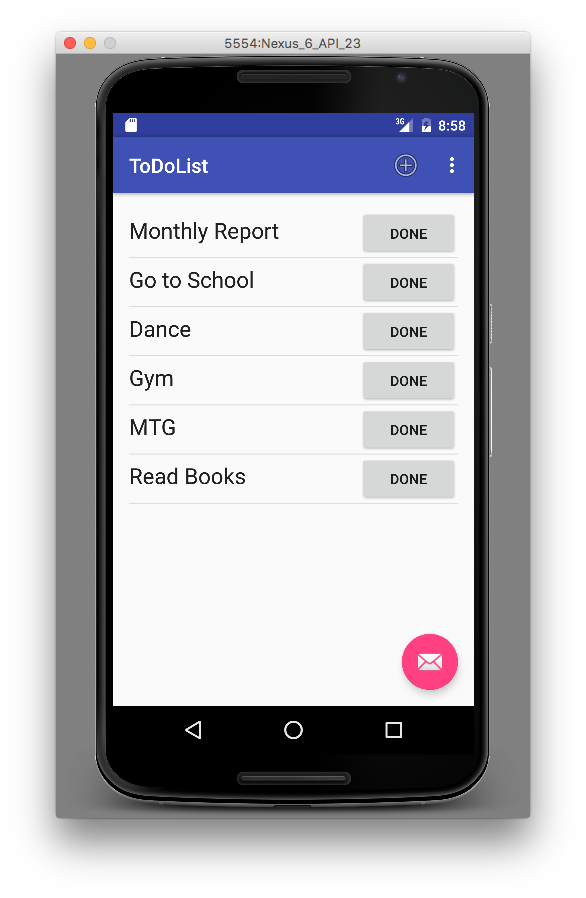
Để bắt đầu Phần 2 ToDoList tutorial, mình sẽ giới thiệu với các bạn hình ảnh màn hình kết quả những gì chúng ta sẽ thực hiện hôm nay. Mục đích chỉ là để tăng sự hào hứng mà thôi ^^.

Trước khi bắt đầu Phần 2, các bạn hãy đọc qua và làm đầy đủ các bước mình đã giới thiệu ở Phần 1 nhé!
I. Button thêm task mới và AlertDialog
1. Vẽ button thêm task mới
Trước tiên các bạn tạo file res/menu/tasks_fragment.xml với nội dung như sau:
<?xml version="1.0" encoding="utf-8"?>
<menu xmlns:android="http://schemas.android.com/apk/res/android"
    xmlns:app="http://schemas.android.com/apk/res-auto">

    <item
        android:title="@string/action_add_task"
        android:icon="@android:drawable/ic_menu_add"
        android:id="@+id/action_add_task"
        app:showAsAction="always" />

</menu>
2. Hiển thị AlertDialog khi người dùng click vào + button
    @Override
    public boolean onOptionsItemSelected(MenuItem item) {
        int id = item.getItemId();
        switch (id){
            case R.id.action_add_task:
                AlertDialog.Builder builder = new AlertDialog.Builder(getActivity());
                builder.setTitle("Add a task");
                final EditText inputField = new EditText(getActivity());
                builder.setView(inputField);
                builder.setPositiveButton("Add", new DialogInterface.OnClickListener() {
                    @Override
                    public void onClick(DialogInterface dialogInterface, int i) {
                         Toast.makeText(getActivity(), inputField.getText(), Toast.LENGTH_SHORT).show();
                    }
                });
                builder.setNegativeButton("Cancel", null);
                builder.create().show();
                return true;
        }
        return super.onOptionsItemSelected(item);
    }
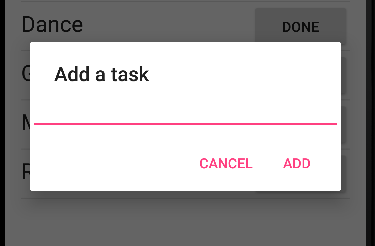
Khi click vào + button ta sẽ thấy AlertDialog sau hiển thị

II. Lưu trữ và nhận dữ liệu từ Database
1. Tạo database
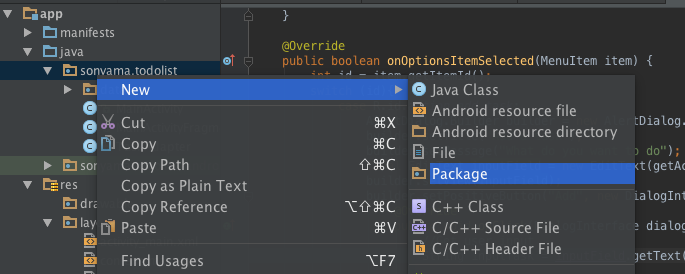
1.1 Tạo package data như ảnh dưới đây

1.2 Tạo file TaskConTract trong package data
Contract trong file này giúp app có khả năng làm việc với các URIs, tên cột trong bảng, intent actions, và các features của content provider.
package sonyama.todolist.data;

import android.provider.BaseColumns;

/**
 * Created by sonyama on 1/11/16.
 */
public class TaskConTract {

    //Each of xxxEntry corresponds to a table in the database
    public class TaskEntry implements BaseColumns {
        public static final String TABLE_NAME = "tasks";
        public static final String COLUMN_TASK = "task";
    }
}
1.3 Tạo TaskDBHelper
Và sử dụng nó để tạo database theo yêu cầu.
package sonyama.todolist.data;

import android.content.Context;
import android.database.sqlite.SQLiteDatabase;
import android.database.sqlite.SQLiteOpenHelper;

/**
 * Created by sonyama on 1/11/16.
 */
public class TaskDBHelper extends SQLiteOpenHelper {
    public static final String DATABASE_NAME = "tasks.db";
    private static final int DATABASE_VERSION = 1;

    public TaskDBHelper(Context context) {
        super(context, DATABASE_NAME, null, DATABASE_VERSION);
    }

    @Override
    public void onCreate(SQLiteDatabase db) {
        final String SQL_CREATE_TASKS_TABLE =
                "CREATE TABLE " + TaskConTract.TaskEntry.TABLE_NAME + " (" +
                        TaskConTract.TaskEntry._ID + " INTEGER PRIMARY KEY," +
                        TaskConTract.TaskEntry.COLUMN_TASK + " TEXT NOT NULL" +
                        " );";
        db.execSQL(SQL_CREATE_TASKS_TABLE);
    }

    @Override
    public void onUpgrade(SQLiteDatabase db, int oldVersion, int newVersion) {
        db.execSQL("DROP TABLE IF EXISTS " + TaskConTract.TaskEntry.TABLE_NAME);
        onCreate(db);
    }
}
2. Đọc ghi dữ liệu vào database
2.1 Ghi dữ liệu
Chúng ta sẽ chỉnh sửa code ở MainActivityFragment.java sao cho khi click vào nút + ta có thể nhập tên task muốn làm và lưu vào một bản ghi trong database.
    @Override
    public boolean onOptionsItemSelected(MenuItem item) {
        int id = item.getItemId();
        switch (id){
            case R.id.action_add_task:
                AlertDialog.Builder builder = new AlertDialog.Builder(getActivity());
                builder.setTitle("Add a task");
                builder.setMessage("What do you want to do");
                final EditText inputField = new EditText(getActivity());
                builder.setView(inputField);
                builder.setPositiveButton("Add", new DialogInterface.OnClickListener() {
                    @Override
                    public void onClick(DialogInterface dialogInterface, int i) {
                        //Get user input
                        String inputTask = inputField.getText().toString();

                        //Get DBHelper to write to database
                        TaskDBHelper helper = new TaskDBHelper(getActivity());
                        SQLiteDatabase db = helper.getWritableDatabase();

                        //Put in the values within a ContentValues
                        ContentValues values = new ContentValues();
                        values.clear();
                        values.put(TaskConTract.TaskEntry.COLUMN_TASK, inputTask);

                        //Insert the values into the Table for Tasks
                        db.insertWithOnConflict(
                                TaskConTract.TaskEntry.TABLE_NAME,
                                null,
                                values,
                                SQLiteDatabase.CONFLICT_IGNORE
                        );

                        //Query database again to get updated data
                        Cursor cursor = db.query(TaskConTract.TaskEntry.TABLE_NAME,
                                new String[]{TaskConTract.TaskEntry._ID, TaskConTract.TaskEntry.COLUMN_TASK},
                                null, null, null, null, null);

                        //Swap old data with new data for display
                        mTaskAdapter.swapCursor(cursor);

                    }
                });
                builder.setNegativeButton("Cancel", null);
                builder.create().show();
                return true;
        }
        return super.onOptionsItemSelected(item);
    }
2.2 Xoá dữ liệu
Tạo file TaskAdapter.java với nội dung như sau:
package sonyama.todolist;

import ...

import sonyama.todolist.data.TaskConTract;
import sonyama.todolist.data.TaskDBHelper;

/**
 * Created by sonyama on 1/12/16.
 */
public class TaskAdapter extends CursorAdapter {

    private static Context context;
    TaskDBHelper helper;

    public TaskAdapter (Context context, Cursor cursor) {
        super(context, cursor, 0);
        this.context = context;
        helper = new TaskDBHelper(context);
    }

    //The newView method is used to inflate a new view and return it,
    //you don't bind any data to the view at this point
    @Override
    public View newView(Context context, Cursor cursor, ViewGroup parent) {
        return LayoutInflater.from(context).inflate(R.layout.list_item_task, parent, false);
    }

    @Override
    public void bindView(View view, Context context, Cursor cursor) {
        //Find Views to populate in inflated template
        TextView textView = (TextView) view.findViewById(R.id.list_item_task_textview);
        Button done_button = (Button) view.findViewById(R.id.list_item_task_done_button);

        //Extract properties from cursor
        final String id = cursor.getString(MainActivityFragment.COL_TASK_ID);
        final String task = cursor.getString(MainActivityFragment.COL_TASK_NAME);

        //Populate views with extracted properties
        textView.setText(task);
        done_button.setOnClickListener(new View.OnClickListener() {
            @Override
            public void onClick(View v) {
                //Create a SQL command for deleting a particular ID.
                String sql = String.format("DELETE FROM %s WHERE %s = '%s'",
                        TaskConTract.TaskEntry.TABLE_NAME,
                        TaskConTract.TaskEntry._ID,
                        id);
                SQLiteDatabase sqlDB = helper.getWritableDatabase();
                //Execute the delete command
                sqlDB.execSQL(sql);
                Log.d("kakakak", "kekekek");
                notifyDataSetChanged();

                //Query database for updated data
                Cursor cursor = sqlDB.query(TaskConTract.TaskEntry.TABLE_NAME,
                        new String[]{TaskConTract.TaskEntry._ID, TaskConTract.TaskEntry.COLUMN_TASK},
                        null, null, null, null, null);
                //Instance method with TaskAdapter so no need to use adapter.swapCursor()
                swapCursor(cursor);
            }
        });
    }
}
Lời kết
Run app and enjoy!
All rights reserved