Bắt đầu Học Android Với Việc Tạo App ToDoList (Phần 1)
Bài đăng này đã không được cập nhật trong 4 năm
I. Lời mở đầu
Nếu bạn là một verry beginner với Android, chắc hẳn bạn đang phân vân xem nên bắt đầu học theo hướng nào.
- Vào thẳng trang
Android Developerđể mệt mài cày tài liệu - Hay làm đại một cái app nào đó để thấy được sự thú vị của Android
Thay vì ngồi đó phân vân suy nghĩ, hãy cùng mình bắt tay vào những dòng code đầu tiên để tạo nên một app làm bản thân mình "Sung Sướng" và có động lực tìm hiểu sâu hơn về Android nhé!
App mình chọn để bắt đầu là To Do List.
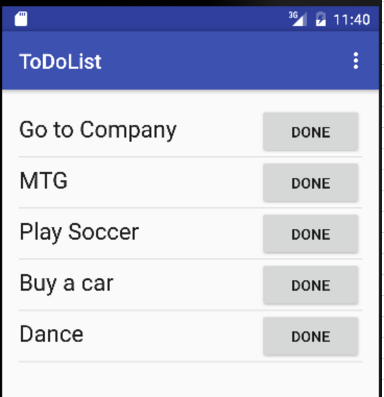
Trông đại khái nó sẽ thế này sau khi các bạn hoàn thành xong phần 1 này.

II. Start
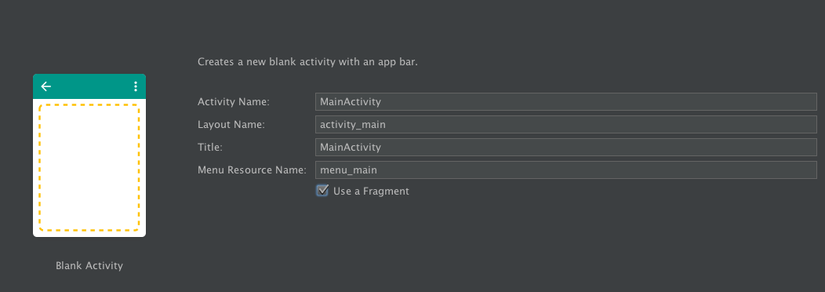
Ở bài này mình sẽ mặc định là các bạn đã biết cách sử dụng Android Studio để tạo một project mới. Tuy nhiên có một điểm lưu ý là mình sẽ sử dụng Fragment để có thể hiển thị multi-pane trên tablet nữa nên lúc khởi tạo project các bạn nhớ thêm một tick vào ô Use a Fragment như dưới đây nhé.

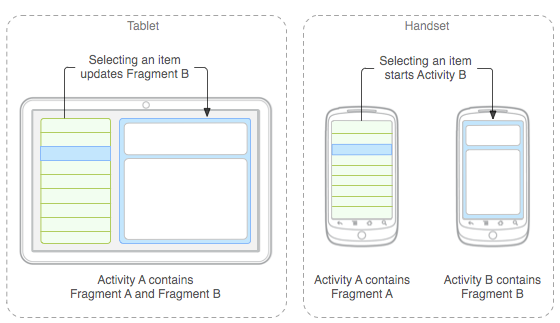
Để hiểu một cách nhanh gọn đơn giản sự cần thiết của việc chọn sử dụng Fragment các bạn tham khảo trong ảnh dưới đây ^^

1. Tạo danh sách các công việc cần làm
1.1 Thêm ListView
Với UI Mockmình đưa ra ở đầu bài viết, App của chúng ta sẽ bao gồm một danh sách item là các việc cần làm. Với mỗi việc có một nút DONE ở bên cạnh để người dùng xác nhận là mình đã hoàn thành công việc đó rồi. Trong trường hợp này chúng ta có thể sử dụng ListView để lưu giữ danh sách các item đó.
Trước tiên hãy edit lại file fragment_main.xmlmặc định
app/src/main/res/layout/fragment_main.xml
<FrameLayout xmlns:android="http://schemas.android.com/apk/res/android"
    xmlns:tools="http://schemas.android.com/tools"
    android:layout_width="match_parent"
    android:layout_height="match_parent"
    android:paddingBottom="@dimen/activity_vertical_margin"
    android:paddingLeft="@dimen/activity_horizontal_margin"
    android:paddingRight="@dimen/activity_horizontal_margin"
    android:paddingTop="@dimen/activity_vertical_margin"
    tools:context=".MainActivityFragment">

    <ListView
        android:id="@+id/listview_tasks"
        android:layout_width="match_parent"
        android:layout_height="match_parent" />
</FrameLayout>
1.2 Tạo layout cho danh sách các task cần làm
Tạo file app/src/main/res/layout/list_item_task.xml như dưới đây
<?xml version="1.0" encoding="utf-8"?>
<LinearLayout xmlns:android="http://schemas.android.com/apk/res/android"
    android:layout_width="match_parent"
    android:layout_height="match_parent"
    android:orientation="horizontal">

    <TextView
        android:id="@+id/list_item_task_textview"
        android:layout_width="0dp"
        android:layout_height="wrap_content"
        android:layout_weight="7"
        android:textAppearance="?android:textAppearanceLarge" />

    <Button
        android:id="@+id/list_item_task_done_button"
        android:layout_width="0dp"
        android:layout_height="wrap_content"
        android:layout_weight="3"
        android:text="@string/button_done" />

</LinearLayout>
Như các bạn đã thấy mình để 7 phần chiều rộng để hiển thị phần TextView và 3 phần còn lại cho Button DONE.
1.3 Kiểm tra layout đã ổn hay chưa
Thường thì dể biết được layout đã hiển thị đúng ý hay chưa lập trình viên sẽ tạo Fake Data để kiểm tra
Code dưới đây sẽ giúp các bạn tạo mảng các Strings ứng với tên của các tasks sau đó tạo mới một adapter để kết nối giữa Underlying data và UI Views.
package sonyama.todolist;
...
public class MainActivityFragment extends Fragment {

    ArrayAdapter<String> mTaskAdapter;

    public MainActivityFragment() {
    }

    @Override
    public View onCreateView(LayoutInflater inflater, ViewGroup container,
                             Bundle savedInstanceState) {

        View rootView = inflater.inflate(R.layout.fragment_main, container, false);

        //Create the fake data
        String[] fakeData = {
                "Go to Company",
                "MTG",
                "Play Soccer",
                "Buy a car",
                "Dance",
        };
        List<String> tasks = new ArrayList<String>(Arrays.asList(fakeData));

        //Create the ArrayAdapter by specifying context
        mTaskAdapter = new ArrayAdapter<String>(
                getActivity(),
                R.layout.list_item_task,
                R.id.list_item_task_textview,
                tasks
        );

        //Still need to bind adapter to the ListView
        ListView listView = (ListView) rootView.findViewById(R.id.listview_tasks);
        listView.setAdapter(mTaskAdapter);

        return rootView;
    }
Nếu bạn run app ngay bây giờ thì bạn sẽ thấy app của mình trông giống như ảnh ở đầu bài viết mình đã đăng.

Ở bài kế tiếp, mình sẽ giới thiệu tiếp tới các bạn chức năng
- Cho phép người dùng có thể đăng ký mới một task
- Cho phép người dùng cập nhật DONE task
- Cho phép người dùng edit và xoá task
All rights reserved