Áp dụng kiến trúc 3 Layer Architecture vào project NodeJS
Bài đăng này đã không được cập nhật trong 5 năm
The problem encountered
Các framework nodejs phổ biết như Express cho phép chúng ta dễ dàng tạo ra Resful API xử lí các request từ phía client một cách nhanh chóng và linh hoạt. Tuy nhiên, Express lại không có một kiến trúc hay một quy tắc tổ chức codde một cách cụ thể. Điều này sẽ là một vấn đề lớn khi dự án của bạn được scale với nhiều chức năng cũng như logic nghiệp vụ ngày các phức tạp. Tình trạng này sẽ gây ra một số vấn đề:
- Rối code và trùng lặp code
- Khó quản lý và maintain
- Khó khăn trong việc mở rộng cũng như tính ổn định
- Cấu trúc tệ khiến khó khăn hoặc không thể viết unit-test
Việc Không tổ chức tốt cấu trúc dự án sau này sẽ dẫn đến phát sinh chi phí cũng như rủi do trong quá trình update cũng như maintain.
Dưới đây là một ví dụ đển hình cho việc tổ chức code kém: ❌
route.post('/', async (req, res, next) => {

  // This should be a middleware or should be handled by a library like Joi.
  const userDTO = req.body;
  const isUserValid = validators.user(userDTO)
  if(!isUserValid) {
    return res.status(400).end();
  }

  // Lot of business logic here...
  const userRecord = await UserModel.create(userDTO);
  delete userRecord.password;
  delete userRecord.salt;

  ...whatever...

  // And here is the 'optimization' that mess up everything.
  // The response is sent to client...
  res.json({ user: userRecord, company: companyRecord });
});
Nhìn vào cách tổ chức code như bên trên thì việc tái sử dụng logic hoặc triển khai unit-test là điều không thể. Để giải quyết bài toàn này, trong bài viết dưới đây mình sẽ giới thiệu về kiến trúc 3 Layer Architecture
3 Layer Architecture
Concept 3 Layer Architecture 🥪
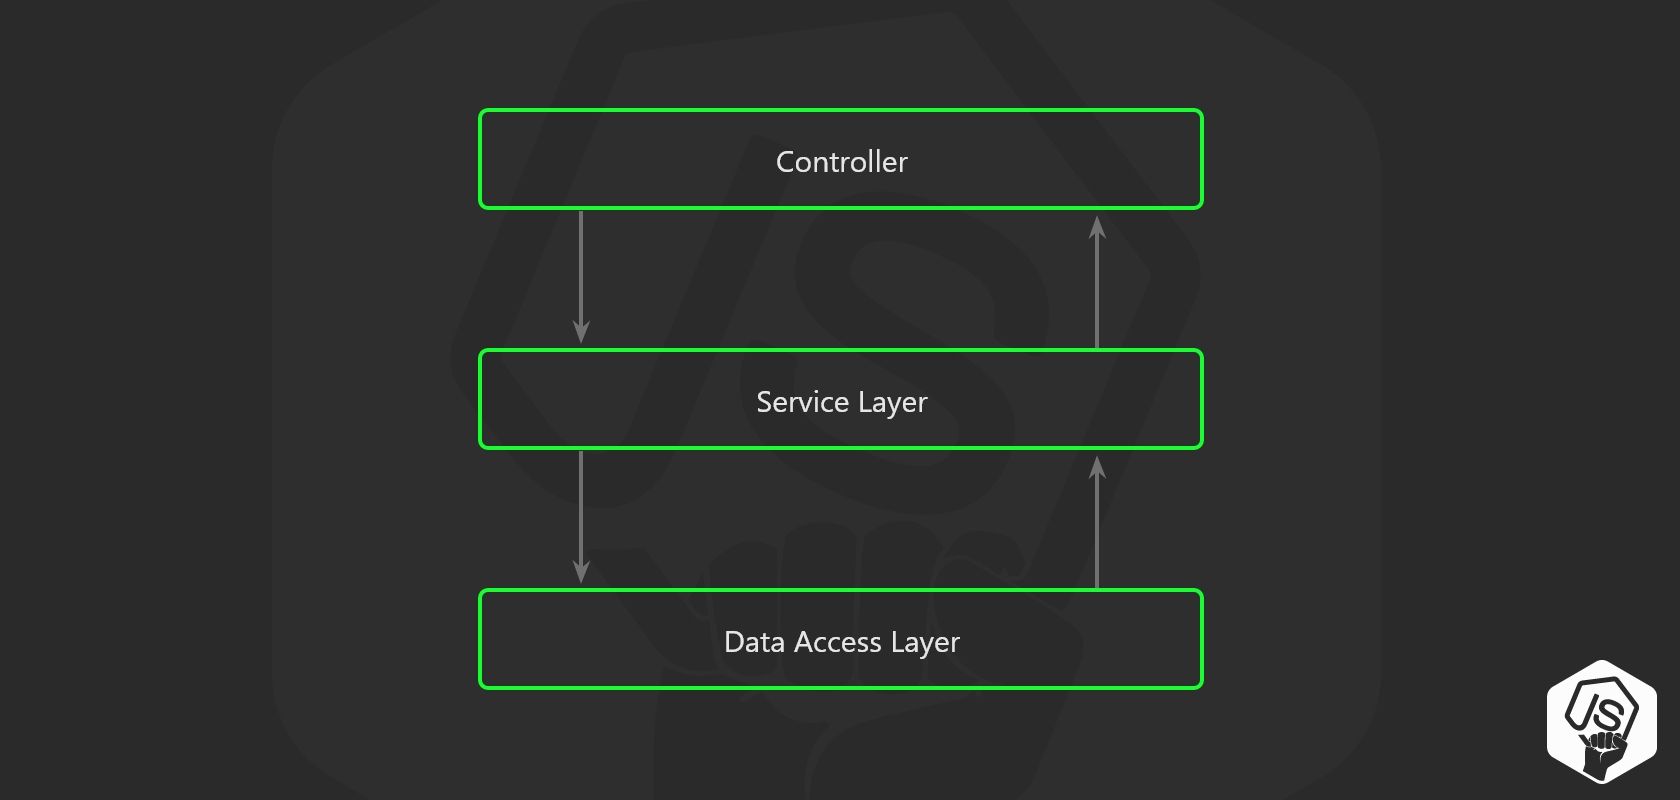
Ý tưởng kiến trúc này là tách biệt hoàn toàn logic nghiệp vụ cũng như truy vấn database ra khỏi API route và chuyển chúng đến các layer tương ứng như bên trên.
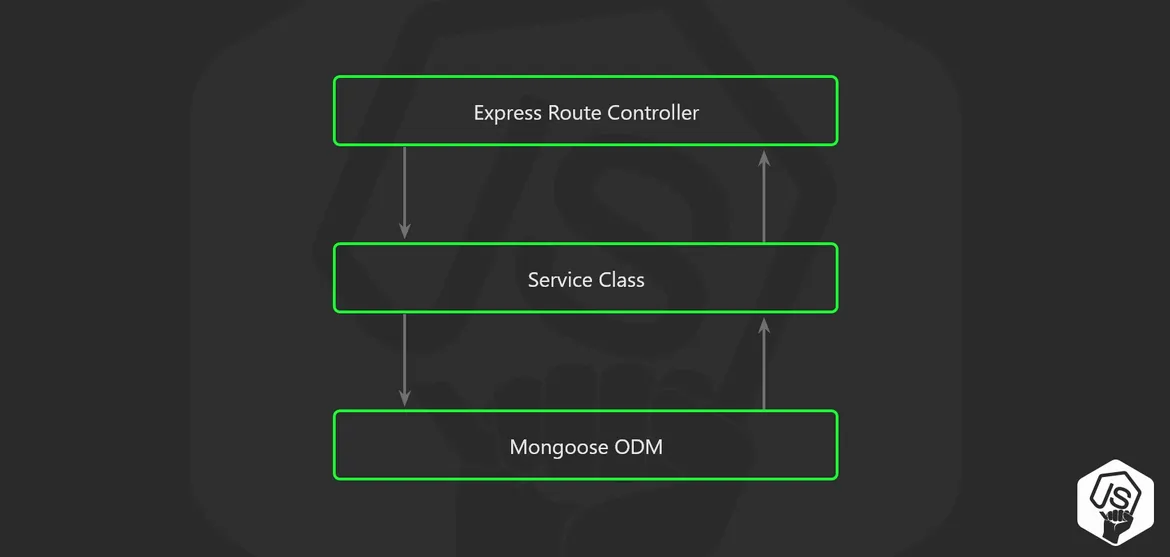
Dưới đây là mô hình sau khi apply vào Express trong NodeJS:
- Controller layer (API routes and endpoints) 🎮 Đây là module code cho phép định nghĩa các API route trong ứng dụng. Nhiệm vụ module này là xác thức data và chuyển đến Service Layer để xử lý.
Note: Module này chỉ định nghĩa API và xử lý dữ liệu. Không tạo ra logic xử lý trong module này
- Service layer (for business logic) 👩🏽🏭 🏭 Module này cho phép tạo ra lớp tách biệt ra khỏi các API Router. Mỗi một service tương ứng với một nhiệm vụ riêng biệt (Nên tuân theo nguyên tắc SOLID). Việc chuyển logic nghiệp vụ vào module này cho phép các thể tái sử dụng ở các API khác nhau một cách hiệu quả.
Note: Không chuyển các object Response hay Request cũng như trả về Http Status hay header trong service layer
- Data access layer (for working with a database) 🌐 Module này đảm nhận trách nhiệm giao tiếp với database với các công việc truy vấn như get, update, create,.... Ngoài ra các công việc như định nghĩa model, ORM, connect databse đều được thực hiện tại đây.
Packages needed 💼
Một số packege nodejs nên cài đặt trước khi bắt đầu một dự án NodeJS
| Pakage | Link |
|---|---|
| express | Link |
| celebrate | Link |
| winston | Link |
| typedi | Link |
| event-dispatch | Link |
| eslint | Link |
| jest | Link |
| prettier | Link |
| nodemon | Link |
| lodash | Link |
Folder structure 🗂
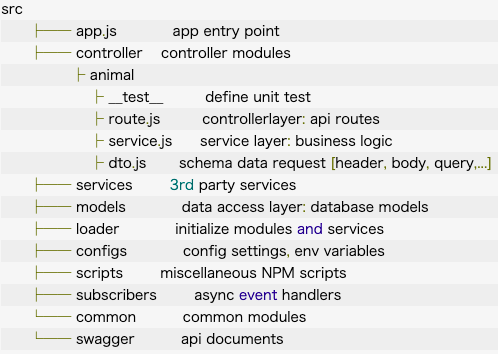
1. Controller
Đây là nơi xác định các api router cũng như các lớp service layer chưa logic xử lý nghiệp vụ.
animal/dto.js: Định nghĩa request data schema cho phép xác thực kiểu dữ liệu
import { Joi, Segments } from 'celebrate'

export const createAnimalDto = {
    [Segments.BODY]: Joi.object().keys({
        name: Joi.string().required(),
        age: Joi.number().required(),
        weight: Joi.number().required(),
        address: Joi.string().required(),
        type: Joi.string().required()
    })
}

export const updateAnimalDto = {
    [Segments.BODY]: Joi.object().keys({
        name: Joi.string().required(),
        age: Joi.number().required(),
        weight: Joi.number().required(),
        address: Joi.string().required(),
    })
}
animal/route.js: Chúng ta sẽ định nghĩa api POST: /animals. Đây là nơi xác thực dữ liệu từ client và gọi đến service layer để thực hiện xử lý logic.
export const route = express.Router()

route.post('/', celebrate(createAnimalDto), async (req, res, next) => {
    try {
        const animalService = Container.get(AnimalService)
        const animalRecord = await animalService.create(req.body)
        return res.status(HttpStatus.OK).send(HttpResponse.success({ data: animalRecord }))
    } catch (error) {
        console.log(error)
        return res.status(error.code || HttpStatus.INTERNAL_SERVER_ERROR).json(HttpResponse.error(error))
    }
})
animals/service.js: Tạo logic nghiệp vụ và gọi đến data access layer để thực hiện lưu trữ vào database
export class AnimalService {
    constructor(container) {
        this.animalModel = container.get('animalModel')
    }
    async create(payload) {
        const newAnimal = await this.animalModel.create(payload)
        return newAnimal
    }
}
2. Models
Module này cho phép định nghĩa các model, schema cho database. Các truy vấn đến database sẽ thực hiện trong module này:
models/animal.js: Định nghĩa shema và truy vấn đến database
import moongose from 'mongoose'

const schema = moongose.Schema

const animalSchema = schema({
    name: {
        type: String,
        required: true
    },
    age: {
        type: Number,
        required: true
    },
    weight: {
        type: Number,
        required: true
    },
    address: {
        type: String,
        required: true
    },
    type: {
        type: String,
        required: true
    }
}, { timpestamp: true })

const Animal = moongose.model('Animal', animalSchema)
export default Animal
3. Loaders
Ý tưởng của module này là thay vì khởi tạo và cấu hình các service trong một nơi duy nhất là index.js thì ta nên tách ra thành các module nhỏ khác nhau tương ứng với các service khác nhau.
❌ Không nên:
const mongoose = require('mongoose');
const express = require('express');
const bodyParser = require('body-parser');
const session = require('express-session');
const cors = require('cors');
const errorhandler = require('errorhandler');
const app = express();

app.get('/status', (req, res) => { res.status(200).end(); });
app.head('/status', (req, res) => { res.status(200).end(); });
app.use(cors());
app.use(require('morgan')('dev'));
app.use(bodyParser.urlencoded({ extended: false }));
app.use(bodyParser.json(setupForStripeWebhooks));
app.use(require('method-override')());
app.use(express.static(__dirname + '/public'));
app.use(session({ secret: process.env.SECRET, cookie: { maxAge: 60000 }, resave: false, saveUninitialized: false }));
mongoose.connect(process.env.DATABASE_URL, { useNewUrlParser: true });

require('./config/passport');
require('./models/user');
require('./models/company');
app.use(require('./routes'));
app.use((req, res, next) => {
  var err = new Error('Not Found');
  err.status = 404;
  next(err);
});
app.use((err, req, res) => {
  res.status(err.status || 500);
  res.json({'errors': {
    message: err.message,
    error: {}
  }});
});


... more stuff

... maybe start up Redis

... maybe add more middlewares

async function startServer() {
  app.listen(process.env.PORT, err => {
    if (err) {
      console.log(err);
      return;
    }
    console.log(`Your server is ready !`);
  });
}

// Run the async function to start our server
startServer();
✅ Nên:
app.js: Root fille và nơi khởi tạo server app. Nhiệm vụ của nó là gọi đến module loader để thực hiện init các module cần thiết khi khởi tạo ứng dụng
const loaders = require('./loaders');
const express = require('express');

async function startServer() {

  const app = express();

  await loaders.init({ expressApp: app });

  app.listen(process.env.PORT, err => {
    if (err) {
      console.log(err);
      return;
    }
    console.log(`Your server is ready !`);
  });
}

startServer();
loaders/index.js: Nơi import và load các module đã được cấu hình từ các module nhỏ.
import expressLoader from './express';
import mongooseLoader from './mongoose';

export default async ({ expressApp }) => {
  const mongoConnection = await mongooseLoader();
  console.log('MongoDB Initialized');

  await expressLoader({ app: expressApp });
  console.log('Express Initialized');

  await dependencyInjectorLoader(mongoConnection)
  Logger.info('✌️ Dependency Injector loaded');

  // ... more loaders can be here
}
loaders/express.js: Nơi thực hiện và cấu hình express framework. Chúng ta có thể tạo ra nhiều module khác tương ứng với các thư viện khác nhau để cấu hình
import * as express from 'express';
import * as bodyParser from 'body-parser';
import * as cors from 'cors';

export default async ({ app }: { app: express.Application }) => {

  app.get('/status', (req, res) => { res.status(200).end(); });
  app.head('/status', (req, res) => { res.status(200).end(); });
  app.enable('trust proxy');

  app.use(cors());
  app.use(require('morgan')('dev'));
  app.use(bodyParser.urlencoded({ extended: false }));

  // ...More middlewares

  // Return the express app
  return app;
})
Với việc chia nhỏ các module cấu hình và khởi tạo lần lượt như bên trên cho phép ta dễ dàng quản lý cũng như viết uni-test cho các module đó
4. Subscribers
Module này sử dụng mô hình pub/sub cho phép gửi và lắng nghe các event trong ứng dụng.

Một số API sau khi xử lý logic nghiệp vụ thường sẽ call đến 3rd service như ghi log hay gửi email.
Việc thực hiện gửi mail hoặc ghi log ngày ngay tại router không có gì là sai. Tuy nhiên nếu đợi thực hiện gửi mail hoặc ghi log thành công khiến client sẽ phải đợi response châm trễ hơn. Đồng thời có thể một số API khác cũng sẽ thực hiện nhiệm vụ ghi log hoặc gửi mail. Một phần làm code dài hơn trong api, một phần sau này khi update lại logic ghi log ta sẽ phải sửa lại code các api đang sử dụng chúng.
Hơn nữa khi service layer phải gách vác quá nhiều trách nhiệm thì lượng code sẽ càng ngày sẽ càng tăng. Như vậy sẽ khiến code sẽ trở nên phức tạp và khó quản lý hơn.
Để cấu trúc tốt hơn và dễ dàng quản lý thì nên tạo ra một module chuyên xử lý lắng nghe và thực hiện các công việc liên quan đến bên thứ 3.
Ví dụ dưới đây sử dụng pakage event-dispatch để triển khai mô hình pub/sub layer
npm install event-dispatch --save
subscribers/aminal-event.js: Khởi tạo đối tượng subscriber để lăng nghe event và thực hiện nhiệm vụ gửi mail.
@EventSubscriber()
export class AnimalEventSubscriber {
    constructor(){
        this.mailService = Container.get(MailService)
        this.logger = Container.get('logger')
    }

    @On("onAnimalCreate")
    onUserCreate(animal) {
        try {
            // Send mail when create animal success
            if(this.mailService) {
                const option = {
                    from: process.env.USER_EMAIL,
                    to: process.env.MANAGER_SYSTEM_EMAIL,
                    subject: '[Animal] Add new animal to app',
                    message: `Create success animal ${animal.name}`
                }
                this.mailService.sendMail(option)
            }
            logger.info(`Animal ${animal.name} created!`)
        } catch (error) {
            logger.error(error)
        }
    }

}
controller/animals/service.js: Sau khi xử lý logic và lưu vào database thành công thì AnimalService sẽ dispatcher một event để thực hiện gửi mail
@Service()
export class AnimalService {
    constructor(container) {
        this.animalModel = container.get('animalModel')
        this.eventDispatcher = container.get('event')
    }

    async create(payload) {
        const newAnimal = await this.animalModel.create(payload)
        if(newAnimal) {
            this.eventDispatcher.dispatch('onAnimalCreate', newAnimal)
        }
        return newAnimal
    }
}
5. Services (3rd)
Module này cho phép định nghĩa và quản lý các service liên quan đến bên thứ 3. Thay thì định nghĩa trực tiếp từ service layer (bussiness logic) thì ta lên quản lý chúng tại đây nhằm cho việc update sau này khi các service bên thứ 3 có sự thay đổi về code hoặc chức năng. Việc maintain hoặc viết integration test hay unit-test cũng trở nên khá dễ dàng.
Note: Đây là nơi quản lý các service bên thứ 3, không tạo ra các logic nghiệp vụ tại module này.
Example: services/node-mail.js
@Service()
export class MailService {
    constructor(){
        this.transporter = nodemailer.createTransport({
            service: 'hotmail',
            auth: {
                user: process.env.USER_EMAIL,
                pass: process.env.PASSWORD
            }
        })
    }

    async sendMail(option) {
        if(option) {
            return await this.transporter.sendMail()
        }
        throw new Error('Requires an option to send mail!')
    }
}
Unit test 🕵🏻
Với việc apply dependency injection và kiến trúc 3 layer service vào dự án thì việc triển khai unit-test khá dễ dàng. Việc mock req, res hay moongose đã không còn là cơn ác mộng nữa
Example:
import { AnimalService } from '../service';

describe('Animal service unit tests', () => {
  describe('create animal', () => {
    test('Should create animal record', async () => {
      const animalModel = {
        create: (payload) => {
          return {
            ...payload,
            _id: 'mock-animal-id'
          }
        },
      };

      const containerMock = {
        get: () => animalModel
      }

      const dataMock = {
        name: "Sun Bear",
        age: 5,
        weight: 50,
        address: "Ha Noi",
        type: "Bear"
      };

      const animalService = new AnimalService(containerMock);
      const animalRecord = await animalService.create(dataMock)

      expect(animalRecord).toBeDefined();
      expect(animalRecord._id).toBeDefined();
      expect(animalRecord).toEqual({ ...dataMock, _id: 'mock-animal-id' })
    });
  })
})
Conclusion
Việc triển khai 3 layer architecture mang lại các lợi ích sau
- Dễ dàng scake cũng như maintain
- Dễ dàng tái sử dụng code
- Dễ dàng triển khai unit-test
- Cấu trúc rõ dàng và clean code
- Mỗi một layer đảm nhận một nhiệm vụ riệng biệt
All rights reserved
