[Android Wear]: Real-time weather communication
Bài đăng này đã không được cập nhật trong 4 năm
Tiếp tục phần 1 : [Android Wear]: Xây dựng Android Wear watch face! và phần 2 [Android Wear]: WATCH INTERFACE!!, trong phần này sẽ khám phá về phương thức giao tiếp của Wearable với API và xây dựng ứng dụng hiển thị dữ liệu thời thiết theo thời gian thực.
Wearable APIs
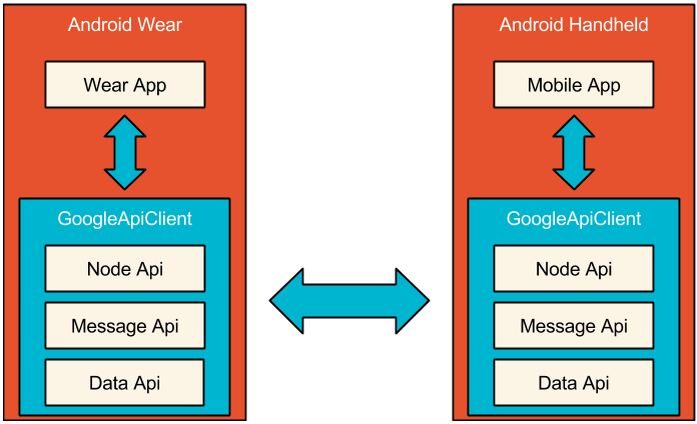
Một điều cần lưu ý là các thiết bị wearable không kết nối trực tiếp được với internet. Smartphone hoặc device phải được pair với wearable device. Hơn nữa, sau khi pair chúng sẽ giao tiếp với nhau thông qua wearable api. Có 3 Wearable api:
- Node API : Để xác định device connect hoặc disconect.
- Message API : Dùng để gửi message đến device khác..
- Data API: Ghi và nhận dữ liệu từ device khác.
Giống như các google api khác, chúng ta phải sử dụng GoogleApiClient để thao tác với Wearable api. Hình ảnh dưới đây mô tả hoạt động của wearable và mobile app thông qua wearable APIs.

Google Api Client
Bước đầu tiên là tạo một instance của GoogleApiClient.
public void onCreate(SurfaceHolder holder) {
    mGoogleApiClient = new GoogleApiClient.Builder(WeatherWatchFaceService.this)
            .addConnectionCallbacks(new GoogleApiClient.ConnectionCallbacks() {
                @Override
                public void onConnected(Bundle bundle) {
                    Log.d(TAG, "GoogleApiClient is Connected");
                }
                @Override
                public void onConnectionSuspended(int i) {
                    Log.d(TAG, "GoogleApiClient is ConnectionSuspended");
                }})
            .addOnConnectionFailedListener(new GoogleApiClient.OnConnectionFailedListener() {
                @Override
                public void onConnectionFailed(ConnectionResult connectionResult) {
                    Log.d(TAG, "The connection of GoogleApiClient is failed");
                }
            })
           .addApi(Wearable.API) // tell Google API that we want to use Warable API
           .build();
}
Khi GoogleApiClient được kết nối, cần tại các listener cho các Wearable APIS.
public void onConnected(Bundle bundle) { // the part of GoogleApiClient.ConnectionCallbacks
    Wearable.NodeApi.addListener(mGoogleApiClient, new NodeApi.NodeListener() {
        @Override
        public void onPeerConnected(Node node) {
            Log.d(TAG, "A node is connected and its id: " + node.getId());
        }
        @Override
        public void onPeerDisconnected(Node node) {
            Log.d(TAG, "A node is disconnected and its id: " + node.getId());
        }
    });

    Wearable.MessageApi.addListener(mGoogleApiClient, new MessageApi.MessageListener() {
        @Override
        public void onMessageReceived(MessageEvent messageEvent) {
            Log.d(TAG, "You have a message from " + messageEvent.getPath());
        }
    });

    Wearable.DataApi.addListener(mGoogleApiClient, new DataApi.DataListener() {
        @Override
        public void onDataChanged(DataEventBuffer dataEvents) {
            Log.d(TAG, "Your data is changed");
        }
    });
}
Đồng thời cũng phải lưu ý remove các listener và disconnect GoogleApiClient khi không còn dùng nữa.
public void onVisibilityChanged(boolean visible) {
    if (visible) {
        mGoogleApiClient.connect();
    } else {
        if (mGoogleApiClient != null && mGoogleApiClient.isConnected()) {
            Wearable.NodeApi.removeListener(mGoogleApiClient, this);
            Wearable.MessageApi.removeListener(mGoogleApiClient, this);
            Wearable.DataApi.removeListener(mGoogleApiClient, this);
            mGoogleApiClient.disconnect();
        }
    }
}
Trong ví dụ này chúng ta connect với Wearable APIs khi screen hiển thị ra va disconect khi screen chuyển vào background mode.
NODE API
NodeApi có 2 method bạn có thể sử dụng:
- getLocalNode: Dùng để lấy node id của device, Bạn sẽ cần nó để nhận dữ liệu qua DataApi.
- getConnectedNodes: List những device đã được kết nối với device hiện tại.
Ví dụ:
Wearable.NodeApi.getLocalNode(mGoogleApiClient)
        .setResultCallback(new ResultCallback<NodeApi.GetLocalNodeResult>() {
            @Override
            public void onResult(NodeApi.GetLocalNodeResult result) {
                Log.d(TAG, "My node id is " + result.getNode().getId());
            }
        });

Wearable.NodeApi.getConnectedNodes(mGoogleApiClient)
        .setResultCallback(new ResultCallback<NodeApi.GetConnectedNodesResult>() {
            @Override
            public void onResult(NodeApi.GetConnectedNodesResult result) {
                for(Node node: result.getNodes()){
                    Log.d(TAG, "Node " + node.getId() + " is connected");
                }
            }
        });
MESSAGE API
MessageApi gần giống như 1 Message Queue, bạn có thể gửi message tới queue và GoogleApiClient sẽ chuyển message tới device khác. Nhưng không giống như 1 số kỹ thuật khác về message queue, nếu kết nỗi không còn active, GoogleApiClient sẽ không giữ lại message.
Ví dụ dưới đây sẽ mô tả rõ hơn về cách gửi và nhận message cùng với dữ liệu về thời tiết.
// SEND a message
// we can use data map to generate a byte array.
DataMap config = new DataMap();

//Weather Information
config.putInt("Temperature", 100);
config.putString("Condition", "cloudy");

// the parameter of  node id can be empty string "".
// the third parameter is message path.
Wearable.MessageApi.sendMessage(mGoogleApiClient, mPeerId, "/WeatherInfo", config.toByteArray())
        .setResultCallback(new ResultCallback<MessageApi.SendMessageResult>() {
            @Override
            public void onResult(MessageApi.SendMessageResult sendMessageResult) {
                Log.d(TAG, "SendMessageStatus: " + sendMessageResult.getStatus());
            }
        });

// RECIVE a message
@Override
public void onMessageReceived(MessageEvent messageEvent) {
    // convert a byte array to DataMap
    byte[] rawData = messageEvent.getData();
    DataMap dataMap = DataMap.fromByteArray(rawData);

    // we have different methods for different messages
    if (messageEvent.getPath().equals("/WeatherInfo")) {
        fetchInfo(dataMap);
    }

    if (messageEvent.getPath().equals("/WeatherWatchFace/Config")) {
        fetchConfig(dataMap);
    }
}
DATA API
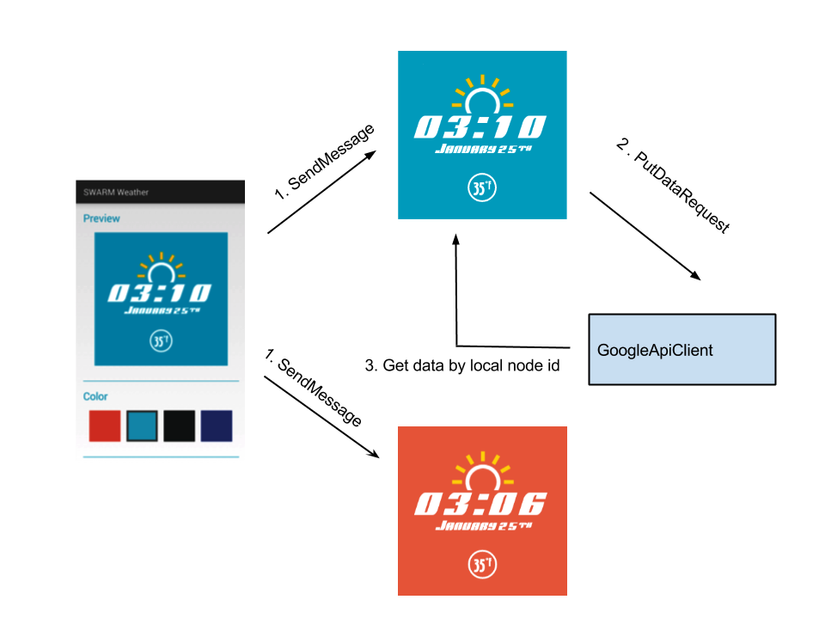
DataApi cho phép chúng ta lưu trữ wear data 1 cách liên tục, chúng ta sử dụng PutDataMapRequest để lưu trữ data liên tục.
PutDataMapRequest putDataMapRequest = PutDataMapRequest.create("/WeatherWatchFace/Config");
DataMap config = putDataMapRequest.getDataMap();

config.putInt("TemperatureScale", mTemperatureScale);
config.putInt("BackgroundColor", mBackgroundColor);
config.putInt("RequireInterval", mRequireInterval);

Wearable.DataApi.putDataItem(mGoogleApiClient, putDataMapRequest.asPutDataRequest())
        .setResultCallback(new ResultCallback<DataApi.DataItemResult>() {
            @Override
            public void onResult(DataApi.DataItemResult dataItemResult) {
                log("SaveConfig: " + dataItemResult.getStatus() + ", " + dataItemResult.getDataItem().getUri());
            }
        });
Khi data được save thành công, đường dẫn để truy cập vào data sẽ có dạng:
wear://<NodeId>/<path> //the path is given when you call PutDataMapRequest.create()
Bạn không thể access vào node Id. Data API sử dụng local nodeid khi bạn gọi Wearable.DataApi.putDataItem().
// to get local node id
Wearable.NodeApi.getLocalNode(mGoogleApiClient).setResultCallback(new ResultCallback<NodeApi.GetLocalNodeResult>() {
    @Override
    public void onResult(NodeApi.GetLocalNodeResult getLocalNodeResult) {
        Uri uri = new Uri.Builder()
                .scheme("wear")
                .path("/WeatherWatchFace/Config")
                .authority(getLocalNodeResult.getNode().getId())
                .build();

        Wearable.DataApi.getDataItem(mGoogleApiClient, uri)
                .setResultCallback(
                        new ResultCallback<DataApi.DataItemResult>() {
                            @Override
                            public void onResult(DataApi.DataItemResult dataItemResult) {
                                log("Finish Config: " + dataItemResult.getStatus());
                                if (dataItemResult.getStatus().isSuccess() && dataItemResult.getDataItem() != null) {
                                    fetchConfig(dataItemResult.getDataItem());
                                }
                            }
                        }
                );
    }
});
Bạn có thể có nhiều wearable device connect tới 1 phong và dữ liệu cùng đươc ghi trong path.
Uri uri = new Uri.Builder()
        .scheme("wear")
        .path("/WeatherWatchFace/Config")
        .build();

Wearable.DataApi.getDataItems(mGoogleApiClient, uri)
        .setResultCallback(
                new ResultCallback<DataItemBuffer>() {
                    @Override
                    public void onResult(DataItemBuffer dataItems) {
                        for(int i=0;i<dataItems.getCount();i++){
                            Log.d(TAG,"The data is from: " + dataItems.get(i).getUri().getAuthority());
                        }
                    }
                }
        );
WEARABLE LISTENER SERVICE
Bạn có thể sử dụng WEARABLE LISTENER SERVICE để lắng nghe các event của device.
Step1 Khởi tạo một WeatherService class which extends WearableListenerService
public class WeatherService extends WearableListenerService {
    @Override
    public void onMessageReceived(MessageEvent messageEvent) {
        mPeerId = messageEvent.getSourceNodeId();
        if (messageEvent.getPath().equals("/WeatherService/Require")) {
            // Get Location
            mLocationManager = (LocationManager) this.getSystemService(Context.LOCATION_SERVICE);
            mLocation = mLocationManager.getLastKnownLocation(LocationManager.NETWORK_PROVIDER);

            // Start getting weather data asynchronously
            GetWeatherTask task = new GetWeatherTask();
            task.execute();
        }
    }

    private class GetWeatherTask extends AsyncTask {
        @Override
        protected Object doInBackground(Object[] params) {
            try {
                WeatherApi api = new OpenWeatherApi();

                WeatherInfo info = api.getCurrentWeatherInfo(mLocation.getLatitude(), mLocation.getLongitude());

                // Send Data to the wear.
                DataMap config = new DataMap();

                config.putInt(KEY_WEATHER_TEMPERATURE, info.getTemperature());
                config.putString(KEY_WEATHER_CONDITION, info.getCondition());
                config.putLong(KEY_WEATHER_SUNSET, info.getSunset());
                config.putLong(KEY_WEATHER_SUNRISE, info.getSunrise());

                Wearable.MessageApi.sendMessage(mGoogleApiClient, mPeerId, PATH_WEATHER_INFO, config.toByteArray())
                        .setResultCallback(new ResultCallback<MessageApi.SendMessageResult>() {
                    @Override
                    public void onResult(MessageApi.SendMessageResult sendMessageResult) {
                        Log.d(TAG, "SendUpdateMessage: " + sendMessageResult.getStatus());
                    }
                });
            } catch (Exception e) {
                Log.d(TAG, "Task Fail: " + e);
            }

            return null;
        }
    }
}
Step2 Sửa file AndroidManifest.xml
<service android:name=".WeatherService" >
    <intent-filter>
        <action 			android:name="com.google.android.gms.wearable.BIND_LISTENER" />
    </intent-filter>
</service>
WEATHER API
Có 1 súu Weather có thể sử dụng như Yahoo, Open Weather... Và chúng ta sẽ chọn Open Weather trong ví dụ này vì nó rất dễ sử dụng, hơn nữa là ...free.
// We create a interface in case we change to another API host
public interface WeatherApi {
    WeatherInfo getCurrentWeatherInfo(double lon, double lat);
}

// WeatherInfo includes the narrow data which we need
public class WeatherInfo {
    private String cityName;
    private String condition;
    private int temperature;
    private long sunrise;
    private long sunset;
}

// Implement OpenWeatherApi
public class OpenWeatherApi implements WeatherApi {
    private static final String TAG ="OpenWeatherApi";
    private static final String APIURL = "http://api.openweathermap.org/data/2.5/weather?lat=%f&lon=%f&units=imperial&APPID=%s";

    @Inject
    private Context context;

    @Override
    public WeatherInfo getCurrentWeatherInfo(double lat, double lon) {
        WeatherInfo w = null;
        try {
            // ObjectMapper is a RestClient supplied by Jackson
            ObjectMapper mapper = new ObjectMapper();
            mapper.disable(DeserializationFeature.FAIL_ON_UNKNOWN_PROPERTIES);

            String key = context.getResources().getString(R.string.openweather_appid);
            String url = String.format(APIURL, lat, lon, key);

            Log.d(TAG,"ApiUrl: "+url);
            OpenWeatherQueryResult result = mapper.readValue(new URL(url), OpenWeatherQueryResult.class);

            if ("200".equals(result.getCod())) {
                w = new WeatherInfo();
                w.setCityName(result.getName());
                w.setTemperature((int) result.getMain().getTemp());
                w.setSunset(result.getSys().getSunset());
                w.setSunrise(result.getSys().getSunrise());

                OpenWeatherData[] dataArray = result.getWeather();
                if (dataArray != null && dataArray.length > 0) {
                    w.setCondition(ConvertCondition(dataArray[0].getId()));
                }
            }
        } catch (Exception e) {
            e.printStackTrace();
        }

        return w;
    }
}
ANDROIDMANIFEST.XML trên WEAR
<service android:name=".WeatherWatchFaceService">
    <!-- the setting is for the config activity on the handhold app-->
    <meta-data
            android:name="com.google.android.wearable.watchface.wearableConfigurationAction"
            android:value="com.mycompany.wearable.watchface.CONFIG" />

    <!-- the setting is for the config activity on the wear app-->
    <meta-data
            android:name="com.google.android.wearable.watchface.wearableConfigurationAction"
            android:value="com.mycompany.wearable.watchface.CONFIG" />
</service>

<activity android:name=".WeatherWatchFaceConfigActivtiy">
    <intent-filter>
        <!--The value has to match the value of service’s meta-data-->
        <action android:name="com.mycompany.wearable.watchface.CONFIG" />
        <category android:name="com.google.android.wearable.watchface.category.WEARABLE_CONFIGURATION" />
        <category android:name="android.intent.category.DEFAULT" />
    </intent-filter>
</activity>
ANDROIDMANIFEST.XML trên device điều khiển.
<activity android:name=".WeatherWatchFaceConfigActivtiy">
    <intent-filter>
        <!--The value has to match the value of service’s meta-data-->
        <action android:name="com.mycompany.wearable.watchface.CONFIG" />
        <category android:name="com.google.android.wearable.watchface.category.COMPANION_CONFIGURATION" />
        <category android:name="android.intent.category.DEFAULT" />
    </intent-filter>
</activity>
Sau khi chạy app, nếu thành công, trên watch face, gear icon sẽ hiển thị bên dưới watch face trên wearable device. CÒn tại điện thoại, mở app, setting gear hiện thị như 1 menu option.

STORING DATA FOR MULTIPLE WEARABLES

Như vậy chúng ta đã thành công trong việc xây dựng 1 ứng dung trên Wearable device hiển thị dữ liệu thời gian thực thông qua trung gian là điện thoại bằng Wearable APIs.
All rights reserved