How Butterknife library works?
Bài đăng này đã không được cập nhật trong 4 năm
Trước đây khi Google chưa ra đời Data Binding Library thì thư viện Butterknife được sử dụng rộng rãi để viết code gọn hơn và nhanh hơn. Với Butterknife, chúng ta không cần phải lặp lại nhiều lần findViewById() hoặc setOnClick(), setLongClick(), ... mà chỉ cần khai báo Annotation, ví dụ
- Cách thông thường
public class MainActivity extends AppCompatActivity {

    TextView mTextView;

    Button mButton;

    @Override
    protected void onCreate(Bundle savedInstanceState) {
        super.onCreate(savedInstanceState);
        setContentView(R.layout.activity_main);

        mTextView = (TextView) findViewById(R.id.text_view);
        mButton = (Button) findViewById(R.id.button);

        mButton.setOnClickListener(new View.OnClickListener() {
            @Override
            public void onClick(View view) {
                Toast.makeText(getBaseContext(), "Simple", Toast.LENGTH_SHORT).show();
            }
        });
    }
}
- Sử dụng Butterknife
public class MainActivity extends AppCompatActivity {

    @BindView(R.id.text_view)
    TextView mTextView;

    @BindView(R.id.button)
    Button mButton;

    @OnClick(R.id.button)
    void submit() {
        Toast.makeText(getBaseContext(), "Simple", Toast.LENGTH_SHORT).show();
    }

    @Override
    protected void onCreate(Bundle savedInstanceState) {
        super.onCreate(savedInstanceState);
        setContentView(R.layout.activity_main);
        ButterKnife.bind(this);
    }
}
Bạn có thấy nhanh và gọn hơn cách thông thường ko?  Hôm nay mình sẽ hướng dẫn các bạn tạo một project nho nhỏ để hiểu được thư viện Butterknife hoạt động như nào. Vì nội dung này khá khó hiểu nên trước hết cần có kiến thức nền về
 Annotation, Java Reflection và Annotation Processing Tool. Các bạn có thể tham khảo ở hai link sau, mình thấy giải thích cũng rõ ràng và có ví dụ cụ thể, đặc biệt là có phiên bản tiếng việt :p
- Annotation và Java Reflection : http://o7planning.org/vi/10197/huong-dan-su-dung-java-annotation
- Annotation Processing Tool (APT): http://o7planning.org/vi/10303/tuy-bien-trinh-bien-dich-java-xu-ly-annotation-cua-ban-annotation-processing-tool
Sau khi đọc xong và hiểu được thì chúng ta bắt đầu tạo project nhỏ nhỏ của mình nhé, ở đây mình tạo project có tên là BindView
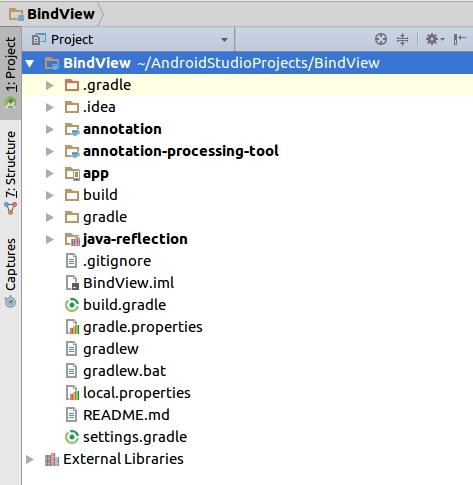
Bước 1: Tạo các module
Các bạn tạo các module như hình nhé, hai module annotation và annotation-processing-tool là java module, còn java-reflection là android module nhé, mình đặt tên như thế để mọi người dễ hiểu là phần kiến thức nào sẽ được áp dụng vào đâu
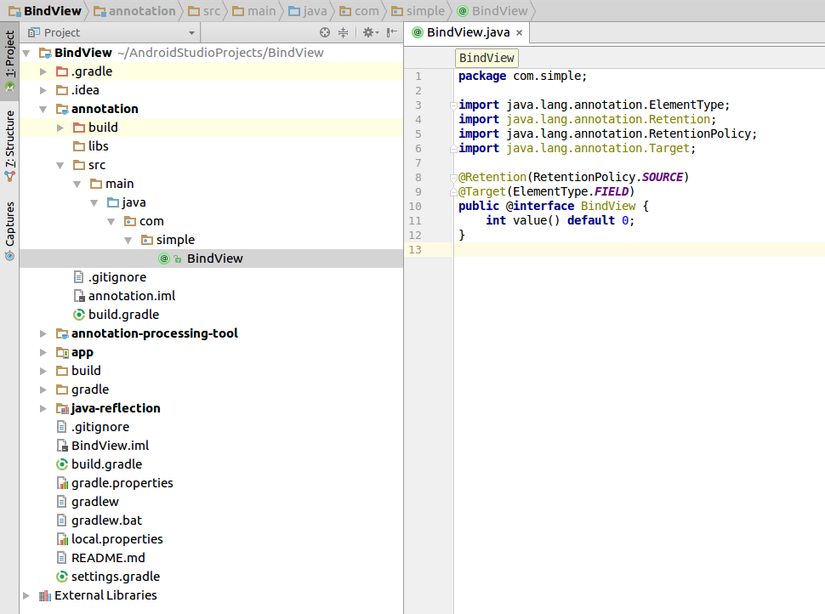
Bước 2: Định nghĩa Annotation
Ở đây chúng ta sẽ định nghĩa các Annotation kiểu như @BindView của Butterknife. Trong source của module annotation, tạo annotation BindView như hình sau
 Mình giải thích một chút
- Khai báo
@Retention(RetentionPolicy.CLASS)để bộ dịch java có thể nhận biết được annotation tại thời điểm biên dịch - Khai báo
@Target(ElementType.FIELD)để xác định annotation này chỉ áp dụng cho Field - Định nghĩa
int value() default 0;là vì thông thường trong android sẽ sử dụng id là một số nguyên duy nhất, nên chúng ta sẽ sử dụng kiểu int .
Bước 3: Xây dựng Processor
Processor ở đây sẽ dựa vào các annotation được khai báo bởi annotation (cụ thể là BindView) để sinh ra các class tương ứng.
- Trước hết chúng ta thêm vào
build.gradlecủaannotation-processing-toolnhư sau
apply plugin: 'java'

dependencies {
  compile fileTree(include: ['*.jar'], dir: 'libs')
  compile project(':annotation')
  compile 'com.google.auto.service:auto-service:1.0-rc3'
  compile 'com.squareup:javapoet:1.9.0'
}
- Do cần dùng module
annotationnên chúng ta cần addcompile project(':annotation') - Thư viện
com.google.auto.service:auto-service:1.0-rc3được sử dụng để tự động chạyprocessing-toolkhi quá trình biên dịch diễn ra mà chúng ta không cần can thiệp. - Thư viện
com.squareup:javapoet:1.9.0được sử dụng để sinh ra các file source.java.
- Chúng ta sẽ tạo class
MyProcessortrong source của moduleannotation-processing-tool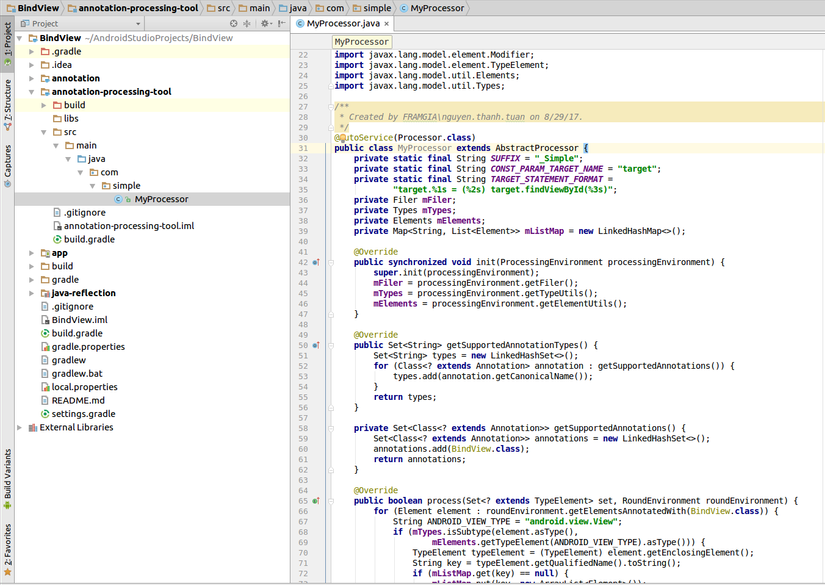 Full code
@AutoService(Processor.class)
public class MyProcessor extends AbstractProcessor {
    private static final String SUFFIX = "_Simple";
    private static final String CONST_PARAM_TARGET_NAME = "target";
    private static final String TARGET_STATEMENT_FORMAT =
            "target.%1s = (%2s) target.findViewById(%3s)";
    private Filer mFiler;
    private Types mTypes;
    private Elements mElements;
    private Map<String, List<Element>> mListMap = new LinkedHashMap<>();

    @Override
    public synchronized void init(ProcessingEnvironment processingEnvironment) {
        super.init(processingEnvironment);
        mFiler = processingEnvironment.getFiler();
        mTypes = processingEnvironment.getTypeUtils();
        mElements = processingEnvironment.getElementUtils();
    }

    @Override
    public Set<String> getSupportedAnnotationTypes() {
        Set<String> types = new LinkedHashSet<>();
        for (Class<? extends Annotation> annotation : getSupportedAnnotations()) {
            types.add(annotation.getCanonicalName());
        }
        return types;
    }

    private Set<Class<? extends Annotation>> getSupportedAnnotations() {
        Set<Class<? extends Annotation>> annotations = new LinkedHashSet<>();
        annotations.add(BindView.class);
        return annotations;
    }

    @Override
    public boolean process(Set<? extends TypeElement> set, RoundEnvironment roundEnvironment) {
        for (Element element : roundEnvironment.getElementsAnnotatedWith(BindView.class)) {
            String ANDROID_VIEW_TYPE = "android.view.View";
            if (mTypes.isSubtype(element.asType(),
                    mElements.getTypeElement(ANDROID_VIEW_TYPE).asType())) {
                TypeElement typeElement = (TypeElement) element.getEnclosingElement();
                String key = typeElement.getQualifiedName().toString();
                if (mListMap.get(key) == null) {
                    mListMap.put(key, new ArrayList<Element>());
                }
                mListMap.get(key).add(element);
            }
        }
        if (mListMap.isEmpty()) {
            return true;
        }
        for (Map.Entry<String, List<Element>> entry : mListMap.entrySet()) {
            MethodSpec constructor = createConstructor(entry.getValue());
            TypeSpec binder = createClass(getClassName(entry.getKey()), constructor);
            JavaFile javaFile =
                    JavaFile.builder(getPackage(entry.getValue().get(0)), binder).build();
            try {
                javaFile.writeTo(mFiler);
            } catch (IOException e) {
                e.printStackTrace();
            }
        }
        return true;
    }

    private TypeSpec createClass(String className, MethodSpec constructor) {
        return TypeSpec.classBuilder(className + SUFFIX)
                .addModifiers(Modifier.PUBLIC, Modifier.FINAL)
                .addMethod(constructor)
                .build();
    }

    private String getClassName(String qualifier) {
        String DOT = ".";
        return qualifier.substring(qualifier.lastIndexOf(DOT) + 1);
    }

    private String getPackage(Element element) {
        return mElements.getPackageOf(element).toString();
    }

    private MethodSpec createConstructor(List<Element> elements) {
        Element firstElement = elements.get(0);
        MethodSpec.Builder builder = MethodSpec.constructorBuilder()
                .addModifiers(Modifier.PUBLIC)
                .addParameter(TypeName.get(firstElement.getEnclosingElement().asType()),
                        CONST_PARAM_TARGET_NAME);
        for (int i = 0; i < elements.size(); i++) {
            Element element = elements.get(i);
            builder.addStatement(
                    String.format(TARGET_STATEMENT_FORMAT, element.getSimpleName().toString(),
                            element.asType().toString(),
                            String.valueOf(element.getAnnotation(BindView.class).value())));
        }
        return builder.build();
    }
}
- Mình giải thích một chút về các thành phần quan trọng trong
MyProcessor.java
@AutoService(Processor.class)xác định processor được tự động chạy khi bộ dịch hoạt động (cái này thuộccom.google.auto.service:auto-service:1.0-rc3mà mình đã nói ở trên)- Ở đây chúng ta có hằng số
TARGET_STATEMENT_FORMAT
private static final String TARGET_STATEMENT_FORMAT =
            "target.%1s = (%2s) target.findViewById(%3s)";
Hằng số trên được định nghĩa để định dạng cho kiểu câu lệnh mà chúng ta muốn tạo ra (chính là hàm findViewById của android)
- Method
init
    @Override
    public synchronized void init(ProcessingEnvironment processingEnvironment) {
        super.init(processingEnvironment);
        mFiler = processingEnvironment.getFiler();
        mTypes = processingEnvironment.getTypeUtils();
        mElements = processingEnvironment.getElementUtils();
    }
Method init dùng để khởi tạo các biến cần thiết. Ở đây chúng ta cần mFiler cung cấp môi trường để ghi file, mTypes là TypeUtils cũng cấp các function hỗ trợ về kiểu (type) của một thành phần trong java, còn mElements là ElementUtils cung cấp các function hỗ trợ Element. Ví dụ về Element (dịch ra là phần tử :p),
@BindView(R.id.text_view)
TextView mTextView;
- Method
getSupportedAnnotationTypesvàgetSupportedAnnotations
    @Override
    public Set<String> getSupportedAnnotationTypes() {
        Set<String> types = new LinkedHashSet<>();
        for (Class<? extends Annotation> annotation : getSupportedAnnotations()) {
            types.add(annotation.getCanonicalName());
        }
        return types;
    }

    private Set<Class<? extends Annotation>> getSupportedAnnotations() {
        Set<Class<? extends Annotation>> annotations = new LinkedHashSet<>();
        annotations.add(BindView.class);
        return annotations;
    }
Hai method này dùng để lấy các annotation mà processor sẽ hỗ trợ, ở đây mình chỉ có 1 annotation là BindView nên chỉ cần add BindView.class thôi
- Method
process
	@Override
    public boolean process(Set<? extends TypeElement> set, RoundEnvironment roundEnvironment) {
        for (Element element : roundEnvironment.getElementsAnnotatedWith(BindView.class)) {
            String ANDROID_VIEW_TYPE = "android.view.View";
            if (mTypes.isSubtype(element.asType(),
                    mElements.getTypeElement(ANDROID_VIEW_TYPE).asType())) {
                TypeElement typeElement = (TypeElement) element.getEnclosingElement();
                String key = typeElement.getQualifiedName().toString();
                if (mListMap.get(key) == null) {
                    mListMap.put(key, new ArrayList<Element>());
                }
                mListMap.get(key).add(element);
            }
        }
        if (mListMap.isEmpty()) {
            return true;
        }
        for (Map.Entry<String, List<Element>> entry : mListMap.entrySet()) {
            MethodSpec constructor = createConstructor(entry.getValue());
            TypeSpec binder = createClass(getClassName(entry.getKey()), constructor);
            JavaFile javaFile =
                    JavaFile.builder(getPackage(entry.getValue().get(0)), binder).build();
            try {
                javaFile.writeTo(mFiler);
            } catch (IOException e) {
                e.printStackTrace();
            }
        }
        return true;
    }
Method này là method chính để tạo class cần thiết khi biên dịch. Chúng ta sẽ lấy ra tất cả các Field được khai báo Annotation là BindView, sau đó sử dụng JavaPoet sinh source file .java.
Bước 4: Xây dựng thư viện để sử dụng
Trong source của module java-reflection, chúng ta sẽ tạo class với tên là BindViewLib để sử dụng
public class BindViewLib {

    private static final String SUFFIX = "_Simple";

    public static void bind(Activity activity) {
        try {
            Class bindingClass = Class.forName(activity.getClass().getCanonicalName() + SUFFIX);
            //noinspection unchecked
            Constructor constructor = bindingClass.getConstructor(activity.getClass());
            constructor.newInstance(activity);
        } catch (ClassNotFoundException e) {
            Log.e("TAG", "Meaningful Message", e);
        } catch (NoSuchMethodException e) {
            Log.e("TAG", "Meaningful Message", e);
        } catch (IllegalAccessException e) {
            Log.e("TAG", "Meaningful Message", e);
        } catch (InstantiationException e) {
            Log.e("TAG", "Meaningful Message", e);
        } catch (InvocationTargetException e) {
            Log.e("TAG", "Meaningful Message", e);
        }
    }

}
Ở đây chúng ta sẽ sử dụng Java Reflection để có thể tìm kiếm được lớp mà được gen ra ở Bước 3 và sau đó gọi constructor để khởi tạo.
Bước 5: Sử dụng thư viện mới tạo
- Thêm các module và project
dependencies {
  compile fileTree(dir: 'libs', include: ['*.jar'])
  androidTestCompile('com.android.support.test.espresso:espresso-core:2.2.2', {
    exclude group: 'com.android.support', module: 'support-annotations'
  })
  compile 'com.android.support:appcompat-v7:26.0.0-alpha1'
  testCompile 'junit:junit:4.12'
  compile project(':java-reflection')
  compile project(':annotation')
  annotationProcessor project(':annotation-processing-tool')
}
- Tạo một activity, ở đây mình đặt tên là MainActivity và activity_main.xml
activity_main.xml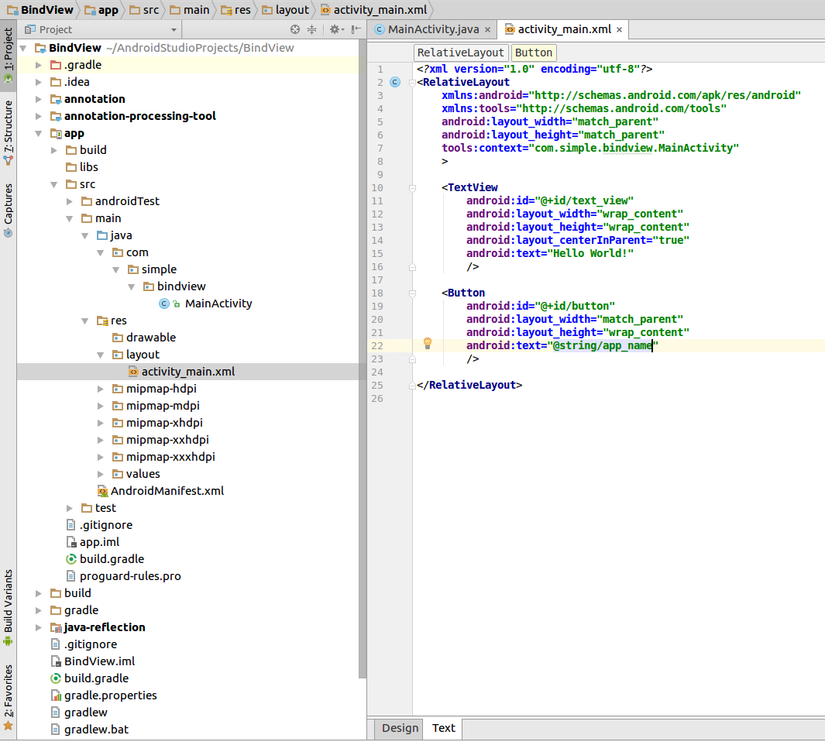
MainActivity.java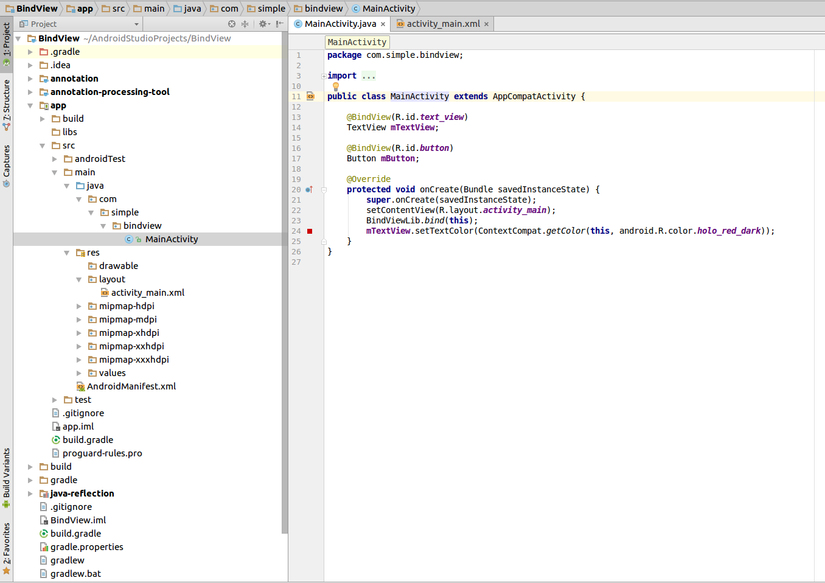
- Run project
- Nếu thành công, app sẽ chạy được và không lỗi, class
MainActivity_Simplesẽ được tạo và nằm trong thư mục build như trong hình sau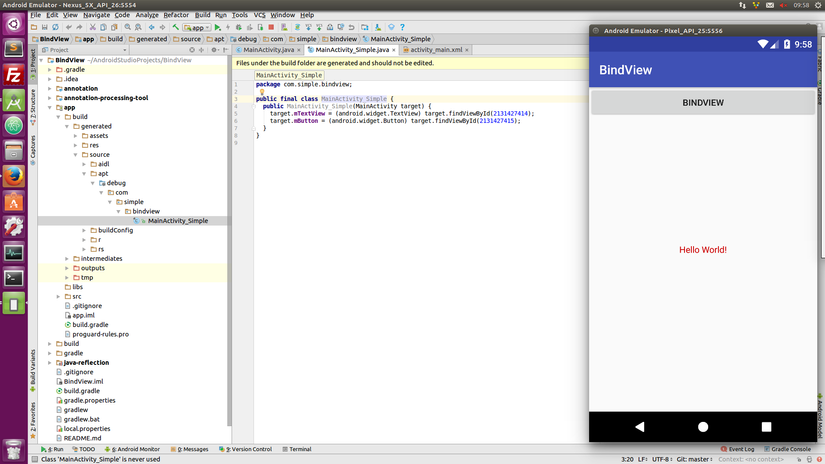
- Nếu thất bại, bạn sẽ bị lỗi
NullPointException:p
Kết luận
Trên đây là một ví dụ nhỏ nhỏ để hiểu được cách hoạt động của Butterknife. Mặc dù hiện nay đã có Data Binding nhưng chúng ta có thể sử dụng APT với nhiều mục đích khác nhau, bạn hãy thử nghiên cứu về APT sẽ thấy được rất nhiều điều thú vị
Tài liệu tham khảo
- Document
- Medium Post: https://medium.com/@lgvalle/how-butterknife-actually-works-85be0afbc5ab
- Element Doc: https://docs.oracle.com/javase/7/docs/api/javax/lang/model/element/Element.html
- Source
- Github source code: https://github.com/tuanbaros/bindview
- Butterknife: https://github.com/JakeWharton/butterknife
- JavaPoet: https://github.com/square/javapoet
- AutoService: https://github.com/google/auto/tree/master/service
Chúc các bạn thành công. Simple Coding
All rights reserved
