[Android] Socket connection part 1
Bài đăng này đã không được cập nhật trong 9 năm
In this tutorial we’ll learn how to create a chat client that communicates with a Socket.IO Node.JS chat server, with our native Android Client! If you want to jump straight to the code, it’s on GitHub. Otherwise, read on!
TCP Client tutorial with TCP socket
I. Introduction
To follow along, start by cloning the repository: socket.io-android-chat.
The app has the following features:
Sending a message to all users joining to the room. Notifies when each user joins or leaves. Notifies when an user start typing a message. Socket.IO provides an event-oriented API that works across all networks, devices and browsers. It’s incredibly robust (works even behind corporate proxies!) and highly performant, which is very suitable for multiplayer games or realtime communication.
II. Setup
The first step is to install the Java Socket.IO client with Gradle.
For this app, we just add the dependency to build.gradle:
// app/build.gradle
dependencies {
    ...
    compile 'com.github.nkzawa:socket.io-client:0.3.0'
}
We must remember adding the internet permission to AndroidManifest.xml.
<!-- app/AndroidManifest.xml -->
<manifest xmlns:android="http://schemas.android.com/apk/res/android">
    <uses-permission android:name="android.permission.INTERNET" />
    ...
</manifest>
Now we can use Socket.IO on Android!
III. Implementation
Two important lines are these:
The first line must contain the IP of your TCP server. The second line has to contain the port where it listens on for new connections.
public static final String SERVER_IP = “192.168.1.165”;
public static final int SERVER_PORT = 3000;
The sendMessage function: It’s important to know that the sendMessage function always sends lines. This means that it will always end with a \n . So pay attention when you try to receive data from it, that you do not forget the \n .
The stopClient function is self explaining. It stops the connecting and sets the listener to null.
Now the real thing starts. The run() function. The run() function starts a thread. TCP connection is not allowed to be in the same thread as the UI since it can block each other and you will get a list of Android errors (and you Android app will crash).
This “Socket socket = new Socket(serverAddr, SERVER_PORT);” will create a new socket with the right IP and PORT. This socket will be used to make connection with the server.
To be able to read and write we have to create a PrintWriter and BufferedReader as you can see in the code below. It creates two instances, one to read and one to write. It’s easy as that
mBufferOut = new PrintWriter(new BufferedWriter(new OutputStreamWriter(socket.getOutputStream())), true);
mBufferIn = new BufferedReader(new InputStreamReader(socket.getInputStream()));
In this while loop, the thread reads the bufferreader until it has read a line or the buffer is full. If you want to send data piece by piece, you’ll have to add \n. The readLine() function will cut it off for you anyway! When the bufferreader has read something, it will call the messageReceived function. More information about it later in the tutorial!
while (mRun) {
    mServerMessage = mBufferIn.readLine();
    if (mServerMessage != null && mMessageListener != null) {
    //call the method messageReceived from MyActivity class
    mMessageListener.messageReceived(mServerMessage);
    }
}
Here we create the messageReceived function. We declare the interface here but the function must be called in the mainactivity in an asynckTask doInBackground.
public interface OnMessageReceived {
    public void messageReceived(String message);
}
In the mainactivitiy: Place this line where you would like to start the tcp code.
new ConnectTask().execute("");
To stop, I advice you to use this:
if(TcpClient.isConnected)
{
    mTcpClient.stopClient();
}
This is to prevent you to call the stopClient when the client is not yet created. This will cause your app to crash!
Now I will try to explain the asynck task. I advice you to download it below.
The task has 2 functions. messageReceived will be called if you receive a message.
In the messageReceived you see a call of publishProgress. This publishProgress function allows you to call the onProgressUpdate function.
The onProgressUpdate is an important one. It allows you to update your GUI without blocking your application!
In this onProgressUpdate you can use all of the GUI changing function, for example, a textview can be updated with it’s “setText(string)” function.
From now on you should be able to set it up all by yourself. If you have any more question, do not hesitate to leave a reply!
TCP client can be found here: TCP client
The asynck task:
public class ConnectTask extends AsyncTask {

    @Override
    protected TcpClient doInBackground(String... message) {
    //we create a TCPClient object and
    mTcpClient = new TcpClient(new TcpClient.OnMessageReceived() {
        @Override
        //here the messageReceived method is implemented
        public void messageReceived(String message) {
            //this method calls the onProgressUpdate
            //publishProgress(message);
            Log.i("Debug","Input message: " + message);
        }
        });
    mTcpClient.run();

    return null;
    }

    @Override
    protected void onProgressUpdate(String... values) {
    super.onProgressUpdate(values);
    Log.i("onProgressUpdate",values[0]);

    }
}
IV. Conclusion
This is demo simple about socket, and of course, it not main point of topic.
And the main wil be introduced in next tutorial:
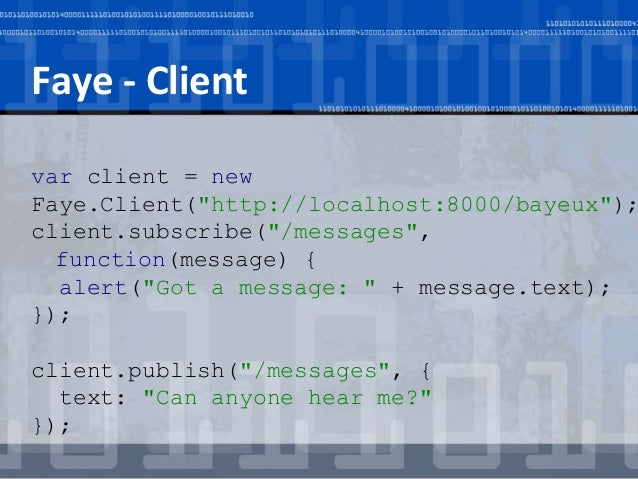
Using Android faye client to keep communicate with socket server.
See you!
All rights reserved
