Android O: Fonts
Bài đăng này đã không được cập nhật trong 4 năm
Giới thiệu
Trước đây để có thể thiết lập được một Fonts cho TextView hoặc EditText thì cần phải làm theo các bước:
- Tải file fonts (có thể tải từ Google Fonts) vào thư mục
assetsproject của bạn - Thiết lập setTypeFace() cho TextView hoặc EditText nếu chỉ dùng 1 lần
textView.setTypeface(Typeface.createFromAsset(context.assets, font))
hoặc bạn cũng có thể custom TextView hoặc EditText nếu bạn sử dụng nhiều lần
public class FontTextView extends TextView {

    public FontTextView(Context context) {
      super(context);
      Typeface face=Typeface.createFromAsset(context.getAssets(), "Helvetica_Neue.ttf");
      this.setTypeface(face);
    }

    public FontTextView(Context context, AttributeSet attrs) {
        super(context, attrs);
     Typeface face=Typeface.createFromAsset(context.getAssets(), "Helvetica_Neue.ttf");
  this.setTypeface(face);
    }

    public FontTextView(Context context, AttributeSet attrs, int defStyle) {
        super(context, attrs, defStyle);
     Typeface face=Typeface.createFromAsset(context.getAssets(), "Helvetica_Neue.ttf");
  this.setTypeface(face);
    }

    protected void onDraw (Canvas canvas) {
        super.onDraw(canvas);
    }
}
Nhưng tháng 3 năm 2017, Google công bố phiên bản phát hành Android O đầu tiên. Trong phiên bản Android O có rất nhiều các tính năng mới mẻ và 1 trong các tính năng của nó là hỗ trợ Fonts tốt hơn các phiên bản Android trước đó.
Cài đặt
Trước hết bạn cần phải sử dụng phiên bản Android Studio thấp nhấp là 24 Preview 3 (trong bài giới thiệu này tôi sử dụng phiên bản Android Studio Canary 3.0 ) vì phiên bản này có nhiều tính năng mà các phiên bản trước không có. Để có thể tìm được Fonts đẹp các bạn có thể vào trang web Google Fonts của Google
Các bước để thực hiện thiết lập 1 fonts bất kỳ cho TextView hoặc EditText của bạn:
- Chúng ta cần làm là tải Fonts cần thiết (có thể tải Font từ Google Fonts).
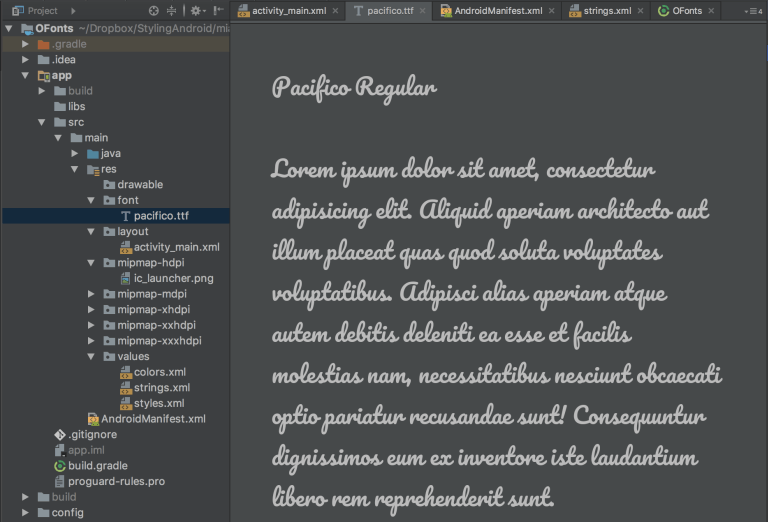
- Giải nén file zip, sao chép file fonts.ttf vào thư mục
res/fontsresource của project của ứng dụng.
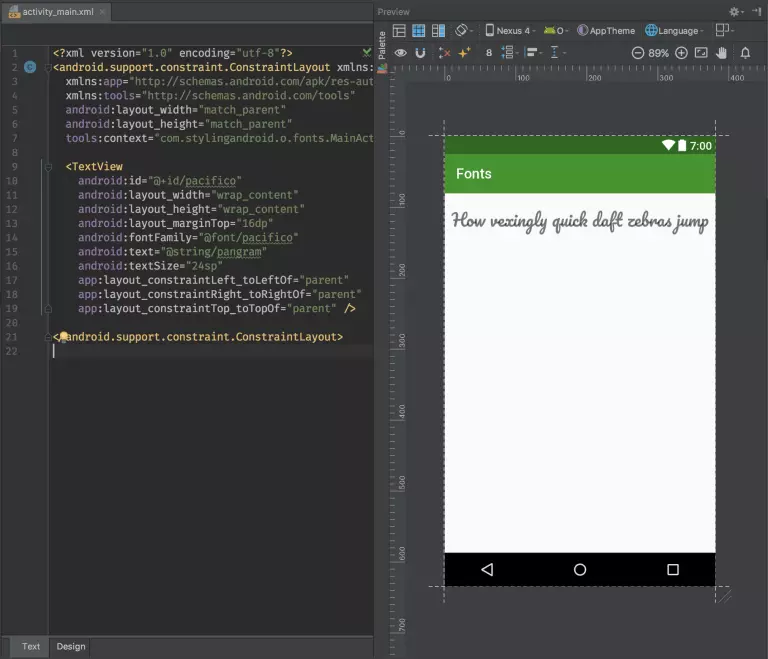
 3. Tiếp theo là ta chỉ việc sử dụng
 fonts trong file xml của chúng ta
<?xml version="1.0" encoding="utf-8"?>
<android.support.constraint.ConstraintLayout xmlns:android="http://schemas.android.com/apk/res/android"
  xmlns:app="http://schemas.android.com/apk/res-auto"
  xmlns:tools="http://schemas.android.com/tools"
  android:layout_width="match_parent"
  android:layout_height="match_parent"
  tools:context="com.stylingandroid.o.fonts.MainActivity">

  <TextView
    android:layout_width="wrap_content"
    android:layout_height="wrap_content"
    android:layout_marginTop="16dp"
    android:fontFamily="@font/pacifico"
    android:text="@string/pangram"
    android:textSize="20sp"
    app:layout_constraintLeft_toLeftOf="parent"
    app:layout_constraintRight_toRightOf="parent"
    app:layout_constraintTop_toTopOf="parent" />

</android.support.constraint.ConstraintLayout>
sau đó ta được như sau:
 Từ trên Android Studio ta có thể thấy được những đoạn text đã được thiết lập fonts theo ý muốn của chúng ta. Trong khi theo phương pháp cũ đã được nêu lên ở phần giới thiệu thì các bạn phải
 build và chạy chương trình mới có thể thấy được.
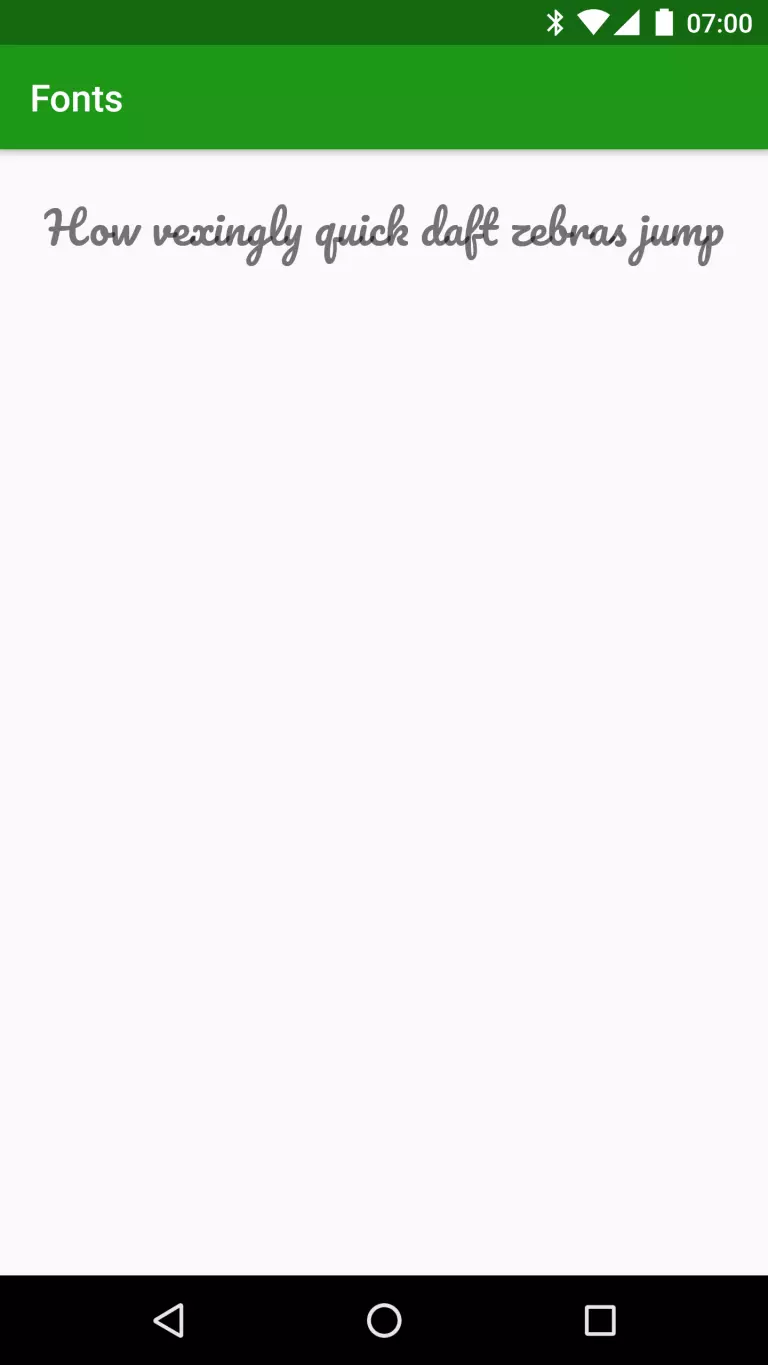
4. Xem kết quả sau khi chạy chương trình
 Nguồn Nguồn bài viết
Source code Source code
Nguồn Nguồn bài viết
Source code Source code
Thiết lập TextStyle cho TextView hoặc EditText
Một vấn đề đặt ra là nếu bạn muốn TextView hoặc EditText của bạn lúc thì chữ nghiêng( Italic), chữ đậm ( bold) hoặc font chữ thường (normal) của cùng một loại Fonts chữ thì sao. Vấn đề này sẽ được trình bày tiếp dưới đây. Trong ví dụ dưới đây ta sẽ sử dụng Fonts chữ Nunito được tải trên trang web Google Fonts của Google.
Để thực hiện được điều đó chúng ta làm lần lượt theo các bước sau đây:
- Chúng ta tải các fonts Nunito-Regular.ttf, Nunito-Bold.ttf, Nunito-Italic.ttf, and Nunito-BoldItalic.ttf và đổi tên chúng thành nunito_regular.ttf, nunito_bold.ttf, nunito_italic.ttf, và nunito_bold_italic.ttf bởi vì trong file
res/fontschỉ được phép chứa các ký tự thường và gạch dưới không được ký tự in hoa. - Tiếp theo bước 2 chúng ta sẽ tạo ra một file font-family xml trong thư mục
res/fontsnhư dưới đây
<?xml version="1.0" encoding="utf-8"?>
<font-family xmlns:android="http://schemas.android.com/apk/res/android">
  <font
    android:font="@font/nunito_regular"
    android:fontStyle="normal"
    android:fontWeight="400" />

  <font
    android:font="@font/nunito_italic"
    android:fontStyle="italic"
    android:fontWeight="400" />

  <font
    android:font="@font/nunito_bold"
    android:fontStyle="normal"
    android:fontWeight="700" />

  <font
    android:font="@font/nunito_bold_italic"
    android:fontStyle="italic"
    android:fontWeight="700" />

</font-family>
Về cơ bản đây chỉ đơn giản là một mapping của một fontStyle và fontWeight cụ thể đến tài nguyên font sẽ được sử dụng để render các biến thể cụ thể. Các giá trị hợp lệ cho fontStyle là normal hoặc italic; Và fontWeight phù hợp với đặc tả trọng lượng font CSS (đây là một tài nguyên tốt để hiểu cách các kiểu được đặt tên trong Nunito như các ánh xạ bổ sung, ánh sáng, thông thường, semi-bold, bold, extra-bold, và black
3. Bước tiếp theo là chúng ta sử dụng chúng ở TextView hoặc EditText trong file xml
<?xml version="1.0" encoding="utf-8"?>
<android.support.constraint.ConstraintLayout xmlns:android="http://schemas.android.com/apk/res/android"
  xmlns:app="http://schemas.android.com/apk/res-auto"
  xmlns:tools="http://schemas.android.com/tools"
  android:layout_width="match_parent"
  android:layout_height="match_parent"
  tools:context="com.stylingandroid.o.fonts.MainActivity">

  <TextView
    android:id="@+id/pacifico"
    android:layout_width="wrap_content"
    android:layout_height="wrap_content"
    android:layout_marginTop="16dp"
    android:fontFamily="@font/pacifico"
    android:text="@string/pangram"
    android:textSize="20sp"
    app:layout_constraintLeft_toLeftOf="parent"
    app:layout_constraintRight_toRightOf="parent"
    app:layout_constraintTop_toTopOf="parent" />

  <TextView
    android:id="@+id/nunito_regular"
    android:layout_width="wrap_content"
    android:layout_height="wrap_content"
    android:layout_marginTop="8dp"
    android:fontFamily="@font/nunito_regular"
    android:text="@string/pangram"
    android:textSize="20sp"
    app:layout_constraintLeft_toLeftOf="parent"
    app:layout_constraintRight_toRightOf="parent"
    app:layout_constraintTop_toBottomOf="@+id/pacifico" />

  <TextView
    android:id="@+id/nunito_bold"
    android:layout_width="wrap_content"
    android:layout_height="wrap_content"
    android:layout_marginTop="8dp"
    android:fontFamily="@font/nunito_bold"
    android:text="@string/pangram"
    android:textSize="20sp"
    app:layout_constraintLeft_toLeftOf="parent"
    app:layout_constraintRight_toRightOf="parent"
    app:layout_constraintTop_toBottomOf="@+id/nunito_regular" />

  <TextView
    android:id="@+id/nunito_italic"
    android:layout_width="wrap_content"
    android:layout_height="wrap_content"
    android:layout_marginTop="8dp"
    android:fontFamily="@font/nunito_italic"
    android:text="@string/pangram"
    android:textSize="20sp"
    app:layout_constraintLeft_toLeftOf="parent"
    app:layout_constraintRight_toRightOf="parent"
    app:layout_constraintTop_toBottomOf="@+id/nunito_bold" />

  <TextView
    android:id="@+id/nunito_bold_italic"
    android:layout_width="wrap_content"
    android:layout_height="wrap_content"
    android:layout_marginTop="8dp"
    android:fontFamily="@font/nunito_bold_italic"
    android:text="@string/pangram"
    android:textSize="20sp"
    app:layout_constraintLeft_toLeftOf="parent"
    app:layout_constraintRight_toRightOf="parent"
    app:layout_constraintTop_toBottomOf="@+id/nunito_italic" />

  <TextView
    android:id="@+id/nunito_programmatic"
    android:layout_width="wrap_content"
    android:layout_height="wrap_content"
    android:layout_marginTop="8dp"
    android:text="@string/pangram"
    android:textSize="20sp"
    app:layout_constraintLeft_toLeftOf="parent"
    app:layout_constraintRight_toRightOf="parent"
    app:layout_constraintTop_toBottomOf="@+id/nunito_italic" />

</android.support.constraint.ConstraintLayout>
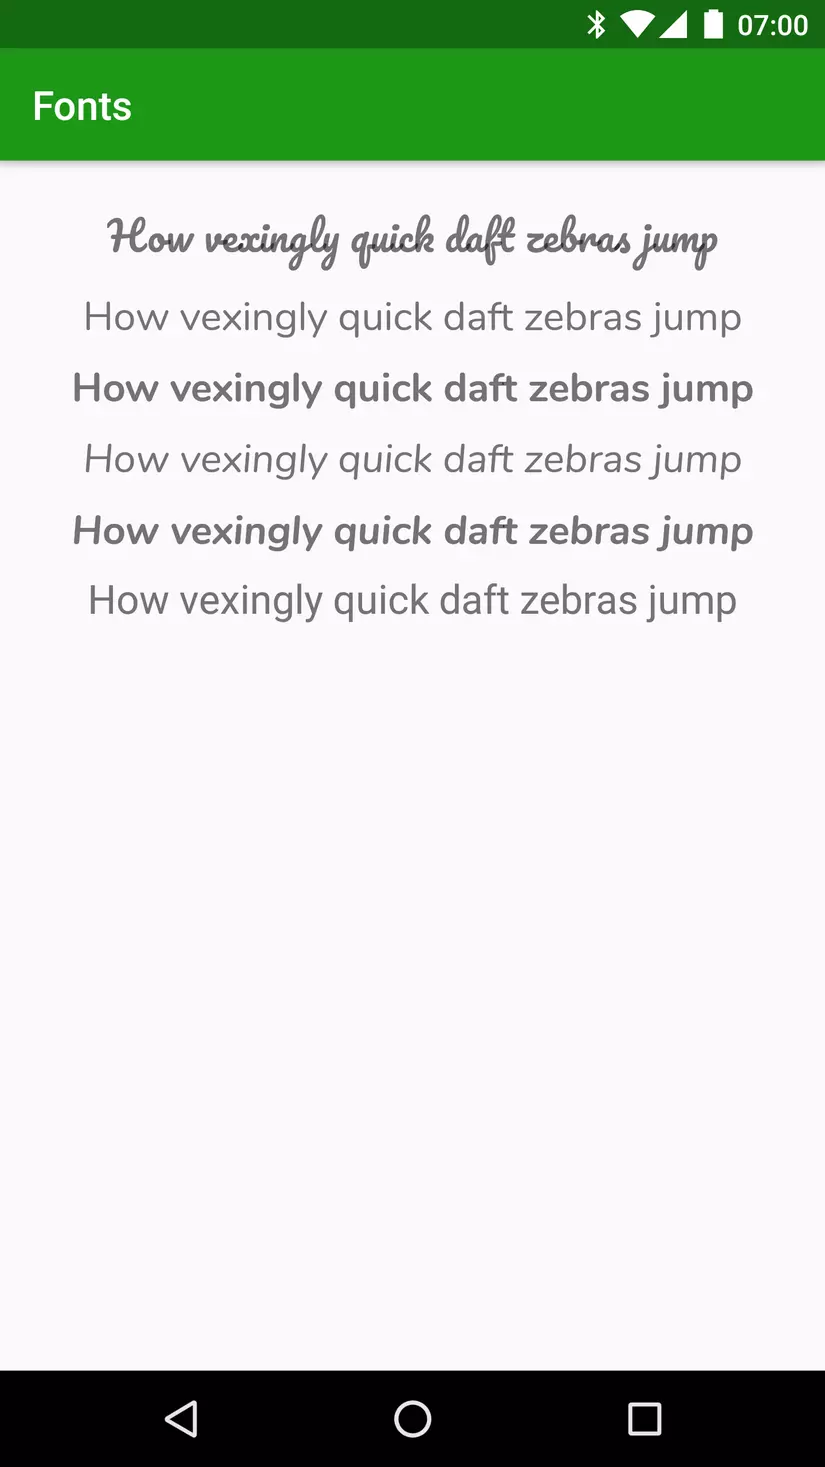
Kết quả sau khi sử dụng fonts
 Nguồn bài viết Nguồn bài viết
Source code ví dụng Source code
Qua bài viết này t đã giới thiệu cho các bạn cách thay đổi fonts cho TextView hoặc EditText, nếu có bất cứ thắc mắc nào hãy comment bên dưới nhé.!
Nguồn bài viết Nguồn bài viết
Source code ví dụng Source code
Qua bài viết này t đã giới thiệu cho các bạn cách thay đổi fonts cho TextView hoặc EditText, nếu có bất cứ thắc mắc nào hãy comment bên dưới nhé.!
All rights reserved
