[Android Boilerplate]Cùng tạo ứng dụng đầu tiên sử dụng MVVM, Dagger2, RxJava, LiveData và Room (P2 : Setup Retrofit, Repository Pattern, ViewModel)
Bài đăng này đã không được cập nhật trong 8 năm
P1 : Setup Dagger 2 + Room
P2 : Setup Retrofit, Repository Pattern, ViewModel
1. Setup Retrofit
Ở Phần trước : Chúng ta đã cấu hình và implement injection dependency framework và cơ sở dữ liệu local rồi. Ở bước này chúng ta sẽ tạo kết nối internet đến API của CoinmarketCap và lấy các dữ liệu mà chúng ta cần.
Để lấy các dữ liệu từ API thì chúng ta làm việc với Retrofit. Sau đó chúng ta cần phải xem xét một số cấu hình bổ sung thêm với Retrofit. Chúng ta cần thêm Moshi để thêm vào Convert Factory và RxJava2 để thêm vào Call Factory của các đối tượng JSON vào trong POJOs và chúng làm việc với Observables như một Http Response. Để làm các việc trên, chúng ta phải cấu hình RxJava2 và RxAndroid
File build.gradle của ứng dụng sẽ như sau
dependencies {
    //android libs
    implementation fileTree(dir: 'libs', include: ['*.jar'])
    implementation "org.jetbrains.kotlin:kotlin-stdlib-jre7:$kotlin_version"
    implementation "com.android.support:appcompat-v7:${rootProject.ext.supportLibVersion}"
    implementation "com.android.support.constraint:constraint-layout:${rootProject.ext.constraintLayoutVersion}"
    //moshi
    implementation "com.squareup.moshi:moshi-kotlin:${rootProject.ext.moshiKotlinVersion}"
    implementation "com.squareup.moshi:moshi-adapters:${rootProject.ext.moshiKotlinVersion}"
    //dagger2
    implementation "com.google.dagger:dagger-android:${rootProject.ext.dagger2Version}"
    kapt "com.google.dagger:dagger-compiler:${rootProject.ext.dagger2Version}"
    kapt "com.google.dagger:dagger-android-processor:${rootProject.ext.dagger2Version}"
    //Room
    implementation "android.arch.persistence.room:runtime:${rootProject.ext.archRoomVersion}"
    kapt "android.arch.persistence.room:compiler:${rootProject.ext.archRoomVersion}"
    //Lifecycle
    implementation "android.arch.lifecycle:extensions:${rootProject.ext.archLifecycleVersion}"
    kapt "android.arch.lifecycle:compiler:${rootProject.ext.archLifecycleVersion}"
    //Retrofit
    implementation "com.squareup.retrofit2:retrofit:${rootProject.ext.retrofitVersion}"
    implementation "com.squareup.retrofit2:converter-moshi:${rootProject.ext.moshiConverterVersion}"
    implementation "com.squareup.retrofit2:adapter-rxjava2:${rootProject.ext.rxJavaAdapterVersion}"
    //RxJava RxAndroid
    implementation "io.reactivex.rxjava2:rxjava:${rootProject.ext.rxJava2Version}"
    implementation "io.reactivex.rxjava2:rxandroid:${rootProject.ext.rxAndroidVersion}"

    //test
    testImplementation "junit:junit:${rootProject.ext.junitVersion}"
    androidTestImplementation "com.android.support.test:runner:${rootProject.ext.testRunnerVersion}"
    androidTestImplementation "com.android.support.test.espresso:espresso-core:${rootProject.ext.testEspressoVersion}"
}
Bước đầu tiên, Tạo class ApiClient. Trong ApiClient khởi tạo Retrofit với BaseURL là “https://api.coinmarketcap.com/v1/".
class ApiClient {

  companion object {

    private const val BASE_URL = "https://api.coinmarketcap.com/v1/"

    fun getClient(): Retrofit {
      val okHttpClient = OkHttpClient.Builder().build()
      val moshi = Moshi.Builder().build()

      return Builder().client(okHttpClient).baseUrl(BASE_URL)
          .addConverterFactory(MoshiConverterFactory.create(moshi))
          .addCallAdapterFactory(RxJava2CallAdapterFactory.create())
          .build()
    }
  }
}
Bước thứ 2 là tạo interface(ApiInterface), với các phương thức để chúng ta có thể truy vấn dữ liệu (GET), hoặc cập nhật dữ liệu (POST,DELETE). Ở đây chúng ta sẽ truy vấn một danh sách tất cả các đồng tiền ảo (cryptocurrencies). Thông qua API có endpoint là ticker/, và tham số start. và Response sẽ là một Observable. với danh sách các đồng tiền(cryptocurrencies). Đối với các dữ liệu ban đầu (để đảm bảo rằng chắc chắn API sẽ chạy được) tôi sử dụng ticker/ làm điểm cuối và fix cứng giá trị 0 vào start parameter
interface ApiInterface {

  @GET("ticker/")
  fun getCryptocurrencies(@Query("start") start: String): Observable<List<Cryptocurrency>>
}
Sau những config đơn giản, Chúng ta có thể test http client của chúng ta từ Activity để truy vấn tất cả các đồng tiền ảo. Để giữ cho quá trình test dễ dàng. Thì tôi sử dụng một truy vấn đơn giản bằng cách sử dụng RxJava2 và hiển thị Số lượng bản ghi tiền ảo được truy vấn về thay vì liệt kê từng mục. Nhớ thêm permission INTERNET vào trong file manifest nhé.
class CryptocurrenciesActivity : AppCompatActivity() {

  val compositeDisposable = CompositeDisposable()

  override fun onCreate(savedInstanceState: Bundle?) {
    super.onCreate(savedInstanceState)
    setContentView(R.layout.activity_main)

    showCryptocurrencies()
  }

  private fun showCryptocurrencies() {
    val cryptocurrenciesResponse = getCryptocurrencies()
        .subscribeOn(Schedulers.newThread())
        .observeOn(AndroidSchedulers.mainThread())

    val disposableObserver =
        cryptocurrenciesResponse.subscribeWith(object : DisposableObserver<List<Cryptocurrency>>() {
          override fun onComplete() {
          }

          override fun onNext(cryptocurrencies: List<Cryptocurrency>) {
            val listSize = cryptocurrencies.size
            Log.e("ITEMS **** ", listSize.toString())
          }

          override fun onError(e: Throwable) {
            Log.e("ERROR *** ", e.message)
          }

        })

    compositeDisposable.addAll(disposableObserver)

  }

  private fun getCryptocurrencies(): Observable<List<Cryptocurrency>> {
    val retrofit = ApiClient.getClient()
    val apiInterface = retrofit.create(ApiInterface::class.java)
    return apiInterface.getCryptocurrencies("0")
  }

  override fun onDestroy() {
    compositeDisposable.dispose()
    super.onDestroy()
  }
}
Bây giờ thì bạn có thể clean project và run lại để hưởng thụ thành quả
2. Setup Repository và ViewModel
1. Setup Repository
 Mục này sẽ có vẻ hơi khó hiểu 1 chút, vì chúng ta sẽ phải cần làm mục này vì thực sự nó cần thiết. Ví dụ chúng ta sẽ phải viết lại cách để kết nối để có thể sử dụng
 Repository Pattern và ViewModel. Tôi sẽ cố gắng viết nó theo cách đơn giản nhất có thể vì thực sự nó hơi khó hiểu một chút so với người mới tiếp cận.
Như ở mục trên, Retrofit đã được cấu hình để biến Http API thành một Interface và một class Helper với một đối tượng Retrofit. Chúng ta tạo một connection mới có thể lấy dữ liệu từ API.
Nhưng để tận dụng lợi thế của Dagger2. Tôi sẽ tạo 1 module mới có tên là NetModule để injection tất cả các network dependencies và đưa nó vào trong biểu đồ của Dagger2 để dễ dàng sử dụng trong ứng dụng.Module mới này cung cấp tất cả các điều này (Một điều quan trọng nữa là phải thêm KotlinJsonAdapterFactory khi cung cấp đối tượng Moshi, vì thêm vào để có thể tích hợp đầy đủ giữa Kotlin và Moshi, lấy dữ liệu từ API sau đó ghi vào trong cơ sở dữ liệu).
@Module
class NetModule(private val baseUrl: String) {

  @Provides
  @Singleton
  fun providesOkHttpClient(): OkHttpClient = OkHttpClient.Builder().build()

  @Provides
  @Singleton
  fun providesMoshi(): Moshi = Moshi.Builder().add(KotlinJsonAdapterFactory()).build()

  @Provides
  @Singleton
  fun providesRetrofit(okHttpClient: OkHttpClient, moshi: Moshi): Retrofit {
    return Builder().client(okHttpClient).baseUrl(baseUrl)
        .addConverterFactory(MoshiConverterFactory.create(moshi))
        .addCallAdapterFactory(RxJava2CallAdapterFactory.create())
        .build()
  }

  @Provides
  @Singleton
  fun providesApiInterface(retrofit: Retrofit): ApiInterface = retrofit.create(
      ApiInterface::class.java)
}
Hãy nhỡ rằng khi tạo mới module thì phải khao báo trong AppComponent :
@Singleton
@Component(
    modules = arrayOf(AndroidInjectionModule::class, BuildersModule::class, AppModule::class,
        NetModule::class)
)
interface AppComponent {
  fun inject(app: CryptocurrencyApplication)
}
Cũng trong Class Application khi injection là tạo mới Module phải được viết như sau :
class CryptocurrencyApplication: Application(), HasActivityInjector {

  @Inject lateinit var activityInjector: DispatchingAndroidInjector<Activity>

  override fun onCreate() {
    super.onCreate()

    DaggerAppComponent.builder()
        .appModule(AppModule(this))
        .netModule(NetModule(BuildConfig.URL))
        .build().inject(this)
  }

  override fun activityInjector(): AndroidInjector<Activity> = activityInjector

}
Tôi đặt tất cả các class liên quan đến Room vào một package tên là local, Còn tất cả liên quan đến Retrofit vào package tên là remote. Sau đó tôi tạo một class Repository (CryptocurrencyRepository). Class này sẽ có trách nhiệm duy nhất để lấy thông tin từ các nguồn dữ liệu khác nhau:
class CryptocurrencyRepository @Inject constructor(val apiInterface: ApiInterface,
    val cryptocurrenciesDao: CryptocurrenciesDao) {

  fun getCryptocurrencies(): Observable<List<Cryptocurrency>> {
    val observableFromApi = getCryptocurrenciesFromApi()
    val observableFromDb = getCryptocurrenciesFromDb()
    return Observable.concatArrayEager(observableFromApi, observableFromDb)
  }

  fun getCryptocurrenciesFromApi(): Observable<List<Cryptocurrency>> {
    return apiInterface.getCryptocurrencies("0")
        .doOnNext {
          Log.e("REPOSITORY API * ", it.size.toString())
          for (item in it) {
            cryptocurrenciesDao.insertCryptocurrency(item)
          }
        }
  }

  fun getCryptocurrenciesFromDb(): Observable<List<Cryptocurrency>> {
    return cryptocurrenciesDao.queryCryptocurrencies()
        .toObservable()
        .doOnNext {
          //Print log it.size :)
          Log.e("REPOSITORY DB *** ", it.size.toString())
        }
  }
}
Như bạn có thể thấy. RxJava là chủ đạo trong class Repository. Follow tôi thực hiện sẽ là đầu tiên tôi sẽ thực hiện gọi tới API để lấy dữ liệu, sau đó tôi chèn vào DB và với toán tử concatArray nhận được kết quả từ DB và những kết quả từ API. Trong tương lai sẽ có ý tưởng thực hiện kiểm tra có kết nói hay không thì lấy ở DB hoặc cập nhật vào DB. Nhưng ở đây chỉ để đạt được mục tiêu : Là ứng dụng Offline đầu tiên.
2. Setup ViewModel
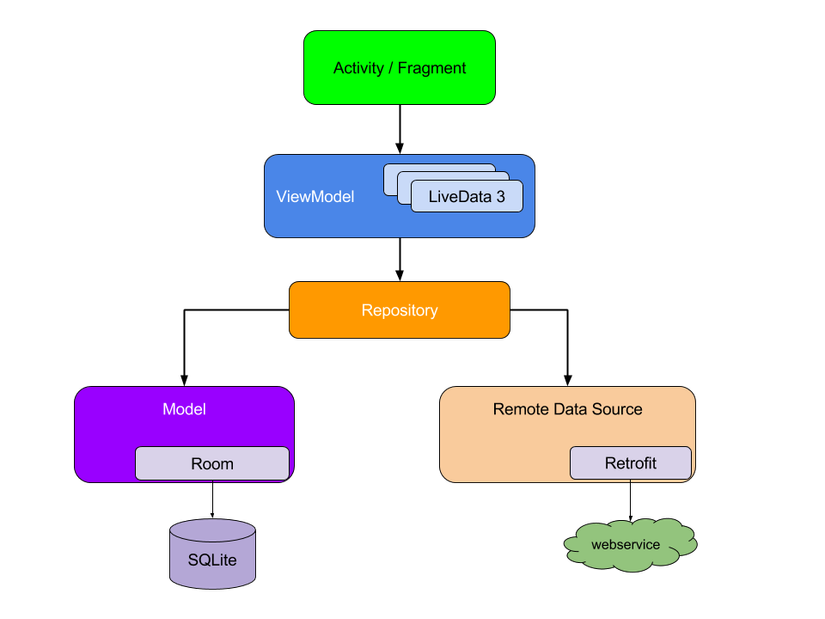
Tầng tiếp theo chúng ta cần phát triển để liên kết giữa tầng data sources và tầng view(có thể là activity) nó chính là ViewModel. ViewModel trong trường hợp này của tôi là nhận dữ liệu từ Repository và sắp xếp lại sau đó gửi ra ngoài Activity. Ở đây có một đối tượng mới được đưa đến hoàn cảnh này đó chính là LiveData, sau đó các đối tượng MutableLiveData mới được tạo và dữ liệu, danh sách các tiền điện tử hoặc một lỗi được thiết lập để được hiển thị trong View. Điều quan trọng cần phải lưu ý là tôi đặt dữ liệu cho đối tượng LiveData thông qua method value hoặc postValue.
class CryptocurrenciesViewModel @Inject constructor(
    private val cryptocurrencyRepository: CryptocurrencyRepository) : ViewModel() {

  var cryptocurrenciesResult: MutableLiveData<List<Cryptocurrency>> = MutableLiveData()
  var cryptocurrenciesError: MutableLiveData<String> = MutableLiveData()
  lateinit var disposableObserver: DisposableObserver<List<Cryptocurrency>>

  fun cryptocurrenciesResult(): LiveData<List<Cryptocurrency>> {
    return cryptocurrenciesResult
  }

  fun cryptocurrenciesError(): LiveData<String> {
    return cryptocurrenciesError
  }

  fun loadCryptocurrencies() {

    disposableObserver = object : DisposableObserver<List<Cryptocurrency>>() {
      override fun onComplete() {

      }

      override fun onNext(cryptocurrencies: List<Cryptocurrency>) {
        cryptocurrenciesResult.postValue(cryptocurrencies)
      }

      override fun onError(e: Throwable) {
        cryptocurrenciesError.postValue(e.message)
      }
    }


    cryptocurrencyRepository.getCryptocurrencies()
        .subscribeOn(Schedulers.newThread())
        .observeOn(AndroidSchedulers.mainThread())
        .debounce(400, MILLISECONDS)
        .subscribe(disposableObserver)
  }

  fun disposeElements(){
    if(null != disposableObserver && !disposableObserver.isDisposed) disposableObserver.dispose()
  }

}
Tôi muốn chia sẻ ở đây một chiến lược được sử dụng quan trọng trong ViewModel để tránh những hành vi lạ khi nhận dữ liệu từ DB và API, toán tử debounce () từ RxJava được sử dụng để mang lại trải nghiệm người dùng tốt hơn: một kết nối nếu cuộc gọi API được thực thi nhanh, có thể bạn không muốn hiển thị các mục DB, và sau đó nhanh chóng thay đổi chúng với những dữ liệu mới. Điều này được giải thích rõ hơn trong bài viết của Ovidiu Latcu
3.Và bây giờ thì làm thế nào để hiển thị dữ liệu chúng ta vừa lấy được
Cuối cùng, trước khi chúng ta có thể hiển thị dữ liệu trong Activity, vì class ViewModel của chúng ta không có một hàm tạo rỗng. Chúng ta cần gọi ViewModelProvider.Factory và chuyển nó thành tham số của ViewModelProviders. Sau đó CryptocurrenciesViewModel được tạo và gọi để nhận các cryptocurrencies được tạo ra và LiveData (observers) cũng được thực hiện:
class CryptocurrenciesActivity : AppCompatActivity() {
@Inject
lateinit var cryptocurrenciesViewModelFactory: CryptocurrenciesViewModelFactory
lateinit var cryptocurrenciesViewModel: CryptocurrenciesViewModel
override fun onCreate(savedInstanceState: Bundle?) {
super.onCreate(savedInstanceState)
setContentView(layout.activity_main)
AndroidInjection.inject(this)
cryptocurrenciesViewModel = ViewModelProviders.of(this, cryptocurrenciesViewModelFactory).get(
CryptocurrenciesViewModel::class.java)
cryptocurrenciesViewModel.loadCryptocurrencies()
cryptocurrenciesViewModel.cryptocurrenciesResult().observe(this,
Observer<List<Cryptocurrency>> {
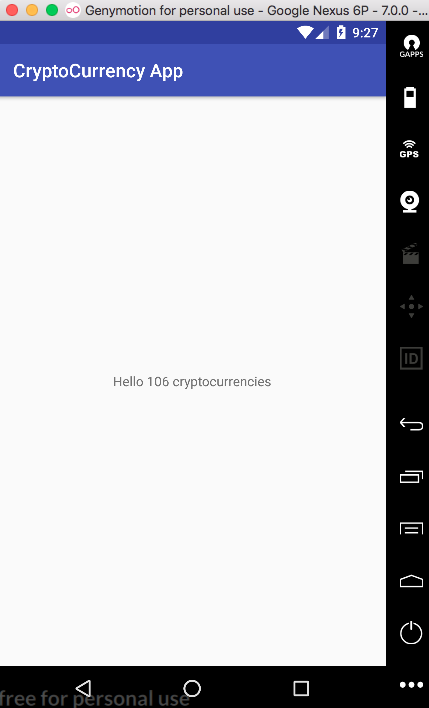
hello_world_textview.text = "Hello ${it?.size} cryptocurrencies"
})
cryptocurrenciesViewModel.cryptocurrenciesError().observe(this, Observer<String>{
hello_world_textview.text = "Hello error $it"
})
}
override fun onDestroy() {
cryptocurrenciesViewModel.disposeElements()
super.onDestroy()
}
}
Trước khi kết thúc mục này, tôi muốn chia sẻ thêm một vài điều tôi đã phải để khắc phục một số vấn đề khi nhận dữ liệu từ API và hiển thị thông tin (số lượng mục) ở ngoài màn hình. Khi chúng ta thay đổi POJO - Entity, chúng ta cũng sẽ cần phải thay đổi phiên bản Database vì sự thay đổi của lược đồ DB cũng thay đổi. Đồng thời Room yêu cầu phải migration plan để cho biết các thay đổi của các phiên bản (cũng để tránh mất dữ liệu). Và thêm nó vào trong trình tạo Database. Đây là đường dẫn thích hợp, nhưng nếu bạn không muốn giữ dữ liệu và tránh di chuyển, phương thức fallbackToDestructiveMigration () có thể được sử dụng.
Trong trường hợp của tôi, điều này có thể được nhìn thấy trong lớp AppModule (nếu bạn muốn có ý tưởng rõ ràng hơn về điều này, tôi khuyên bạn nên đọc bài viết của Florina về Room migrations:
@Module
class AppModule(val app: Application) {

  companion object {
    val MIGRATION_1_2: Migration = object : Migration(1, 2){
      override fun migrate(database: SupportSQLiteDatabase) {
        // Change the table name to the correct one
        database.execSQL("ALTER TABLE cryptocurrency RENAME TO cryptocurrencies")
      }
    }
  }

  @Provides
  @Singleton
  fun provideApplication(): Application = app

  @Provides
  @Singleton
  fun provideCryptocurrenciesDatabase(app: Application): Database = Room.databaseBuilder(app,
      Database::class.java, "cryptocurrencies_db")
      /*.addMigrations(MIGRATION_1_2)*/
      .fallbackToDestructiveMigration()
      .build()

  @Provides
  @Singleton
  fun provideCryptocurrenciesDao(
      database: Database): CryptocurrenciesDao = database.cryptocurrenciesDao()

  @Provides
  fun provideCryptocurrenciesViewModelFactory(
      factory: CryptocurrenciesViewModelFactory): ViewModelProvider.Factory = factory
}
Khi chạy project sẽ được màn hình sau
4. Hiển thị danh sách tiền ảo với infinite scrolling
1. Viết lại logic lấy data
Để có thể dùng infinite scrolling thì chúng ta viết lại hàm queryCryptocurrencies tại class DAO có truyền vào các tham số limit (tổng số lượng bản ghi lấy về trong một câu truy vấn), offset (vị trí bắt đầu của danh sách bản ghi được lấy ra). Theo cách này thì dữ liệu sẽ được lấy ra theo khối thay vì lấy ra hàng loạt.
@Dao
interface CryptocurrenciesDao {

  @Query("SELECT * FROM cryptocurrencies ORDER BY rank limit :limit offset :offset")
  fun queryCryptocurrencies(limit:Int, offset:Int): Single<List<Cryptocurrency>>

  // ... rest of the code
}
Sự thay đổi bên trên cũng làm ảnh hưởng lớn đến lớp Repository, sau đó hàm getCryptocurrencies () cũng thay đổi để nhận hai tham số: limit và offset
class CryptocurrencyRepository @Inject constructor(val apiInterface: ApiInterface,
    val cryptocurrenciesDao: CryptocurrenciesDao, val utils: Utils) {

  fun getCryptocurrencies(limit: Int, offset: Int): Observable<List<Cryptocurrency>> {
    val hasConnection = utils.isConnectedToInternet()
    var observableFromApi: Observable<List<Cryptocurrency>>? = null
    if (hasConnection){
      observableFromApi = getCryptocurrenciesFromApi()
    }
    val observableFromDb = getCryptocurrenciesFromDb(limit, offset)

    return if (hasConnection) Observable.concatArrayEager(observableFromApi, observableFromDb)
    else observableFromDb
  }
  //...rest of the code
}
Như các bạn đã thấy, logic trong hàm getCryptocurrencies có một đoạn check để xem thiết bị có kết nối Internet nào không để lấy dữ liệu từ API. và luôn lấy data từ trong Database. Để gọi hàm check internet thì có một class mới có tên Utils được viết hàm isConnectedToInternet() để check có kết nối internet không
class Utils @Inject constructor(private val context: Context) {

  fun isConnectedToInternet(): Boolean {
    val connectivity = context.getSystemService(
        Context.CONNECTIVITY_SERVICE) as ConnectivityManager
    if (connectivity != null) {
      val info = connectivity.allNetworkInfo
      if (info != null)
        for (i in info.indices)
          if (info[i].state == NetworkInfo.State.CONNECTED) {
            return true
          }
    }
    return false
  }
}
Hãy nhớ thêm permission ACCESS_NETWORK_STATE để có thể làm việc check xem có kết nối internet không.
Ngoài ra còn 1 chút thay đổi trong class AppModule của Dagger2 cung cấp class Utils. Để có thể Injection được :
@Module
class AppModule(val app: Application) {

  //...rest of the code

  @Provides
  @Singleton
  fun provideUtils(): Utils = Utils(app)
}
2. Hiển thị dữ liệu ra list
Đầu tiên chúng ta sẽ hiển thị danh sách các đồng tiền ảo trước. Đây là file layout của từng đồng tiền trong list
<?xml version="1.0" encoding="utf-8"?>

<android.support.v7.widget.CardView
    xmlns:android="http://schemas.android.com/apk/res/android"
    xmlns:app="http://schemas.android.com/apk/res-auto"
    android:id="@+id/cryptocurrency_card"
    android:layout_width="match_parent"
    android:layout_height="wrap_content"
    android:layout_margin="@dimen/default_4dp"
    app:cardElevation="@dimen/cardview_default_elevation"
    app:cardCornerRadius="@dimen/default_4dp"
    >

  <RelativeLayout
      android:layout_width="match_parent"
      android:layout_height="match_parent"
      >

    <TextView
        android:id="@+id/cryptocurrency_id"
        android:layout_width="wrap_content"
        android:layout_height="wrap_content"
        android:layout_centerInParent="true"
        android:layout_margin="@dimen/default_8dp"
        android:text="@string/cryptocurrency_text"
        android:textSize="@dimen/text_name_size"
        android:textStyle="italic"
        android:textColor="@color/colorAccent"
        />

  </RelativeLayout>
</android.support.v7.widget.CardView>
Bước tiếp theo chúng ta sẽ tạo Adapter và ViewHolder
class CryptocurrenciesAdapter(
    cryptocurrencies: List<Cryptocurrency>?) : RecyclerView.Adapter<CryptocurrencieViewHolder>() {

  private var cryptocurrenciesList = ArrayList<Cryptocurrency>()

  init {
    this.cryptocurrenciesList = cryptocurrencies as ArrayList<Cryptocurrency>
  }

  override fun onCreateViewHolder(parent: ViewGroup?, viewType: Int): CryptocurrencieViewHolder {
    val itemView = LayoutInflater.from(parent?.context).inflate(R.layout.cryptocurrency_list_item,
        parent, false)
    return CryptocurrencieViewHolder(itemView)
  }

  override fun getItemCount(): Int {
    return cryptocurrenciesList.size
  }

  override fun onBindViewHolder(holder: CryptocurrencieViewHolder?, position: Int) {
    val cryptocurrencyItem = cryptocurrenciesList[position]
    holder?.cryptocurrencyListItem(cryptocurrencyItem)
  }

  fun addCryptocurrencies(cryptocurrencies: List<Cryptocurrency>){
    val initPosition = cryptocurrenciesList.size
    cryptocurrenciesList.addAll(cryptocurrencies)
    notifyItemRangeInserted(initPosition, cryptocurrenciesList.size)
  }

  class CryptocurrencieViewHolder(itemView: View) : RecyclerView.ViewHolder(itemView) {

    var cryptocurrencyId = itemView.findViewById<TextView>(R.id.cryptocurrency_id)

    fun cryptocurrencyListItem(cryptocurrencyItem: Cryptocurrency) {
      cryptocurrencyId.text = cryptocurrencyItem.id
    }
  }
}
Một điều quan trọng cần phải nói ở đây là hàm addCryptocurrencies (). Đây sẽ là chìa khóa để làm việc infinite scroll.
Tiếp theo là cập nhật bố cục của danh sách cryptocurrencies, do đó, chúng ta sẽ có một RecyclerView và một ProgressBar
<?xml version="1.0" encoding="utf-8"?>
<RelativeLayout
    xmlns:android="http://schemas.android.com/apk/res/android"
    xmlns:tools="http://schemas.android.com/tools"
    android:layout_width="match_parent"
    android:layout_height="match_parent"
    android:layout_margin="8dp"
    tools:context="co.cdmunoz.cryptocurrencyapp.ui.list.CryptocurrenciesActivity"
    >

  <android.support.v7.widget.RecyclerView
      android:id="@+id/recycler"
      android:layout_width="match_parent"
      android:layout_height="wrap_content"
      />
  <ProgressBar
      android:id="@+id/progressBar"
      android:layout_width="wrap_content"
      android:layout_height="wrap_content"
      android:layout_centerHorizontal="true"
      android:layout_centerVertical="true"
      style="?android:attr/progressBarStyle"
      android:visibility="gone"
      />

</RelativeLayout>
3. Triển khai infinite scrolling
Chúng ta sẽ tạo 1 class InfiniteScrollListener để bắt sự kiện addOnScrollListener như sao :
class InfiniteScrollListener(
    val func: () -> Unit,
    val layoutManager: LinearLayoutManager) : RecyclerView.OnScrollListener() {

  private var previousTotal = 0
  private var loading = true
  private var visibleThreshold = 2
  private var firstVisibleItem = 0
  private var visibleItemCount = 0
  private var totalItemCount = 0

  override fun onScrolled(recyclerView: RecyclerView, dx: Int, dy: Int) {
    super.onScrolled(recyclerView, dx, dy)

    if (dy > 0) {
      visibleItemCount = recyclerView.childCount
      totalItemCount = layoutManager.itemCount
      firstVisibleItem = layoutManager.findFirstVisibleItemPosition()

      if (loading) {
        if (totalItemCount > previousTotal) {
          loading = false
          previousTotal = totalItemCount
        }
      }
      if (!loading && (totalItemCount - visibleItemCount) <= (firstVisibleItem + visibleThreshold)) {
        // End has been reached
        func()
        loading = true
      }
    }
  }
}
và bây giờ Activity của chúng ta sẽ như sau :
class CryptocurrenciesActivity : AppCompatActivity() {

  override fun onCreate(savedInstanceState: Bundle?) {
    super.onCreate(savedInstanceState)
    setContentView(layout.activity_cryptocurrencies)

    initializeRecycler()

    progressBar.visibility = View.VISIBLE
    loadData()

    cryptocurrenciesViewModel.cryptocurrenciesResult().observe(this,
        Observer<List<Cryptocurrency>> {
          if (it != null) {
            val position = cryptocurrenciesAdapter.itemCount
            cryptocurrenciesAdapter.addCryptocurrencies(it)
            recycler.adapter = cryptocurrenciesAdapter
            recycler.scrollToPosition(position - Constants.LIST_SCROLLING)
          }
        })

    cryptocurrenciesViewModel.cryptocurrenciesError().observe(this, Observer<String> {
      if (it != null) {
        Toast.makeText(this, resources.getString(R.string.cryptocurrency_error_message) + it,
            Toast.LENGTH_SHORT).show()
      }
    })

    cryptocurrenciesViewModel.cryptocurrenciesLoader().observe(this, Observer<Boolean> {
      if (it == false) progressBar.visibility = View.GONE
    })
  }

  private fun initializeRecycler() {
    val gridLayoutManager = GridLayoutManager(this, 1)
    gridLayoutManager.orientation = LinearLayoutManager.VERTICAL
    recycler.apply {
      setHasFixedSize(true)
      layoutManager = gridLayoutManager
      addOnScrollListener(InfiniteScrollListener({ loadData() }, gridLayoutManager))
    }
  }

  fun loadData() {
    cryptocurrenciesViewModel.loadCryptocurrencies(Constants.LIMIT, currentPage * Constants.OFFSET)
    currentPage++
  }
}
Hãy xem xét một điều : Để giữ cho trải niệm cuộn trơn tru, chúng ta cần phải nói định nghĩa vị trí lấy dữ diệu tại 1 vị trí cụ thể . để tránh các chuyển động không mong muốn :
recycler.scrollToPosition(position — Constants.LIST_SCROLLING)
Class Constants trong project sẽ gồm các giá trị như sau :
class Constants {
  companion object {
    const val OFFSET = 12
    const val LIMIT = 12
    const val START_ZERO_VALUE = "0"
    const val DATABASE_NAME = "cryptocurrencies_db"
    const val LIST_SCROLLING = 12
  }
}
Kết thúc bài viết , các bạn thử chạy project của mình xem sao nhé. giờ các bạn đã có thể có 1 project Android BoilerPlate đơn giản rồi đấy Thanks Nguồn bài viết : Tại ĐÂY Sources code project hoàn chỉnh tại ĐÂY
All rights reserved
