Tổng hợp một số Design pattern trong Java
Bài đăng này đã không được cập nhật trong 4 năm

Như chúng ta đã biết Design Pattern là kỹ thuật trong lập trình hướng đối tượng, nó rất quan trọng khi giải quyết vấn đề của nhiều bài toán khác nhau. Có thể nói đây là sự đúc kết kinh nghiệm để linh hoạt trong quá trình sử dụng về sau và mỗi lập trình viên muốn giỏi đều phải biết.
Trên thực tiễn khi áp dụng có thể sẽ mất nhiều thời gian để ngấm sâu về nó, mong muốn của bài viết là trình bày về 3 design pattern nổi bật thuộc 3 nhóm khác nhau :
- Java Singleton (Creational Design Patterns)
- Adapter Pattern (Structural Design Patterns)
- Chain of Responsibility Pattern (Behavioral Design Patterns)
Java Singleton
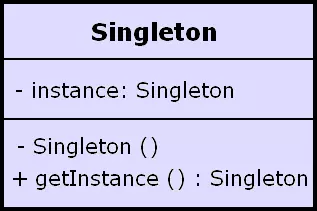
Java Singleton thuộc vào 1 trong 5 design pattern của nhóm Creational Design Pattern.
- Chức năng: Singleton đảm bảo chỉ duy nhất môt new instance được tạo ra và nó sẽ cung cấp cho bạn một method để truy cập đến thực thể đó.
- Nguyên tắc: Dù cho việc thực hiện bằng cách nào đi nữa cũng dựa vào nguyên tắc dưới đây.
- private constructor để hạn chế truy cập từ class bên ngoài
- đặt private static variable đảm bảo biến chỉ được khởi tạo trong class.
- có một method public để return instance được khởi tạo ở trên.
Khi hiểu được 3 mục đích chính này rồi chúng ta đang hình dung ra cách thức thực hiện có thể dựa trên kinh nghiệm của chính mình. Dưới đây sẽ là một vài cách thức mình nghĩ là khá đầy đủ cho việc tham khảo.
- Eager initialization
- Static block initialization
- Lazy Initialization
- Thread Safe Singleton
- Bill Pugh Singleton Implementation
- Using Reflection to destroy Singleton Pattern
- Enum Singleton
- Serialization and Singleton
1. Eager initialization
Singleton Class được khởi tạo ngay khi được gọi đến. Đây là cách dễ nhất nhưng nó có một nhược điểm mặc dù instance đã được khởi tạo mà có thể sẽ không dùng tới. Ví dụ:
public class EagerInitializedSingleton {

    private static final EagerInitializedSingleton instance = new EagerInitializedSingleton();

    //private constructor to avoid client applications to use constructor
    private EagerInitializedSingleton(){}

    public static EagerInitializedSingleton getInstance(){
        return instance;
    }
}
2. Static block initialization
Cách làm tương tự như Eager initialization chỉ khác phần static block cung cấp thêm option cho việc handle. Ví dụ:
public class StaticBlockSingleton {

    private static StaticBlockSingleton instance;

    private StaticBlockSingleton(){}

    //static block initialization for exception handling
    static{
        try{
            instance = new StaticBlockSingleton();
        }catch(Exception e){
            throw new RuntimeException("Exception occured in creating singleton instance");
        }
    }

    public static StaticBlockSingleton getInstance(){
        return instance;
    }
}
3. Lazy Initialization
Là một cách làm mang tính mở rộng hơn so với 2 cách làm trên và hoạt động tốt trong từng thread đơn lẻ. Và tất nhiên vấn để xấu sẽ sảy ra nếu chúng ta đang dùng nó với multi thread. 
Ví dụ:
public class LazyInitializedSingleton {

    private static LazyInitializedSingleton instance;

    private LazyInitializedSingleton(){}

    public static LazyInitializedSingleton getInstance(){
        if(instance == null){
            instance = new LazyInitializedSingleton();
        }
        return instance;
    }
}
Để khắc phục nhược điểm trên, bạn theo dõi tiếp cách làm số 4. 
4. Thread Safe Singleton
Thực chất với những gì ta đã nắm được từ Java basic thì đã nghĩ ngay đến để method getInstance với synchronized . It's true. Vì vậy mà mình ko cần phải viết lại đoạn code trên nữa nhé .
5. Bill Pugh Singleton Implementation
Với cách làm này bạn sẽ tạo ra static nested class với vai trò 1 Helper khi muốn tách biệt chức năng cho 1 class function rõ ràng hơn. Theo mình nghĩ đây là một cách làm hay bạn có thể thử áp dụng. 
Ví dụ:
public class BillPughSingleton {

    private BillPughSingleton(){}

    private static class SingletonHelper{
        private static final BillPughSingleton INSTANCE = new BillPughSingleton();
    }

    public static BillPughSingleton getInstance(){
        return SingletonHelper.INSTANCE;
    }
}
6. Using Reflection to destroy Singleton Pattern
Reflection được dùng để destroy tất cả các singletion ở trên mà chúng ta đã tạo ra nó. Ví dụ:
public class ReflectionSingletonTest {

    public static void main(String[] args) {
        EagerInitializedSingleton instanceOne = EagerInitializedSingleton.getInstance();
        EagerInitializedSingleton instanceTwo = null;
        try {
            Constructor[] constructors = EagerInitializedSingleton.class.getDeclaredConstructors();
            for (Constructor constructor : constructors) {
                //Below code will destroy the singleton pattern
                constructor.setAccessible(true);
                instanceTwo = (EagerInitializedSingleton) constructor.newInstance();
                break;
            }
        } catch (Exception e) {
            e.printStackTrace();
        }
        System.out.println(instanceOne.hashCode());
        System.out.println(instanceTwo.hashCode());
    }

}
7. Enum Singleton
Khi dùng enum thì các params chỉ được khởi tạo 1 lần duy nhất, đây cũng là cách giúp bạn tạo ra Singleton instance. Tuy rằng cách làm của nó có phần cứng nhắc . Ví dụ:
public enum EnumSingleton {

    INSTANCE;

    public static void doSomething(){
        //do something
    }
}
8. Serialization and Singleton
Serialization là một kỹ thuật sắp xếp đối tượng cần lưu trữu một cách tuần tự. Dưới đây là quá trình đọc ghi dữ liệu khi tích hợp singleton. Ví dụ :
public class SerializableSingletonClass implements Serializable{
    private static final long serialVersionUID = 1L;
    private int value;
    private String name;

    private SerializableSingletonClass(int value, String name) {
        if( value < 0 ) throw new IllegalArgumentException("Value may not be less than 0");
        this.value = value;
        this.name = Validate.notNull(name, "Name may not be null");
    }

    private static class SerializableSingletonHolder{
        public static final SerializableSingletonClass INSTANCE;
        static {
            INSTANCE = new SerializableSingletonClass(0, "default");
        }
    }

    private void readObject(ObjectInputStream stream) throws InvalidObjectException{
        throw new InvalidObjectException("proxy required");
    }

    private Object writeReplace(){
        return new SerializationProxy(this);
    }

    private static class SerializationProxy implements Serializable{
        private static final long serialVersionUID = 1L;
        public SerializationProxy(SerializableSingletonClass ignored) { } //Here is the question

        private Object readResolve(){
            return SerializableSingletonHolder.INSTANCE;
        }
    }
}
Dưới đây là bảng đo performance của một số phương pháp dùng trong Singleton | Link chi tiết
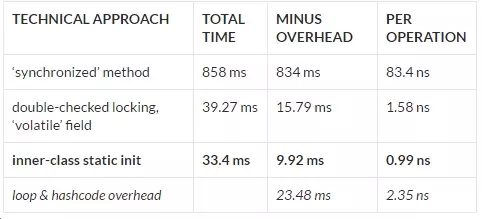
==> Qua đó thấy được cách làm khi sử dụng inner-class static ( hay Bill Pugh Singleton Implementation ) đạt performance cao nhất.
Adapter Pattern
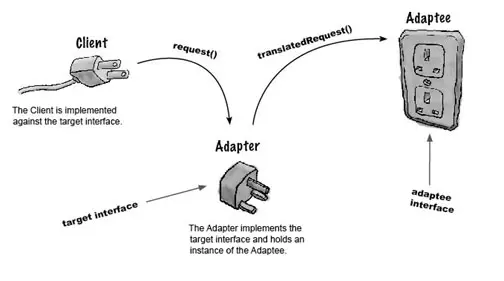
Adapter Pattern thuộc vào nhóm mẫu thiết kế Cấu trúc, có chức năng làm cho 2 giao diện không liên quan tới nhau có thể làm việc cùng nhau. Nói đơn giản hơn, một chiếc điện thoại chạy pin 5V khi sạc điện vào ổ cắm 220V cần dùng 1 đốc sạc ( đây chính là Adapter).
Một đoạn code demo trực tiếp ví dụ trên cho các bạn hiểu ngay được cấu trúc này vì đây là cấu trúc thân thuộc với chúng ta, sẽ rất tốt nếu bạn hiểu ngay được nó.  Let's gooo...
**B1: ** Bạn tạo ra 2 model Volt & Socket như sau:
Volt class
public class Volt {

	private int volts;

	public Volt(int v){
		this.volts=v;
	}

	public int getVolts() {
		return volts;
	}

	public void setVolts(int volts) {
		this.volts = volts;
	}

}
Socket class
public class Socket {

	public Volt getVolt(){
		return new Volt(120);
	}
}
Tiếp theo bạn tạo ra interface Adapter với mong muốn đầu ra được lazy hơn.
*SocketAdapter *
public interface SocketAdapter {

	public Volt get120Volt();

	public Volt get12Volt();

	public Volt get3Volt();
}
Bây giờ việc triển khai Adapter pattern có 2 cách:
- Class Adapter
 //Using inheritance for adapter pattern
public class SocketClassAdapterImpl extends Socket implements SocketAdapter{

	Override
	public Volt get120Volt() {
		return getVolt();
	}

	Override
	public Volt get12Volt() {
		Volt v= getVolt();
		return convertVolt(v,10);
	}

	Override
	public Volt get3Volt() {
		Volt v= getVolt();
		return convertVolt(v,40);
	}

	private Volt convertVolt(Volt v, int i) {
		return new Volt(v.getVolts()/i);
	}

}
- Object Adapter
public class SocketObjectAdapterImpl implements SocketAdapter{

	//Using Composition for adapter pattern
	private Socket sock = new Socket();

	Override
	public Volt get120Volt() {
		return sock.getVolt();
	}

	Override
	public Volt get12Volt() {
		Volt v= sock.getVolt();
		return convertVolt(v,10);
	}

	Override
	public Volt get3Volt() {
		Volt v= sock.getVolt();
		return convertVolt(v,40);
	}

	private Volt convertVolt(Volt v, int i) {
		return new Volt(v.getVolts()/i);
	}
}
Chain of Responsibility Pattern
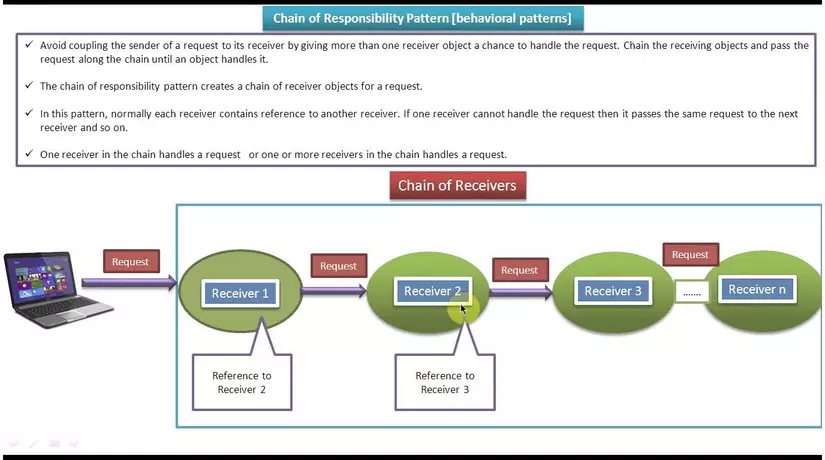
Khắc phục việc ghép cặp giữa bộ gởi và bộ nhận thông điệp; Các đối tượng nhận thông điệp được kết nối thành một chuỗi và thông điệp được chuyển dọc theo chuỗi nầy đến khi gặp được đối tượng xử lý nó.Tránh việc gắn kết cứng giữa phần tử gởi request với phần tử nhận và xử lý request bằng cách cho phép hơn 1 đối tượng có có cơ hội xử lý request . Liên kết các đối tượng nhận request thành 1 dây chuyền rồi “pass” request xuyên qua từng đối tượng xử lý đến khi gặp đối tượng xử lý cụ thể.
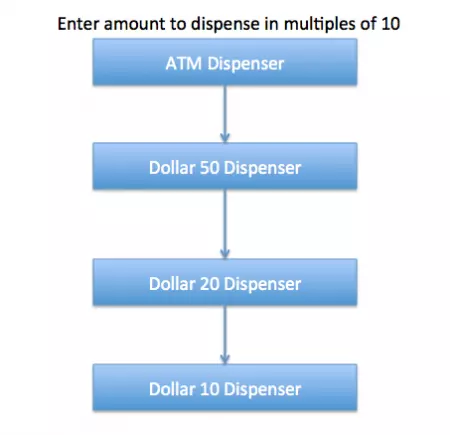
Để làm rõ ý tưởng của pattern này, chúng ta cùng thực hiện ví dụ: Rút tiền ATM
- Yêu cầu: Request từ user khi input số tiền <= số tiền có trong tài khoản ==> ATM sẽ trả ra số tiền là bội số : 50K, 20K, 10K. ( nếu ko thể là bội số của 10K ==> error )
Hình minh họa
B1: Tạo model Currency là số tiền mỗi lần thanh toán được dùng bởi chuỗi implement interface DispenseChain
Currency class
public class Currency {

	private int amount;

	public Currency(int amt){
		this.amount=amt;
	}

	public int getAmount(){
		return this.amount;
	}
}
interface DispenseChain
public interface DispenseChain {

	void setNextChain(DispenseChain nextChain);

	void dispense(Currency cur);
}
B2: Tạo các processor cho từng loại tiền 50K, 20K, 10K.
Dollar50Dispenser class
public class Dollar50Dispenser implements DispenseChain {

	private DispenseChain chain;

	@Override
	public void setNextChain(DispenseChain nextChain) {
		this.chain=nextChain;
	}

	@Override
	public void dispense(Currency cur) {
		if(cur.getAmount() >= 50){
			int num = cur.getAmount()/50;
			int remainder = cur.getAmount() % 50;
			System.out.println("Dispensing "+num+" 50$ note");
			if(remainder !=0) this.chain.dispense(new Currency(remainder));
		}else{
			this.chain.dispense(cur);
		}
	}

}
Dollar20Dispenser class
public class Dollar20Dispenser implements DispenseChain{

	private DispenseChain chain;

	Override
	public void setNextChain(DispenseChain nextChain) {
		this.chain=nextChain;
	}

	Override
	public void dispense(Currency cur) {
		if(cur.getAmount() >= 20){
			int num = cur.getAmount()/20;
			int remainder = cur.getAmount() % 20;
			System.out.println("Dispensing "+num+" 20$ note");
			if(remainder !=0) this.chain.dispense(new Currency(remainder));
		}else{
			this.chain.dispense(cur);
		}
	}

}
Dollar10Dispenser class
public class Dollar10Dispenser implements DispenseChain {

	private DispenseChain chain;

	Override
	public void setNextChain(DispenseChain nextChain) {
		this.chain=nextChain;
	}

	Override
	public void dispense(Currency cur) {
		if(cur.getAmount() >= 10){
			int num = cur.getAmount()/10;
			int remainder = cur.getAmount() % 10;
			System.out.println("Dispensing "+num+" 10$ note");
			if(remainder !=0) this.chain.dispense(new Currency(remainder));
		}else{
			this.chain.dispense(cur);
		}
	}

}
B3: Vận hành máy ATM này chúng ta cần lưu ý: các processor xử lý request lần lượt là: Dispenser 50K >> Dispenser 20K >> Dispenser 10K
public class ATMDispenseChain {

	private DispenseChain c1;

	public ATMDispenseChain() {
		// initialize the chain
		this.c1 = new Dollar50Dispenser();
		DispenseChain c2 = new Dollar20Dispenser();
		DispenseChain c3 = new Dollar10Dispenser();

		// set the chain of responsibility
		c1.setNextChain(c2);
		c2.setNextChain(c3);
	}

	public static void main(String[] args) {
		ATMDispenseChain atmDispenser = new ATMDispenseChain();
		while (true) {
			int amount = 0;
			System.out.println("Enter amount to dispense");
			Scanner input = new Scanner(System.in);
			amount = input.nextInt();
			if (amount % 10 != 0) {
				System.out.println("Amount should be in multiple of 10s.");
				return;
			}
			// process the request
			atmDispenser.c1.dispense(new Currency(amount));
		}

	}

}
Các bạn hãy cùng thực hiện ví dụ trên , mình nghĩ rằng nó rất hay khi thực hiện và giúp ta hiểu hơn. Bước đầu có vẻ hơi khó với người mới học về ngôn ngữ lập trình hướng đối tượng nhưng dần dần sẽ thấy nó thú vị hơn nhiều. Tất nhiên các bạn đã từng đọc qua thì biết đâu sẽ thấy hay hơn so với lần đầu mình đọc chăng ? ^_^
Chúc các bạn code vui và ngày càng pro hơn với design pattern nhé !!!
All rights reserved