Xây dựng ứng dụng Web sử dụng Laravel 5 và AngularJS - phần 2
Bài đăng này đã không được cập nhật trong 8 năm
1. Giới thiệu
Chào các bạn!
Trong phần một, ,mình đã tạo ra migration và seeder, chúng ta đã có một database đầy đủ dữ liệu. Trong phần 2 này, mình sẽ tiến hành tạo ra router, controler RESTful, các function để thao tác với database một cách chi tiết nhất. Các bạn có thể xem lại phần 1 tại đây.
Chúng ta bắt đầu thôi nào!
2. Creating & Testing Routes
Mở tệp routes.php (/var/www/html/blog/routes/web.php) và thêm mã sau:
Route::resource('posts', 'PostsController');
Bây giờ chúng ta cần tạo ra PostsController, tiến hành chạy câu lệnh sau ở Terminal:
php artisan make:controller PostsController
Đây là nội dung của PostsController chúng ta vừa tạo:
<?php

namespace App\Http\Controllers;

use Illuminate\Http\Request;

class PostsController extends Controller
{
    //
}
Nhưng ở đây chúng ta thao tác với RESTful nên route này sẽ đi kèm với một RESTful controller, tiến hành tạo lại PostsController bằng dòng lệnh sau:
php artisan make:controller PostsController --resource
Nếu nó hiển thị thông báo sau là việc tạo controller thành công.
Controller created successfully.
Bây giờ bạn sẽ thấy nó sẽ có các action cơ bản sau:
<?php

namespace App\Http\Controllers;

use Illuminate\Http\Request;

class PostsController extends Controller
{
    /**
     * Display a listing of the resource.
     *
     * @return \Illuminate\Http\Response
     */
    public function index()
    {
        //
    }

    /**
     * Show the form for creating a new resource.
     *
     * @return \Illuminate\Http\Response
     */
    public function create()
    {
        //
    }

    /**
     * Store a newly created resource in storage.
     *
     * @param  \Illuminate\Http\Request  $request
     * @return \Illuminate\Http\Response
     */
    public function store(Request $request)
    {
        //
    }

    /**
     * Display the specified resource.
     *
     * @param  int  $id
     * @return \Illuminate\Http\Response
     */
    public function show($id)
    {
        //
    }

    /**
     * Show the form for editing the specified resource.
     *
     * @param  int  $id
     * @return \Illuminate\Http\Response
     */
    public function edit($id)
    {
        //
    }

    /**
     * Update the specified resource in storage.
     *
     * @param  \Illuminate\Http\Request  $request
     * @param  int  $id
     * @return \Illuminate\Http\Response
     */
    public function update(Request $request, $id)
    {
        //
    }

    /**
     * Remove the specified resource from storage.
     *
     * @param  int  $id
     * @return \Illuminate\Http\Response
     */
    public function destroy($id)
    {
        //
    }
}
Chúng ta có thể xem tất cả các action của RESTful controller mà Route::resource hỗ trợ, thông qua câu lệnh sau:
php artisan route:list
Nó sẽ hiển thị dưới dạng terminal như thế này  Bây giờ chúng ta có thể thêm các tiền tố prefix cho routers, trong routes.php cập nhật các mã như sau:
Route::group(['prefix' => 'api/v1'], function () {
    Route::resource('posts', 'PostsController');
});
Tiến hành chạy lại lệnh sau:
php artisan route:list
Bạn thấy đã có tiền tố api/v1 trong các URI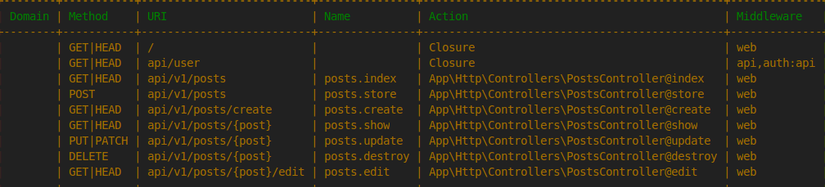 Bây giờ mở PostsController.php, thêm đoạn mã sau
 use App\Posts; ở phía trên:
namespace App\Http\Controllers;

use Illuminate\Http\Request;
use App\Posts;
Tiến hành cập nhật lại action índex như sau:
public function index()
    {
        $posts = Posts::all();
        return $posts;
    }
Ở đây mình đang sử dụng ORM để thao tác cới cơ sở dữ liệu, bạn có thể xem chi tiết hơn tại đây
Khởi động server:
php artisan serve
sau đó truy cập link sau:
http://localhost:8000/api/v1/posts
Bạn sẽ thấy tất cả các bản ghi trong table posts được hiển thị dưới dạng json.

3. Responses & Codes
Bây giờ mình sẽ thêm mã trạng thái vào dữ liệu, mã trạng thái sẵn có là: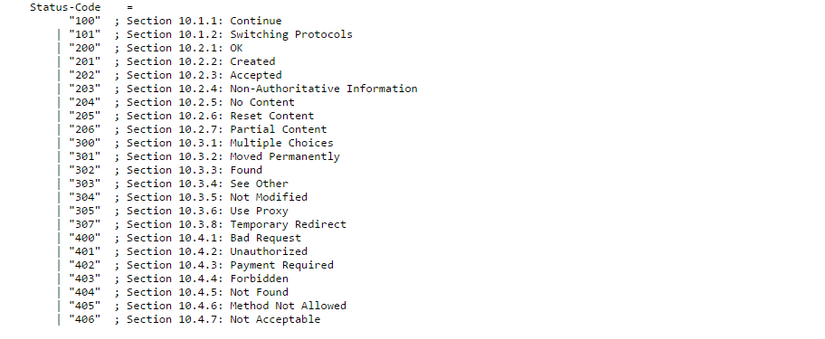 Chúng ta update lại action index như sau:
public function index()
    {
        try {
            $result = Posts::all();
            return response()->json(['data' => $result], \Illuminate\Http\Response::HTTP_OK);
        } catch (Exception $e) {
            $result = [
                'message' => $e->getMessage(),
                'data' => []
            ];
            return response()->json(['data' => $result], \Illuminate\Http\Response::HTTP_BAD_REQUEST);
        }
    }
Nếu trong quá trình xử lý dữ liệu nếu xảy ra lỗi thì chúng ta sẽ trả về HTTP_BAD_REQUEST như sau:
 Bạn cần phải thêm mã sau
 use Exception;vào trên use App\Posts;
use Exception;
use App\Posts;
4. Transforming Data
Để đảm bảo tính bảo mật cũng như chỉ lấy các trường cần thiết của database , chúng ta thêm 2 phương thức sau vào Model Posts:
protected function transformCollection($posts)
    {
        return array_map([$this, 'transform'], $posts->toArray());
    }

protected function transform($post)
    {
        return [
            'post_id' => $post['id'],
            'post' => $post['body'],
        ];
    }
Chúng ta cần phải update lại hàm index 1 chút như sau:
public function index()
    {
        try {
            $result = Posts::all();
            return response()->json(['data' => Posts::transformCollection($result)], \Illuminate\Http\Response::HTTP_OK);
        } catch (Exception $e) {
            $result = [
                'message' => $e->getMessage(),
                'data' => []
            ];
            return response()->json(['data' => $result], \Illuminate\Http\Response::HTTP_BAD_REQUEST);
        }
    }
và hàm show:
public function show($id)
    {
        try {
            $result = Posts::find($id);
            if (!$result) {
                $result = [
                    'message' => 'Post does not exist',
                    'data' => []
                ];
                return response()->json(['data' => $result], \Illuminate\Http\Response::HTTP_BAD_REQUEST);
            }
            return response()->json(['data' => Posts::transform($result)], \Illuminate\Http\Response::HTTP_OK);
        } catch (Exception $e) {
            $result = [
                'message' => $e->getMessage(),
                'data' => []
            ];
            return response()->json(['data' => $result], \Illuminate\Http\Response::HTTP_BAD_REQUEST);
        }
    }
5. Eloquent Relationships
Mở file model User.php và thêm đoạn mã sau:
public function posts()
    {
        return $this->hasMany('App\Posts');
    }
và file Posts.php thêm đoạn mã sau:
public function user(){
        return $this->belongsTo('App\User');
    }
Cập nhật lại function transform trong model Posts 1 chút:
protected function transform($post)
    {
        return [
            'post_id' => $post['id'],
            'post' => $post['body'],
            'submitted_by' => $post['user']['name']
        ];
    }
Mở file PostsController và update lại function index như sau:
public function index()
    {
        try {
            $result = Posts::with(array('User' => function ($query) {
                $query->select('id', 'name');
            }))->get();
            return response()->json(['data' => $this->transformCollection($result)], \Illuminate\Http\Response::HTTP_OK);
        } catch (Exception $e) {
            $result = [
                'message' => $e->getMessage(),
                'data' => []
            ];
            return response()->json(['data' => $result], \Illuminate\Http\Response::HTTP_BAD_REQUEST);
        }
    }
Tiếp theo mở file PostsController và update lại function show như sau:
public function show($id)
    {
        try {
            $result = Posts::with(array('User' => function ($query) {
                $query->select('id', 'name');
            }))->find($id);
            if (!$result) {
                $result = [
                    'message' => 'Post does not exist',
                    'data' => []
                ];
                return response()->json(['data' => $result], \Illuminate\Http\Response::HTTP_BAD_REQUEST);
            }
            return response()->json(['data' => $this->transform($result)], \Illuminate\Http\Response::HTTP_OK);
        } catch (Exception $e) {
            $result = [
                'message' => $e->getMessage(),
                'data' => []
            ];
            return response()->json(['data' => $result], \Illuminate\Http\Response::HTTP_BAD_REQUEST);
        }
    }
Tiến hành test action show để thấy sự thay đổi:

6. Implement POST, PUT, DELETE requests
Mở PostsController.php và cập nhật các phương thức store, update and destroy:
Function store
public function store(Request $request)
    {
        try {
            if (!$request->body or !$request->user_id) {
                $result = [
                    'message' => 'Please Provide Both body and user_id',
                    'data' => []
                ];
                return response()->json(['data' => $result], \Illuminate\Http\Response::HTTP_UNPROCESSABLE_ENTITY);
            }
            Posts::create($request->all());
            $result = [
                'message' => 'Post Created Succesfully',
            ];
            return response()->json(['data' => $result], \Illuminate\Http\Response::HTTP_OK);
        } catch (Exception $e) {
            $result = [
                'message' => $e->getMessage(),
                'data' => []
            ];
            return response()->json(['data' => $result], \Illuminate\Http\Response::HTTP_BAD_REQUEST);
        }
    }
Test để thấy kết quả: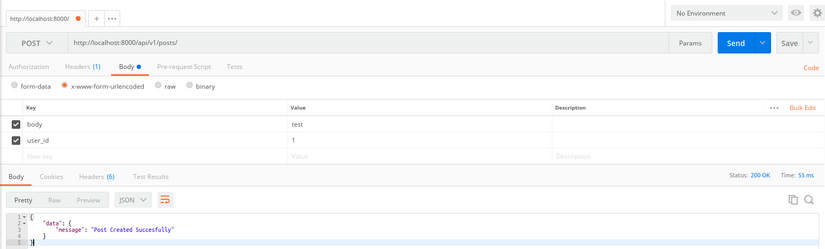 Function update
public function update(Request $request, $id)
    {
        try {
            if (!$request->body or !$request->user_id) {
                $result = [
                    'message' => 'Please Provide Both body and user_id',
                    'data' => []
                ];
                return response()->json(['data' => $result], \Illuminate\Http\Response::HTTP_UNPROCESSABLE_ENTITY);
            }
            $post = Posts::find($id);
            $post->body = $request->body;
            $post->user_id = $request->user_id;
            $post->save();
            $result = [
                'message' => 'Post Updated Succesfully'
            ];
            return response()->json(['data' => $result], \Illuminate\Http\Response::HTTP_OK);
        } catch (Exception $e) {
            $result = [
                'message' => $e->getMessage(),
                'data' => []
            ];
            return response()->json(['data' => $result], \Illuminate\Http\Response::HTTP_BAD_REQUEST);
        }
    }
Test để thấy kết quả:  và cuối cùng là function destroy:
public function destroy($id)
    {
        try {
            Posts::destroy($id);
            $result = [
                'message' => 'Post Deleted Succesfully'
            ];
            return response()->json(['data' => $result], \Illuminate\Http\Response::HTTP_OK);
        } catch (Exception $e) {
            $result = [
                'message' => $e->getMessage(),
                'data' => []
            ];
            return response()->json(['data' => $result], \Illuminate\Http\Response::HTTP_BAD_REQUEST);
        }
    }
Test để thấy kết quả: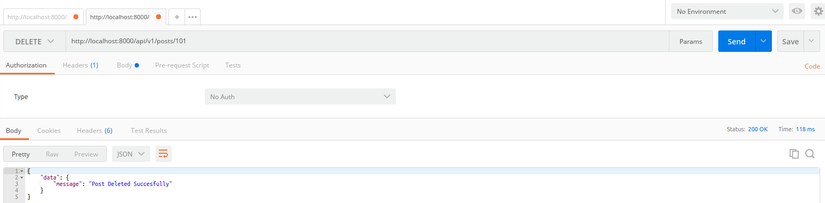
7. Kết Luận
Kết thúc phần này chúng ta đã hoàn thiện xong phần get dữ liệu của Backend, trong phần tới chúng ta sẽ tìm hiểu về cơ chế bảo mật trong api (JWT Auth,Tackling CORS). Hẹn gặp lại các bạn trong phần kế tiếp!
All rights reserved
