Xây dựng Ứng dụng hiển thị hình ảnh với thư viện Glide trong Android
Bài đăng này đã không được cập nhật trong 5 năm

1. Glide là gì ?
Glide là thư viện Android mã nguồn mở phổ biến để tải hình ảnh, video và ảnh động GIF. Với Glide, bạn có thể tải và hiển thị hình ảnh từ nhiều nguồn khác nhau, chẳng hạn như từ server hoặc các ảnh lưu cục bộ.
Theo mặc định, Glide sử dụng thực hiện tùy chỉnh của HttpURLConnection để tải hình ảnh qua internet. Tuy nhiên, Glide cũng cung cấp các plugin cho các thư viện mạng phổ biến khác như Volley hay OkHttp.
2. Tại sao sử dụng Glide
Việc tự phát triển các phương thức tải và hiển thị ảnh của riêng bạn trong Java thực sự là một vấn đề lớn : bạn phải chú ý tới bộ nhớ đệm, decode, quản lí các kết nối internat, luồng, xử lí exception và những vấn đề khác nữa. Glide là một lựa chọn hàng đầu, có tài liệu tốt, và được kiểm tra kỹ lưỡng, có thể giúp bạn tiết kiệm rất nhiều thời gian quý giá.
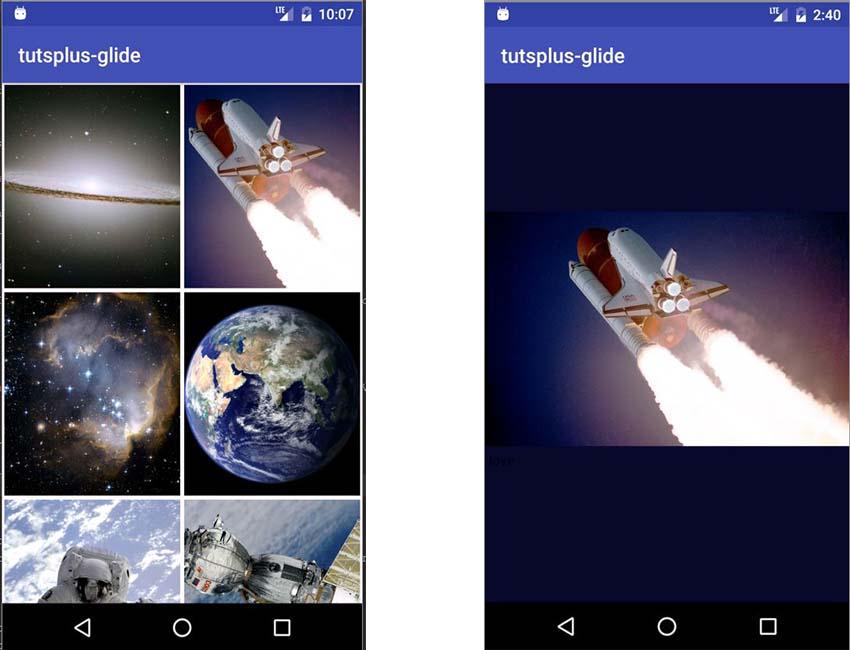
Trong hướng dẫn này, chúng ta sẽ tìm hiểu về Glide 3 bằng cách xây dựng một ứng dụng thư viện hình ảnh đơn giản. Nó sẽ tải hình ảnh qua internet và hiển thị chúng dưới dạng hình thu nhỏ trong RecyclerView, và khi người dùng nhấp vào bất kỳ hình ảnh nào, nó sẽ mở ra một Activity chi tiết có chứa hình ảnh lớn hơn.
3. Tạo Android Studio Project
Tạo mới một Project trong Android Studio với một activity rỗng MainActivity.

4. Khai báo Dependencies
Sau khi tạo Project, khai báo trong build.gradle
repositories {
  mavenCentral() // jcenter() works as well because it pulls from Maven Central
}

dependencies {
    // Glide
    compile 'com.github.bumptech.glide:glide:3.7.0'

    // Recyclerview
    compile 'com.android.support:recyclerview-v7:25.1.1'
}
Hoặc với Maven :
<dependency>
  <groupId>com.github.bumptech.glide</groupId>
  <artifactId>glide</artifactId>
  <version>3.7.0</version>
</dependency>
<dependency>
  <groupId>com.google.android</groupId>
  <artifactId>support-v4</artifactId>
  <version>r7</version>
</dependency>
Nhớ sync Project say khi đã thêm các khai báo trên.
Tích hợp thư viện
Nếu bạn muốn sử dụng một thư viện mạng như OkHttp hoặc Volley trong dự án của mình để thực hiện các kết nối internet, bạn nên tích hợp Glide cụ thể vào thư viện mà bạn đang sử dụng (thay vì một gói tin mặc định có gói HttpURLConnection).
Volley
dependencies {

    compile 'com.github.bumptech.glide:glide:3.7.0'
    compile 'com.github.bumptech.glide:volley-integration:1.4.0@aar'
    compile 'com.mcxiaoke.volley:library:1.0.8'
}
OkHttp
dependencies {

    // okhttp 3
    compile 'com.github.bumptech.glide:okhttp3-integration:1.4.0@aar'
    compile 'com.squareup.okhttp3:okhttp:3.2.0'

    // okhttp 2
    compile 'com.github.bumptech.glide:okhttp-integration:1.4.0@aar'
    compile 'com.squareup.okhttp:okhttp:2.2.0'
}
Bạn có thể tham khảo thêm tài liệu của Glide để biết thêm chi tiết https://github.com/bumptech/glide/wiki/Integration-Libraries
5. Thêm Internet permission
Để Gilde thực hiện tải ảnh thông qua internet, chúng ta cần sử dụng permission INTERNET trong AndroidManifest.xml
<uses-permission android:name="android.permission.INTERNET" />
6. Tạo layout
activity_main.xml
<?xml version="1.0" encoding="utf-8"?>
<RelativeLayout
        xmlns:android="http://schemas.android.com/apk/res/android"
        xmlns:tools="http://schemas.android.com/tools"
        android:id="@+id/activity_main"
        android:layout_width="match_parent"
        android:layout_height="match_parent">

    <android.support.v7.widget.RecyclerView
            android:id="@+id/rv_images"
            android:layout_width="match_parent"
            android:layout_height="match_parent"/>
</RelativeLayout>
Tạo custom item layout
Tiếp theo, chúng ta sẽ tạo custom layout cho mỗi view bên trong RecyclerView.
<?xml version="1.0" encoding="utf-8"?>
<LinearLayout xmlns:android="http://schemas.android.com/apk/res/android"
              android:orientation="vertical"
              android:layout_width="match_parent"
              android:layout_height="wrap_content">
<ImageView
        android:id="@+id/iv_photo"
        android:adjustViewBounds="true"
        android:layout_height="200dp"
        android:scaleType="centerCrop"
        android:layout_margin="2dp"
        android:layout_width="match_parent"/>

</LinearLayout>
7. Tạo data model
Chúng ta sẽ tạo một class model cho RecyclerView. Model này sẽ implement từ Parcelable để chuyển dữ liệu từ activity này đến activity khác. Trong ví dụ này, dữ liệu sẽ được chuyển từ SpaceGalleryActivity đến SpacePhotoActivity.
import android.os.Parcel;
import android.os.Parcelable;

public class SpacePhoto implements Parcelable {

    private String mUrl;
    private String mTitle;

    public SpacePhoto(String url, String title) {
        mUrl = url;
        mTitle = title;
    }

    protected SpacePhoto(Parcel in) {
        mUrl = in.readString();
        mTitle = in.readString();
    }

    public static final Creator<SpacePhoto> CREATOR = new Creator<SpacePhoto>() {
        @Override
        public SpacePhoto createFromParcel(Parcel in) {
            return new SpacePhoto(in);
        }

        @Override
        public SpacePhoto[] newArray(int size) {
            return new SpacePhoto[size];
        }
    };

    public String getUrl() {
        return mUrl;
    }

    public void setUrl(String url) {
        mUrl = url;
    }

    public String getTitle() {
        return mTitle;
    }

    public void setTitle(String title) {
        mTitle = title;
    }

    public static  SpacePhoto[] getSpacePhotos() {

        return new SpacePhoto[]{
                new SpacePhoto("http://i.imgur.com/zuG2bGQ.jpg", "Galaxy"),
                new SpacePhoto("http://i.imgur.com/ovr0NAF.jpg", "Space Shuttle"),
                new SpacePhoto("http://i.imgur.com/n6RfJX2.jpg", "Galaxy Orion"),
                new SpacePhoto("http://i.imgur.com/qpr5LR2.jpg", "Earth"),
                new SpacePhoto("http://i.imgur.com/pSHXfu5.jpg", "Astronaut"),
                new SpacePhoto("http://i.imgur.com/3wQcZeY.jpg", "Satellite"),
        };
    }

    @Override
    public int describeContents() {
        return 0;
    }

    @Override
    public void writeToParcel(Parcel parcel, int i) {
        parcel.writeString(mUrl);
        parcel.writeString(mTitle);
    }
}
8. Tạo Adapter
Chúng ta sẽ tạo một adapter để đưa dữ liệu vào RecyclerView. Chúng ta cũng sẽ lắng nghe sự kiện click để mở activity chi tiết - SpacePhotoActivity - truyền vào nó một đối tượng SpacePhoto. Activity chi tiết sẽ hiển thị ảnh lớn , rõ ràng của hình ảnh được click trong RecyclerView.
public class MainActivity extends AppCompatActivity {
    // ...
    private class ImageGalleryAdapter extends RecyclerView.Adapter<ImageGalleryAdapter.MyViewHolder>  {

        @Override
        public ImageGalleryAdapter.MyViewHolder onCreateViewHolder(ViewGroup parent, int viewType) {

            Context context = parent.getContext();
            LayoutInflater inflater = LayoutInflater.from(context);
            View photoView = inflater.inflate(R.layout.item_photo, parent, false);
            ImageGalleryAdapter.MyViewHolder viewHolder = new ImageGalleryAdapter.MyViewHolder(photoView);
            return viewHolder;
        }

        @Override
        public void onBindViewHolder(ImageGalleryAdapter.MyViewHolder holder, int position) {

            SpacePhoto spacePhoto = mSpacePhotos[position];
            ImageView imageView = holder.mPhotoImageView;
        }

        @Override
        public int getItemCount() {
            return (mSpacePhotos.length);
        }

        public class MyViewHolder extends RecyclerView.ViewHolder implements View.OnClickListener {

            public ImageView mPhotoImageView;

            public MyViewHolder(View itemView) {

                super(itemView);
                mPhotoImageView = (ImageView) itemView.findViewById(R.id.iv_photo);
                itemView.setOnClickListener(this);
            }

            @Override
            public void onClick(View view) {

                int position = getAdapterPosition();
                if(position != RecyclerView.NO_POSITION) {
                    SpacePhoto spacePhoto = mSpacePhotos[position];
                    Intent intent = new Intent(mContext, SpacePhotoActivity.class);
                    intent.putExtra(SpacePhotoActivity.EXTRA_SPACE_PHOTO, spacePhoto);
                    startActivity(intent);
                }
            }
        }

        private SpacePhoto[] mSpacePhotos;
        private Context mContext;

        public ImageGalleryAdapter(Context context, SpacePhoto[] spacePhotos) {
            mContext = context;
            mSpacePhotos = spacePhotos;
        }
    }
}
9. Load ảnh từ URL
Đây là lúc chúng ta cần dùng đến Glide, để load ảnh từ internet và hiển thị chúng lên ImageView, chúng ta sẽ thực hiện trong phương thức onBindViewHolder() trong RecyclerView.
// ...
@Override
public void onBindViewHolder(MyViewHolder holder, int position) {
    Photo photo = mPhotoList.get(position);
    ImageView imageView = holder.mPhotoImageView;

     Glide.with(mContext)
            .load(spacePhoto.getUrl())
            .placeholder(R.drawable.ic_cloud_off_red)
            .into(imageView);
}
// ...
10. Khởi tạo Adapter
Tại đây, chúng ta sẽ khởi tạo RecyclerView với GridLayoutManager, khởi tạo adapter và set nó cho RecyclerView.
// ...
@Override
protected void onCreate(Bundle savedInstanceState) {
    super.onCreate(savedInstanceState);
    setContentView(R.layout.activity_main);

    RecyclerView.LayoutManager layoutManager = new GridLayoutManager(this, 2);
    RecyclerView recyclerView = (RecyclerView) findViewById(R.id.rv_images);
    recyclerView.setHasFixedSize(true);
    recyclerView.setLayoutManager(layoutManager);

    ImageGalleryAdapter adapter = new ImageGalleryAdapter(this, SpacePhoto.getSpacePhotos());
    recyclerView.setAdapter(adapter);

}
// ...
11. Tạo Detail Activity
import android.graphics.Bitmap;
import android.graphics.Color;
import android.os.Bundle;
import android.support.v7.app.AppCompatActivity;
import android.support.v7.graphics.Palette;
import android.view.ViewGroup;
import android.widget.ImageView;
import com.bumptech.glide.Glide;
import com.bumptech.glide.request.RequestListener;
import com.bumptech.glide.request.target.Target;

public class SpacePhotoActivity extends AppCompatActivity {

    public static final String EXTRA_SPACE_PHOTO = "SpacePhotoActivity.SPACE_PHOTO";
    private ImageView mImageView;

    @Override
    protected void onCreate(Bundle savedInstanceState) {
        super.onCreate(savedInstanceState);
        setContentView(R.layout.activity_photo_detail);

        mImageView = (ImageView) findViewById(R.id.image);
        SpacePhoto spacePhoto = getIntent().getParcelableExtra(EXTRA_SPACE_PHOTO);

        Glide.with(this)
                .load(spacePhoto.getUrl())
                .asBitmap()
                .error(R.drawable.ic_cloud_off_red)
                .diskCacheStrategy(DiskCacheStrategy.SOURCE)
                .into(mImageView);
    }
}
activity_photo_detail.xml
<?xml version="1.0" encoding="utf-8"?>
<LinearLayout
        xmlns:android="http://schemas.android.com/apk/res/android"
        android:layout_width="match_parent"
        android:layout_height="match_parent"
        android:orientation="vertical">

    <ScrollView
            android:layout_width="match_parent"
            android:layout_height="match_parent">

        <LinearLayout
                android:id="@+id/activity_character"
                android:layout_width="match_parent"
                android:layout_height="wrap_content"
                android:orientation="vertical"
                android:layout_gravity="center_vertical">

            <ImageView
                    android:id="@+id/image"
                    android:layout_width="match_parent"
                    android:layout_height="wrap_content"
                    android:adjustViewBounds="true"
                    android:scaleType="fitCenter"/>

        </LinearLayout>
    </ScrollView>
</LinearLayout>
12. Chạy ứng dụng ta có kết quả như sau
All rights reserved
