Xây dựng ứng dụng đọc báo theo mô hình MVVM sử dụng News API
Bài đăng này đã không được cập nhật trong 6 năm
Bài viết này mình sẽ nói về cách mình xây dựng ứng dụng đọc báo sử dụng News API
Link Demo Ứng dụng : https://drive.google.com/file/d/1xMfRkSgLRBNFoIPRBVDlWCDNwqBrWZo-/view?usp=sharing
Link Github : https://github.com/yenntt-1728/FilterNewsExample/tree/my_project
I. Tổng quan
News API
GET http://newsapi.org/v2/top-headlines?sources=google-news&apiKey=API_KEY
{
"status": "ok",
"totalResults": 10,
-"articles": [
-{
-"source": {
"id": "google-news",
"name": "Google News"
},
"author": "Tucker Reals",
"title": "Coronavirus updates: Progress, but the COVID-19 \"beast is still alive\"",
"description": "In some of the hardest-hit nations and America's own virus ground-zero, unprecedented shutdowns are turning the tide, but in some places, patience is wearing thin.",
"url": "https://www.cbsnews.com/live-updates/coronavirus-pandemic-covid-19-latest-news-2020-04-20/",
"urlToImage": "https://cbsnews2.cbsistatic.com/hub/i/r/2020/04/20/3a3f36ec-ed59-4edd-922d-84dc210f4c97/thumbnail/1200x630/731b77a0b9241eb514cd616568c2300d/florida-coronavirus1219819579.jpg",
"publishedAt": "2020-04-20T10:36:19+00:00",
"content": "India recorded its biggest single-day jump in coronavirus cases on Sunday, with 1,553 new patients, government data show. India's Health Ministry said the spike brought the total number of COVID-19 cases in the country to 17,265.\r\nThe number of deaths rose by… [+1110 chars]"
},
1. Gradle dependency
Trong file build.gradle (Module : app) thêm các thư viện sau để sử dụng cho toàn project
    //Material component for android
    implementation "com.google.android.material:material:$material_version"

    //Retrofit
    implementation 'com.squareup.retrofit2:retrofit:2.3.0'
    implementation 'com.squareup.retrofit2:converter-gson:2.3.0'

    //glide
    implementation 'com.github.bumptech.glide:glide:3.7.0'
    annotationProcessor 'com.github.bumptech.glide:compiler:4.8.0'

    //Rx
    implementation 'com.squareup.retrofit2:converter-gson:2.3.0'
    implementation 'com.squareup.retrofit2:adapter-rxjava2:2.3.0'
    implementation 'io.reactivex.rxjava2:rxjava:2.1.6'
    implementation 'io.reactivex.rxjava2:rxandroid:2.0.1'

    //Room
    implementation 'androidx.room:room-rxjava2:2.2.5'
    testImplementation 'androidx.room:room-testing:2.2.5'
    implementation "android.arch.persistence.room:runtime:1.1.1"
    kapt "android.arch.persistence.room:compiler:1.1.1"
2. Create Data class
Trong package model tạo các lớp Data class để lưu trữ đối tượng
- ArticleResponse.kt
@Parcelize
data class ArticlesResponse(
    @SerializedName("status")
    val status : String? = null,
    @SerializedName("totalResults")
    val totalResults: Int? = null,
    @SerializedName("articles")
    val articles : List<News> = mutableListOf()
) : Parcelable
- News.kt
@Parcelize
data class News(
    @SerializedName("author")
    var author: String? = null,
    @SerializedName("title")
    val title: String? = null,
    @SerializedName("description")
    val description: String? = null,
    @SerializedName("url")
    val url: String? = null,
    @SerializedName("urlToImage")
    val urlToImage: String? = null,
    @SerializedName("publishedAt")
    val publishedAt: String? = null,
    @SerializedName("content")
    val content: String? = null
) : Parcelable
3. Create layout file
- Create view để hiển thị khi load data thành công
itemnew.xml
Thêm thẻ layout để sử dụng DataBinding
<?xml version="1.0" encoding="utf-8"?>

<layout
    xmlns:android="http://schemas.android.com/apk/res/android"
    xmlns:app="http://schemas.android.com/apk/res-auto">

    <data>

        <variable
            name="viewModel"
            type="com.example.filternewsexample.model.News" />

    </data>

    <androidx.cardview.widget.CardView
        android:layout_width="match_parent"
        android:layout_height="wrap_content"
        android:layout_margin="6dp">

        <LinearLayout
            android:id="@+id/itemNews"
            android:layout_width="match_parent"
            android:layout_height="wrap_content"
            android:orientation="horizontal">

            <androidx.appcompat.widget.AppCompatImageView
                android:id="@+id/image_view"
                android:layout_width="70dp"
                android:layout_height="70dp"
                android:scaleType="centerCrop"
                app:bindImageUrl="@{viewModel.urlToImage}" />

            <LinearLayout
                android:layout_width="match_parent"
                android:layout_height="70dp"
                android:layout_marginLeft="6dp"
                android:orientation="vertical">

                <androidx.appcompat.widget.AppCompatTextView
                    android:id="@+id/text_view_title"
                    android:layout_width="match_parent"
                    android:layout_height="wrap_content"
                    android:ellipsize="end"
                    android:maxLength="30"
                    android:maxLines="1"
                    android:scrollHorizontally="true"
                    android:singleLine="true"
                    android:text="@{viewModel.title}"
                    android:textColor="@color/colorGreen"
                    android:textSize="20sp"
                    android:textStyle="bold" />

                <androidx.appcompat.widget.AppCompatTextView
                    android:id="@+id/text_view_description"
                    android:layout_width="match_parent"
                    android:layout_height="match_parent"
                    android:text="@{viewModel.description}"
                    android:lines="2"
                    android:ellipsize="end"/>
            </LinearLayout>
        </LinearLayout>
    </androidx.cardview.widget.CardView>
</layout>
- Create view cho chức năng search
item_search.kt
<?xml version="1.0" encoding="utf-8"?>
<menu xmlns:android="http://schemas.android.com/apk/res/android"
    xmlns:app="http://schemas.android.com/apk/res-auto">

    <item android:id="@+id/item_search"
        android:title="Search"
        android:icon="@drawable/ic_search"
        app:showAsAction="collapseActionView|ifRoom"
        app:actionViewClass="android.widget.SearchView" />
</menu>
4. Create ViewHolder and Adapter
Tiếp theo đó khởi tạo Adapter và ViewHolder
Đối với Tab News mình khởi tạo NewsAdapter.java NewsViewHolder là một class bên trong NewsAdapter để đổ data lên fragment_news
class NewsAdapter(private val listNews : List<News>?, private val context: Context) :
    RecyclerView.Adapter<NewsAdapter.NewsViewHolder>() {
    private var newsLocalRepository : NewsLocalRepository? = null
    private var appDatabase : AppDataBase? = null

    class NewsViewHolder(private val binding: ItemNewsBinding) : RecyclerView.ViewHolder(binding.root) {
        fun bind(new : News){
            binding.setVariable(BR.viewModel, new)
            binding.executePendingBindings()
        }

    override fun onCreateViewHolder(parent: ViewGroup, viewType: Int): NewsViewHolder {
        val binding : ItemNewsBinding = DataBindingUtil.inflate(LayoutInflater.from(parent.context),
            R.layout.item_news, parent, false)
        return NewsViewHolder(binding)
    }

    override fun getItemCount(): Int {
       if (listNews?.size == null) return 0
        return listNews.size
    }

    override fun onBindViewHolder(holder: NewsViewHolder, position: Int) {
        appDatabase = AppDataBase.getInstance(context)
        if (listNews?.size != null) {
            val news = listNews[position]
            holder.bind(news)
            holder.openUrl(context, news)
            appDatabase?.apply {
                newsLocalRepository = NewsLocalRepository.newInstance(NewsLocalDataSource.getInstance(this.newsDao()))
                newsLocalRepository?.apply {
                    holder.onLongClickItem(context, listNews[position], this,
                        EntityNews(
                            title = news.title!!,
                            description = news.description,
                            imageUrl = news.urlToImage))
                }
            }
        }

    }
}
5. Binding Adapter
Create file binding adapter để bind dữ liệu sau khi get về lên View
@BindingAdapter("bindImageUrl")
fun AppCompatImageView.loadImage(url: String?) {
    Glide.with(this.context)
        .load(url)
        .skipMemoryCache(true)
        .fitCenter()
        .into(this)
}
II. Get List News
1. Create Factory Pattern
Khởi tạo factory pattern cho đối tượng NewsAPIImpl
- interface NewsAPIImpl chứa tất cả các funtion để get data khi request api
interface NewsAPIImpl {
    fun getNewsListTop(apiKey : String) : Observable<ArticlesResponse>
    fun getNewsListSearch(keySearch : String, apiKey : String) : Observable<ArticlesResponse>
}
- Khởi tạo interface NewsAPI
interface NewsAPI {
    @GET("/v2/top-headlines?sources=google-news")
    fun getNewsListTop(@Query("apiKey") apiKey: String): Observable<ArticlesResponse>

    @GET("/v2/everything")
    fun getNewsListSearch(@Query("q") keySearch : String, @Query("apiKey") apiKey : String) : Observable<ArticlesResponse>
}
- Create instance của NewsAPI thông qua NewsAPIClient
open class NewsApiClient {
    fun <T> createService(
        context: Context,
        endPoint: String?,
        serviceClass: Class<T>?): T {
        val httpClientBuilder = OkHttpClient.Builder()
        val cacheSize = 10 * 1024 * 1024
        httpClientBuilder.cache(
            Cache(
                context.applicationContext.cacheDir,
                cacheSize.toLong()
            )
        )
        val retrofit = Retrofit.Builder().baseUrl(endPoint)
            .client(httpClientBuilder.build())
            .addCallAdapterFactory(RxJava2CallAdapterFactory.create())
            .addConverterFactory(GsonConverterFactory.create())
            .build()
        return retrofit.create(serviceClass)
    }
}
class NewsApiInstance : NewsApiClient() {
    private var newsAPI: NewsAPI? = null

    fun newInstance(context: Context) : NewsAPI {
        if (newsAPI == null){
            newsAPI = createService(context, Constance.BASE_URL, NewsAPI ::class.java)
        }
        return newsAPI as NewsAPI
    }

    companion object {
        fun getInstance() = NewsApiInstance()
    }
}
- Khởi tạo NewsRepository
NewsRepository implement trưc tiếp từ interface NewsAPIImpl và đc đưa vào trong ViewModel để getData
class NewsRepository(private val context: Context) : NewsAPIImpl {
    private val apiNews : NewsAPI = NewsApiInstance.getInstance().newInstance(context)
    override fun getNewsListTop(apiKey: String): Observable<ArticlesResponse> {
        return apiNews.getNewsListTop(apiKey)
    }

    override fun getNewsListSearch(
        keySearch: String,
        apiKey: String
    ): Observable<ArticlesResponse> {
        return apiNews.getNewsListSearch(keySearch, apiKey)
    }
}
2. Xử lí getData - Tab News
NewsViewModel.java
Trong ViewModel này mình sử dụng RxJava 2 để get List News. khi có data trả về một biến liveData "news" đc chuyển sang màn NewsFragment. Tại màn này observe "news" lấy data và đổ dữ liệu vào Adapter để hiển thị lên màn hình
class NewsViewModel(private val newRepo : NewsRepository) : ViewModel() {
    private var listNews : List<News> = mutableListOf()
    private var compositeDisposable: CompositeDisposable = CompositeDisposable()
    val news =  MutableLiveData<List<News>>()

    fun getNews() : List<News>{
        val disposable : Disposable = newRepo.getNewsListTop(NewsFragment.API_KEY)
            .subscribeOn(Schedulers.io())
            .observeOn(AndroidSchedulers.mainThread())
            .subscribe({
                news.value = it.articles
                listNews = it.articles
            }, {})
        compositeDisposable.add(disposable)
        return listNews
    }
}
NewsFragment.java
class NewsFragment : Fragment() {
    private lateinit var newViewModel: NewsViewModel
    private lateinit var newAdapter: NewsAdapter
    private lateinit var newsRepo: NewsRepository
    private lateinit var progressDialog : ProgressDialog

    override fun onCreateView(
        inflater: LayoutInflater,
        container: ViewGroup?,
        savedInstanceState: Bundle?
    ): View? {
        return inflater.inflate(R.layout.fragment_new, container, false)
    }

    override fun onActivityCreated(savedInstanceState: Bundle?) {
        super.onActivityCreated(savedInstanceState)
        progressDialog = ProgressDialog(context)
        progressDialog.setMessage(getString(R.string.message_loading))
        progressDialog.show()
        context?.apply {
            newsRepo = NewsRepository(this)
            newViewModel = NewsViewModel(newsRepo)
            newViewModel.getNews()
            newViewModel.news.observe(viewLifecycleOwner, Observer {
                newAdapter = NewsAdapter(newViewModel.news.value, this)
                recyclerNews.adapter = newAdapter
                progressDialog.dismiss()
            })
        }
    }

    companion object {
        const val TAB_NAME = "news"
        fun newInstance() = NewsFragment()
    }

}
3. Download News và lưu thông tin với bảng sử dụng Room
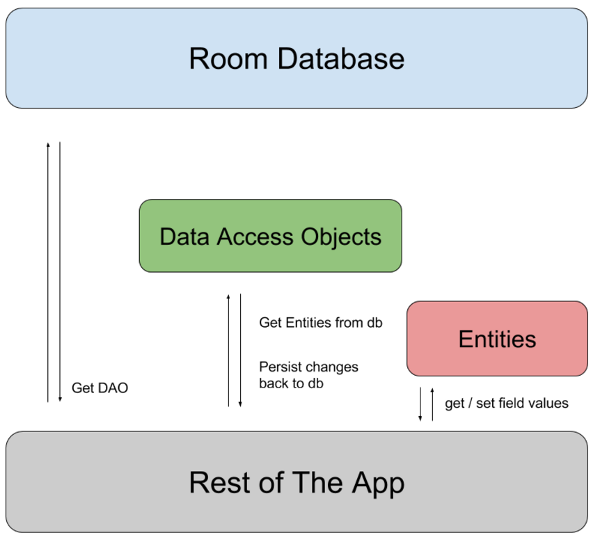
- Khởi tạo thực thể : EntityNews
@Entity(tableName = "news")
data class EntityNews(
    @NonNull
    @PrimaryKey(autoGenerate = false)
    @ColumnInfo(name = "title")
    val title : String ,
    @ColumnInfo(name = "description")
    val description : String?,
    @ColumnInfo(name = "image_url")
    val imageUrl : String?
)
- Create Data Access Object (NewsDao)
@Dao
interface NewsDAO {
    @Query("SELECT * FROM news")
    fun getAllNews() : Flowable<List<EntityNews>>

    @Query("SELECT * FROM favourite")
    fun getAllFavourite() : Flowable<List<EntityFavorite>>

    @Insert(onConflict = OnConflictStrategy.REPLACE)
    fun insertNews(vararg news : EntityNews)

    @Insert(onConflict = OnConflictStrategy.REPLACE)
    fun insertFavorite(vararg entityFavorite: EntityFavorite)

    @Delete
    fun deleteNews(vararg news : EntityNews)

    @Delete
    fun deleteNewsFavorite(vararg newsFavorite: EntityFavorite)
}
- Create Room Database (AppDataBase.java)
@Database(entities = [EntityNews::class, EntityFavorite::class], version = 2)

abstract class AppDataBase : RoomDatabase() {
    abstract fun newsDao() : NewsDAO

    companion object {
        fun getInstance(context: Context) : AppDataBase {
            val db = Room.databaseBuilder(context, AppDataBase::class.java, "news_database")
                .allowMainThreadQueries().build()
            return db
        }
    }
}
- Sử lí lưu data vào bảng và get list thông tin từ bảng vào màn Save (SaveFagment)
SaveViewModel
Do trong NewsDAO khi get ListNews trả về một Flowable<List<News>> nên sử dụng rxJava 2 để parse từ flowable sang entiry để hiển thị lên view
class SaveViewModel(private val context: Context) : ViewModel() {
    private lateinit var appDatabase: AppDataBase
    private lateinit var newsLocalRepository: NewsLocalRepository
    private var compositeDisposable = CompositeDisposable()
    val listNewsLiveData = MutableLiveData<List<EntityNews>>()

    fun getListSave(){
        appDatabase = AppDataBase.getInstance(context)
        newsLocalRepository = NewsLocalRepository.newInstance(NewsLocalDataSource.getInstance(appDatabase.newsDao()))
        val disposable: Disposable = newsLocalRepository.getAllNews()
            .observeOn(AndroidSchedulers.mainThread())
            .subscribeOn(Schedulers.io())
            .subscribe({
               listNewsLiveData.value = it
            },  {  })
        compositeDisposable.add(disposable)
    }
}
SaveFragment .java
Observe live data "listNewsLiveData" từ SaveViewModel và đổ dự liệu vào adapter để hiển thị lên view
class SaveFragment : Fragment() {
    private lateinit var viewModel: SaveViewModel
    private lateinit var saveAdapter: SaveAdapter
    private var listNews : ArrayList<News> = arrayListOf()

    override fun onCreateView(inflater: LayoutInflater, container: ViewGroup?, savedInstanceState: Bundle?): View? {
        return inflater.inflate(R.layout.fragment_save, container, false)
    }

    override fun onViewCreated(view: View, savedInstanceState: Bundle?) {
        super.onViewCreated(view, savedInstanceState)
        viewModel = SaveViewModel(context!!)
        viewModel.getListSave()
        viewModel.listNewsLiveData.observe(viewLifecycleOwner, Observer {
            val arrayListNews = arrayListOf<News>()
            for (item : EntityNews in it){
                val news = News(
                    title = item.title,
                    description = item.description,
                    urlToImage = item.imageUrl)
                arrayListNews.add(news)
            }
            addAllNews(arrayListNews)
            saveAdapter = SaveAdapter(listNews, context!!)
            recyclerSave.adapter = saveAdapter
        })
    }

    private fun addAllNews(arrayListNews : ArrayList<News>){
        listNews.clear()
        listNews.addAll(arrayListNews)
    }

    companion object {
        const val TAB_NAME = "SAVE"
        fun newInstance() = SaveFragment()
    }
}
Trên đây mình có nói qua các bước cơ bản và các thành phần quan trọng trong project. Chi tiết hơn mn tham khảo link github đính kèm bên trên nhé
All rights reserved
