Xây dựng ứng dụng CRUD với angular CLI.
Bài đăng này đã không được cập nhật trong 7 năm
Bài viết này mình xin giới thiệu cách tạo 1 ứng dụng CRUD với angular CLI. Điều kiện trước tiên các bạn phải cài đặt npm hoặc yarn, node, angular CLI. Ở bài viết này mình sử dụng npm và angular 7.1.4, Node 11.6.0.
Trước tiên thì mình cần khởi tạo ứng dụng.
ng new demo-app --style=scss
Đợi 1 lúc thành công thì chúng ta tiến hành start server angular
ng serve ---port 9000
Sau đó truy cập vào http://localhost:4200 để kiểm tra xem server đã hoạt động hay chưa.
Một số file trong ứng dụng.
- app.module.ts
Phần quan trọng nhất là phần bên trong @NgModule. Hiện tại là declarations, imports, providers và bootstrap.
- Declarations: Danh sách các components.
- Imports: routes and modules muốn import.
- Bootstrap: Danh sách compornent muốn khởi chạy khi start app. mặc định là AppComponent.
- app.component.ts AppComponent nhìn khá giống với module.ts , nhưng thay vì @NgModule chúng ta có @Component, Phần chính là selector, templateUrlvà styleUrls:
- selector: Là tên của component. Đây là nơi nó được định nghĩa.
- templateUrl: Đây là nơi chứa code HTML. <app-root> sẽ được thay thế cho mã code có trong file html.
- styleUrls: Chúng ta có thể có các style css chỉ áp dụng cho component này. Điều này là rõ ràng và độc lập! và có thể thay đổi css khi biết rằng nó sẽ không bị ảnh hưởng vào các component khác của trang web.
Trong class AppComponent chúng ta có thể thay đổi title của trang.
Tạo một component mới.
ng generate component todo
Dòng lệnh này sẽ thực hiện tạo, cập nhật các file:
CREATE src/app/todo/todo.component.scss (0 bytes)
CREATE src/app/todo/todo.component.html (23 bytes)
CREATE src/app/todo/todo.component.spec.ts (614 bytes)
CREATE src/app/todo/todo.component.ts (262 bytes)
UPDATE src/app/app.module.ts (467 bytes)
Thay đổi file app.component.html =>
<app-todo></app-todo>
Lúc này trang giao diện web của chúng ta sẽ được thay thế = todo.component.html. thay thế todo.component.html bằng mã sau.
<section class="todoapp">
  <header class="header">
    <h1>CLI</h1>
    <input class="new-todo" placeholder="Name?" autofocus>
  </header>
  <section class="main">
    <ul class="todo-list">
      <li class="completed">
        <div class="view">
          <input class="toggle" type="checkbox" checked>
          <label>Install angular-cli</label>
          <button class="destroy"></button>
        </div>
        <input class="edit" value="Create a TodoMVC template">
      </li>
      <li>
        <div class="view">
          <input class="toggle" type="checkbox">
          <label>Understand Angular2 apps</label>
          <button class="destroy"></button>
        </div>
        <input class="edit" value="Rule the web">
      </li>
    </ul>
  </section>
  <footer class="footer">
    <span class="todo-count"><strong>0</strong> item left</span>
    <ul class="filters">
      <li>
        <a class="selected" href="#/">All</a>
      </li>
      <li>
        <a href="#/active">Active</a>
      </li>
      <li>
        <a href="#/completed">Completed</a>
      </li>
    </ul>
    <button class="clear-completed">Clear completed</button>
  </footer>
</section>
Tiếp tục cài css mẫu để hiển thị được đẹp hơn. https://github.com/tastejs/todomvc-app-css
npm install --save todomvc-app-css
Để sử dụng được file css từ module thì ta cần thêm "node_modules/todomvc-app-css/index.css" vào phần styles file angular.json. Stop và Start lại server để thấy sự khác biệt !
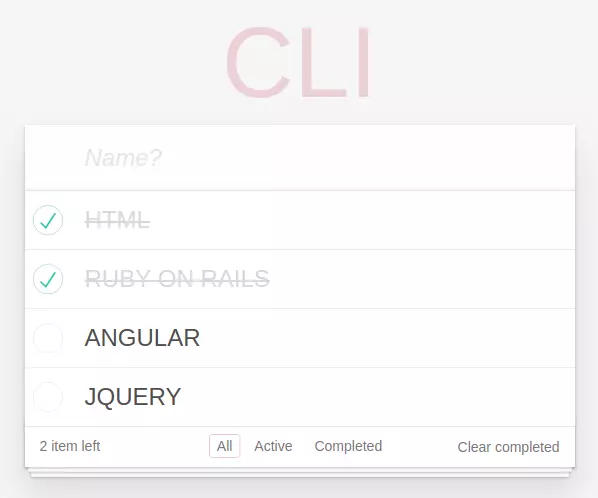
Ta sẽ có 1 giao diện trông như sau.
Service
Trước tiên hãy bắt đầu bằng cách tạo một service chứa danh sách ban đầu các tác vụ mà chúng ta muốn quản lý. Chúng ta sẽ sử dụng một service để thao tác dữ liệu. Hãy tạo service với CLI bằng cách gõ: ng g service todo/todo
CREATE src/app/todo/todo.service.spec.ts (323 bytes)
CREATE src/app/todo/todo.service.ts (133 bytes)
CRUD cho ứng dụng.
1. Trước tiên thì ta sẽ tạo phần danh sách.
để khởi tạo thì việc đầu tiên mình cần khai báo 1 biến chứ 1 vài ngôn ngữ hay sử dụng. Mở file todo.service.ts và thêm vào như sau
import { Injectable } from '@angular/core';

const LANGUAGES = [
  { title: 'HTML', isDone: true },
  { title: 'RUBY ON RAILS', isDone: true },
  { title: 'ANGULAR', isDone: false },
  { title: 'JQUERY', isDone: false },
];

@Injectable({
  providedIn: 'root'
})
export class TodoService {

  constructor() { }

  get() {
    return new Promise(resolve => resolve(LANGUAGES));
  }
}
todo.component.ts
import { Component, OnInit } from '@angular/core';
import { TodoService } from './todo.service'; // import serivce của chúng ta

@Component({
  selector: 'app-todo',
  templateUrl: './todo.component.html',
  styleUrls: ['./todo.component.scss'],
  providers: [TodoService] // Khai báo thêm providers
})
export class TodoComponent implements OnInit {
  private todos;
  private activeTasks;
  constructor(private todoService: TodoService) { }
  getTodos(){
    return this.todoService.get().then(todos => {
      this.todos = todos;
      this.activeTasks = this.todos.filter(todo => todo.isDone).length;
    });
  }
  ngOnInit() {
    this.getTodos();
  }
}
Khi Khai báo thêm providers vào thì chúng ta có thể sử dụng todoService các function trong này. Tiếp theo là change 1 chút code html
<ul class="todo-list">
  <li *ngFor="let todo of todos" [ngClass]="{completed: todo.isDone}" >
    <div class="view">
      <input class="toggle" type="checkbox" [checked]="todo.isDone">
      <label>{{todo.title}}</label>
      <button class="destroy"></button>
    </div>
    <input class="edit" value="{{todo.title}}">
  </li>
</ul>

<span class="todo-count"><strong>{{activeTasks}}</strong> item left</span>
- ngFor: lặp qua mảng mà chúng ta đã xác định trong component.
- [ngClass]: áp dụng class cho language tương ứng.
- [checked]: áp dụng checked thuộc tính cho input checkbox ( todo.isDone).
2. Create.
Update src/app/todo/todo.component.html
<input class="new-todo" placeholder="Name?" [(ngModel)]="newTodo" (keyup.enter)="addTodo()" autofocus>
src/app/todo/todo.component.ts
private newTodo;
addTodo(){
  this.todoService.add({ title: this.newTodo, isDone: false }).then(() => {
    return this.getTodos();
  }).then(() => {
    this.newTodo = ''; // clear input form value
  });
}
src/app/todo/todo.service.ts
add(data) {
    return new Promise(resolve => {
      LANGUAGES.push(data);
      resolve(data);
    });
  }
app.module.ts
import { FormsModule } from '@angular/forms';
// ...
@NgModule({
  imports: [
    // ...
    FormsModule
  ],
  // ...
})
Vậy là xong phần create. Giờ chúng ta có thể nhập tên vào và nhân enter. => list danh sách sẽ được thêm.
3. Update khi click đôi.
Update src/app/todo/todo.component.html
<li *ngFor="let todo of todos" [ngClass]="{completed: todo.isDone, editing: todo.editing}" >
  <div class="view">
    <input class="toggle" type="checkbox" [checked]="todo.isDone">
    <label (dblclick)="todo.editing = true">{{todo.title}}</label>
    <button class="destroy"></button>
  </div>
  <input class="edit"  #updatedTodo   [value]="todo.title"  (blur)="updateTodo(todo, updatedTodo.value)"  (keyup.escape)="todo.editing = false" (keyup.enter)="updateTodo(todo, updatedTodo.value)">
</li>
Viết thêm function vào src/app/todo/todo.component.ts
updateTodo(todo, newValue) {
  todo.title = newValue;
  return this.todoService.put(todo).then(() => {
    todo.editing = false;
    return this.getTodos();
  });
}
Xử lý src/app/todo/todo.service.ts
put(changed) {
  return new Promise(resolve => {
    const index = LANGUAGES.findIndex(todo => todo === changed);
    LANGUAGES[index].title = changed.title;
    resolve(changed);
  });
}
4. Delete.
Update src/app/todo/todo.component.html
<button class="destroy" (click)="destroyTodo(todo)"></button>
src/app/todo/todo.component.ts
destroyTodo(todo) {
  this.todoService.delete(todo).then(() => {
    return this.getTodos();
  });
}
src/app/todo/todo.service.ts
delete(selected) {
  return new Promise(resolve => {
    const index = LANGUAGES.findIndex(todo => todo === selected);
    LANGUAGES.splice(index, 1);
    resolve(true);
  });
}
Vậy là xong phần CRUD cho ứng dụng angular.
Qua bài viết giới thiệu trên. Chúng ta cũng có được cái nhìn về ứng dụng Angular CLI tuy nhiên đây mới chỉ là trên client. => nó không thể lưu vào database như backend. Ở phần sau mình trình bày cách lưu thông qua api. Cảm ơn các bạn đã tham khảo.
All rights reserved
