Xây dựng một ứng dụng nhắn tin đơn giản với Laravel
Bài đăng này đã không được cập nhật trong 2 năm
Lời mở đầu
- Tiếp tục là một bài viết thuộc series Những chức năng bạn có thể cần trong một project Laravel, lần này chúng ta sẽ đến với một công cụ mang tên broadcast với ứng dụng thực tế là xây dựng một ứng dụng nhắn tin trên trang web của bạn.
Nội dung
1. Broadcast trong Laravel
- Theo như mình tìm được trên google thì
Broadcast là thuật ngữ được sử dụng trong mạng máy tính để mô tả cách thức truyền tin được gửi từ 1 điểm đến tất cả các điểm khác trong cùng một mạng. Trong trường hợp này, một gói broadcast chuyển đến tất cả những thiết bị tham gia trong một mạng cục bộ, mà không cần phải được quy định rõ ràng như một máy nhận.
-
Trong laravel, bằng việc kết hợp giữa broadcast event và queue, bạn có thể dễ dàng truyển tải các gói tin tới client-side. Để làm được việc này bạn cần:
- Broadcaster: như redis hay pusher
- Receiver: laravel echo hay bất kì Receiver nào khác
-
Trong bài viết này, mình sẽ sử dụng Pusher làm Broadcaster và Laravel echo làm Receiver nhé.
2. Xây dựng ứng dụng chat
- Ở đây mình sẽ mặc định coi là project của bạn đã có một database với đầy đủ user rồi nhé. Nên chúng ta sẽ bỏ qua các phần tạo database, đăng ký đăng nhập các kiểu để đi thẳng đển phần gửi tin nhắn luôn nhé.
2.1. Tạo app Pusher
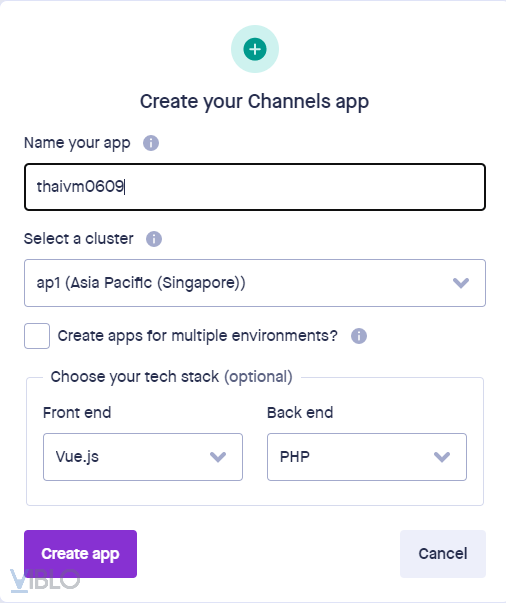
- Trước khi bắt đầu, chúng ta cần truy cập vào pusher để tạo một ứng dụng pusher bằng cách click vào nút create app, điền thông tin về tên app, khu vực, ngôn ngữ mà bạn sử dụng (ở đây mình chọn Vuejs và PHP) là xong.

-
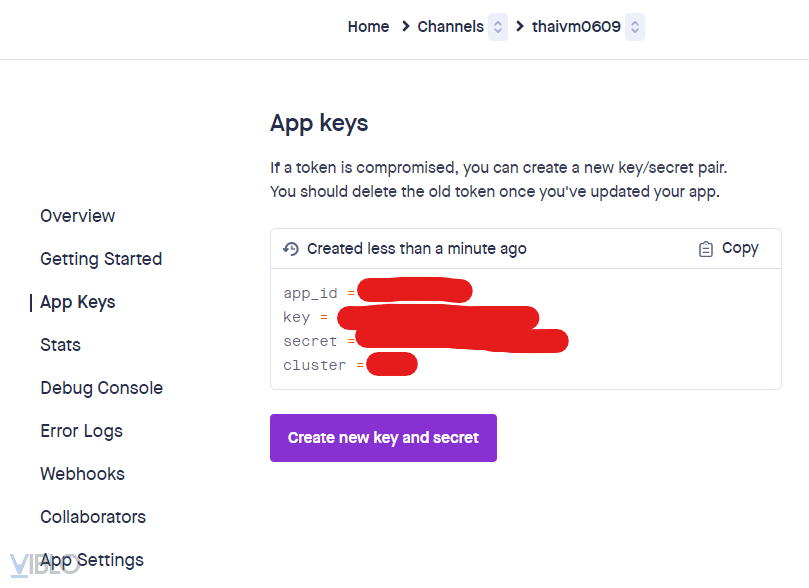
Tiếp theo đó bạn sẽ vào phần APP KEY và lấy những thông tin cần thiết để lát nữa tiến hành config.
![]()
2.2. Cài đặt, cấu hình broadcast pusher
-
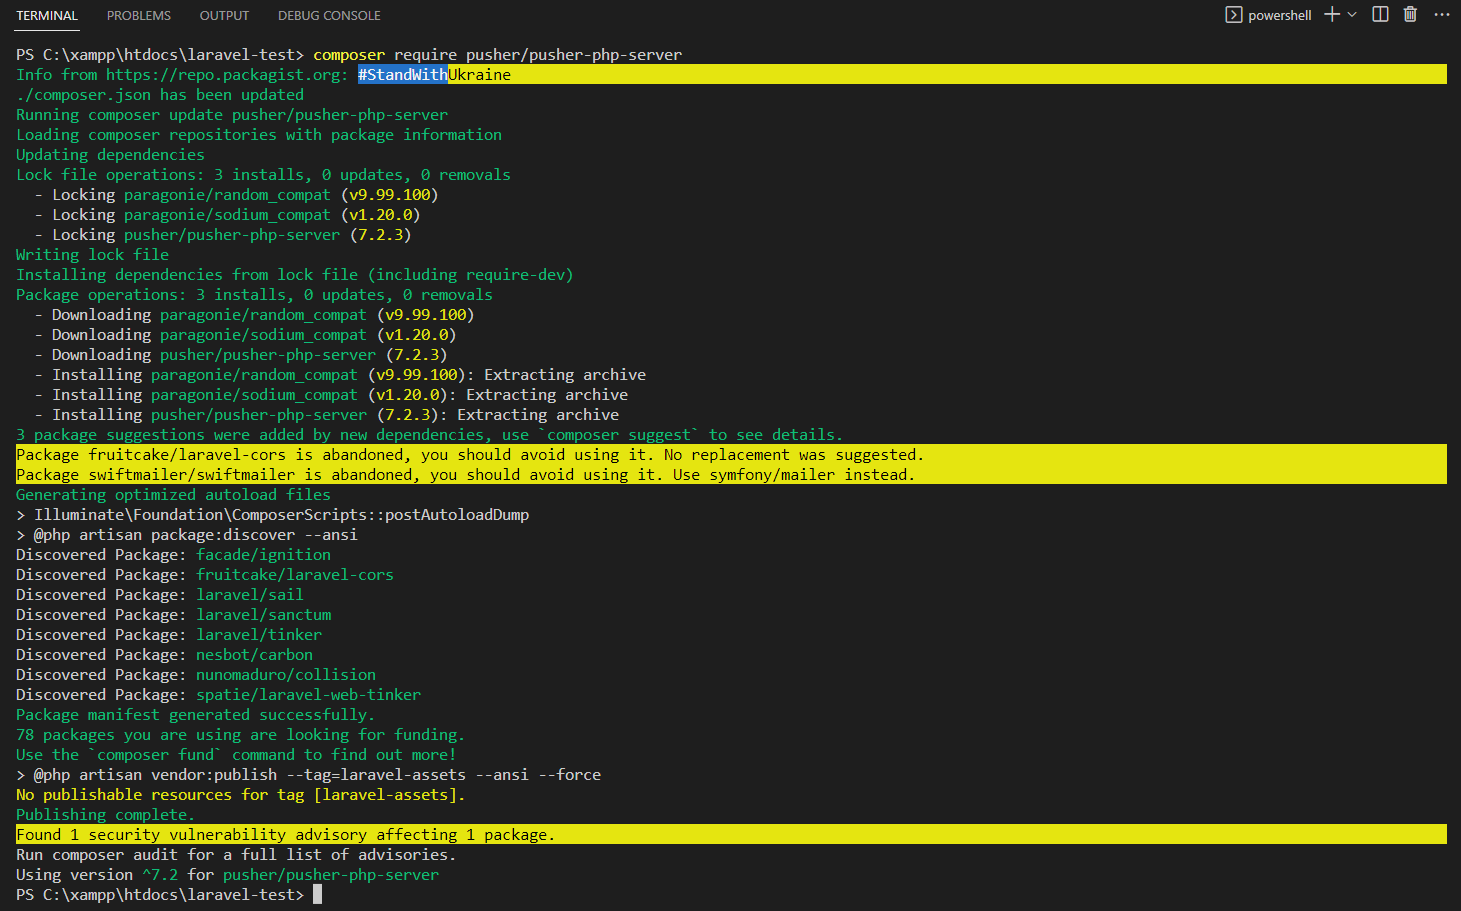
Trước hết, ta cần chạy câu lệnh sau để cài đặt Pusher Channels PHP SDK và thành quả sẽ được như hình bên dưới
composer require pusher/pusher-php-server

-
Sau khi cài đặt xong, chúng ta cần vào file
config/app.phpvà bỏ comment ở dòngApp\Providers\BroadcastServiceProvider::class, -
Và ở trong file
.envthì đổi phần BROADCAST_DRIVER thành pusher và điền các app key đã tạo ở phần 2.1 vào như sauBROADCAST_DRIVER=pusher PUSHER_APP_ID=app_id PUSHER_APP_KEY=key PUSHER_APP_SECRET=secret PUSHER_APP_CLUSTER=cluster -
Ở trong file
config/broadcasting.phpthì bạn sẽ không cần phải chỉnh sửa gì, và nó sẽ như thế này<?php return [ /* |-------------------------------------------------------------------------- | Default Broadcaster |-------------------------------------------------------------------------- | | This option controls the default broadcaster that will be used by the | framework when an event needs to be broadcast. You may set this to | any of the connections defined in the "connections" array below. | | Supported: "pusher", "ably", "redis", "log", "null" | */ 'default' => env('BROADCAST_DRIVER', 'null'), /* |-------------------------------------------------------------------------- | Broadcast Connections |-------------------------------------------------------------------------- | | Here you may define all of the broadcast connections that will be used | to broadcast events to other systems or over websockets. Samples of | each available type of connection are provided inside this array. | */ 'connections' => [ 'pusher' => [ 'driver' => 'pusher', 'key' => env('PUSHER_APP_KEY'), 'secret' => env('PUSHER_APP_SECRET'), 'app_id' => env('PUSHER_APP_ID'), 'options' => [ 'cluster' => env('PUSHER_APP_CLUSTER'), 'useTLS' => true, ], ], 'ably' => [ 'driver' => 'ably', 'key' => env('ABLY_KEY'), ], 'redis' => [ 'driver' => 'redis', 'connection' => 'default', ], 'log' => [ 'driver' => 'log', ], 'null' => [ 'driver' => 'null', ], ], ]; -
Tiếp theo, chúng ta mở file
resources/assets/bootstrap.jsthì sẽ thầy phần laravel-echo đang bị comment ở cuối file, chúng ta tiến hành bỏ comment và điền key và cluster giống như đã điền ở phần.envnhé. Laravel-echo là một thư viện js có nhiệm vụ đăng ký channels và lắng nghe sự kiện.import Echo from 'laravel-echo' window.Pusher = require('pusher-js'); window.Echo = new Echo({ broadcaster: 'pusher', key: 'xxxxxxxxxxxxxxxxxxxx', // app key cluster: 'xxx', //app cluster encrypted: true });
2.3 Gửi/nhận tin nhắn
Bước 1; Tạo bảng để lưu messages
- Việc đầu tiên chúng ta cần làm là tạo ra một bảng
messagesvới 3 trườngid,user_id,contentvà tạo modelMessage.phptương ứng. - Về cách thao tác thì chắc mình cũng không cần phải hướng dẫn lại nữa phải không nào. Các bạn nên nhớ quan hệ giữa
UservàMessageslà quan hệ 1-n.
Bước 2:
-
Tạo một event bằng câu lệnh
php artisan make:event ChatEventvà thay đổi nội dung như sau:
use Illuminate\Broadcasting\Channel; use Illuminate\Broadcasting\InteractsWithSockets; use Illuminate\Broadcasting\PresenceChannel; use Illuminate\Broadcasting\PrivateChannel; use Illuminate\Contracts\Broadcasting\ShouldBroadcast; use Illuminate\Foundation\Events\Dispatchable; use Illuminate\Queue\SerializesModels; use App\Models\Message; use App\Models\User; class ChatEvent implements ShouldBroadcast { use Dispatchable, InteractsWithSockets, SerializesModels; public $user, $message; /** * Create a new event instance. * * @return void */ public function __construct(User $user, Message $message) { $this->user = $user; $this->message = $message; } /** * Get the channels the event should broadcast on. * * @return \Illuminate\Broadcasting\Channel|array */ public function broadcastOn() { return new PrivateChannel('chat_room'); //khai báo tên và kiểu của channel } } -
Các bạn lưu ý ở function broadcastOn() sẽ có các option cho bạn chọn:
- PrivateChannel('tên-channel'): nếu kênh của bạn là private (ở đây mình chọn private)
- Channel('tên-channel'): nếu kênh của bạn là public
Bước 3:
- Khai báo channel trong
routes/channels.php, ở đây, mình đặt điều kiện để user có thể tham gia và chat-room là trạng thái vẫn đang hoạt độngis_active === true, bạn có thể tuỳ ý thay đổi điều kiện phù hợp với bài toán của mình ở trong function.Broadcast::channel('chat-room', function ($user) { return $user->is_active === 1; });
Bước 4: tạo controller để lưu/gửi message
-
Ta sẽ tạo file
ChatController.phpvới nội dung như sau (command tạo controller mình không nhắc lại nữa nhé):public function getMessages() { return Message::with('user')->get(); } public function store(Request $request) { $user = Auth::user(); $message = Message::create([ 'user_id' => Auth::id(), 'content' => $request->content, ]); event(new ChatEvent($user, $message)); //phát sự kiện ChatEvent return response()->json([ 'message' => 'success', ]); } -
Và đừng quên khai báo vào
routes/web.phpnhéRoute::get('/chat', 'ChatController@index'); Route::get('/chat/messages', 'ChatController@getMessages'); Route::post('/chat/messages', 'ChatController@store');
Bước 5: tạo giao diện để gửi tin nhắn
-
Đầu tiên chúng ta cần tạo một giao diện chat đơn giản để có thể gửi và nhận tin nhắn như sau:
@extends('layouts.app') @section('content') <div class="container"> <div class="row"> <div class="col-md-8 col-md-offset-2"> <div class="panel panel-default"> <div class="panel-heading">Chats</div> <div class="panel-body"> <chat :messages="messages"></chat> </div> <div class="panel-footer"> <form v-on:sent="addMessage" :user="{{ Auth::user() }}" ></form> </div> </div> </div> </div> </div> @endsection -
Tạo tiếp file
resources/js/components/Chat.vue<template> <ul class="chat"> <li class="left clearfix" v-for="message in messages"> <div class="chat-body clearfix"> <div class="header"> <strong class="primary-font"> {{ message.user.name }} </strong> </div> <p> {{ message.content }} </p> </div> </li> </ul> </template> <script> export default { props: ['messages'] }; </script> -
Và một components
resources/js/components/Form.vuebao gồm ô input để nhập content và nút gửi.<template> <div class="input-group"> <input id="btn-input" type="text" name="message" class="form-control input-sm" placeholder="Type your message here..." v-model="newMessage" @keyup.enter="sendMessage"> <span class="input-group-btn"> <button class="btn btn-primary btn-sm" id="btn-chat" @click="sendMessage"> Send </button> </span> </div> </template> <script> export default { props: ['user'], data() { return { newMessage: '' } }, methods: { sendMessage() { this.$emit('sent', { user: this.user, content: this.newMessage }); this.newMessage = '' } } } </script> -
Khai báo component trong file
resources/js/app.jsrequire('./bootstrap'); Vue.component('chat', require('./components/Chat.vue')); Vue.component('form', require('./components/Form.vue')); const app = new Vue({ el: '#app', data: { messages: [] }, created() { this.getMessages(); Echo.private('chat_room') .listen('ChatEvent', (e) => { this.messages.push({ message: e.message.content, user: e.user }); }); }, methods: { getMessages() { axios.get('/chat/messages').then(response => { this.messages = response.data; }); }, addMessage(message) { this.messages.push(message); axios.post('/chat/messages', message).then(response => { console.log(response.data); }); } } });
Bước 6: Nghiệm thu thành quả
-
Trước khi chạy thử ứng dụng này cần biên dịch các tệp JavaScript sử dụng Laravel Mix:
npm run dev -
Sau đó thì có thể chạy ứng dụng với câu lệnh:
php artisan serve -
Và nghiệm thu thành quả ngay thôi nào.
Tổng kết
- Hy vọng bài viết này hữu ích với những bạn mới bắt đầu tìm hiểu về Laravel nói chung cũng như là Broadcasting nói riêng.
- Hẹn gặp lại các bạn trong các bài viết sau trong series Những chức năng bạn có thể cần trong một project Laravel.
Tài liệu tham khảo
- Laravel Doc: https://laravel.com/docs/9.x/broadcasting
- Pusher: https://dashboard.pusher.com/channels
All rights reserved
