Xây dựng app chat đơn giản với Firebase(Phần 3)
Bài đăng này đã không được cập nhật trong 4 năm
Tiếp theo phần 2, phần này mình sẽ tiếp tục đề cập đến các tính năng chat :
Server side
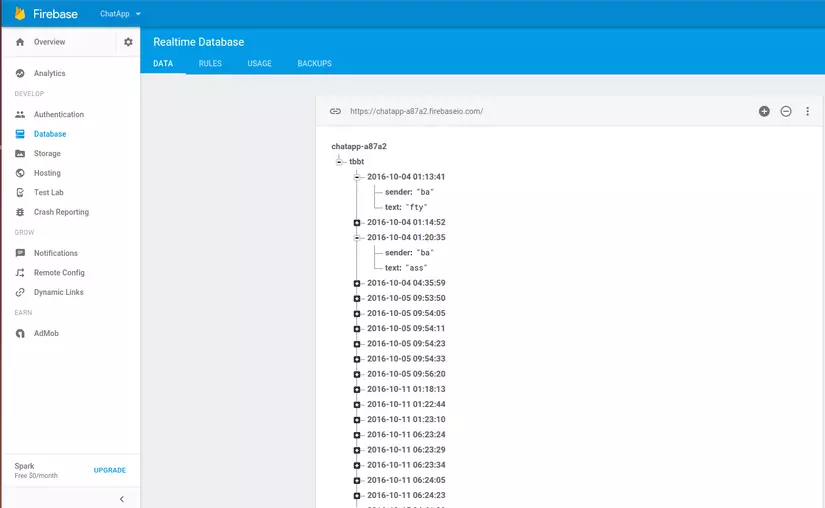
-Đầu tiên phải nhắc đến lưu lưu trữ thông tin ở trên Firebase , nó sẽ nằm ở trong Database , tab Data , dưới đây là dữ liệu của app mình làm :

Như các bạn thấy thì nó không sẽ không lưu dưới dạng table .....(SQL) mà lưu dưới dạng NoSql mà cụ thể là kiểu json , vì thế chúng ta có thể import từ dữ liệu cũ vào hoặc export nó ra (đều dưới dạng json)

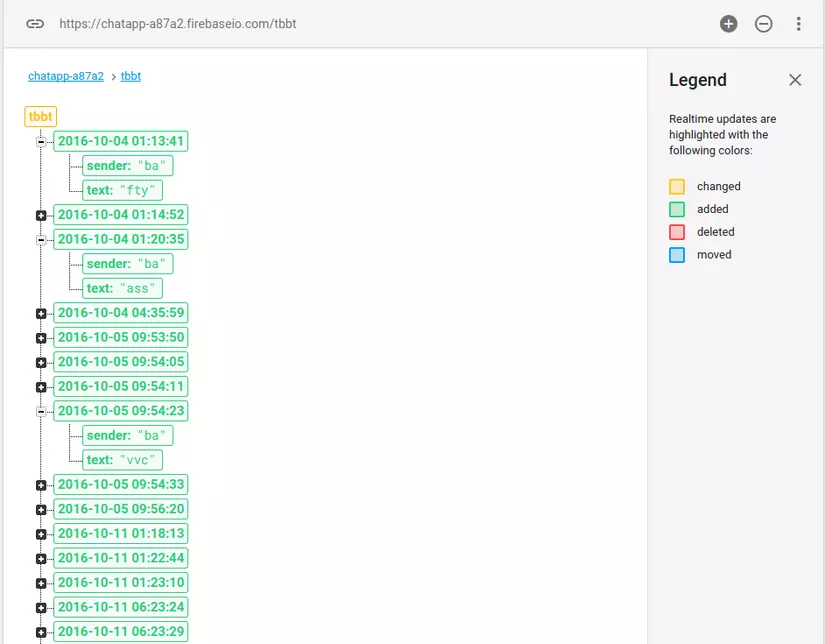
Cuối cùng là option Show legend , nó dùng để highlight các kiểu dữ liệu tương ứng với các thay đổi theo thời gian thực như thêm mới , sửa, xóa , di chuyển :

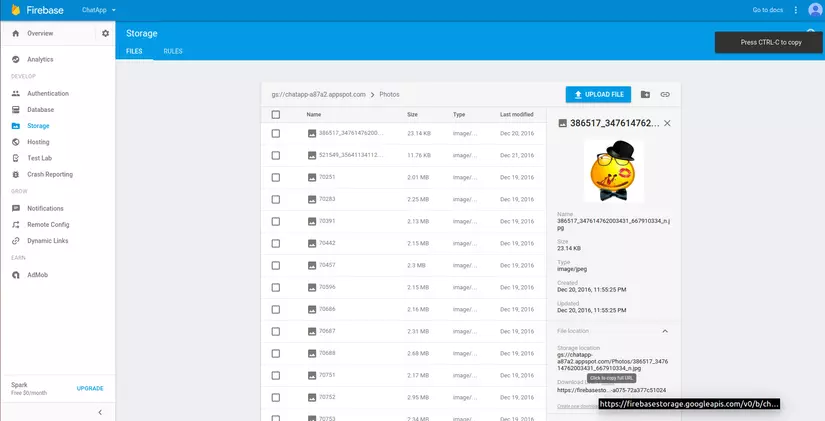
Ảnh sẽ được lưu trên Storage , ảnh sẽ chứa link dạng https://firebasestorage.googleapis.com/.... chúng ta nên lưu ý vì sẽ sử dụng link dạng này để hiển thị ảnh ở phần dưới

Tất nhiên đó là trên server , vậy bên client chúng ta xử lí như thế nào , mới các bạn đón xem tiếp phần dưới đây .
Client side
Initializing Model
Chúng ta khởi tạo đối tượng MessageUser để lưu và hiển thị nội dung , ngày giờ gửi, người gửi
public class MessageUser {
    private String mText;
    private String mSender;
    private Date mDate;
    private String mDateString;

    public MessageUser() {

    }

    public MessageUser(String mText, String mSender) {
        this.mText = mText;
        this.mSender = mSender;
    }

    public MessageUser(String mText, String mSender, Date mDate) {
        this.mText = mText;
        this.mSender = mSender;
        this.mDate = mDate;
    }

    public String getText() {
        return mText;
    }

    public void setText(String mText) {
        this.mText = mText;
    }

    public String getSender() {
        return mSender;
    }

    public void setSender(String mSender) {
        this.mSender = mSender;
    }

    public Date getDate() {
        return mDate;
    }

    public void setDate(Date mDate) {
        this.mDate = mDate;
    }

    public String getDateString() {
        Calendar cal = Calendar.getInstance(TimeZone.getTimeZone(Constants.GMT_TIME));
        Date currentLocalTime = cal.getTime();
        DateFormat date = new SimpleDateFormat(Constants.FORMAT_TIME);
        date.setTimeZone(TimeZone.getTimeZone(Constants.GMT_TIME));
        String localTime = date.format(currentLocalTime);
        return localTime;
    }

    public void setDateString(String mDateString) {
        this.mDateString = mDateString;
    }
}
Creating layout
Ta phải tạo 1 layout để lưu đổ dữ liệu vào(tất nhiên rồi )
<?xml version="1.0" encoding="utf-8"?>
<LinearLayout xmlns:android="http://schemas.android.com/apk/res/android"
              xmlns:app="http://schemas.android.com/apk/res-auto"
              xmlns:emojicon="http://schemas.android.com/tools"
              android:layout_width="match_parent"
              android:layout_height="wrap_content"
              android:orientation="vertical"
              android:weightSum="5">

    <TextView
        android:id="@+id/text_time"
        android:layout_width="match_parent"
        android:layout_height="match_parent"
        android:layout_weight="4"
        android:text="14:03"
        android:textSize="@dimen/common_text_size_4"
        android:visibility="gone"/>

    <RelativeLayoutEmojiconTextView
        android:id="@+id/layout_item_chat"
        android:layout_width="wrap_content"
        android:layout_height="match_parent"
        android:orientation="horizontal">

        <de.hdodenhof.circleimageview.CircleImageView
            android:id="@+id/image_avatar"
            android:layout_width="@dimen/common_size_40"
            android:layout_height="@dimen/common_size_40"
            android:src="@drawable/avatar_default"/>

        <ProgressBar
            android:id="@+id/progressBar"
            android:layout_width="@dimen/common_size_80"
            android:layout_height="@dimen/common_size_80"
            android:layout_centerInParent="true"
            android:layout_marginLeft="@dimen/common_size_10"
            android:layout_toRightOf="@id/image_avatar"
            android:visibility="gone"/>

        <ImageView
            android:id="@+id/image_server"
            android:layout_width="@dimen/common_size_100"
            android:layout_height="@dimen/common_size_100"
            android:layout_centerInParent="true"
            android:layout_marginLeft="@dimen/common_size_10"
            android:layout_toRightOf="@id/image_avatar"
            android:visibility="gone"/>

        <android.support.v7.widget.CardView
            android:id="@+id/card_item_chat"
            android:layout_width="wrap_content"
            android:layout_height="wrap_content"
            android:layout_centerInParent="true"
            android:layout_marginLeft="@dimen/common_size_10"
            android:layout_toRightOf="@id/image_avatar"
            android:background="@drawable/flat_effect"
            android:clickable="true"
            app:cardCornerRadius="@dimen/common_size_5">

            <io.github.rockerhieu.emojicon.EmojiconTextView
                android:id="@+id/txtEmojicon"
                android:layout_width="wrap_content"
                android:layout_height="wrap_content"
                android:layout_gravity="center"
                android:gravity="center"
                android:minEms="5"
                android:text="123"
                android:textSize="@dimen/common_text_size_6"
                emojicon:emojiconAlignment="baseline"/>

        </android.support.v7.widget.CardView>

    </RelativeLayout>
</LinearLayout>
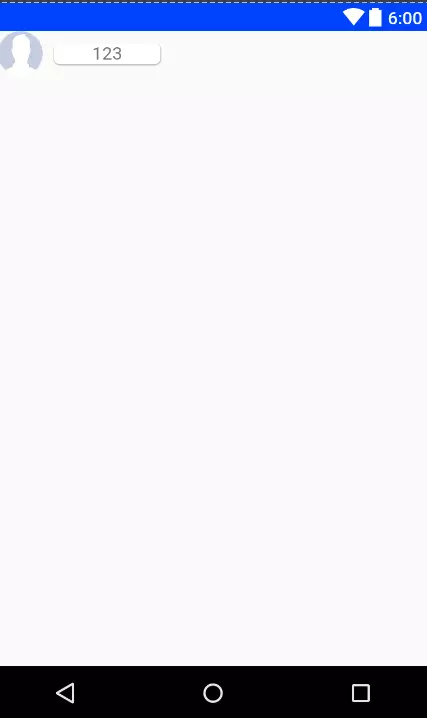
Ta sẽ có được layout như hình :
 Kế đến là adapter , chúng ta sẽ tạo 1 cái view holder như hình :
    public class ItemHolder extends RecyclerView.ViewHolder {

        EmojiconTextView mTxtEmojicon;
        CardView mCardView;
        TextView mTextTime;
        CircleImageView mImageAvatar;
        RelativeLayout mLayoutItemChat;
        ImageView mImageView;
        ProgressBar mProgressBar;

        public ItemHolder(View itemView) {
            super(itemView);
            mProgressBar= (ProgressBar) itemView.findViewById(R.id.progressBar);
            mImageView = (ImageView) itemView.findViewById(R.id.image_server);
            mTxtEmojicon = (EmojiconTextView) itemView.findViewById(R.id.txtEmojicon);
            mTextTime = (TextView) itemView.findViewById(R.id.text_time);
            mCardView = (CardView) itemView.findViewById(R.id.card_item_chat);
            mImageAvatar = (CircleImageView) itemView.findViewById(R.id.image_avatar);
            mLayoutItemChat = (RelativeLayout) itemView.findViewById(R.id.layout_item_chat);
        }
    }
Và phần chính trong adapter nữa :
 private List<MessageUser> mMessageUserList;
    private Context mContext;
    private ProgressDialog mProgressDialog;
    public static FirebaseAuth sFirebaseAuth = FirebaseAuth.getInstance();

    public ChatAdapter(List<MessageUser> messageUserList, Context context) {
        this.mMessageUserList = messageUserList;
        this.mContext = context;
    }

    @Override
    public ItemHolder onCreateViewHolder(ViewGroup parent, int viewType) {
        View view = LayoutInflater.from(parent.getContext()).inflate(R.layout.item_chat, parent, false);
        return new ItemHolder(view);
    }

    @Override

    public void onBindViewHolder(final  ItemHolder holder, int position) {

         MessageUser messageUser = mMessageUserList.get(position);

        holder.mTextTime.setText(messageUser.getDateString());

        if (messageUser.getText().contains("firebasestorage.googleapis.com")) {

            holder.mImageView.setVisibility(View.VISIBLE);

            holder.mTxtEmojicon.setVisibility(View.GONE);

            holder.mProgressBar.setVisibility(View.VISIBLE);

            Glide.with(mContext)

                    .load(messageUser.getText())

                    .listener(new RequestListener<String, GlideDrawable>() {

                        @Override

                        public boolean onException(Exception e, String model, Target<GlideDrawable> target, boolean isFirstResource) {

                            holder.mProgressBar.setVisibility(View.GONE);

                            return false;

                        }

          else {
            holder.mImageView.setVisibility(View.GONE);
            holder.mTxtEmojicon.setText(messageUser.getText());
            holder.mCardView.setOnClickListener(new View.OnClickListener() {
                @Override
                public void onClick(View v) {
                    if (holder.mTextTime.getVisibility() == View.VISIBLE) {
                        holder.mTextTime.setVisibility(View.GONE);
                    } else {
                        holder.mTextTime.setVisibility(View.VISIBLE);
                    }
                }
            });
        }
    if (sFirebaseAuth.getCurrentUser()!=null && messageUser.getSender() != null) {
            if (messageUser.getSender().equals(sFirebaseAuth.getCurrentUser().getEmail())) {
                holder.mImageAvatar.setVisibility(View.VISIBLE);
                holder.mLayoutItemChat.setGravity(Gravity.RIGHT);
                holder.mCardView.setCardBackgroundColor(mContext.getResources().getColor(R.color.colorPrimary));
                holder.mTxtEmojicon.setTextColor(mContext.getResources().getColor(R.color.white));
            } else {
                holder.mImageAvatar.setVisibility(View.GONE);
                holder.mLayoutItemChat.setGravity(Gravity.LEFT);
                holder.mCardView.setCardBackgroundColor(mContext.getResources().getColor(R.color.white));
                holder.mTxtEmojicon.setTextColor(mContext.getResources().getColor(R.color.black));
            }
        }
        holder.mImageAvatar.setVisibility(View.VISIBLE);
    }

    @Override
    public int getItemCount() {
        return mMessageUserList.size();
    }
Trong phần này chúng ta sẽ check xem nội dung của tin nhắn có phải là ảnh được lưu trên server không(ảnh được lưu trên server có có link dạng firebasestorage.googleapis.com/ như mình đã đề cập ở bên trên ) , nếu có thì cho load ảnh (sử dụng thư viện Glide ) ,nếu không thì hiện thị dưới dạng text
Trong qúa trình load thì ảnh có thể hiển thị chậm , vì vậy bạn nên gọi listener trong glide và hiện thị 1 progress bar để người dùng có thể biết dữ liệu có đang load hay không
Tiếp đến là kiểm tra xem item nào chứa các tin nhắn được viết bởi user hiện tại để highlight nó lên (gọi getCurrentUser() để kiểm tra )
Vậy là phần hiển thị đã xong , giờ đến với phần đẩy dữ liệu lên server nào
Sending data to server
package vulan.com.chatapp.util;


import android.content.Context;
import android.util.Log;

import com.firebase.client.ChildEventListener;
import com.firebase.client.DataSnapshot;
import com.firebase.client.Firebase;
import com.firebase.client.FirebaseError;

import java.text.ParseException;
import java.text.SimpleDateFormat;
import java.util.Date;
import java.util.HashMap;

import vulan.com.chatapp.activity.SignUpActivity;
import vulan.com.chatapp.newtype.model.MessageUser;

/**
 * Created by VULAN on 9/19/2016.
 */
public class MessageDataSource {
    private static final Firebase sRef = new Firebase(Constants.FIREBASE_LINK);
    private static SimpleDateFormat sDateFormat = new SimpleDateFormat(Constants.FORMAT_TIME);
    public static String COLUMN_TEXT = "text";
    public static String COLUMN_SENDER = "sender";

//Send message to server
    public static void saveMessage(MessageUser message, String Id) {
        Date date = message.getDate();
        String key = sDateFormat.format(date);
        HashMap<String, String> msg = new HashMap<>();
        msg.put(COLUMN_TEXT, message.getText());
        msg.put(COLUMN_SENDER,Id);
        sRef.child(Id).child(key).setValue(msg);
    }

//Calling interface to handle event after getting data from server
    public static MessageListener addMessageListener(String id, MessageCallback messageCallback) {
        MessageListener messageListener = new MessageListener(messageCallback);
        sRef.child(id).addChildEventListener(messageListener);
        return messageListener;
    }

    public static void stopListener(MessageListener mListener) {
        sRef.removeEventListener(mListener);
    }

//Create a MessageListener which gets data from server in realtime
//We set data new item(child) into MessageUser  on onChildAdded method
    public static class MessageListener implements ChildEventListener {
        private MessageCallback callback;

        public MessageListener(MessageCallback callback) {
            this.callback = callback;
        }

        @Override
        public void onChildAdded(DataSnapshot dataSnapshot, String s) {
            HashMap<String, String> msg = dataSnapshot.getValue(HashMap.class);
            MessageUser messageUser = new MessageUser();
            messageUser.setSender(msg.get(COLUMN_SENDER));
            messageUser.setText(msg.get(COLUMN_TEXT));
            try {
                messageUser.setDate(sDateFormat.parse(dataSnapshot.getKey()));
            } catch (ParseException e) {
                e.printStackTrace();
            }
            if (callback != null) {
                callback.onMessageAdded(messageUser);
            }
            Log.e("child added ", "");
        }

        @Override
        public void onChildChanged(DataSnapshot dataSnapshot, String s) {

        }

        @Override
        public void onChildRemoved(DataSnapshot dataSnapshot) {

        }

        @Override
        public void onChildMoved(DataSnapshot dataSnapshot, String s) {

        }

        @Override
        public void onCancelled(FirebaseError firebaseError) {
            Log.e("child cancel ", "");
        }
    }

    public interface MessageCallback {
        void onMessageAdded(MessageUser messageUser);
    }
}
Chúng ta có thể truy cập sâu hơn vào các node con nhờ cách gọi sRef.child() , bạn có thể lồng sRef.child(key1) .child(key2) .child(key3) .child(key5) .vvvvv miễn là nó đúng =)) (Trong trường hợp ví dụ này mình chỉ set dữ liệu đến node thứ 2 ). Giờ là xử lí bên activity
Handling events in Activity
- Tạo layout
 <LinearLayout xmlns:android="http://schemas.android.com/apk/res/android"
              xmlns:app="http://schemas.android.com/apk/res-auto"
              xmlns:emojicon="http://schemas.android.com/apk/res-auto"
              xmlns:tools="http://schemas.android.com/tools"
              android:layout_width="match_parent"
              android:layout_height="match_parent"
              android:gravity="bottom"
              android:orientation="vertical"
              android:weightSum="10"
              tools:context="vulan.com.chatapp.activity.ChatActivity">

    <android.support.v7.widget.RecyclerView
        android:id="@+id/recycler_chat"
        android:layout_width="match_parent"
        android:layout_height="0dp"
        android:layout_weight="6.5"
        app:stackFromEnd="true"/>

    <LinearLayout
        android:background="@drawable/border_line"
        android:id="@+id/layout_icon"
        android:layout_width="match_parent"
        android:layout_height="@dimen/common_size_30"
        android:orientation="horizontal"
        android:paddingTop="@dimen/common_size_3"
        android:weightSum="3">

        <ImageView
            android:id="@+id/image_gallery"
            android:layout_width="0dp"
            android:layout_height="match_parent"
            android:layout_weight="1"
            android:src="@drawable/ic_picture_gallery"/>

        <ImageView
            android:id="@+id/image_camera"
            android:layout_width="0dp"
            android:layout_height="match_parent"
            android:layout_weight="1"
            android:src="@drawable/ic_photo_camera"/>

        <ImageView
            android:id="@+id/image_emoji"
            android:layout_width="0dp"
            android:layout_height="match_parent"
            android:layout_weight="1"
            android:src="@drawable/ic_emoji"/>
    </LinearLayout>

    <LinearLayout
        android:background="@color/white"
        android:id="@+id/layout_text_chat"
        android:layout_width="match_parent"
        android:layout_height="wrap_content"
        android:layout_weight="0.1"
        android:weightSum="5">

        <io.github.rockerhieu.emojicon.EmojiconEditText
            android:background="@color/white"
            android:id="@+id/text_chat"
            android:layout_width="0dp"
            android:layout_height="match_parent"
            android:layout_weight="4"
            android:singleLine="false"
            emojicon:emojiconAlignment="baseline"/>


        <ImageView
            android:background="@color/white"
            android:id="@+id/button_send"
            android:layout_width="0dp"
            android:layout_height="match_parent"
            android:layout_marginTop="@dimen/common_size_8"
            android:layout_weight="1"
            android:clickable="true"
            android:src="@drawable/ic_send"/>

    </LinearLayout>

    <FrameLayout
        android:id="@+id/emojicons"
        android:layout_width="match_parent"
        android:layout_height="0dp"
        android:layout_weight="3"/>
</LinearLayout>
Ta khởi tạo các biến như hình dưới , trong đó tạo 1 biến sStorageReference dể truy cập đến Storage trên server
  private List<MessageUser> mMesseageList;
    private RecyclerView mRecyclerChat;
    private EmojiconEditText mEditEmojicon;
    private ImageView mButtonSend, mButtonCamera, mButtonGallery;
    private ChatAdapter mChatAdapter;
    private String mId;
    private MessageDataSource.MessageListener mListener;
    private ImageView mTextEmoji;
    private FrameLayout mFrameEmoji;
    private static final int WEIGHT_7 = 7, WEIGHT_10 = 10;
//Creating a reference to  server storage
 private static StorageReference sStorageReference  =FirebaseStorage.getInstance().getReferenceFromUrl("gs://chatapp-a87a2.appspot.com");
private void init(){
mMesseageList = new ArrayList<>();
        mChatAdapter = new ChatAdapter(mMesseageList, this);
        final LinearLayoutManager linearLayoutManager = new LinearLayoutManager(this);
        mRecyclerChat.setLayoutManager(linearLayoutManager);
        mRecyclerChat.addItemDecoration(new LinearItemDecoration(this));
        mRecyclerChat.setAdapter(mChatAdapter);
        mId = "tbbt";
        mListener = MessageDataSource.addMessageListener(mId, this);
}
Xử lí event được trả về :
 @Override
    public void onMessageAdded(MessageUser messageUser) {
        mMesseageList.add(messageUser);
        mChatAdapter.notifyItemInserted(mMesseageList.indexOf(messageUser));
     }
Tiếp đến là chọn ảnh để gửi trong khi chat , bạn có thể chọn ảnh từ gallery hoặc camera :
 case R.id.image_camera:
                Intent intent = new Intent(MediaStore.ACTION_IMAGE_CAPTURE);
                startActivityForResult(intent, Constants.CAMERA_CODE);
                break;
            case R.id.image_gallery:
                Intent galleryIntent = new Intent(Intent.ACTION_PICK, MediaStore.Images.Media.EXTERNAL_CONTENT_URI);
                startActivityForResult(galleryIntent, Constants.GALLERY_CODE);
                break;
 @Override
    protected void onActivityResult(int requestCode, int resultCode, Intent data) {
        super.onActivityResult(requestCode, resultCode, data);
        if (requestCode == Constants.CAMERA_CODE && resultCode == RESULT_OK) {
        //Get uri
            final Uri uri = data.getData();
        //Send photo to Photos folder  and set name for the photo by using uri.getLastPathSegment()
            final StorageReference filePath = sStorageReference.child("Photos").child(uri.getLastPathSegment());
            filePath.putFile(uri).addOnFailureListener(new OnFailureListener() {
                @Override
                public void onFailure(@NonNull Exception e) {
          //Show toast if failure occurs
                    Toast.makeText(ChatActivity.this, "Failure", Toast.LENGTH_LONG).show();
                }
            }).addOnSuccessListener(new OnSuccessListener<UploadTask.TaskSnapshot>() {
                @Override
                public void onSuccess(UploadTask.TaskSnapshot taskSnapshot) {occurs
             //Get download url and save it in database
                    if(taskSnapshot.getDownloadUrl()!=null){
                        MessageUser messageUser = new MessageUser();
                        messageUser.setDate(new Date());
                        messageUser.setText(taskSnapshot.getDownloadUrl().toString());
                        MessageDataSource.saveMessage(messageUser, mId);
                        Log.e("link : ",""+taskSnapshot.getDownloadUrl().toString());
                    }
                }
            });
        }
        if (requestCode == Constants.GALLERY_CODE && resultCode == RESULT_OK && data != null) {
                //Get uri
            Uri selectedImage = data.getData();
            String[] filePathColum = {MediaStore.Images.Media.DATA};
            Cursor cursor = getContentResolver().query(selectedImage, filePathColum, null, null, null);
            if (cursor != null) {
                if (cursor.moveToFirst()) {
                    int columIndex = cursor.getColumnIndexOrThrow(filePathColum[0]);
                    String path = cursor.getString(columIndex);
                    int startPosition = path.lastIndexOf('/');
                    int length = path.length();
                    String pathCode = "";
                    //get the substring which will be the name of photo
                    for (int i = startPosition + 1; i < length; i++) {
                        pathCode += path.charAt(i);
                    }
                    final StorageReference filePath = sStorageReference.child("Photos").child(pathCode);
                    filePath.putFile(selectedImage).addOnFailureListener(new OnFailureListener() {
                        @Override
                        public void onFailure(@NonNull Exception e) {
                             //Show toast if failure occurs
                            Toast.makeText(ChatActivity.this, "Failure", Toast.LENGTH_LONG).show();
                        }
                    }).addOnSuccessListener(new OnSuccessListener<UploadTask.TaskSnapshot>() {
                        @Override
                        public void onSuccess(UploadTask.TaskSnapshot taskSnapshot) {
                           //Get download url and save it in database
                            if(taskSnapshot.getDownloadUrl()!=null){
                                MessageUser messageUser = new MessageUser();
                                messageUser.setDate(new Date());
                                messageUser.setText(taskSnapshot.getDownloadUrl().toString());
                                MessageDataSource.saveMessage(messageUser, mId);
                            }
                        }
                    });
                }
                cursor.close();
            }
        }
    }
Vậy là mình đã hoàn thành bài viết về cách xây dựng 1 ứng dụng Chat cơ bản. Nếu có phản hồi gì thì các bạn hãy comment ở dưới nhé
All rights reserved