Xây dựng app chat đơn giản với Firebase(Phần 2)
Bài đăng này đã không được cập nhật trong 4 năm
Tiếp theo phần 1 https://viblo.asia/p/xay-dung-app-chat-don-gian-voi-firebasephan-1-3Q75wgY25Wb , phần này mình sẽ tiếp tục đề cập đến các tính năng khi làm việc với user :
- Lấy thông tin của user
- Xác thực lại 1 user
- Xóa một 1 user
- Cập nhật thông tin
1.2.4 .Get currently user information
Cách được khuyên dùng đó chính là gọi listener với đối tượng AuthListener :
mAuthListener = new FirebaseAuth.AuthStateListener() {
    @Override
    public void onAuthStateChanged(@NonNull FirebaseAuth firebaseAuth) {
        FirebaseUser user = firebaseAuth.getCurrentUser();
        if (user != null) {
            // User is signed in
            Log.d(TAG, "onAuthStateChanged:signed_in:" + user.getUid());
        } else {
            // User is signed out
            Log.d(TAG, "onAuthStateChanged:signed_out");
        }
        // ...
    }
};
Nếu user không sign in thì getCurrentUser sẽ trả về null .Chúng ta cần cho user xác thực lại bằng hàm reauthenticate(mình sẽ đề cập bên dưới )
Việc tiếp theo cần làm là lấy các thông tin từ profile của user đó :
FirebaseUser user = FirebaseAuth.getInstance().getCurrentUser();
if (user != null) {
    // Name, email address, and profile photo Url
    String name = user.getDisplayName();
    String email = user.getEmail();
    Uri photoUrl = user.getPhotoUrl();

    // The user's ID, unique to the Firebase project. Do NOT use this value to
    // authenticate with your backend server, if you have one. Use
    // FirebaseUser.getToken() instead.
    String uid = user.getUid();
}
1.2.5 .Send a user a verification email
Bạn có thể gửi mail để xác minh tài khoản với hàm sendEmailVerification :
FirebaseUser user = FirebaseAuth.getInstance().getCurrentUser();

user.sendEmailVerification()
        .addOnCompleteListener(new OnCompleteListener<Void>() {
            @Override
            public void onComplete(@NonNull Task<Void> task) {
                if (task.isSuccessful()) {
                    Log.d(TAG, "Email sent.");
                }
            }
        });
1.2.6 .Delete a user
Bạn có thể delete user với hàm delete :
FirebaseUser user = FirebaseAuth.getInstance().getCurrentUser();

user.delete()
        .addOnCompleteListener(new OnCompleteListener<Void>() {
            @Override
            public void onComplete(@NonNull Task<Void> task) {
                if (task.isSuccessful()) {
                    Log.d(TAG, "User account deleted.");
                }
            }
        });
Hàm này rất ít được sử dụng ,hay nói đúng hơn là mình chưa thấy người ta sử dụng tính năng delete user này trong app bao giờ vì như thế tính bảo mật rất thấp , chỉ khi tính năng xác thực hoạt động hiệu quả thì mới nên thêm tính năng delete này vào .
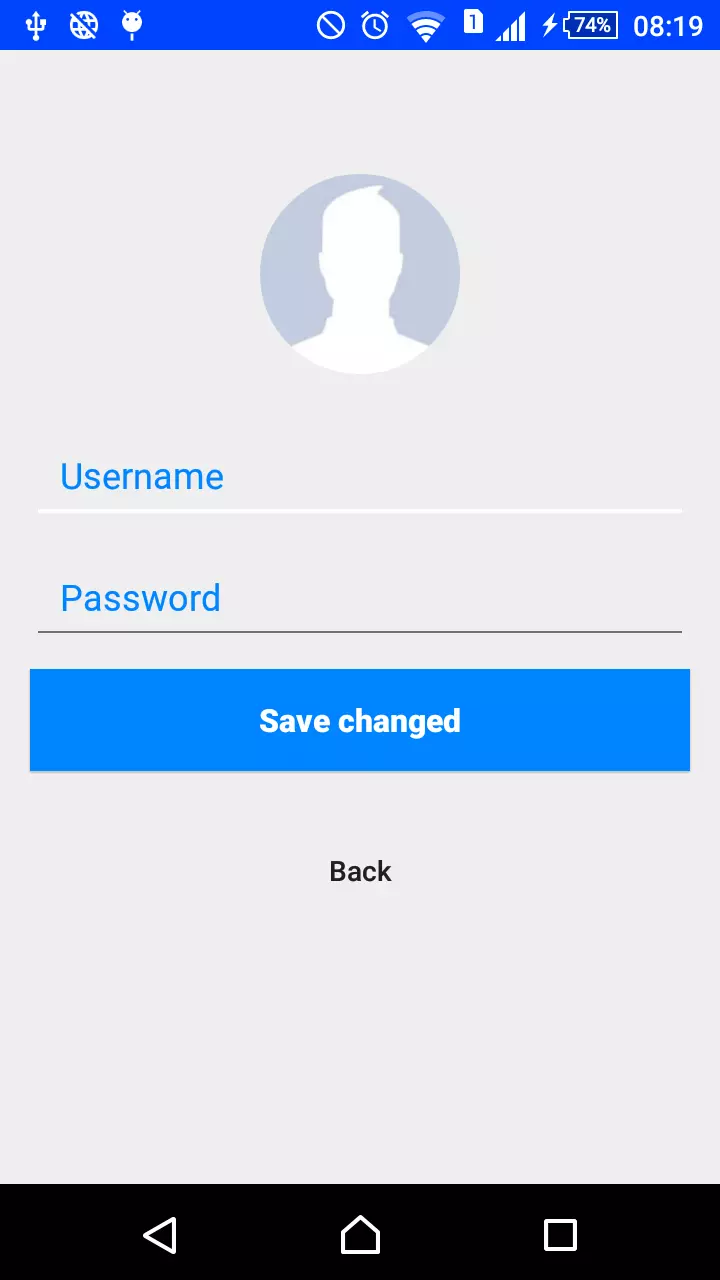
1.3.Tính năng màn hình Update Profile
Trong app của mình thì mình tạo riêng một màn hình để cập nhật thông tin như hình :
 Firebase cũng đã cung cấp rất nhiều hàm để hỗ trợ bạn trong vấn đề này :
1.3.1 .Update a user's profile
Bạn có thể update các thông tin cơ bản như tên hiển thị , ảnh đại diện
FirebaseUser user = FirebaseAuth.getInstance().getCurrentUser();

UserProfileChangeRequest profileUpdates = new UserProfileChangeRequest.Builder()
        .setDisplayName("Jane Q. User")
        .setPhotoUri(Uri.parse("https://example.com/jane-q-user/profile.jpg"))
        .build();

user.updateProfile(profileUpdates)
        .addOnCompleteListener(new OnCompleteListener<Void>() {
            @Override
            public void onComplete(@NonNull Task<Void> task) {
                if (task.isSuccessful()) {
                    Log.d(TAG, "User profile updated.");
                }
            }
        });
1.3.2.Set a user's email address
Việc update lại email cũng rất dễ dàng với hàm updateEmail :
FirebaseUser user = FirebaseAuth.getInstance().getCurrentUser();

user.updateEmail("user@example.com")
        .addOnCompleteListener(new OnCompleteListener<Void>() {
            @Override
            public void onComplete(@NonNull Task<Void> task) {
                if (task.isSuccessful()) {
                    Log.d(TAG, "User email address updated.");
                }
            }
        });
1.3.3.Set a user's email address
Và tất nhiên chúng ta phải cho user được phép thiết lập lại password rồi , có 2 cách để thiết lập lại mật khẩu : -)Set trực tiếp
FirebaseUser user = FirebaseAuth.getInstance().getCurrentUser();
String newPassword = "SOME-SECURE-PASSWORD";

user.updatePassword(newPassword)
        .addOnCompleteListener(new OnCompleteListener<Void>() {
            @Override
            public void onComplete(@NonNull Task<Void> task) {
                if (task.isSuccessful()) {
                    Log.d(TAG, "User password updated.");
                }
            }
        });
-)Gửi mail để reset password:
FirebaseAuth auth = FirebaseAuth.getInstance();
String emailAddress = "user@example.com";

auth.sendPasswordResetEmail(emailAddress)
        .addOnCompleteListener(new OnCompleteListener<Void>() {
            @Override
            public void onComplete(@NonNull Task<Void> task) {
                if (task.isSuccessful()) {
                    Log.d(TAG, "Email sent.");
                }
            }
        });
Cả 2 cách này thì đêu có một vài điểm cần lưu ý :
Đối với cách 1: User phải đăng nhập trước đó .trong 1 số trường hợp bạn phải xác thực lại tài khoản với hàm reauthenticate().(Mình sẽ đề cập hàm này ở bên dưới)
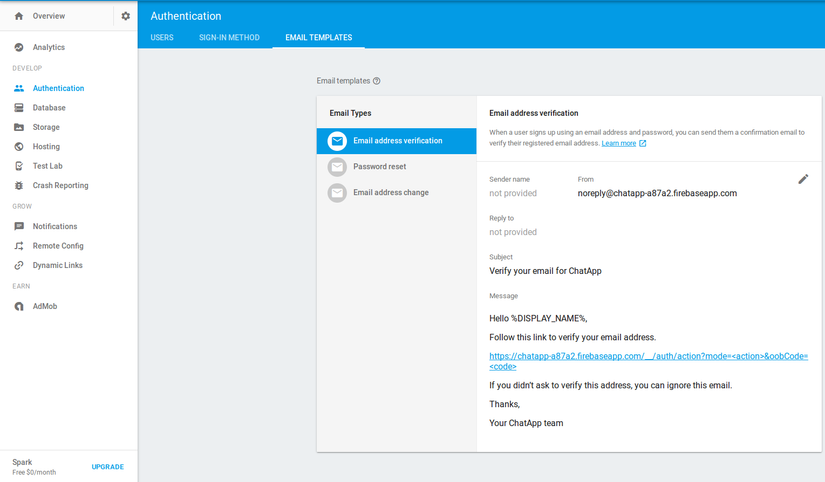
Đối với cách 2: Bạn có thể sửa lại template của mail dựa theo hướng dẫn từ link dưới đây :
https://support.google.com/firebase/answer/7000714?authuser=1
 Bạn có thể vào giao diện bằng cách click vào Authentication -> tab Email Template
Ngoài ra, mình đã test thử với 1 số trường hợp lập id là mail chưa tồn tại , thi khi bạn gửi đi thì hàm sendPasswordResetEmail vẫn nhảy vào onComplete(Tính đến thời điểm mà mình test thì vẫn bị lỗi này, điều này cũng là tất yếu thôi tại vì Firebase làm sao có thể kiểm soát được hoàn toàn việc mail của khách hàng có tồn tại hay không) ,do đó nếu muốn reset password qua mail thì mail ban đầu phải tồn tại (tạm thời mình cũng chưa nghĩ ra được cách nào khác để control việc này )
1.3.4.Re-authenticate a user
Một số hành động có tính bảo mật như xóa tài khoản , thiết lập email , đổi password yêu cầu user phải sign ở thời điểm hiện tại .Nếu thực hiện 1 trong các hành động trên khi mà user đã sign in trước đó khá lâu thì sẽ throw ra FirebaseAuthRecentLoginRequiredException(https://firebase.google.com/docs/reference/android/com/google/firebase/auth/FirebaseAuthRecentLoginRequiredException?authuser=1) Do đó , khi điều này xảy ra thì chúng ta phải xác thực lại thông tin bằng hàm reauthenticate :
FirebaseUser user = FirebaseAuth.getInstance().getCurrentUser();

// Get auth credentials from the user for re-authentication. The example below shows
// email and password credentials but there are multiple possible providers,
// such as GoogleAuthProvider or FacebookAuthProvider.
AuthCredential credential = EmailAuthProvider
        .getCredential("user@example.com", "password1234");

// Prompt the user to re-provide their sign-in credentials
user.reauthenticate(credential)
        .addOnCompleteListener(new OnCompleteListener<Void>() {
            @Override
            public void onComplete(@NonNull Task<Void> task) {
                Log.d(TAG, "User re-authenticated.");
            }
        });
Vậy là phần này mình đã giới thiệu qua một lượt các tính năng cơ bản ở màn hình Login và Update Profile .Mình xin dừng đề cập các tính năng đó ở đây . Phần tới mình sẽ đi chi tiết vào cách thiết lập tính năng ở màn hình chat .
All rights reserved