Xác thực ứng dụng chat Realtime với Laravel Passport, Laravel Echo
Cập nhật gần nhất: 28/11/2024
Hello các bạn lại là mình đây 👋👋
Dạo này dịch bệnh ở VN căng thẳng quá chờ mãi không biết bao giờ con mới được về với đất mẹ 😂😂 Nhớ giữ gìn sức khoẻ nhé các bạn để có sức còn code
Ở các bài trước trong series viết ứng dụng chat này mình dùng session để xác thực account của user cùng với đó là xác thực cho phía laravel echo. Thế nhưng ở các dự án thật thì việc xác thực qua JWT Token cũng rất phổ biến. Có khá nhiều bạn đã hỏi mình về vấn đề này.
Hôm nay tranh thủ rảnh mình viết luôn bài này để từ nay về sau các bạn có cái để xem trực tiếp và làm theo luôn chứ không cần phải lọ mọ search google nữa 😘
Bài sẽ khá là ngắn chứ không dài dòng văn tự như các bài khác nên các bạn yên tâm nhé 😂😂
Setup
Các bạn clone source code ở đây: https://github.com/maitrungduc1410/viblo-private-chat-app
Sau khi clone các bạn chạy lần lượt command sau để setup project:
composer install
npm install
cp .env.example .env
php artisan key:generate
Sau đó các bạn setup lại thông số database ở file .env cho phù hợp với máy của các bạn nha, ví dụ bên dưới của mình nom như sau:
DB_CONNECTION=mysql
DB_HOST=127.0.0.1
DB_PORT=3306
DB_DATABASE=chat_app
DB_USERNAME=root
DB_PASSWORD=
Ta có thể tạo sẵn database chat_app (hoặc không thì tí nữa đoạn migrate Laravel làm thay cũng được) 😁
Oke thì ta migrate và seed dữ liệu nhé:
php artisan migrate --seed
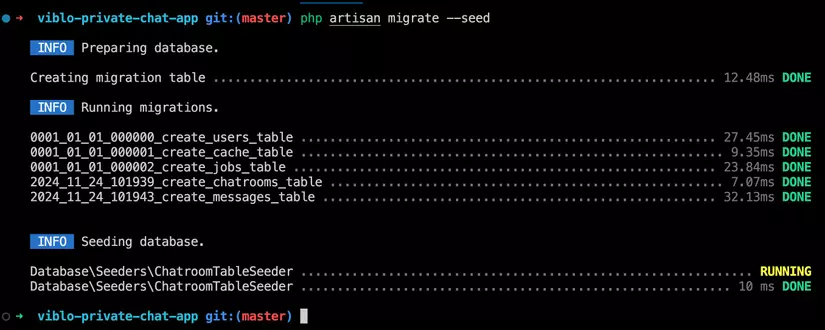
Cuối cùng chạy app để test thử coi xem sao nhen, các bạn chạy các command sau:
php artisan serve
npm run dev
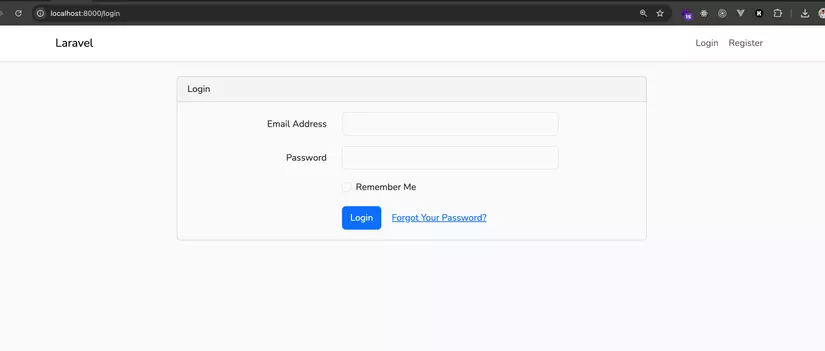
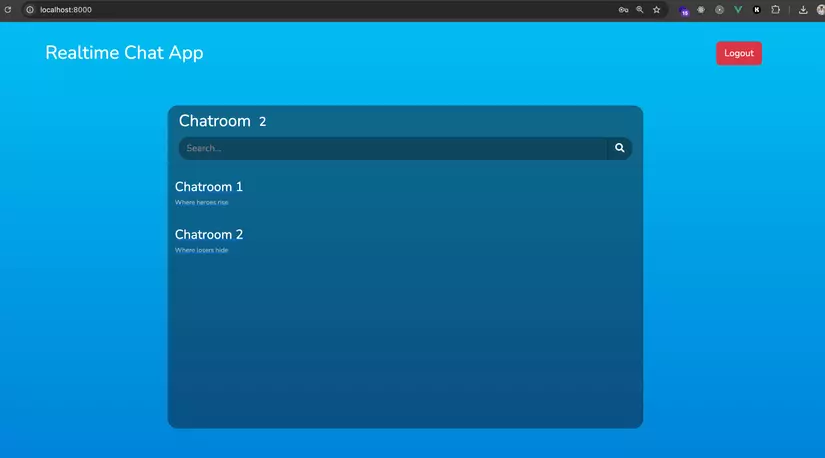
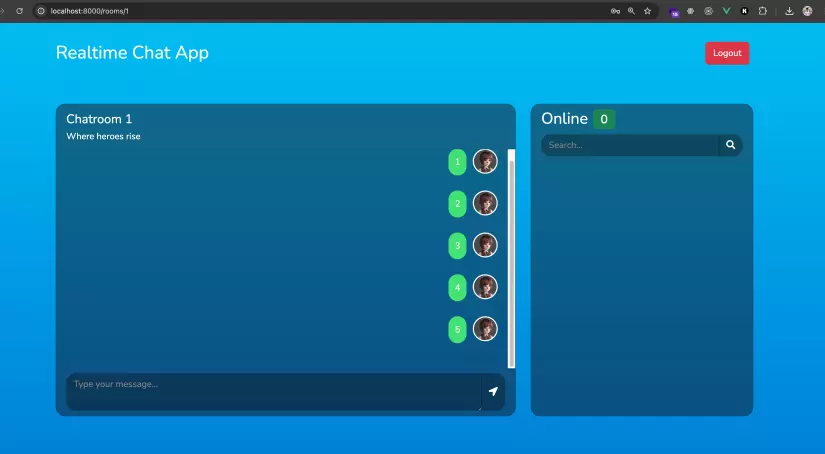
Sau đó ta mở trình duyệt ở địa chỉ http://localhost:8000/, tiến hành tạo tài khoản login, zô gửi vào tin nhắn các kiểu đảm bảo mọi thứ okela nha 😎:
Cài Passport
Ở bài này thì thay vì dùng cách xác thực thông thường thì ta sẽ dùng Laravel Passport nhé: https://laravel.com/docs/master/passport
Đầu tiên là ta cài Passport:
php artisan install:api --passport
Khi được hỏi
Would you like to use UUIDs for all client IDs? (yes/no)thì ta cứ mặc định chọnNonha
Tiếp đó ta mở file app/Models/User.php và thêm trait Laravel\Passport\HasApiTokens vào:
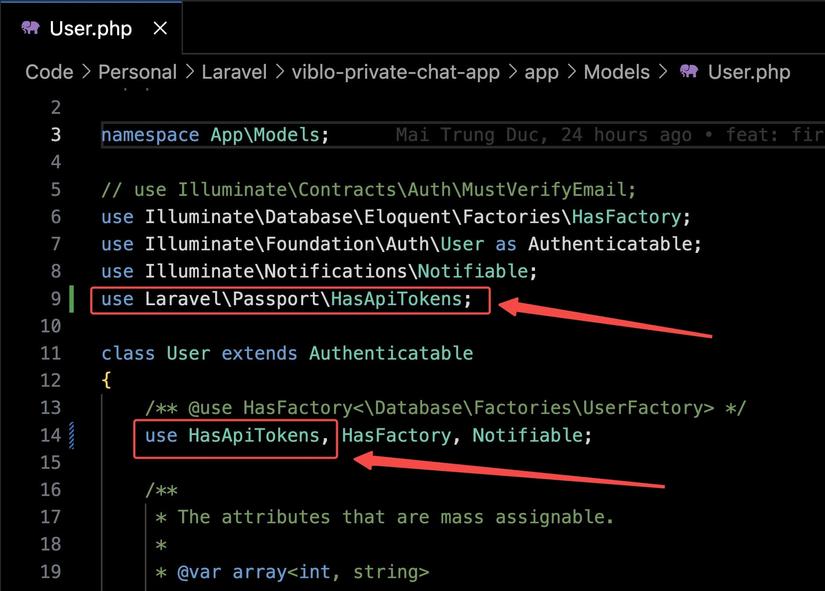
Sau đó ta mở file config/auth.php và thêm 1 auth guard cho api
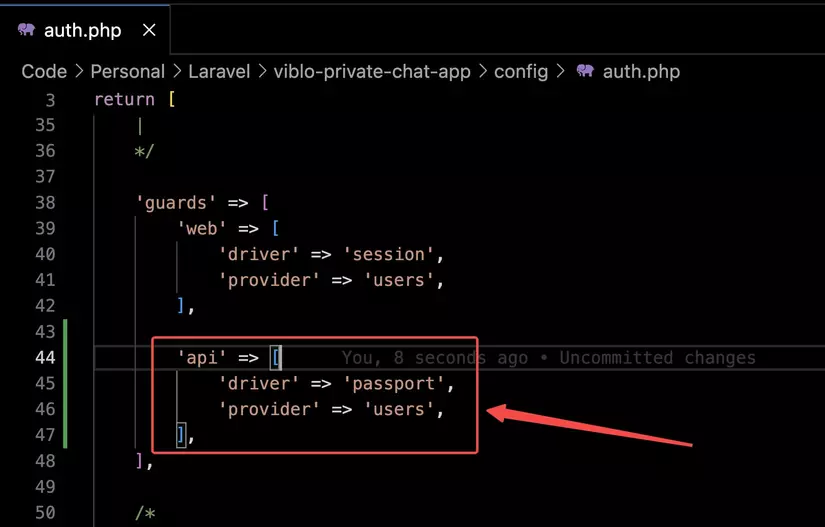
Âu cây roài, ta tới phần realtime nha 💪💪
Realtime
Setup broadcast
Âu cây, hiện tại ở Laravel 11 thì phần Broadcasting đã không được cài sẵn mà ta phải tự cài nó với command sau:
php artisan install:broadcasting
Khi được hỏi có cài Reverb + Node dependencies không thì ta chọn Yes nhé:


Khi cài Oke thì ở .env ta phải thấy xêm xêm như sau:
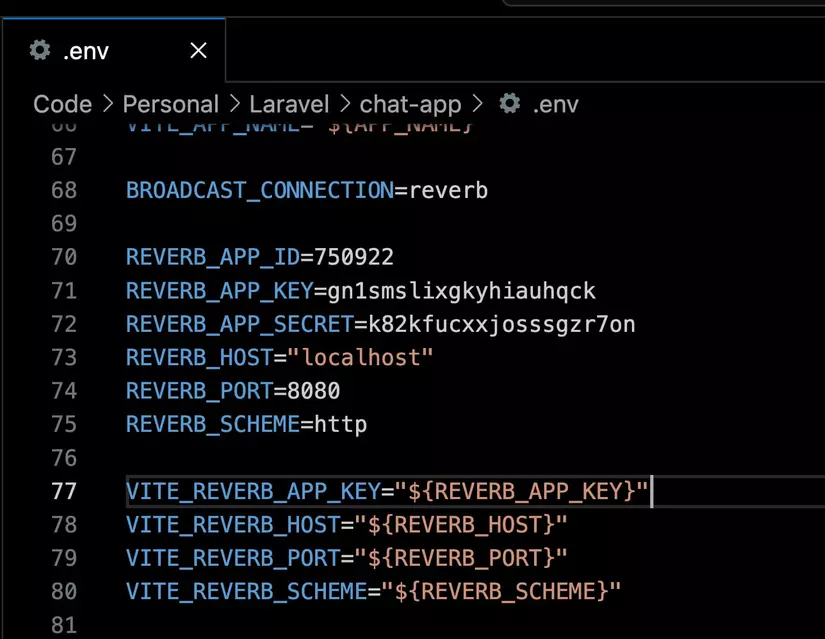
Chú ý: BROADCAST_CONNECTION=reverb nhé
Tiếp theo ta cài thêm 2 packages sau cho Frontend nhé:
npm install --save-dev laravel-echo pusher-js
Lý do ở trên ta cài
pusher-jslà vì Reverb nó cũng follow theo protocol của Pusher
Tiếp theo ta mở file resources/js/bootstrap.js, kéo xuống dưới cùng sẽ thấy là ở đoạn install broadcasting vừa nãy nó đã tự động thêm:
import './echo';
Và file echo.js có nội dung như sau cũng đã được tạo ra:
import Echo from 'laravel-echo';

import Pusher from 'pusher-js';
window.Pusher = Pusher;

window.Echo = new Echo({
    broadcaster: 'reverb',
    key: import.meta.env.VITE_REVERB_APP_KEY,
    wsHost: import.meta.env.VITE_REVERB_HOST,
    wsPort: import.meta.env.VITE_REVERB_PORT ?? 80,
    wssPort: import.meta.env.VITE_REVERB_PORT ?? 443,
    forceTLS: (import.meta.env.VITE_REVERB_SCHEME ?? 'https') === 'https',
    enabledTransports: ['ws', 'wss'],
});
Vì mặc định thì Laravel Echo sẽ gọi tới broadcasting/auth để xác thực channel, giờ ta dùng API route thì ta cần phải update lại, các bạn sửa lại toàn bộ file như sau:
import Echo from "laravel-echo";
import Pusher from "pusher-js";
import axios from "axios";

window.Pusher = Pusher;

window.Echo = new Echo({
    broadcaster: "reverb",
    key: import.meta.env.VITE_REVERB_APP_KEY,
    wsHost: import.meta.env.VITE_REVERB_HOST,
    wsPort: import.meta.env.VITE_REVERB_PORT ?? 80,
    wssPort: import.meta.env.VITE_REVERB_PORT ?? 443,
    forceTLS: (import.meta.env.VITE_REVERB_SCHEME ?? "https") === "https",
    enabledTransports: ["ws", "wss"],
    authorizer: (channel, options) => {
        return {
            authorize: (socketId, callback) => {
                axios
                    .post(
                        "/api/broadcasting/auth",
                        {
                            socket_id: socketId,
                            channel_name: channel.name,
                        },
                        {
                            headers: {
                                Authorization: `Bearer ${localStorage.getItem(
                                    "token"
                                )}`,
                            },
                        }
                    )
                    .then((response) => {
                        console.log(1111, response.data);
                        callback(false, response.data);
                    })
                    .catch((error) => {
                        callback(true, error);
                    });
            },
        };
    },
});
Ở trên các bạn thấy mình thêm vào authorizer, logic khá đơn giản, ta gọi API tới /api/broadcasting/auth, lấy token được lưu ở local storage và gửi đi để xác thực với Laravel API route, kết quả trả về ta đưa vào callback, phần còn lại thì Laravel Echo lo hết 😎
Tiếp theo, ta tạo event MessagePosted (event này sẽ được gọi mỗi khi có tin nhắn được lưu thành công):
php artisan make:event MessagePosted
Sau đó ta mở file app/Events/MessagePosted và sửa lại như sau:
<?php

namespace App\Events;

use Illuminate\Broadcasting\Channel;
use Illuminate\Broadcasting\InteractsWithSockets;
use Illuminate\Broadcasting\PresenceChannel;
use Illuminate\Broadcasting\PrivateChannel;
use Illuminate\Contracts\Broadcasting\ShouldBroadcast;
use Illuminate\Foundation\Events\Dispatchable;
use Illuminate\Queue\SerializesModels;

use App\Models\Message;

class MessagePosted implements ShouldBroadcast
{
    use Dispatchable, InteractsWithSockets, SerializesModels;

    public $message;

    /**
     * Create a new event instance.
     */
    public function __construct(Message $message)
    {
        $this->message = $message;
    }

    /**
     * Get the channels the event should broadcast on.
     *
     * @return array<int, \Illuminate\Broadcasting\Channel>
     */
    public function broadcastOn()
    {
        return new PrivateChannel('room.'.$this->message->room_id);
    }
}
Chú ý đoạn
implements ShouldBroadcastvàuse App\Models\Message;nha 😉
Giải thích chút nhé: ở event này ta nhận vào 1 tham số là message vừa được lưu, sau đó broadcast cho các users khác qua Private channel với tên channel là room của message.
Tiếp theo, vì là bây giờ ta dùng Private Channel, nên ta phải login trước thì lát nữa mới có thể lắng nghe sự kiện nhé. Đồng thời, khi login xong user có tuỳ quyền chọn vào 1 trong các chatroom định sẵn do đó ở file routes/channels.php ta thêm vào như sau nhé:
<?php

use Illuminate\Support\Facades\Broadcast;

Broadcast::channel('room.{id}', function ($user, $id) {
    return true; // user có thể join vào bất kì chatroom nào
});
Chú ý rằng ở callback ta có $user là user sau khi đã authenticated, tức là đã đảm bảo rằng họ đã login
Setup phần broadcast ổn rồi đó. Giờ ta quay lại file MessageController.php ở hàm store (để lưu tin nhắn) ta sửa lại như sau:
use App\Events\MessagePosted; // thêm dòng này ở đầu

...

public function store (Request $request) {
    $message = new Message();
    $message->room_id = $request->input('room_id', -1);
    $message->user_id = Auth::user()->id;
    $message->content = $request->input('content', '');

    $message->save();

    // Thêm dòng bên dưới
    // Gửi đến các user khác trong phòng TRỪ user tạo tin nhắn này
    broadcast(new MessagePosted($message->load('user')))->toOthers();

    return response()->json(['message' => $message->load('user')]);
}
Ổn rồi đó, giờ ta qua frontend để lắng nghe sự kiện bắt tin nhắn mới nhé 😘
Các bạn mở file resources/js/pages/Room.vue ở onBeforeMount các bạn sửa lại như sau:
onBeforeMount(() => {
  getMessages()
  const index = rootData.rooms.findIndex(item => item.id === parseInt(route.params.roomId))
  if (index > -1) {
    currentRoom.value = rootData.rooms[index]

    Echo.private(`room.${currentRoom.value.id}`)
      .listen('MessagePosted', (e) => {
        messages.value.push(e.message)

        scrollToBottom()
      })
  }
})
Giải thích chút nhé:
- Ở
onBeforeMountđầu tiên ta lấy danh sách tin nhắn ứng với room ID hiện tại, room ID được trichs từ URL hiên tại (dùngroute.params.roomId) - vẫn ở
onBeforeMountta check xem room ID có tồn tại trong danh sách room hay không (đề phòng user tự sửa room id và cho load lại trang) - nếu có thì ta mới tiến hành lắng nghe tin nhắn dùng
Echo.private, khi có tin nhắn mới thì ta đẩy vào mảng danh sách message
Tiêp theo đó vẫn ở Room.vue ta thêm vào:
import { onBeforeMount, ref, getCurrentInstance, nextTick, onBeforeUnmount } from 'vue'

//...

onBeforeUnmount(() => {
  // huỷ lắng nghe tin nhắn ở chatroom hiện tại
  // nếu như user chuyển qua route/chatroom khác
  Echo.leaveChannel(`room.${currentRoom.value.id}`)
})
Ô kê đến giờ test rồi. Các bạn tắt hết các cửa sổ terminal đang chạy, clear config bằng command php artisan config:clear và ta tiến hành khởi động lại bằng các command sau nhé, mỗi command chạy ở 1 terminal nhé:
php artisan serve
npm run dev
php artisan reverb:start --debug
php artisan queue:work
ta chạy Reverb với option
--debugđể xem đầy đủ log ở terminal nha
Giờ ta quay trở lại trình duyệt, mở 2 tab, 1 tab thường, 1 ẩn danh, login với 2 account, thử chat loạn xạ và......BÙM, chả có gì xảy ra cả 🥲🥲, mở console trình duyệt thấy như sau:

Hí, quên, đã viết Route để xác thực cho Laravel Echo đâu 😂😂
Ta mở routes/api.php, ta viết thêm 1 route như sau:
Broadcast::routes(['middleware' => ['auth:api']]);
Ở đây ta đã register - đăng kí tất cả các route liên quan tới Broadcast ở API route và dùng auth:api (Laravel Passport), khi frontend gọi tới thì Passport sẽ xác thực trước, oke thì sẽ trả về response theo những gì được định nghĩa bởi module Broadcast
Xong thì ta quay trở lại trình duyệt F5, sẽ thấy console in ra lỗi 401:

Lý do là vì ta chưa có lưu token nào ở localstorage để đem ra mà xác thực cả 😂
Xác thực Laravel Echo
Ở bài này, cho đơn giản thì mình sẽ dùng Personal Access Token nhé: https://laravel.com/docs/master/passport#personal-access-tokens
Đầu tiên ta chạy command sau để tạo passport client:
php artisan passport:client --personal
Ta nhập vào tên client muốn tạo:

Ta sẽ thấy có giá trị client ID và secret, ta copy và tạo 2 biến sau ở .env:
PASSPORT_PERSONAL_ACCESS_CLIENT_ID="3"
PASSPORT_PERSONAL_ACCESS_CLIENT_SECRET="S2iKVwnInd0wERAcusUIUnC0dq3waxu7yxi60G6C"
Ở trên là cái của mình, các bạn nhớ thay giá trị của các bạn vào cho đúng nhé ☺️
Tiếp đó ta mở app/Http/Controllers/AppController.php sửa lại chút như sau để ta trả luôn về token mỗi khi user load app:
<?php

namespace App\Http\Controllers;

use Illuminate\Http\Request;
use App\Models\Chatroom;
use Auth;

class AppController extends Controller
{
    public function index () {
        $user = Auth::user();
        $token = $user->createToken('My Token')->accessToken;
        $data = ['user' => $user, 'rooms' => Chatroom::all(), 'token' => $token];
        return view('app', ['data' => $data]);
    }
}
Ở trên ta có đoạn $token = $user->createToken('My Token')->accessToken; để tạo access token và trả về cho view
Giờ ta đóng tất cả terminal đi và start mới:
php artisan serve

npm run dev

php artisan reverb:start --debug

php artisan queue:work
- reverb: là websocket server
- queue:work: vì event MessagePosted sẽ được xử lý bởi queue jobs nên ta cần có worker thực hiện nó
Tiếp đó ta mở resources/js/echo.jssửa lại chỗ Authorization như sau:
import Echo from "laravel-echo";
import Pusher from "pusher-js";
import axios from "axios";

window.Pusher = Pusher;

window.Echo = new Echo({
    broadcaster: "reverb",
    key: import.meta.env.VITE_REVERB_APP_KEY,
    wsHost: import.meta.env.VITE_REVERB_HOST,
    wsPort: import.meta.env.VITE_REVERB_PORT ?? 80,
    wssPort: import.meta.env.VITE_REVERB_PORT ?? 443,
    forceTLS: (import.meta.env.VITE_REVERB_SCHEME ?? "https") === "https",
    enabledTransports: ["ws", "wss"],
    authorizer: (channel, options) => {
        return {
            authorize: (socketId, callback) => {
                axios
                    .post(
                        "/api/broadcasting/auth",
                        {
                            socket_id: socketId,
                            channel_name: channel.name,
                        },
                        {
                            headers: {
                                Authorization: `Bearer ${window.__app__.token}`,
                            },
                        }
                    )
                    .then((response) => {
                        callback(false, response.data);
                    })
                    .catch((error) => {
                        callback(true, error);
                    });
            },
        };
    },
});
Các bạn để ý rằng thay vì dùng localStorage thì ta đã lấy luôn từ biến window, giá trị được trả về từ AppController khi nãy
Ban đầu tính dùng localStorage mà sau dùng cách này tiện hơn 🤣🤣. Nhưng chú ý rằng đây chỉ là demo thôi nhé, tuyệt vời nhất là các bạn nên thực hiện đúng OAuth flow
Âu cây rồi, giờ ta F5 trình duyệt sẽ thấy /api/broadcasting/auth, thành công:
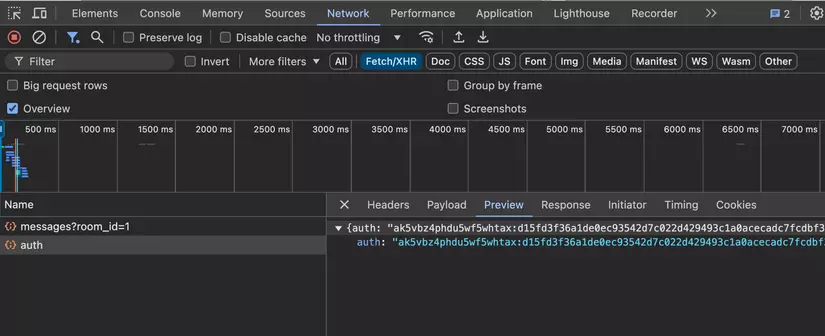
Terminal phía Reverb báo như sau là oke nè:
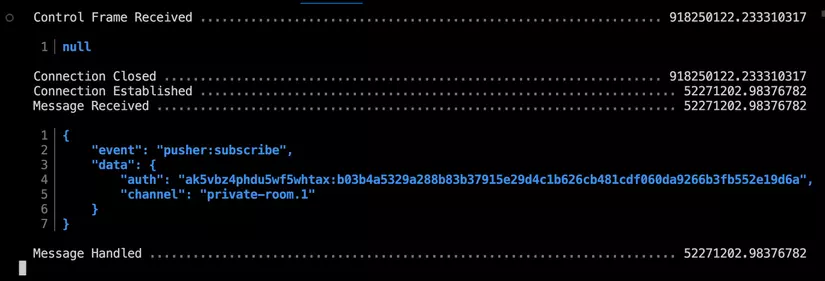
Giờ thì ta mở 2 tab trình duyệt, login 2 tài khoản chat với nhau là ngon luôn nha 😘😘😘:
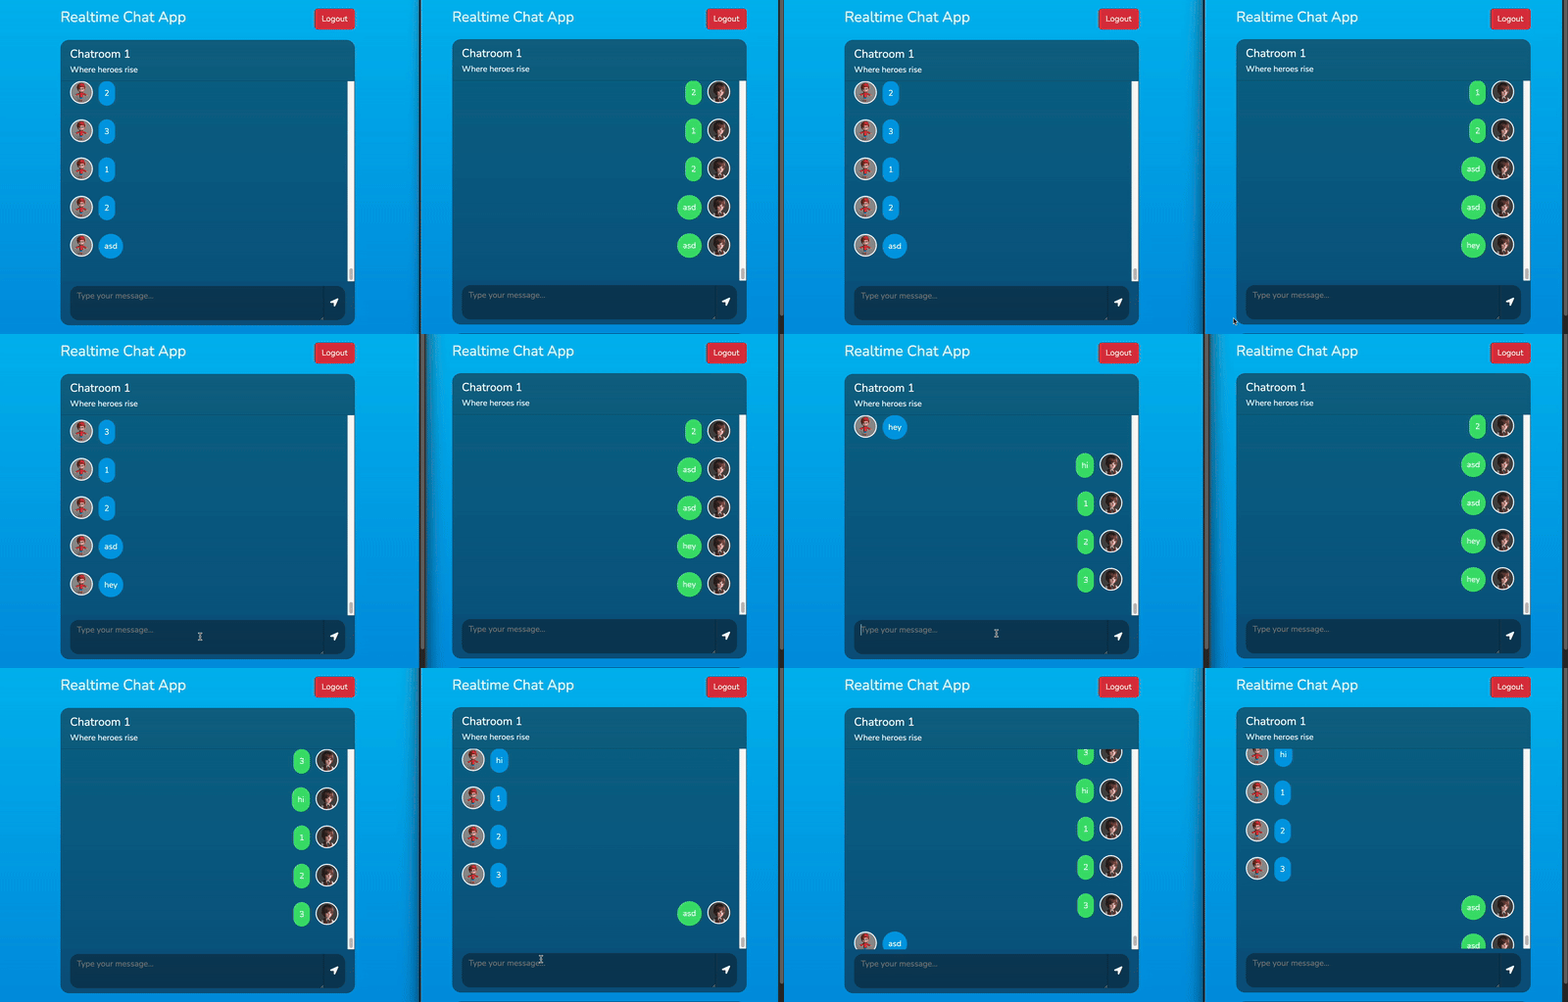
Buggg
Ầu... có gì lạ lạ à nha.
Đúng là từ A gửi tin nhắn sang B thì phía B realtime rồi, cơ mà phía A cũng nhận được tin nhắn, dẫn đến tình trạng tin nhắn bị lặp.
Ê mà ở phía Laravel ta có boadcast()->toOthers rồi mà ta 🤔🤔🤔
Đọc lại documentation của Laravel tí coi nha: https://laravel.com/docs/master/broadcasting#only-to-others-configuration
Àaaaaaaa...thì ra là ta phải gửi cả socketId theo request (axios) lên cho Laravel nữa, thì khi broadcast nó mới bỏ qua socketId của người gửi (sender)
Tức là ở file Room.vue -> saveMessage(), đoạn axios.post ta phải sửa như sau:
const saveMessage = async (content) => {
  try {
    const response = await axios.post('/messages', {
      room_id: parseInt(route.params.roomId),
      content
    }, {
      headers: {
        'X-Socket-ID': window.Echo.socketId(),
      }
    })
    messages.value.push(response.data.message)
    scrollToBottom()
  } catch (error) {
    console.log(error)
  }
}
Ta lưu lại và quay lại trình duyệt F5 là sẽ thấy oke nha, không còn hiện tượng bị lặp tin nhắn 👍️👍️
Ấy thế cơ mà ở ứng dụng thật thì ta có thể có rất nhiều API mà ta cần boadcast()->toOthers, chả nhẽ cứ phải nhớ truyền header kia vào thì rồi có ngày quên xong lỗi ở production là mệt à nha 😂😂
Ta để ý rằng, khi tạo project mới thì ở file resources/js/bootstrap.js, ta đã có sẵn đoạn:
import axios from 'axios';
window.axios = axios;
Vậy thì giờ ta có thể tận dụng, ở mọi component VueJS, thay vì import axios from 'axios' thì ta dùng chung 1 instance axios global window.axios, sau đó set X-Socket-ID 1 lần là được 😉
Ta mở file resources/js/echo.jsvà sửa lại như sau:
import Echo from "laravel-echo";
import Pusher from "pusher-js";

window.Pusher = Pusher;

window.Echo = new Echo({
    broadcaster: "reverb",
    key: import.meta.env.VITE_REVERB_APP_KEY,
    wsHost: import.meta.env.VITE_REVERB_HOST,
    wsPort: import.meta.env.VITE_REVERB_PORT ?? 80,
    wssPort: import.meta.env.VITE_REVERB_PORT ?? 443,
    forceTLS: (import.meta.env.VITE_REVERB_SCHEME ?? "https") === "https",
    enabledTransports: ["ws", "wss"],
    authorizer: (channel, options) => {
        window.axios.defaults.headers.common["X-Socket-Id"] =
            window.Echo.socketId();
        return {
            authorize: (socketId, callback) => {

                window.axios
                    .post(
                        "/api/broadcasting/auth",
                        {
                            socket_id: socketId,
                            channel_name: channel.name,
                        },
                        {
                            headers: {
                                Authorization: `Bearer ${window.__app__.token}`,
                            },
                        }
                    )
                    .then((response) => {
                        console.log(1111, response.data);
                        callback(false, response.data);
                    })
                    .catch((error) => {
                        callback(true, error);
                    });
            },
        };
    },
});
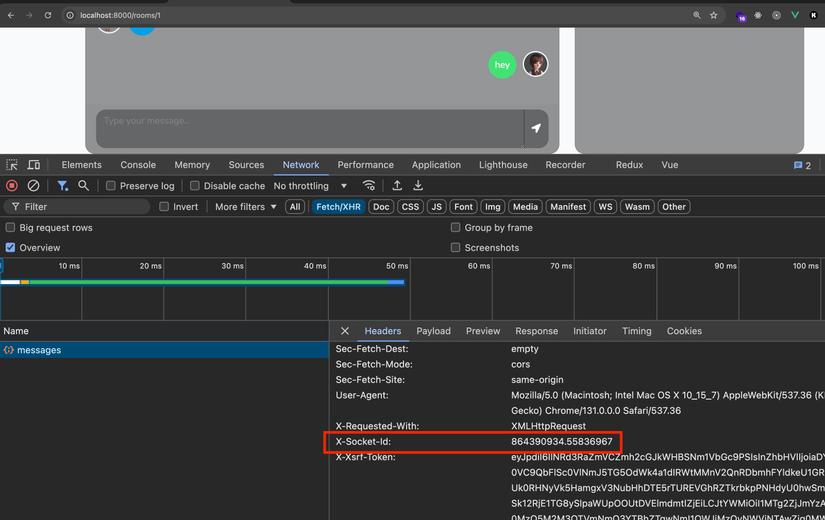
Chú ý rằng mình đã bỏ đi đoạn import axios, cùng với đó là ở authorizer thì mình có lấy ra window.Echo.socketId() và set nó vào header mặc định của axios global luôn, và kể từ đây trở đi, mọi nơi mà ta dùng window.axios... sẽ tự có header kia.
Tiếp theo ở các component Vue nơi ta có dùng axios thì ta chuyển qua dùng window.axios nhé, ví dụ ở Room.vue
const getMessages = async () => {
  try {
    const response = await window.axios.get(`/messages?room_id=${route.params.roomId}`)
    messages.value = response.data
    scrollToBottom(false)
  } catch (error) {
    console.log(error)
  }
}

const saveMessage = async (content) => {
  try {
    const response = await window.axios.post('/messages', {
      room_id: parseInt(route.params.roomId),
      content
    })
    messages.value.push(response.data.message)
    scrollToBottom()
  } catch (error) {
    console.log(error)
  }
}
Ta thử gửi 1 message và inspect API kiểm tra header xem nha:
Presence Channel
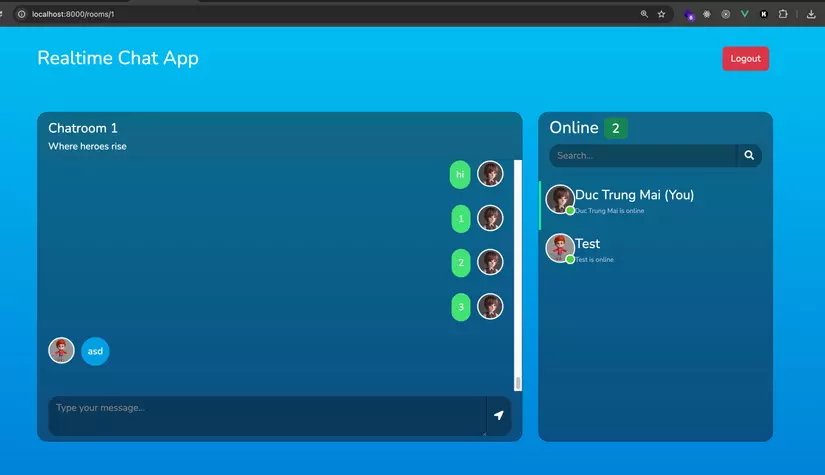
Giờ để hiển thị danh sách user đang có trong phòng thì ta sẽ dùng Presence Channel nhé
Presence channel cũng chính là Private channel nhưng ở đó ta lấy được thông tin cụ thể từng user
Ở file routes/channels.php, ta sửa lại như sau nhé:
Broadcast::channel('room.{id}', function ($user, $id) {
    // // giờ đây ta trả về thông tin user chứ không trả về true/false nữa
    return $user;
});
Tiếp theo ta quay lại file app/Events/MessagePosted.php và sửa lại hàm broadcastOn như sau:
public function broadcastOn()
{
    return new PresenceChannel('room.'.$this->message->room_id);
}
Sau đó ta quay lại file Room.vue ở created ta sửa lại như sau:
onBeforeMount(() => {
  getMessages()
  const index = rootData.rooms.findIndex(item => item.id === parseInt(route.params.roomId))
  if (index > -1) {
    currentRoom.value = rootData.rooms[index]

    Echo.join(`room.${currentRoom.value.id}`)
      .here((users) => { // gọi ngay thời điểm ta join vào phòng, trả về tổng số user hiện tại có trong phòng (cả ta)
        usersOnline.value = users
      })
      .joining((user) => { // gọi khi có user mới join vào phòng
        usersOnline.value.push(user)
      })
      .leaving((user) => { // gọi khi có user rời phòng
        const index = usersOnline.value.findIndex(item => item.id === user.id)
        if (index > -1) {
          usersOnline.value.splice(index, 1)
        }
      })
      .listen('MessagePosted', (e) => {
        messages.value.push(e.message)

        scrollToBottom()
      })
  }
})
Giờ ta đóng tất cả terminal đi và start mới:
php artisan serve

npm run dev

php artisan reverb:start --debug

php artisan queue:work
Ngay sau đó các bạn load lại trang, và BÙM, ta có kết quả như sau:
Custom broadcasting
Hiện tại thì toàn bộ phần xử lý broadcasting ta gần như không có đụng vào mấy, chỉ đơn giản là đưa nó vào file routes/api.php, kiểu giống như lấy route API làm wrapper vậy thôi 😄
Trong trường hợp ta muốn custom phần xử lý broadcast thì có thể làm như sau, ở file routes/api.php
<?php

use Illuminate\Http\Request;
use Illuminate\Support\Facades\Route;
use Illuminate\Support\Facades\Log;

Broadcast::routes(['middleware' => ['auth:api']]);

Route::post('/broadcasting/auth', function (Request $request) {
    Log::info($request->all());

    // Viết bất kì logic nào bạn muốn ở đây

    return Broadcast::auth($request);
})->middleware('auth:api');
Ở trên ta vẫn return về Broadcast::auth($request); để Laravel làm nhiệm vụ xác thực channel, nhưng ta đã có thể viết thêm logic mà ta muốn ở đó. Ví dụ trên mình đơn giản là log ra tất cả các input được gửi kèm request (request body)
Ta quay trở lại trình duyệt F5, vô phòng chat, sau đó check phía server ở folder storage/logs/laravel.log, kéo xuống dưới cùng thấy như sau là oke nà 😊:
[2024-11-28 06:04:52] local.INFO: array (
  'socket_id' => '20030323.63677467',
  'channel_name' => 'presence-room.1',
)
[2024-11-28 06:04:52] local.INFO: array (
  'socket_id' => '197200485.131181659',
  'channel_name' => 'presence-room.1',
)
[2024-11-28 06:05:02] local.INFO: array (
  'socket_id' => '787640536.942947896',
  'channel_name' => 'presence-room.1',
)
[2024-11-28 06:05:02] local.INFO: array (
  'socket_id' => '100173781.438157844',
  'channel_name' => 'presence-room.1',
)
[2024-11-28 06:05:02] local.INFO: array (
  'socket_id' => '864390934.55836967',
  'channel_name' => 'presence-room.1',
)
Nếu bạn gặp lỗi
Trong khi code nếu có khi nào bạn gặp lỗi thì xem lại bài đầu tiên trong series này của mình phần debug mình đã ghi rấttttttt là tâm huyết rồi các bạn à 😘😘😘
Kết bài
Lâu lắm mới có 1 bài "tàu nhanh" như thế này 

 .
.
Qua bài này các bạn thấy rằng việc dùng JWT Token để xác thực với Laravel Echo Server cũng không khó khăn lắm phải không nào? Nhưng vì mình thấy tài liệu và các bài tutorial trên mạng chủ yếu dùng session (như mình làm ở các bài trước), nên khi vào dự án thực tế mà dùng JWT thì bối rối không biết làm như thế nào, thì mong rằng qua bài này các bạn đã hiểu hơn về cách sử dụng nó.
Chúc các bạn thành công và hẹn gặp lại các bạn ở những bài sau
All rights reserved