Writeup SVATTT 2021 (ASCIS 2021)
Bài đăng này đã không được cập nhật trong 4 năm
Challenges in 2 section of this CTF (crypto and misc) are all built from practical ideas, so it's not really hard as usual CTF.
CRYPTO
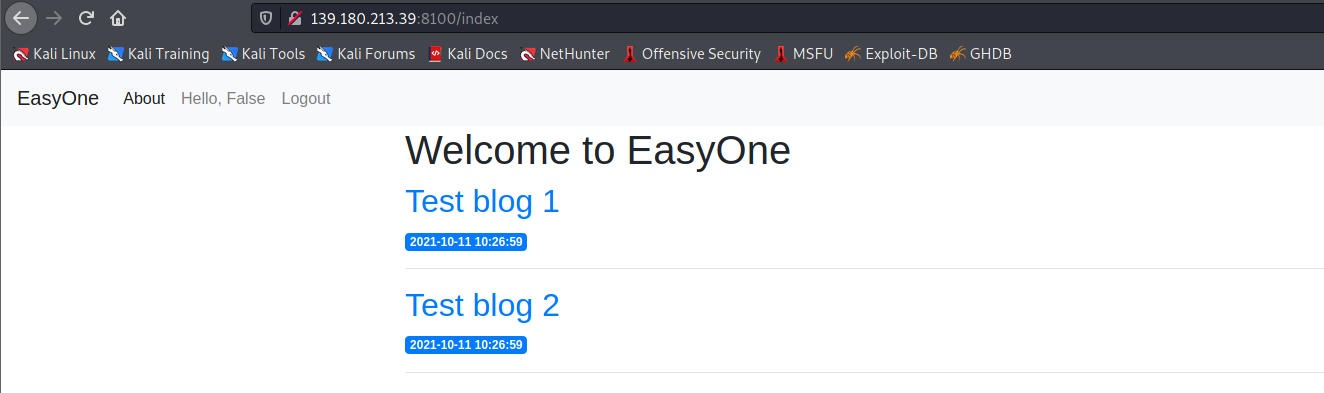
EasyOne
A challenge about digital certificate problem, just the basic things. Full source code can found at here
1. Challenge analysis
Read the source code, I figured out that there is a route /flag which will tell us the flag of this challenge, but only admin can access content of flag
@app.route("/flag")
@login_required
def flag():
    flag = "You are not admin"
    if session["role"] == ROLE_ADMIN:
        flag = "ASCIS{xxxxxx}"
    return render_template('flag.html', flag=flag)
There is a register function, but we can't register as admin. It just allow us to register as a normal user
@app.route("/register", methods=('GET', 'POST'))
def register():
    if request.method == 'POST':
        username = request.form['username']
        password = request.form['password']
        email = request.form['email']
        role = ROLE_USER

        if not username or not password:
            flash('Username and Password is required!')
        else:
            do_register(username, password, email, role)

            return redirect(url_for('login'))

    return render_template('register.html')
However, examine carefully the source code, I found that there is another way to login without admin account. It's the /logincert route
# This function only for admin
@app.route("/logincert", methods=('GET', 'POST'))
def logincert():
    if request.method == 'POST':
        username = None
        uploaded_file = request.files['file']
        if uploaded_file.filename != '':
            split_tup = os.path.splitext(uploaded_file.filename)
            if split_tup[1] != ".pem":
                flash('Cert file is invalid')
                return render_template('logincert.html')
            else:
                username = validate_certificate(uploaded_file)

        if username is None:
            flash('Login cert is invalid!')
            return render_template('logincert.html')
        else:
            session["username"] = username
            session["role"] = ROLE_ADMIN

            return redirect(url_for('index'))

    return render_template('logincert.html')
Notice the line code username = validate_certificate(uploaded_file). Follow the code, it leads us to verify_certificate_chain(cert_pem, trusted_certs) function in file certutils.py.
def verify_certificate_chain(cert_pem, trusted_certs):
    certificate = crypto.load_certificate(crypto.FILETYPE_PEM, cert_pem)
    # parse ceritificate information
    clientcert = CertInfo(certificate)
    # get subject common name
    subject = clientcert.subject_cn
    issuer = clientcert.issuer_cn
    # Check if subject is admin user
    if subject != "admin":
        raise Exception("Not trusted user")
    # validate issuer
    if issuer != "ca":
        raise Exception("Not trusted ca")
    thumbprint = clientcert.digest_sha256.decode('utf-8')
    #TODO: validate thumbprint
    #Create a certificate store and add your trusted certs
    try:
        store = crypto.X509Store()
        # Assuming the certificates are in PEM format in a trusted_certs list
        for _cert in trusted_certs:
            cert_file = open(_cert, 'r')
            cert_data = cert_file.read()
            client_certificate = crypto.load_certificate(crypto.FILETYPE_PEM, cert_data)
            store.add_cert(client_certificate)
        # Create a certificate context using the store
        store_ctx = crypto.X509StoreContext(store, certificate)
        # Verify the certificate signature, returns None if it can validate the certificate
        store_ctx.verify_certificate()
        # verify success
        return subject
    except Exception as e:
        print("[+] Debug certificate validation failed")
        return False
For the one that does not really understand the detail code of digital certificate as me, I have been overwhelmed and confused a little bit. However, just pay attention to the output and the the requirement in 2 if statements, I can draw out the 2 following conclusions.
- There are 2 requirements to successfully login by certificate: the subject must be
adminand the issuers must beca. It's really easy~~ - After passing these 2 requirements, it return us
subject, which is actually theadmin. Now we will aadminsession, thus get the flag.
So, let's go on to create a digital ceritificate.
2. Create digital certificate
I use openssl on Kali Linux machine to create digital certiifcate. The ideas is simple:
- Create a certificate owned by
casubject = ca and issuer = ca - Create another certificate owned by
adminsubject = admin and issuer = admin - Sign the second certificate by the first certificate subject = admin and issuer = ca
For the technical details, follow step by step as following
- Create a RSA key pair for
cacertificate
thangpdhe141354@kali:~$ openssl genrsa -out ca.key 2048
Generating RSA private key, 2048 bit long modulus (2 primes)
.............+++++
...........................+++++
e is 65537 (0x010001)
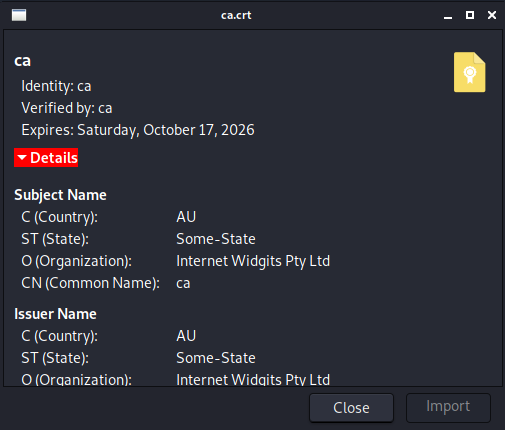
- Create a certificate owned by
ca. Left all other blanks and fillCommon Nameasca
thangpd3160@kali:~$ openssl req -new -x509 -days 1826 -key ca.key -out ca.crt
You are about to be asked to enter information that will be incorporated
into your certificate request.
What you are about to enter is what is called a Distinguished Name or a DN.
There are quite a few fields but you can leave some blank
For some fields there will be a default value,
If you enter '.', the field will be left blank.
-----
Country Name (2 letter code) [AU]:
State or Province Name (full name) [Some-State]:
Locality Name (eg, city) []:
Organization Name (eg, company) [Internet Widgits Pty Ltd]:
Organizational Unit Name (eg, section) []:
Common Name (e.g. server FQDN or YOUR name) []:ca
Email Address []:
After create, you can see the CA look like this
- Create a RSA key pair for
admincertificate
thangpd3160@kali:~$openssl genrsa -out ia.key 2048
Generating RSA private key, 2048 bit long modulus (2 primes)
.....+++++
.............+++++
e is 65537 (0x010001)
- Create a certificate owned by
admin. Left all other blanks and fillCommon Nameasadmin
thangpd3160@kali:~$ openssl req -new -key ia.key -out ia.csr
You are about to be asked to enter information that will be incorporated
into your certificate request.
What you are about to enter is what is called a Distinguished Name or a DN.
There are quite a few fields but you can leave some blank
For some fields there will be a default value,
If you enter '.', the field will be left blank.
-----
Country Name (2 letter code) [AU]:
State or Province Name (full name) [Some-State]:
Locality Name (eg, city) []:
Organization Name (eg, company) [Internet Widgits Pty Ltd]:
Organizational Unit Name (eg, section) []:
Common Name (e.g. server FQDN or YOUR name) []:admin
Email Address []:

Please enter the following 'extra' attributes
to be sent with your certificate request
A challenge password []:
An optional company name []:
The created certificate will look as following
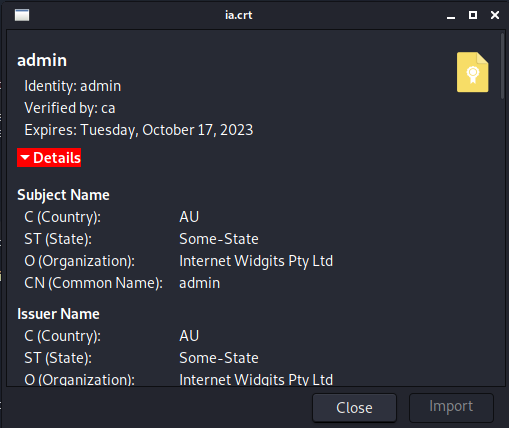
 5. Sign the second certificate by the first certificate
thangpd3160@kali:~$ openssl x509 -req -days 730 -in ia.csr -CA ca.crt -CAkey ca.key -set_serial 01 -out ia.crt
Signature ok
subject=C = AU, ST = Some-State, O = Internet Widgits Pty Ltd, CN = admin
Getting CA Private Key
The signed certificate will look as following
- Finally, convert the certificate to .pem format to fit the code requirement
thangpd3160@kali:~$ openssl x509 -in ia.crt -out ia.pem -outform PEM
3. Submit the digital certificate and get the flag
Submit file ia.pem to server
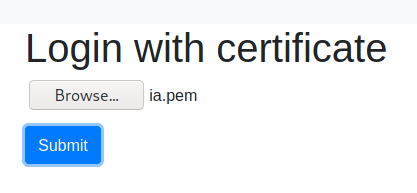
Logon!
And get the flag!

ConfuseOne
This is blackbox crypto challenge! There is no source, and actually the most practical one.
1. Challenge analysis
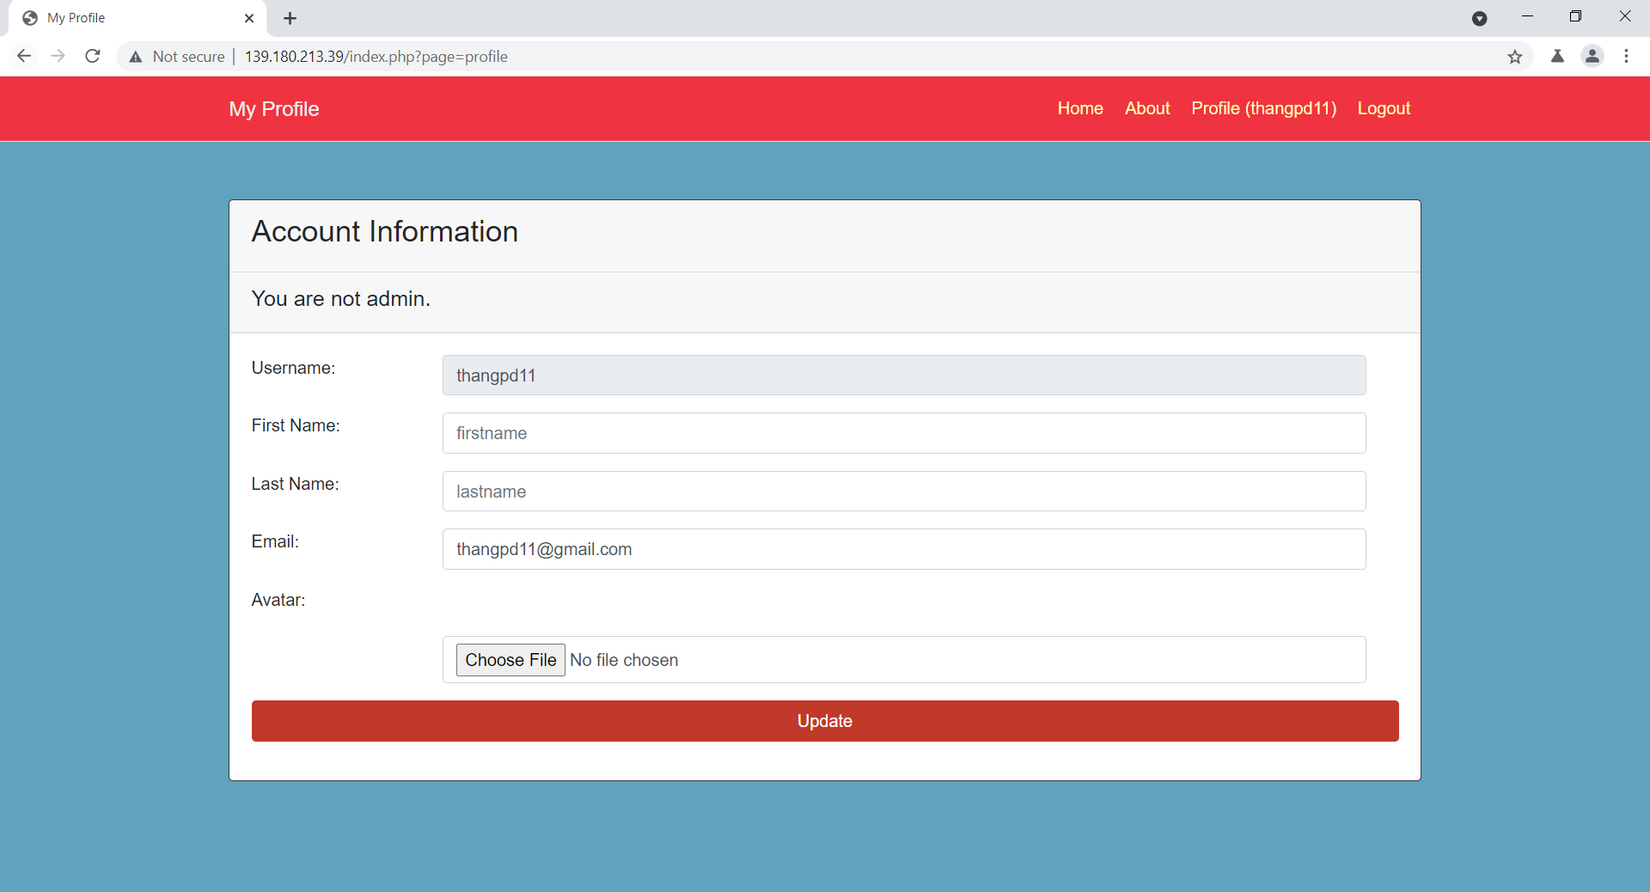
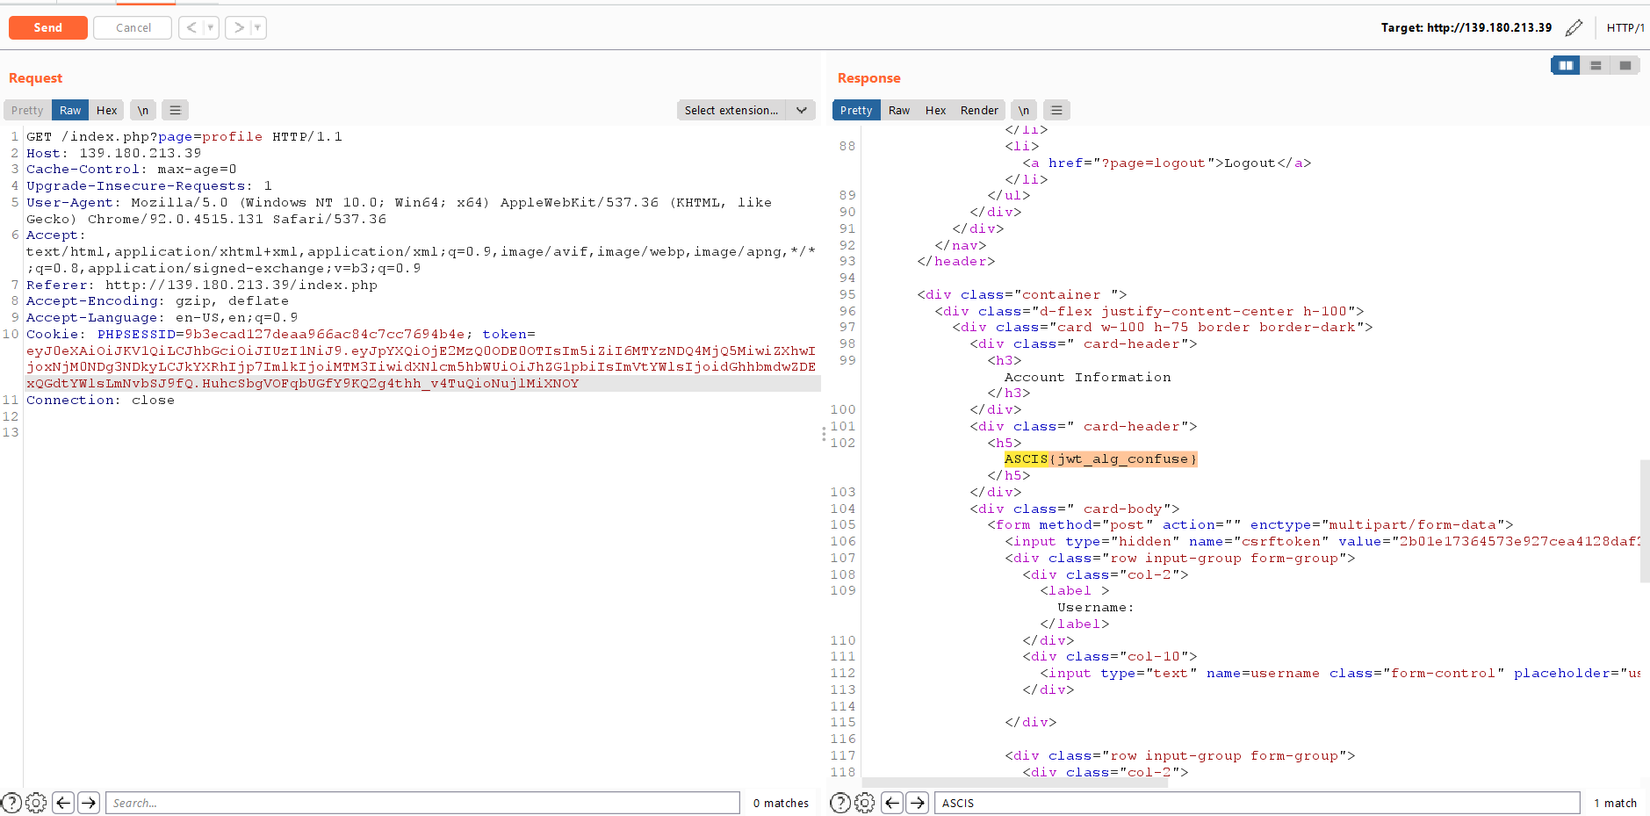
First at all, just register and login. Browse the web and I see the profile page has a suspected line, which is "You are not admin"
The flag may in this page, but we need to login as admin. It impossible as normal. Now, intercept the request, I see the web use jwt token. Try to decode, I get the following result
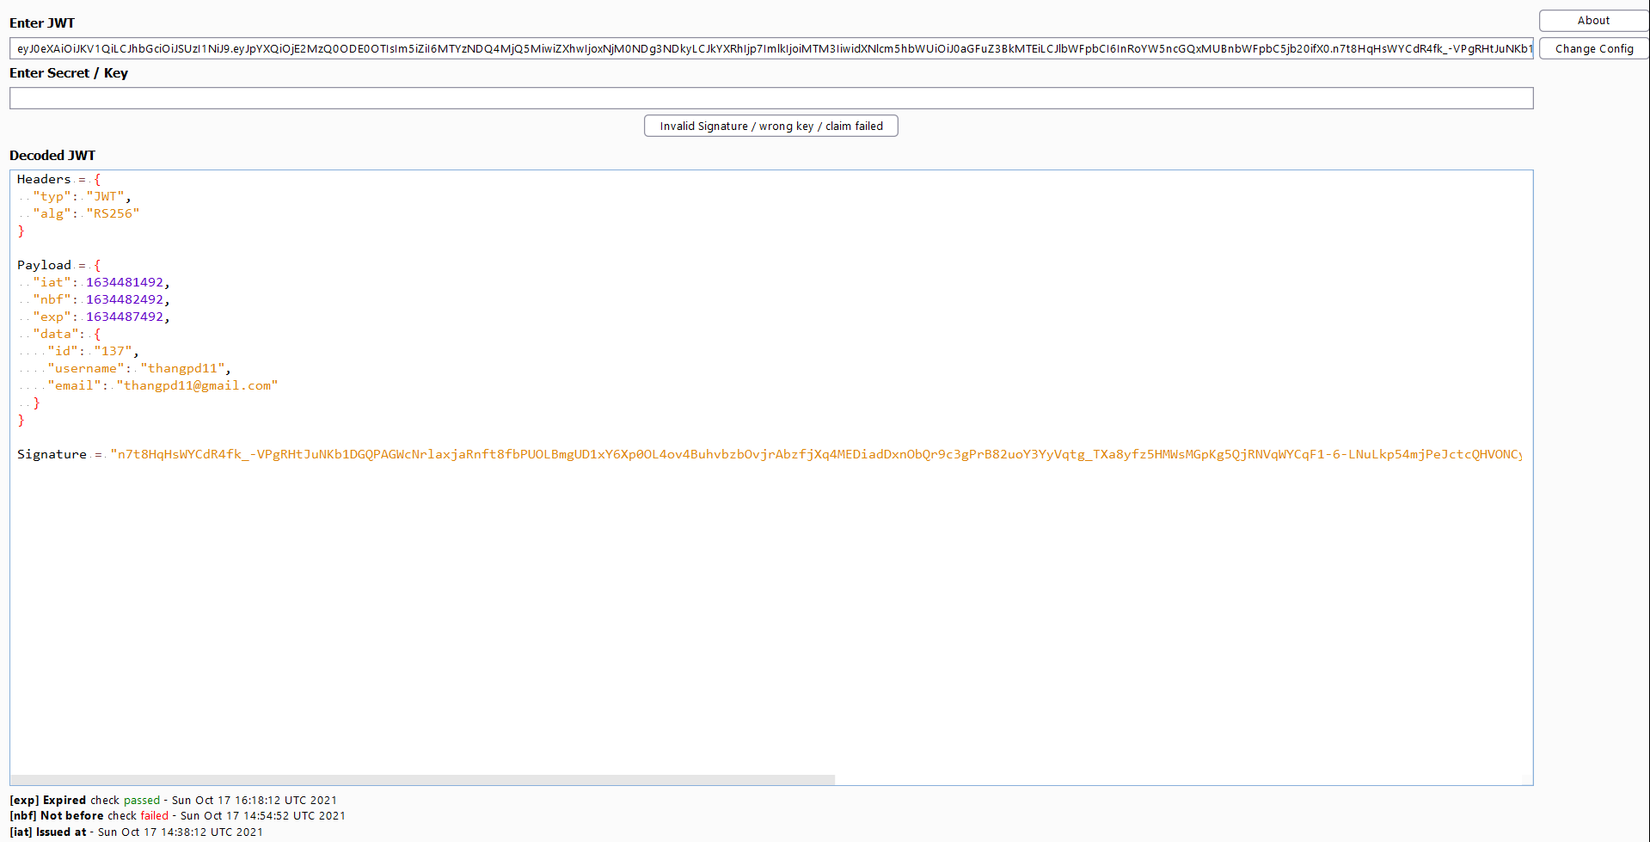
The point this token is signed by RS256 algorithm. I google the current vulnerability of jwt token and found that there is critical vulnerability related to it, which can change the token by change algorithm from RS256 to HS256. You can learn more the attack at here as I will not reinvent the wheel 
The last problem which paramenter's value we need to change? As we look from the jwt token, the only paramenter that is most susceptible is username, as the other parameters are either non-determined or trivival for authorization. So, we need to change the value of username to admin to get the flag!
2. Attack and get the flag
I use TokenBreaker on github to help me perform this attack. Everything I need is this to pull out the public key of server. It's easy as we can get it by openssl
a. Get public key
The technical detail step as following
- Connect to the server using openssl to get the public certificate
thangpd3160@kali:~$ openssl s_client -connect 139.180.213.39:443
[REDACTED]
---
Server certificate
-----BEGIN CERTIFICATE-----
MIIDETCCAfmgAwIBAgIUaYCW/HwHq1b/axHRKM0BpixnwugwDQYJKoZIhvcNAQEL
BQAwGDEWMBQGA1UEAwwNY3J5cHRvMjAwLmNvbTAeFw0yMTEwMTQwMjM2NDBaFw0y
MjEwMTQwMjM2NDBaMBgxFjAUBgNVBAMMDWNyeXB0bzIwMC5jb20wggEiMA0GCSqG
SIb3DQEBAQUAA4IBDwAwggEKAoIBAQDunk8oVD+9cKXT96aOdl/xZ5RqCpxsStFT
f8l/DW2/m4X5scbhq8Qhco0Mvns75KYtCWAKSvwCzgTSMDcO1/Fzt6xRI4EZPtVS
WE2Mq0VffFCYAzS6q07XWbFZ2tyFqbi/Xudh7tAA6TI098AGHKLjWZDJCA/ZbiQJ
u+7XL1y7TjCWBOEmrcWS7G1Cte1oUhUFfXygmskiTpxX+r3ABJuXT9FZcWu8ZMhl
fMGp/y00sBDCp8xxAcIl/D5lAUzWKyyxW5g46s5WSRHkGpxX/uQUGMwV/WM3/199
uvtVkQri88toQMzd03sWKJJZxuvJpwpw8vi/rbnB4c5/4wfuFjtHAgMBAAGjUzBR
MB0GA1UdDgQWBBTmW/TdQlcea4S2DtpxVqa6n6jYFTAfBgNVHSMEGDAWgBTmW/Td
Qlcea4S2DtpxVqa6n6jYFTAPBgNVHRMBAf8EBTADAQH/MA0GCSqGSIb3DQEBCwUA
A4IBAQBUBWMa50jaKO5GtqdCe2jLhfmEgtc6iLr+XO8jGsK2OzaHTHO9N/mjDOJ0
AAdINbCO2qfYsXBLTgzBLiAsE+IuzfxIiTmzVoLhiV0iWuy1NMXMEy1khAtVjdkx
D1zxCdCw/xe70tmGEfVFGF45OPkdsbDa3fr6tSF2Cl7ZXehdpxuzogWAqV4zqn49
XqLzZvB5gL5LbsbjzoUImce0eIxHgrkxM1RurgyN5EwV+SxkXCGxTmdMHI3Gzebf
t5xM393St030npRIRiAIpiLZUX7Yh7+PU079rE0wHtNvqorW+CrGD92TtYS7IufT
E9PrY2ghO453/QM0jW/E429p/aha
-----END CERTIFICATE-----
subject=CN = crypto200.com

issuer=CN = crypto200.com

---
[REDACTED]
- Save the certificate to files.
![image.png]()
- Export public key from the certificate
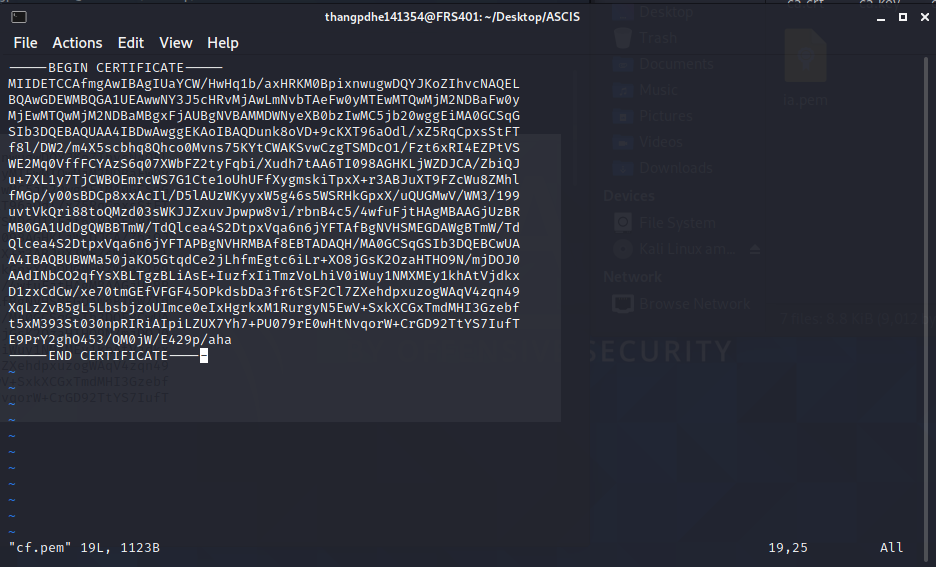
thangpd3160@kali:~$ openssl x509 -pubkey -noout -in cf.pem > pubkey.pem
The public key may look as following
thangpd3160@kali:~$ cat pubkey.pem | xxd -p | tr -d "\\n"
2d2d2d2d2d424547494e205055424c4943204b45592d2d2d2d2d0a4d494942496a414e42676b71686b6947397730424151454641414f43415138414d49494243674b4341514541377035504b46512f7658436c302f656d6a6e5a660a38576555616771636245725255332f4a66773174763575462b6248473461764549584b4e444c35374f2b536d4c516c67436b723841733445306a4133447466780a6337657355534f4247543756556c684e6a4b7446583378516d414d307571744f31316d785764726368616d347631376e59653751414f6b794e506641426879690a34316d51795167503257346b4362767531793963753034776c6754684a7133466b7578745172587461464956425831386f4a724a496b3663562f7139774153620a6c302f5257584672764754495a587a42716638744e4c41517771664d635148434a66772b5a51464d31697373735675594f4f724f566b6b5235427163562f376b0a46426a4d4666316a4e2f396666627237565a454b3476504c6145444d33644e3746696953576362727961634b63504c34763632357765484f662b4d48376859370a52774944415141420a2d2d2d2d2d454e44205055424c4943204b45592d2d2d2d2d0a
- Run TokenBreaker tool to generate new token. Remember to change the value of
usernametoadmin. The new token is shorter than the origianl one.
thangpd3160@kali:~$ python3 RsaToHmac.py -t eyJ0eXAiOiJKV1QiLCJhbGciOiJSUzI1NiJ9.eyJpYXQiOjE2MzQ0ODE0OTIsIm5iZiI6MTYzNDQ4MjQ5MiwiZXhwIjoxNjM0NDg3NDkyLCJkYXRhIjp7ImlkIjoiMTM3IiwidXNlcm5hbWUiOiJ0aGFuZ3BkMTEiLCJlbWFpbCI6InRoYW5ncGQxMUBnbWFpbC5jb20ifX0.n7t8HqHsWYCdR4fk_-VPgRHtJuNKb1DGQPAGWcNrlaxjaRnft8fbPUOLBmgUD1xY6Xp0OL4ov4BuhvbzbOvjrAbzfjXq4MEDiadDxnObQr9c3gPrB82uoY3YyVqtg_TXa8yfz5HMWsMGpKg5QjRNVqWYCqF1-6-LNuLkp54mjPeJctcQHVONCy8tIpCR08E9_G4vpLEEYBPcXPkcD44FH56xnNUlMpDkTayhv5wZ-2nPuFiBsuNP_glp-6abAsDgMSbSHLSQc-mPEecTVx929lNHCjhzFIFqXEFdNNXt3Y3JWdx-VXIIUM2yfxKkubV8NCn8s9nfwXpbIMfIPA9rPQ -p pubkey.pem
 ___  ___   _     _         _  _ __  __   _   ___
| _ \/ __| /_\   | |_ ___  | || |  \/  | /_\ / __|
|   /\__ \/ _ \  |  _/ _ \ | __ | |\/| |/ _ \ (__
|_|_\|___/_/ \_\  \__\___/ |_||_|_|  |_/_/ \_\___|

[*] Decoded Header value: {"typ":"JWT","alg":"RS256"}
[*] Decode Payload value: {"iat":1634481492,"nbf":1634482492,"exp":1634487492,"data":{"id":"137","username":"thangpd11","email":"thangpd11@gmail.com"}}
[*] New header value with HMAC: {"typ":"JWT","alg":"HS256"}
[<] Modify Header? [y/N]:
[<] Enter Your Payload value: {"iat":1634481492,"nbf":1634482492,"exp":1634487492,"data":{"id":"137","username":"admin","email":"thangpd11@gmail.com"}}
[+] Successfully Encoded Token: eyJ0eXAiOiJKV1QiLCJhbGciOiJIUzI1NiJ9.eyJpYXQiOjE2MzQ0ODE0OTIsIm5iZiI6MTYzNDQ4MjQ5MiwiZXhwIjoxNjM0NDg3NDkyLCJkYXRhIjp7ImlkIjoiMTM3IiwidXNlcm5hbWUiOiJhZG1pbiIsImVtYWlsIjoidGhhbmdwZDExQGdtYWlsLmNvbSJ9fQ.HuhcSbgVOFqbUGfY9KQ2g4thh_v4TuQioNujlMiXNOY
- Replace token value in burp request, then submit to get the flag
![image.png]()
NoOne
This is the last challenge, but actually the easiest challenge ever. The idea of this challenge is just fipping one bit, so that is the role from user (1) to admin (0), then we got the flag. Full source code can be found at here
1. Challenge analysis
This challenge is same as the EasyOne challenge, we also need to login as admin, but can by normal register. The different is there is no /logincert anymore.
Follow the code, the login_required function tell us that it extract the user role from the authtoken value in cookies
def login_required(f):
    @wraps(f)
    def wrap(*args, **kwargs):

        try:

            ciphertext = request.cookies.get('authtoken')

            userid = request.cookies.get('userid')

            if not ciphertext or not userid:
                return redirect(url_for('login'))

            encryptkey = get_encryptkey(userid)

            plainbytes = decrypt(ciphertext, encryptkey)

            usernamelen = int.from_bytes(plainbytes[:2], "little")
            usernameencoded = plainbytes[2:usernamelen+2]
            username = usernameencoded.decode("utf-8")
            role = plainbytes[usernamelen+2]

            g.username = username
            g.role = role

        except:
            abort(401)

        return f(*args, **kwargs)

    return wrap
Follow the code, I see that the authtokenvalue is encrypted using AES in CFB mode.
def encrypt(plainbytes, key):

    iv = Random.new().read(AES.block_size)

    cipher = AES.new(key, AES.MODE_CFB, iv)

    cipherbytes = cipher.encrypt(plainbytes)

    ciphertext = base64.b64encode(iv + cipherbytes)

    return ciphertext
And the value of authtoken is generated after we logon. I registered with username thangpd11, so that the role bytes value will lie in the first block.
@app.route("/", methods=('GET', 'POST'))
def login():
    if request.method == 'POST':
        username = request.form['username']
        password = request.form['password']

        if not username or not password:
            flash('Username and Password is required!')
        else:
            # verify login
            user = verify_login(username, password)

            if not user:
                flash('Username and Password is not correct!')
            else:

                userid = user[0]
                username = user[1]
                role = user[5]

                # get key
                key = base64.b64decode(user[4])

                # create authtoken
                usernamebytes = username.encode('utf-8')
                usernamelen = len(usernamebytes)
                plainbytes = len(usernamebytes).to_bytes(2, "little") + usernamebytes + role.to_bytes(1, "little")

                ciphertext = encrypt(plainbytes, key)

                response = make_response(redirect(url_for('index')))

                response.set_cookie('userid', str(userid))
                response.set_cookie('authtoken', ciphertext)

                return response

    return render_template('login.html')
2. Bit Flipping Attack on AES CFB
I take the folllowing from gooogle to help me easily illustrate the attack. The concept is actually very similar to the bit flipping attack on AES CBC (the classic one)
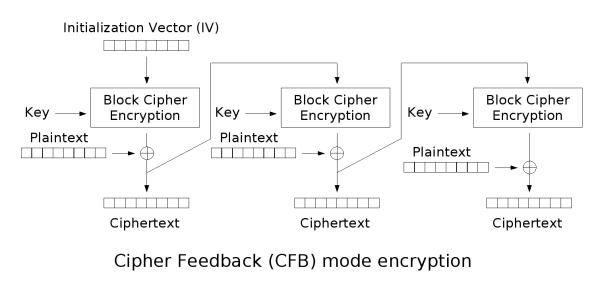
The decryption process of the first block can be interpreted in mathematic formula as or
The point is we wanna change P_{1} to another . Simply, we just need to change the value to another value, such that the value remains. In mathematical formula, we can interpret the above words as
or
3. Exploit and get the flag
With that in mind, now I code the exploit tool as follow. As I'm so lazy, I don't code the full exploit, so I change the cookies value manually through Burp Suite
from Crypto import Random
from Crypto.Cipher import AES
from base64 import b64decode, b64encode

def xor(a: bytes, b: bytes):
    return bytes([_a ^ _b for _a, _b in zip(a, b)])

iv = Random.new().read(AES.block_size)
key = Random.new().read(AES.block_size)

cipher = AES.new(key, AES.MODE_CFB, iv)

username = 'thangpd11'
role = 1
usernamebytes = username.encode('utf-8')
usernamelen = len(usernamebytes)
plainbytes = len(usernamebytes).to_bytes(2, "little") + usernamebytes + role.to_bytes(1, "little")

cipherbytes = b64decode(b'tzRxbyN82l8uJK06ZdSQSI+kc1x1vnjPTLXL6w==') #authtoken in cookies value
iv = cipherbytes[:AES.block_size]
cipherbytes = cipherbytes[AES.block_size:]

new_role = 0
plainbytes_new = len(usernamebytes).to_bytes(2, "little") + usernamebytes + new_role.to_bytes(1, "little")

cipherbytes_new = xor(xor(plainbytes_new, plainbytes), cipherbytes)

ciphertext_new = b64encode(iv + cipherbytes_new)
print(ciphertext_new)
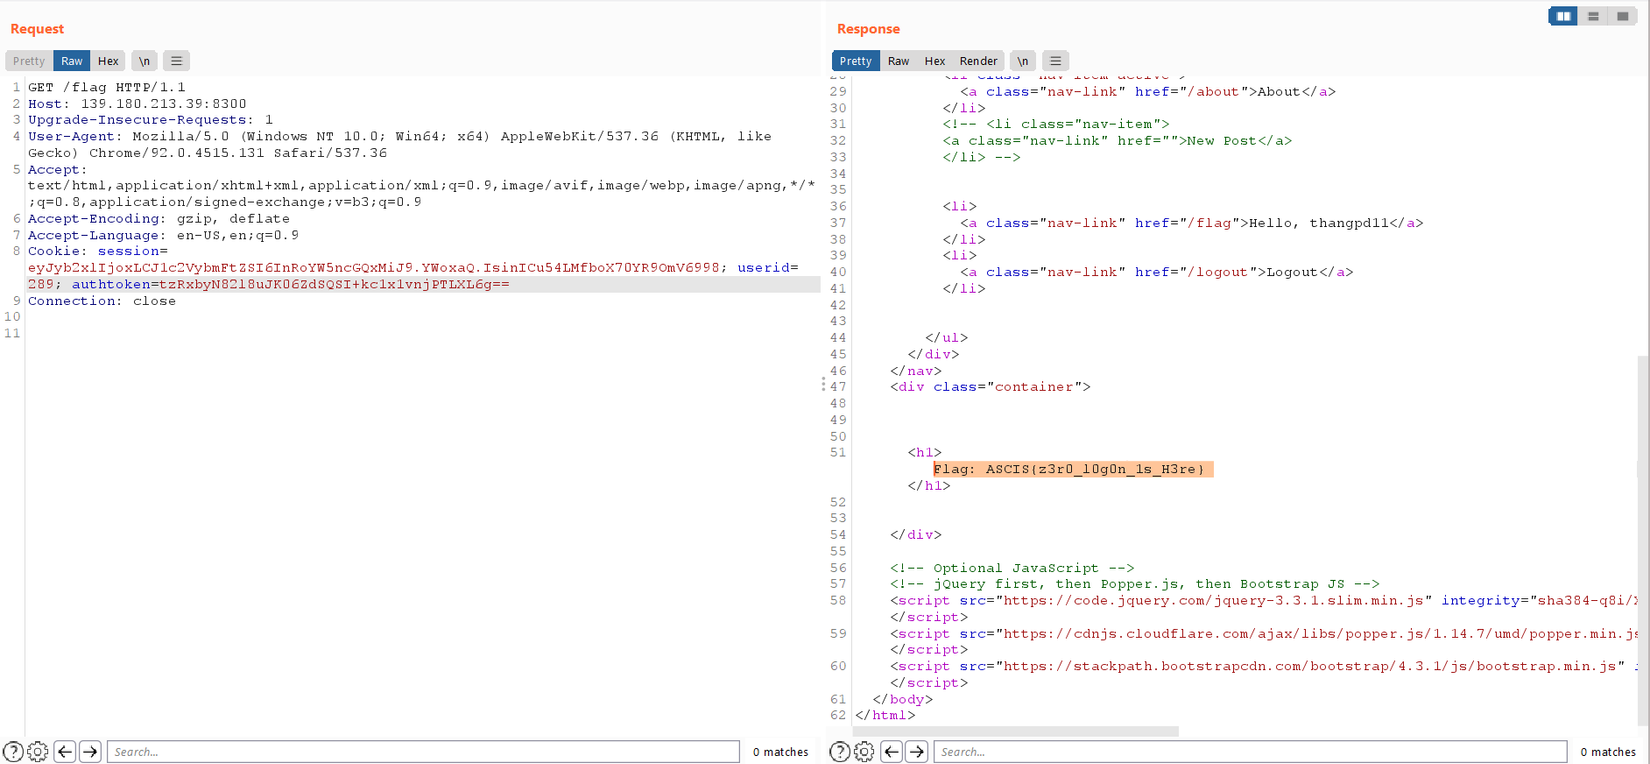
The new authtoken is tzRxbyN82l8uJK06ZdSQSI+kc1x1vnjPTLXL6g==. Let's submit it and get flag.
MISC
Travel Paper
 This challenge is designed based on practical of covid-19 epidemic. It just simple as we need to make a system that automatically scan the QR code.
There are ID Number, Name and Expried date must be entered to check, just as the description of the challenge.
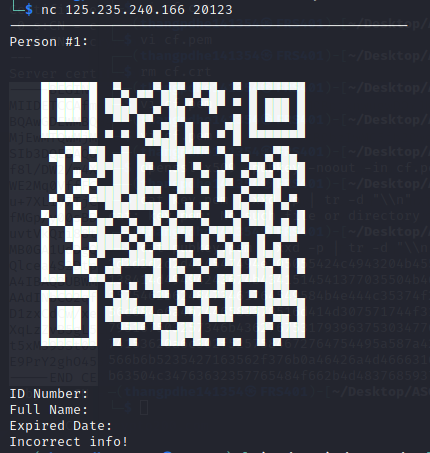
The work is simple (although I can't solve during challenge time 😭, thus lose the ticket for final round). Connect to the server, save the text as image, use the QR scan lib to read the QR code, then submit the answer.
The full code can be found at here
I can't belive that I stuck at the part "save the text as image" for nearly 1 hour, while it can resolve by just by downding the font! Lesson learned is please read the code carefully before googliing the error 😭.
Flag: ASCIS{c0r0n4_v1rus_1s_g0n3}
That's all for my first and final ASCIS. Good time and fun. I would like to thanks all of the venerable mentors and teammates for an enthusiasm play!
All rights reserved
