Wemos authenticate qua laravel (phần 4.2 - Server kết nối với web client)
Bài đăng này đã không được cập nhật trong 4 năm
Giới thiệu
Xin chào các bạn!
Mình đã quay trở lại rồi đây. Hôm nay, mình sẽ chia sẻ tiếp phần Socket-IO Authenticate qua laravel sử dụng jwt token.
Như bài trước mình đã chia sẻ cách tạo server authenticate sử dụng laravel với 2 phân quyền người dùng là users và devices.
Bài viết hôm nay, mình sẽ chia sẻ việc tạo kết nối, xác thực người dùng từ phía web client đến server nodejs để điều khiển wemos.
Chúng ta cùng xem lại sơ đồ:
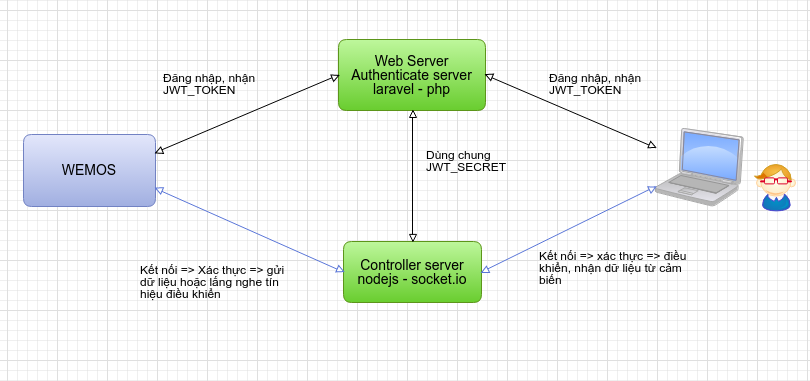 Theo sơ đồ này thì hôm nay chúng ta sẽ thiết lập kết nối và xác thực người dùng ở phía bên phải server. Tức là xác thực web client. Bài sau mình sẽ chia sẻ về việc xác thực từ wemos.
Chúng ta cùng bắt tay vào code thôi!
Lập trình laravel server
Chúng ta sẽ sử dụng lại phần code đã cài đặt sẵn guard và thư viện jwt-auth của phần 4.1 tại đây.
Sau khi tải về bạn cài đặt như 1 server laravel thông thường:
- Chạy
composer install - Cấu hình file .env
- Chạy lệnh tạo database
php artisan migrate - Phân quyền cho thư mục
chmod 777 -R storage bootstrap/cache - Tạo key
php artisan key:generate
Xem chi tiết cài đặt tại đây.
Bây giờ chúng ta sẽ tạo một số controller và view để người dùng (phía web client) có thể đăng nhập vào hệ thống và nhận được jwt-token.
Tạo trang đăng nhập, đăng kí
Mình sẽ sử dụng auth mặc định của laravel và sẽ tùy biến thêm một chút.
Chạy lệnh tạo laravel-auth
php artisan make:auth
Sửa controller đăng kí
Do mình có thay đổi đường dẫn đến các models nên chúng ta cần phải sửa lại namespace của các model thành App\Models để cho đúng với namespace hiện tại.
Sửa file app/Http/Controllers/Auth/RegisterController.php như sau:
Từ
/**......................................**/
use App\User;
use App\Http\Controllers\Controller;
/**......................................**/
thành
/**......................................**/
use App\Models\User;
use App\Http\Controllers\Controller;
/**......................................**/
Tạo JWT-token khi người dùng đã đăng nhập
Cấu hình model
Để có thể tạo jwt-token từ model User ta cần phải implements interface Tymon\JWTAuth\Contracts\JWTSubject và thêm 2 hàm getJWTIdentifier(), getJWTCustomClaims().
Sửa lại file app\Models\User.php như sau:
<?php
/** app/Models/User.php **/
namespace App\Models;

use Illuminate\Notifications\Notifiable;
use Illuminate\Foundation\Auth\User as Authenticatable;
use Tymon\JWTAuth\Contracts\JWTSubject;

class User extends Authenticatable implements JWTSubject
{
    use Notifiable;

    /**
     * The attributes that are mass assignable.
     *
     * @var array
     */
    protected $fillable = [
        'name', 'email', 'password',
    ];

    /**
     * The attributes that should be hidden for arrays.
     *
     * @var array
     */
    protected $hidden = [
        'password', 'remember_token',
    ];

    public function getJWTIdentifier()
    {
        return $this->getKey();
    }

    public function getJWTCustomClaims()
    {
        return [
            'name' => $this->name,
            'email' => $this->email,
            'guard' => 'user',
        ];
    }
}
Tạo jwt-auth token
Khi người dùng đã đăng nhập thì sẽ vào được trang home của chúng ta. Việc cần làm bây giờ là tạo jwt-auth token để người dùng sử dụng nó trong việc kết nối đến server nodejs điều khiển thiết bị.
Sửa lại file /app/Http/Controllers/HomeController.php như sau:
<?php
/** app/Http/Controllers/HomeController.php **/

namespace App\Http\Controllers;

use Illuminate\Http\Request;
use Tymon\JWTAuth\JWTAuth;
use Auth;

class HomeController extends Controller
{
    /**
     * Create a new controller instance.
     *
     * @return void
     */
    public function __construct()
    {
        $this->middleware('auth');
    }

    /**
     * Show the application dashboard.
     *
     * @return \Illuminate\Http\Response
     */
    public function index(JWTAuth $auth)
    {
        $jwtToken = $this->getJWTAuthToken($auth);
        return view('home', ['jwtToken' => $jwtToken]); // truyền jwtToken vào view home và giờ là ta có thể sử dụng biến $jwtToken trong view này rồi.
    }

    protected function getJWTAuthToken(JWTAuth $auth)
    {
        $user = Auth::user();
        return $auth->fromUser($user);
    }
}
Cài đặt thêm các thư viện cần thiết
Trong bài viết này mình sử dụng:
- bootstrap
- jquery
- font-awesome
Các bạn thêm vào file package.json rồi chạy lệnh yarn install hoặc npm install để cài đặt.
    "dependencies": {
        "bootstrap-toggle": "^2.2.2",
        "font-awesome": "^4.7.0",
    }
Tùy biến view điều khiển
Thêm Javascript stack, styles stack
Thêm laravel stack vào thẻ head để có thể thêm các style khác từ view con vào.
    <!-- Styles -->
    <link href="{{ mix('css/app.css') }}" rel="stylesheet">
    @stack('styles')
Thêm các dòng sau ở cuối thẻ body
    <!-- Scripts -->
    @stack('before-scripts')
    <script src="{{ mix('js/app.js') }}"></script>
    @stack('scripts')
Mục đích của việc này là ta sẽ truyền jwt-auth token vào từ view home qua stack before-scripts bằng biến toàn cục. Lúc này thì script ở bên dưới sẽ có thể sử dụng được jwt-auth token này. Các bạn xem tiếp phần dưới để hiểu hơn nhé.
Tạo view điều khiển đèn
Sửa file resource/views/home.blade.php như sau.
<!-- resource/views/home.blade.php -->
@extends('layouts.app')

@section('content')
<div class="container" style="padding: 20px">
    <div style="display: flex; align-content: center; justify-content: center;">
        <div>
            <h2 style="font-weight: 900; text-align: center; margin: 0; margin-bottom: 20px">LED CONTROLL</h2>
        </div>
    </div>
    <div style="display: flex; align-items: center; justify-content: center;" id="control">
        <div style="align-self: flex-start;">
            <div>
                <input id="button" data-width="50" data-height="30" type="checkbox" data-toggle="toggle">
            </div>
        </div>
    </div>
</div>
@endsection

@push('before-scripts')
    <script>var jwtToken = "{!! $jwtToken !!}"</script>
@endpush
Phần này khá dễ hiểu mình sẽ không giải thích gì nhé.
Như vậy là chúng ta đã lấy được jwt-token rồi. Giờ sử dụng jwt-token này để kết nối với server điều khiển thôi.
Để giải mã được jwt-token này thì nodejs server cần phải có JWT_SECRET đã mã hóa jwt-token đó.
Như mình đã nó ở trước là ta sẽ dùng chung file .env cho cả laravel server và nodejs server như vậy là có thể dùng chung JWT_SECRET được rồi.
Bây giờ chúng ta cùng lập trình để thiết lập kết nối giữa client và server nodejs qua socket.io nhé.
Thiết lập quá trình điều khiển
Cài thêm một số thư viện cần thiết
Chúng ta sẽ cài một số thư viện sau:
- "dotenv": "^4.0.0", - Sử dụng để đọc file .env
- "socket.io": "^1.7.4", - socket.io nhất định phải là phiên bản 1.7.4 nhé
- "socketio-jwt": "^4.5.0" - sử dụng để parse jwt-token
Sử dụng yarn hoặc npm để cài đặt các thư viện trên nhé.
Lập trình nodejs server
Tạo file server.js với nội dung như dưới đây. Mình đã comment chi tiết. Hãy đọc comment để hiểu rõ các dòng code nhé.
/** server.js **/
require('dotenv').config();
var express = require('express');
var app = express();
var server = require('http').createServer(app);
var io = require('socket.io')(server);
var colors = require('colors');
var port = process.env.SOCKETIO_PORT || 3000;
var socketioJwt = require('socketio-jwt');

server.listen(port, function () {
   console.log('Server listening at port %d', port);
});

// Let express show index.html to client
app.use(express.static(__dirname + '/static'));

// Accept connection and authorize token
io.on('connection', socketioJwt.authorize({
   secret: process.env.JWT_SECRET,
   timeout: 15000
}));

// When authenticated, send back name + email over socket
io.on('authenticated', function (socket) {
   getRole(socket);
   socket.emit('info', socket.decoded_token);
});

function getRole(socket) {
   switch (socket.decoded_token.guard.toLowerCase()) {
       case 'device':
           addDevice(socket);
           break;
       case 'user':
           addUser(socket);
           break;
   }
}

// Handling each role
function addDevice(socket) {
   console.log(('New device ' + socket.id + ' connected!').green);
   console.log(socket.decoded_token);

   socket.join('devices_room');
   socket.on('device_state', function (data) {
       io.sockets.in('users_room').emit('device_state', data);
   });
   socket.on('disconnect', function () {
       console.log(('Device ' + socket.id + ' disconnected').gray);
   });
}

function addUser(socket) {
   console.log(('New user ' + socket.id + ' connected!').green);
   console.log(socket.decoded_token);
   socket.join('users_room');
   socket.on('led-change', function (data) {
       io.sockets.in('devices_room').emit('led-change', data);
       console.log('Change device state: '.yellow, (data).blue);
   });
   socket.on('disconnect', function () {
       console.log(('User ' + socket.id + ' disconnected').gray);
   });
}
Lập trình javascript thực hiện điều khiển
Bây giờ chúng ta sẽ viết chương trình sử dụng socket.io gửi dữ liệu điều khiển lên server.
Sửa file /resources/assets/js/bootstrap.js như sau:
/** resources/assets/js/bootstrap.js **/

window._ = require('lodash');

/**
 * We'll load jQuery and the Bootstrap jQuery plugin which provides support
 * for JavaScript based Bootstrap features such as modals and tabs. This
 * code may be modified to fit the specific needs of your application.
 */

try {
    window.$ = window.jQuery = require('jquery');

    require('bootstrap-sass');
} catch (e) {}

/**
 * We'll load the axios HTTP library which allows us to easily issue requests
 * to our Laravel back-end. This library automatically handles sending the
 * CSRF token as a header based on the value of the "XSRF" token cookie.
 */

window.axios = require('axios');

window.axios.defaults.headers.common['X-Requested-With'] = 'XMLHttpRequest';

/**
 * Next we will register the CSRF Token as a common header with Axios so that
 * all outgoing HTTP requests automatically have it attached. This is just
 * a simple convenience so we don't have to attach every token manually.
 */

let token = document.head.querySelector('meta[name="csrf-token"]');

if (token) {
    window.axios.defaults.headers.common['X-CSRF-TOKEN'] = token.content;
} else {
    console.error('CSRF token not found: https://laravel.com/docs/csrf#csrf-x-csrf-token');
}

window.io = require('socket.io-client');
require('bootstrap-toggle');
Sửa file resources/assets/js/app.js thành:
/** resources/assets/js/app.js **/

require('./bootstrap');

let socket = io.connect(`${window.location.hostname}:3000`);

// emit event authenticate when connect
socket.on('connect', function () {
    console.log('Connected to SocketIO, Authenticating')
    socket.emit('authenticate', {token: jwtToken});
});

// if authenticated
socket.on('authenticated', function () {
    console.log('Authenticated');
});

// if unauthorized
socket.on('unauthorized', function (data) {
    console.log('Unauthorized, error: ' + data.message);
});

// if disconnect
socket.on('disconnect', function () {
    console.log('Disconnected');
});

// if click button
$('#button').change(function (event) {
    var data;
    if ($(this).prop('checked')) {
        data = 'on';
    } else {
        data = 'off';
    }
    // emit event led-change
    socket.emit('led-change', data);
});
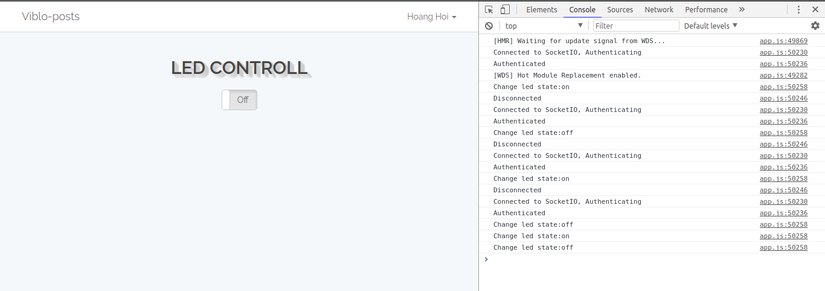
Kết quả
Chương trình tham khảo
Giao diện điều khiển
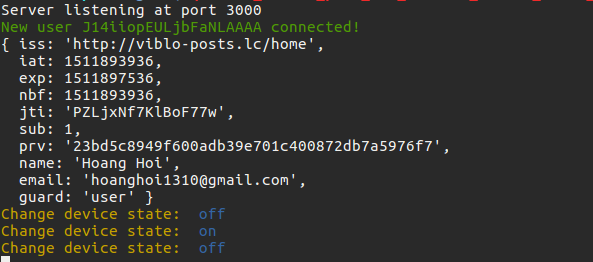
Một số log ở server
Kết luận
Vậy là chúng ta đã cùng nhau đi qua 2/3 quãng đường thiết lập authenticate cho hệ thống bể cá của mình. Phần tiếp theo mình sẽ trình bày về quá trình thiết lập autheticate cho wemos. Các bạn hãy đón đọc nhé.
Nếu có bất kì thắc mắc nào, bạn hãy để lại câu hỏi hoặc bình luận bên dưới. Mình sẽ trả lời nhiệt tình.
Nếu thấy hay thì hãy up vote và share cho bạn bè cùng đọc.
Chúc các bạn thành công!
All rights reserved
