Upload File với VueJS và Laravel
Bài đăng này đã không được cập nhật trong 8 năm
Ở bài viết này chúng ta sẽ thực hiện upload file với laravel và VueJS
Để tiến hành upload file với laravel và vuejs ta thực hiện theo các bước như sau
Bước 1: Cài đặt laravel
Sử dụng terminal để tạo một project laravel với câu lệnh dưới đây
composer create-project laravel/laravel vuefileupload --prefer-dist
Sau khi cài đặt, vào thư mục gốc của dự án và gõ lệnh sau đây.
npm install
Nó cài đặt tất cả các dependencies cần thiết để xây dựng các Vue component.
Bước 2: Config Database
Thêm các thông tin cơ bản để kết nối với database tại file .env
DB_CONNECTION=mysql
DB_HOST=127.0.0.1
DB_PORT=3306
DB_DATABASE=vueupload
DB_USERNAME=root
DB_PASSWORD=
Ở đây chúng ta sử dụng mysql, nếu mysql của bạn có mật khẩu hãy điền mật khẩu của mình vào phần DB_PASSWORD
Bước 3: Tạo model và các file migration
Để đồng thời tạo được cả hai file trên ta thực hiện câu lệnh sau:
php artisan make:model FileUpload -m
Nó sẽ tạo cả model FileUpload và một file migration để tạo bảng tương ứng trong cơ sở dữ liệu
Bước 4: Chỉnh sửa migration
Thực hiện chỉnh file migration để tạo bảng file_uploads (chứa thông tin các file đã được upload lên)
Vào trong file create_file_uploads_table.php và thêm vào đoạn code sau
Schema::create('file_uploads', function (Blueprint $table) {
   $table->increments('id');
   $table->string('image_name');
   $table->timestamps();
});
Bảng file_uploads sẽ gồm 4 cột chính là id, image_name, created_at và updated_at
Sau khi lưu file, tiến hành migrate cơ sở dữ liệu với câu lệnh
php artisan migrate
Bước 5: Định nghĩa route
Trong file web.php định nghĩa một route
Route::post('/image/store', 'ImageController@store');
Khi gọi phương thức post nào request sẽ được gửi tới hàm function store của ImageController. Như vậy ta cần tạo một controller là ImageController bằng cách sử dụng câu lệnh sau
php artisan make:controller ImageController
Sau khi hoàn thành câu lệnh nó sẽ tạo một file ImageController trong file app\Http\Controllers. Vào file này và định nghĩa hàm store:
<?php

namespace App\Http\Controllers;
use App\FileUpload;

use Illuminate\Http\Request;

class ImageController extends Controller
{
    public function store(Request $request)
    {

    }
}
Bước 6: Tạo một Vue Component để upload file
Vào thư mực resources\assets\js\components và tạo một file ImageuploadComponent.vue(laravel đã tự động cấu hình để hiểu được các file .vue mà ta không cần phải làm gì thêm)
Đầu tiên ta cần định nghĩa một giao diện để upload file
// ImageuploadComponent.vue

<template>
    <div class="container" id="app">
        <div class="row justify-content-center">
            <div class="col-md-8">
                <div class="card card-default">
                    <div class="card-header">File Upload Component</div>
                    <div class="card-body">
                        We need to write here file upload HTML code.
                    </div>
                </div>
            </div>
        </div>
    </div>
</template>

<script>
    export default {

    }
</script>
Trên đây chúng ta đã tạo một component mới. Cần phải đăng ký component này tại file app.js trong thư mục resources\assets\js
// app.js

require('./bootstrap');

window.Vue = require('vue');

Vue.component('image-component', require('./components/ImageuploadComponent.vue'));

const app = new Vue({
    el: '#app'
});
Bước 7: Biên dịch file app.js
Chúng ta vừa tạo ra một component mới nhưng những thay đổi đó chưa được đưa lên tệp public\js\app.js. Để làm được điều này ta cần chạy câu lệnh
npm run dev
như vậy những thay đổi từ tệp resources\assets\js\app.js sẽ được biên dịch và đưa sang tệp public\js\app.js.
Tiếp theo ta sẽ đưa component này vào file của laravel để người dùng có thể nhìn được giao diện upload bằng cách chỉnh sửa file welcome.blade.php như sau
<!doctype html>
<html lang="{{ app()->getLocale() }}">
    <head>
        <meta charset="utf-8">
        <meta http-equiv="X-UA-Compatible" content="IE=edge">
        <meta name="viewport" content="width=device-width, initial-scale=1">
        <title>File Upload Tutorial</title>
        <link href="https://fonts.googleapis.com/css?family=Raleway:100,600" rel="stylesheet" type="text/css">
        <link href="{{ asset('css/app.css') }}" rel="stylesheet"/>
    </head>
    <body>
        <div class="container" id="app">
            <image-component></image-component>
        </div>
    <script>
       window.Laravel = <?php echo json_encode([
           'csrfToken' => csrf_token(),
        ]); ?>
    </script>
    <script src="{{asset('js/app.js')}}"></script>
    </body>
</html>
Được rồi, bây giờ ta thử chạy project laravel này lên bằng câu lệnh sau
php artisan serve
Mặc định laravel sẽ sử dụng cổng 8000 http://localhost:8000. Nếu cổng 8000 của bạn đã bị sử dụng bạn có thể chạy laravel bằng một cổng khác bằng cách chạy câu lệnh
php artisan serve --port=8888
Trong đó 8888 là cổng mà bạn chỉ định laravel sử dụng. Bạn có thể thay đổi bằng cổng khác.
Lúc này bạn có thể thấy giao diện của chúng ta sẽ được như sau
 Như vậy ta đã đưa thành công component vue vào blade của laravel
Bước 8: Tạo một form để upload ảnh
Tại file ImageuploadComponent.vue thay thế dòng ' We need to write here file upload HTML code. ' bằng đoạn code sau :
<div class="row">
    <div class="col-md-9">
        <input type="file" v-on:change="onImageChange" class="form-control">
    </div>
    <div class="col-md-3">
        <button class="btn btn-success btn-block" @click="uploadImage">Upload Image</button>
    </div>
</div>
Ta có thể thấy trng đoạn code trên khi bắt sự kiện cho ô input gọi đến hàm onImageChange hay khi bắt sự kiện click vào button ta gọi đến sự kiện uploadImage. Ta cần phải định nghĩa các hàm này. Nó sẽ được thực hiện trong phần script
<script>
    export default {
        data(){
            return {
                image: ''
            }
        },
        methods: {
            onImageChange(e) {
                let files = e.target.files || e.dataTransfer.files;
                if (!files.length)
                    return;
                this.createImage(files[0]);
            },
            createImage(file) {
                let reader = new FileReader();
                let vm = this;
                reader.onload = (e) => {
                    vm.image = e.target.result;
                };
                reader.readAsDataURL(file);
            },
            uploadImage(){
                axios.post('/image/store',{image: this.image}).then(response => {
                   if (response.data.success) {
                     alert(response.data.success);
                   }
                });
            }
        }
    }
</script>
Sử dụng sự kiện onChange để theo dõi ảnh đã được duyệt và hình ảnh đó sẽ được hiển thị ở div bên cạnh. Nếu hình ảnh đó là null thì sẽ không hiển thị gì cho đến khi duyệt một bức ảnh nào đó. Vì vậy bạn có thể thấy div để hiện thị ảnh sẽ có điều kiện v-if. Lưu ý: Chúng ta gửi mã hóa base64 lên server, vì vậy chúng ta cần dựng lại ảnh từ đó, nó cần đến một package là Image intervention.
Bước 9: Cài đặt package image/intervention
Sử dụng câu lệnh sau trong terminal để cài đặt package image/intervention
composer require intervention/image
Sau khi cài đặt, cần config nó trong laravel. Đầu tiên đi đến file config\app.php và đăng ký Intervention Image Provider.
Thêm dòng sau vào providers
Intervention\Image\ImageServiceProvider::class,
và aliases
'Image' => Intervention\Image\Facades\Image::class,
Sau bước này cần phải publish package bằng lệnh
php artisan vendor:publish --provider="Intervention\Image\ImageServiceProviderLaravel5"
Bước 10: Hàm store của controller
Hàm store của ImageController được định nghĩa như sau:
public function store(Request $request)
    {
       if($request->get('image'))
       {
          $image = $request->get('image');
          $name = time().'.' . explode('/', explode(':', substr($image, 0, strpos($image, ';')))[1])[1];
          \Image::make($request->get('image'))->save(public_path('images/').$name);
        }

       $image= new FileUpload();
       $image->image_name = $name;
       $image->save();

       return response()->json(['success' => 'You have successfully uploaded an image'], 200);
     }
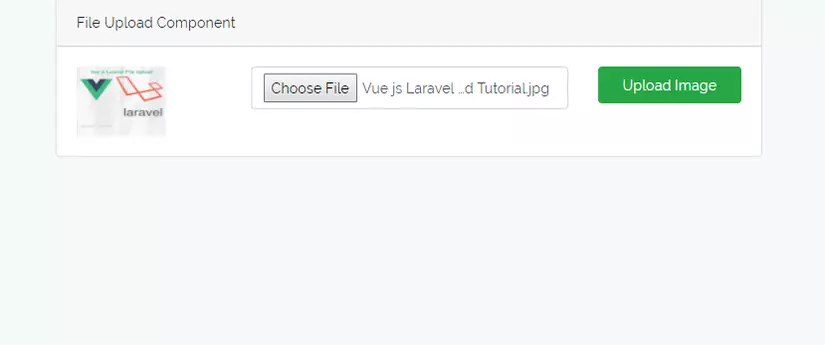
Bước 11: Hoàn thiện project
// ImageuploadComponent.vue

<template>
    <div class="container">
        <div class="row justify-content-center">
            <div class="col-md-8">
                <div class="card card-default">
                    <div class="card-header">File Upload Component</div>
                    <div class="card-body">
                       <div class="row">
                          <div class="col-md-3" v-if="image">
                              <img :src="image" class="img-responsive" height="70" width="90">
                           </div>
                          <div class="col-md-6">
                              <input type="file" v-on:change="onImageChange" class="form-control">
                          </div>
                          <div class="col-md-3">
                             <button class="btn btn-success btn-block" @click="uploadImage">Upload Image</button>
                          </div>
                       </div>
                    </div>
                </div>
            </div>
        </div>
    </div>
</template>

<script>
    export default {
        data(){
            return {
                image: ''
            }
        },
        methods: {
            onImageChange(e) {
                let files = e.target.files || e.dataTransfer.files;
                if (!files.length)
                    return;
                this.createImage(files[0]);
            },
            createImage(file) {
                let reader = new FileReader();
                let vm = this;
                reader.onload = (e) => {
                    vm.image = e.target.result;
                };
                reader.readAsDataURL(file);
            },
            uploadImage(){
                axios.post('/image/store',{image: this.image}).then(response => {
                   if (response.data.success) {
                     alert(response.data.success);
                   }
                });
            }
        }
    }
</script>
Đây là hình ảnh đoạn code cuối cùng của ImageuploadComponent
// ImageuploadComponent.vue

<template>
    <div class="container">
        <div class="row justify-content-center">
            <div class="col-md-8">
                <div class="card card-default">
                    <div class="card-header">File Upload Component</div>
                    <div class="card-body">
                       <div class="row">
                          <div class="col-md-3" v-if="image">
                              <img :src="image" class="img-responsive" height="70" width="90">
                           </div>
                          <div class="col-md-6">
                              <input type="file" v-on:change="onImageChange" class="form-control">
                          </div>
                          <div class="col-md-3">
                             <button class="btn btn-success btn-block" @click="uploadImage">Upload Image</button>
                          </div>
                       </div>
                    </div>
                </div>
            </div>
        </div>
    </div>
</template>

<script>
    export default {
        data(){
            return {
                image: ''
            }
        },
        methods: {
            onImageChange(e) {
                let files = e.target.files || e.dataTransfer.files;
                if (!files.length)
                    return;
                this.createImage(files[0]);
            },
            createImage(file) {
                let reader = new FileReader();
                let vm = this;
                reader.onload = (e) => {
                    vm.image = e.target.result;
                };
                reader.readAsDataURL(file);
            },
            uploadImage(){
                axios.post('/image/store',{image: this.image}).then(response => {
                   if (response.data.success) {
                     alert(response.data.success);
                   }
                });
            }
        }
    }
</script>
Kết quả của project như sau
 Tài liệu tham khảo:
https://appdividend.com/2018/02/13/vue-js-laravel-file-upload-tutorial/
All rights reserved
