Ứng dụng ReSwift trong dự án iOS
Bài đăng này đã không được cập nhật trong 4 năm
1. Giới thiệu:
ReSwift (Redux Swift) thực hiện kiến trúc luồng dữ liệu theo một hướng (unidirectional data flow architecture) trong Swift. ReSwift giúp bạn tách biệt ba nội dung quan trọng trong ứng dụng:
- State: trong ứng dụng áp dụng ReSwift, trạng thái của app được lưu trữ trong một cấu trúc dữ liệu. Việc này giúp cho chúng ta không phải viết những đoạn code phức tạp để quản lý trạng thái, do đó dễ dàng hơn trong việc bảo trì, sửa lỗi...
- View: các view sẽ được cập nhật trạng thái ngay sau khi trạng thái của app thay đổi.
- State Change: ứng dụng ReSwift sẽ chỉ thay đổi trạng thái khi bạn thực hiện thay đổi thông qua các action. Nhờ việc giới hạn cách mà trạng thái app có thể thay đổi, app sẽ dễ hiểu hơn và dễ dàng hơn trong việc hợp tác với các đồng nghiệp khác.
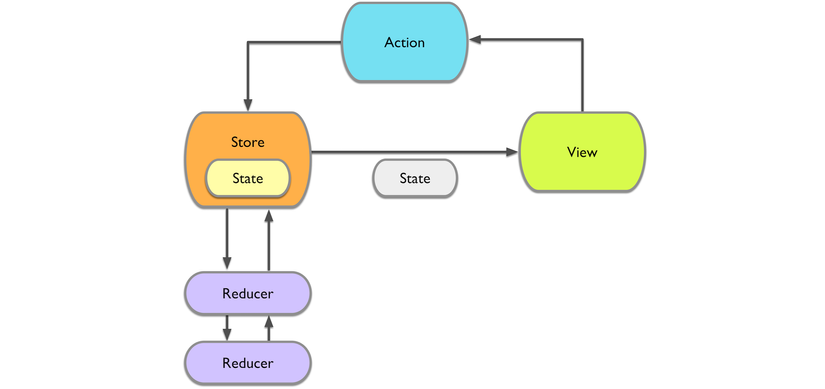
Để áp dụng ReSwift vào dự án, chúng ta cần 3 thành phần sau:
- Store: lưu trữ trạng thái ứng dụng trong một cấu trúc dữ liệu, trạng thái này chỉ có thể được thay đổi thông qua việc gửi (dispatch) các Action tới Store. Bất cứ khi nào trạng thái Store thay đổi, Store sẽ gửi thông báo tới các Observer.
- Action: mỗi Action đại diện cho một sự thay đổi trạng thái của Sate. Action không chứa code, chúng được Store chuyển tới Reducer, tại đây Reducer sẽ tiến hành thay đổi trạng thái của State tương ứng với mỗi Action.
- Reducer: chứa các hàm thay đổi trạng thái của State thông qua trạng thái hiện tại của State và các Action.
Để hiểu rõ hơn, chúng ta sẽ áp dụng ReSwift vào một dự án demo. Trong dự án này chúng ta sẽ quản lý một danh sách sản phẩm, ReSwift đóng vai trò quản lý danh sách, update UI tự động mỗi khi danh sách thay đổi.
2. Demo:
2.1. Tạo dự án:
Ta bắt đấu bằng project iOS với template Single View Application, ngôn ngữ Swift 3.
2.2. Product:
Đối tượng chính của chương trình là Product, gồm các thông tin id, name và price:
class Product {
    var id: String
    var name: String
    var price: Double

    convenience init() {
        self.init(id: "", name: "", price: 0.0)
    }

    init(id: String, name: String, price: Double) {
        self.id = id
        self.name = name
        self.price = price
    }
}
2.3. ProductDataSource:
ProductDataSource quản lý danh sách sản phẩm, để đơn giản trong dự án này chúng ta fix danh sách sản phẩm thông qua 1 dictionary.
class ProductDataStore {
    private static var productDictionary: [ String: Product] = [
        "iphone": Product(id: "iphone", name: "iPhone", price: 600),
        "ipad": Product(id: "ipad", name: "iPad", price: 900),
        "macbook": Product(id: "macbook", name: "MacBook", price: 1500)
    ]

    static var sharedInstance = ProductDataStore()

    private init() {}

    func getProductList() -> [Product] {
        return Array(ProductDataStore.productDictionary.values).sorted { $0.name < $1.name }
    }

    func get(productID: String) -> Product? {
        return ProductDataStore.productDictionary[productID]
    }

    func add(product: Product) {
        ProductDataStore.productDictionary[product.id] = product
    }

    func update(product: Product) {
        ProductDataStore.productDictionary[product.id] = product
    }

    func delete(productID: String) {
        ProductDataStore.productDictionary.removeValue(forKey: productID)
    }
}
2.4. Áp dụng ReSwift:
State:
Trong State chúng ta quản lý danh sách sản phẩm:
struct AppState: StateType {
    var products: [Product] = []
}
Action:
Các hành động lấy danh sách sản phẩm, thêm, sửa, xóa sẽ được thực hiện thông qua các action, mỗi action sẽ kèm các tham số tương ứng:
struct ProductActionSetList: Action {
    var products: [Product]
}
struct ProductActionAdd: Action {
    var product: Product
}
struct ProductActionUpdate: Action {
    var product: Product
}
struct ProductActionDelete: Action {
    var product: Product
}
Reducer:
Tại Reducer, chúng ta sẽ tiến hành thay đổi State tùy thuộc vào từng action.
struct ProductReducer: Reducer {
    func handleAction(action: Action, state: AppState?) -> AppState {
        // if no state has been provided, create the default state
        var state = state ?? AppState()

        switch action {
        case let action as ProductActionSetList:
            state.products = action.products
        case let action as ProductActionAdd:
            state.products.append(action.product)
        case let action as ProductActionUpdate:
            if let index = state.products.index(where: { $0.id == action.product.id }) {
                state.products[index] = action.product
            }
        case let action as ProductActionDelete:
            if let index = state.products.index(where: { $0.id == action.product.id }) {
                state.products.remove(at: index)
            }
        default:
            break
        }

        return state
    }
}
Main Store:
Ta cần khai báo main store là 1 biến global ở đầu AppDelegate:
let mainStore = Store<AppState>(
    reducer: ProductReducer(),
    state: nil
)
2.5. UI:
Giao diện chương trình bao gồm 2 view controller như sau:
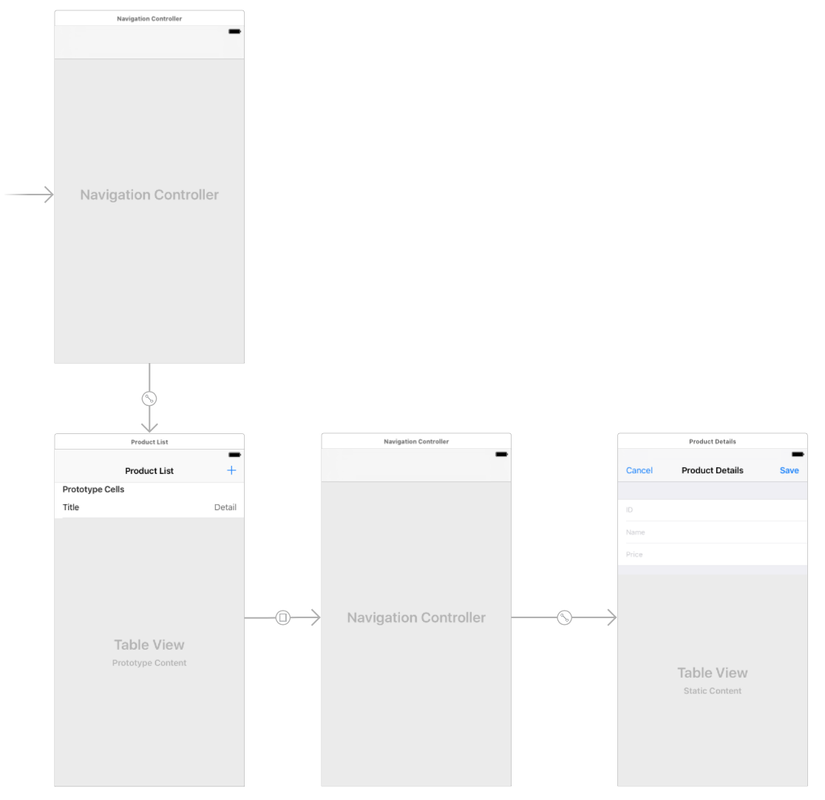
ProductDetailsViewController
Trong view controller này, chúng ta sẽ hiển thị id, name, price của product và cho phép người dùng cập nhật các thông tin đó.
ProductListViewController
ProductListViewController quản lý danh sách sản phẩm, thêm, sửa, xóa sản phẩm. Tương ứng với mỗi chức năng, chúng ta sẽ gửi một action tới store:
Get List:
fileprivate func reloadData() {
    mainStore.dispatch(
        ProductActionSetList(products: ProductDataStore.sharedInstance.getProductList())
    )
}
Add & Update:
extension ProductListViewController: ProductDetailsViewControllerDelegate {
    func productDetailsDidSave(product: Product, isEdited: Bool) {
        if isEdited {
            ProductDataStore.sharedInstance.update(product: product)
            mainStore.dispatch(
                ProductActionUpdate(product: product)
            )
        }
        else {
            ProductDataStore.sharedInstance.add(product: product)
            mainStore.dispatch(
                ProductActionAdd(product: product)
            )
        }
    }
}
Delete:
func tableView(_ tableView: UITableView, commit editingStyle: UITableViewCellEditingStyle, forRowAt indexPath: IndexPath) {
    if editingStyle == .delete {
        let product = products[indexPath.row]
        ProductDataStore.sharedInstance.delete(productID: product.id)
        mainStore.dispatch(
            ProductActionDelete(product: product)
        )
    }
}
Để đăng ký nhận thông báo mỗi khi State thay đổi, chúng ta cần đăng ký ở viewWillAppear, viewWillDisappear và implement StoreSubscriber để cập nhật lại table view:
override func viewWillAppear(_ animated: Bool) {
    super.viewWillAppear(animated)
    mainStore.subscribe(self)
}

override func viewWillDisappear(_ animated: Bool) {
    super.viewWillDisappear(animated)
    mainStore.unsubscribe(self)
}
extension ProductListViewController: StoreSubscriber {
    func newState(state: AppState) {
        print("New state")
        products = state.products
        tableView.reloadData()
    }
}
2.6. Chạy thử chương trình:

3. Kết luận:
Như vậy với việc sử dụng ReSwift, chúng ta sẽ dễ dàng trong việc quản lý trạng thái của App và không cần đến những đoạn code phức tạp sử dụng KVO hay NotificationCenter dẫn tới khó khăn trong việc code hay debug.
All rights reserved
