Ứng dụng “Camera” của bạn được tạo ra như nào ?
Bài đăng này đã không được cập nhật trong 5 năm
Ứng dụng camera của bạn hoạt đông như nào ? Một thắc mắc chắc rằng ai cũng đã từng có, đặc biệt với một lập trình viên mobile thì việc tìm hiểu về cách tạo ra và cách hoạt động của nó là điều tất yếu. Trong bài viết này mình sẽ chia sẽ một chút kinh nghiệm của mình khi làm việc với module Camera trong React native.
1. Tìm hiểu về React native:

- React native được Facebook cho ra mắt vào năm 2015, cho phép các nhà phát triển xây dựng một ứng dụng di động dựa trên ngôn ngữ Javascript.
- Đến thời điểm hiện tại React native đang là một trong những framework phát triển ứng dụng “Hybrid” tốt nhất.
- Việc phát triển ứng dụng bằng React native giúp rút ngắn thời gian phát triển sản phẩm do bản thân React native giúp ta triển khai ứng dụng song song trên 2 nền tảng di động phổ biến hiện nay là Android và IOS mà vẫn đảm bảo hiệu năng.
- Các bạn có thể tìm hiểu thêm về React native thông qua trang tài liệu được phát hành : https://reactnative.dev/docs/getting-started
2. Chuẩn bị:
- Thiết bị chạy hệ điều hành android và ios.
- Môi trường phát triển React native cli.
- Công cụ lập trình : Visual Studio Code.
3. Phát triển ứng dụng
3.1. Khởi tạo ứng dụng.
- Chạy lệnh : react-native init camera trên terminal để tạo một project có tên “camera”
- Tiếp theo chúng ta sẽ sử dụng VScode để triển khai ứng dụng.
3.2. Cấu trúc thư mục:
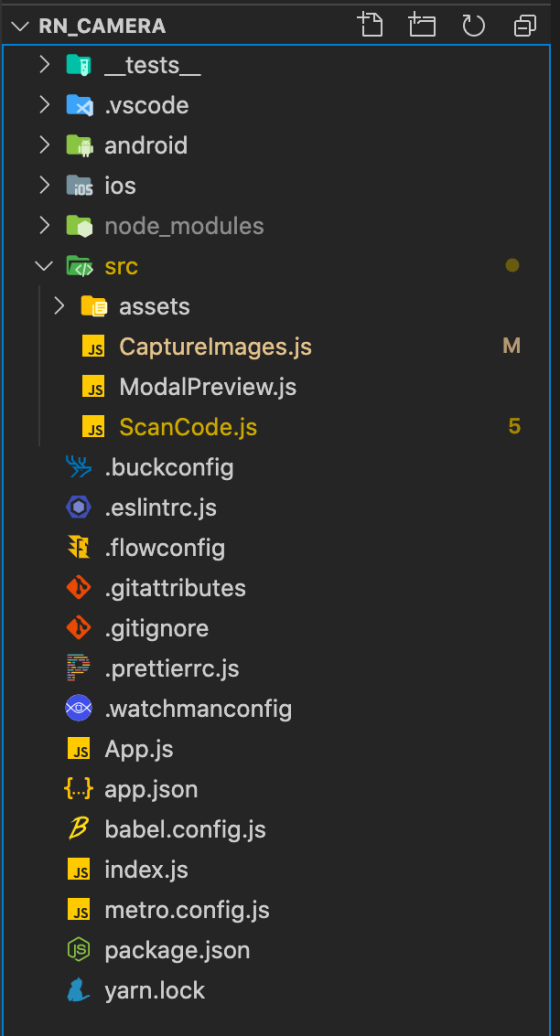
- Tạo thư mục src : nơi lưu trữ source code của ứng dụng.
- Trong /src tạo thư mục assets : Chứa dữ liệu dạng ảnh của ứng dụng.
- Tạo các file : CaptureImages.js, ModalPreview.js
3.3 Cài đặt các thư viện cho ứng dụng.
Trong ứng dụng mình sử dụng các thư viện:
- @react-native-community/cameraroll: lưu ảnh sau khi chụp vào thiết bị.
- react-native-camera: tương tác với camera trên thiết bị.
- react-native-modal: mô phỏng preview ảnh.
- react-native-permissions: xin các truyền truy cập camera, bộ nhớ… của thiết bị.
3.4 Cài đặt các thư viện:
3.4.1. Cài đặt thư viện react-native-camera:
- Trong terminal của VSCode chạy lệnh yarn add react-native-camera.
- Trong android/settings.gradle thêm đoạn mã:
include ':react-native-camera'
project(':react-native-camera').projectDir = new File(rootProject.projectDir,   '../node_modules/react-native-camera/android')
- Trong android/app/build.gradle thêm đoạn mã trong dependencies :
implementation project(':react-native-camera')
- Trong Info.plist (ios / Camera / Info.plist) thêm đoạn mã:
<!-- Required with iOS 10 and higher -->
<key>NSCameraUsageDescription</key>
<string>Your message to user when the camera is accessed for the first time</string>

<!-- Required with iOS 11 and higher: include this only if you are planning to use the camera roll -->
<key>NSPhotoLibraryAddUsageDescription</key>
<string>Your message to user when the photo library is accessed for the first time</string>

<!-- Include this only if you are planning to use the camera roll -->
<key>NSPhotoLibraryUsageDescription</key>
<string>Your message to user when the photo library is accessed for the first time</string>

<!-- Include this only if you are planning to use the microphone for video recording -->
<key>NSMicrophoneUsageDescription</key>
<string>Your message to user when the microphone is accessed for the first time</string>
Một số khai báo khác bắt buộc cho android:
- Thêm quyền vào tệp android/app/src/main/AndroidManifest.xml ứng dụng của bạn:
<!-- Required -->
<uses-permission android:name="android.permission.CAMERA" />

<!-- Include this only if you are planning to use the camera roll -->
<uses-permission android:name="android.permission.READ_EXTERNAL_STORAGE" />
<uses-permission android:name="android.permission.WRITE_EXTERNAL_STORAGE" />

<!-- Include this only if you are planning to use the microphone for video recording -->
<uses-permission android:name="android.permission.RECORD_AUDIO"/>
- Thêm dòng sau vào android/app/build.gradle:
android {
  ...
  defaultConfig {
    ...
    missingDimensionStrategy 'react-native-camera', 'general' // <--- insert this line
  }
}
3.4.2 Cài đặt các thư viện còn lại:
Trên terminal của VSCode chạy lần lượt các lệnh:
yarn add @react-native-community/cameraroll
yarn add react-native-modal
yarn add react-native-permissions
Các thư viện này đối với phiên bản react-native > 0.60 sẽ được cài đặt tự động.
3.5 Triển khai ứng dụng.
3.5.1. Tạo file ModalPreview.js:
Trong file này chúng ta sẽ xây dựng một giao diện để preview những bức ảnh thu được từ camera.
import React from 'react';
import {
  View,
  Dimensions,
  TouchableWithoutFeedback,
  StyleSheet,
  Image,
} from 'react-native';
import Modal from 'react-native-modal';
const scHeight = Dimensions.get('screen').height;
const scWidth = Dimensions.get('screen').width;
export default function ModalPreview(props) {
  const {isVisible, onBackdropPress, imagePreview} = props;
  return (
    <Modal
      style={styles.modal}
      isVisible={isVisible}
      customBackdrop={
        <TouchableWithoutFeedback onPress={onBackdropPress}>
          <View>
            <View />
            <View style={styles.backDropModal} />
          </View>
        </TouchableWithoutFeedback>
      }>
      <View style={styles.viewModal}>
        <Image
          resizeMode="cover"
          style={styles.imageBigPreview}
          source={{uri: imagePreview}}
        />
      </View>
    </Modal>
  );
}
const styles = StyleSheet.create({
  modal: {
    alignSelf: 'center',
  },
  backDropModal: {
    height: scHeight,
    width: scWidth,
    backgroundColor: 'rgba(112, 112, 112, 1)',
  },
  viewModal: {
    height: scHeight * 0.5,
    width: scWidth * 0.95,
    backgroundColor: 'white',
    borderRadius: 10,
  },
  imageBigPreview: {
    height: '100%',
    width: '100%',
    borderRadius: 10,
  },
});
3.5.2 Xây dụng phần chính của ứng dụng CaptureImages.js:
Trong file này mình sẽ tạo giao diện cho ứng dụng camera của mình và xin các quyền truy cập camera, bộ nhớ để tương tác với camera của thiết bị.
import React, {useRef, useState} from 'react';
import {
  View,
  Image,
  StyleSheet,
  TouchableOpacity,
  Text,
  ScrollView,
  Dimensions,
  StatusBar,
  PermissionsAndroid,
  Alert,
  Platform,
} from 'react-native';
import {RNCamera} from 'react-native-camera';
import CameraRoll from '@react-native-community/cameraroll';
import ModalPreview from './ModalPreview';
export default function CaptureImage(props) {
  const camera = useRef(null);
  const scrollViewRef = useRef();
  const [images, setimages] = useState([]);
  const [imagePreview, setimagePreview] = useState(null);
  const [flash, setFlash] = useState(RNCamera.Constants.FlashMode.off);
  const [type, setType] = useState(RNCamera.Constants.Type.back);
  //Modal state
  const [isVisibleModal, setisVisibleModal] = useState(false);
  const getPermissionAndroid = async () => {
    try {
      const granted = await PermissionsAndroid.request(
        PermissionsAndroid.PERMISSIONS.WRITE_EXTERNAL_STORAGE,
        {
          title: 'Image Download Permission',
          message: 'Your permission is required to save images to your device',
          buttonNegative: 'Cancel',
          buttonPositive: 'OK',
        },
      );
      if (granted === PermissionsAndroid.RESULTS.GRANTED) {
        return true;
      }
      Alert.alert(
        'Save remote Image',
        'Grant Me Permission to save Image',
        [{text: 'OK', onPress: () => console.log('OK Pressed')}],
        {cancelable: false},
      );
    } catch (err) {
      Alert.alert(
        'Save remote Image',
        'Failed to save Image: ' + err.message,
        [{text: 'OK', onPress: () => console.log('OK Pressed')}],
        {cancelable: false},
      );
    }
  };
  const changeType = () => {
    type === 0
      ? setType(RNCamera.Constants.Type.front)
      : setType(RNCamera.Constants.Type.back);
  };
  const capture = async () => {
    console.log(RNCamera.Constants.FlashMode);
    const options = {quality: 0.5, base64: false};
    const data = await camera.current.takePictureAsync(options);
    if (Platform.OS === 'android') {
      const granted = await getPermissionAndroid();
      if (granted) {
        CameraRoll.save(data.uri, {
          type: 'photo', // optional
          album: 'CameraApp', // optional
        })
          .then((res) => console.log(res))
          .catch((err) => console.log(err));
      }
    } else {
      CameraRoll.save(data.uri, {
        type: 'photo',
        album: 'CameraApp',
      })
        .then((res) => console.log(res))
        .catch((err) => console.log(err));
    }
    setimages([...images, data.uri]);
    console.log('Debug', data);
  };
  const onChangeFlashMode = (value) => {
    switch (value) {
      case 0:
        setFlash(1);
        break;
      case 1:
        setFlash(2);
        break;
      case 2:
        setFlash(0);
        break;
      default:
        break;
    }
  };
  const removeImage = (image) => {
    const temp = images.filter((e) => e !== image);
    setimages(temp);
  };
  const previewImgae = (image) => {
    setimagePreview(image);
    setisVisibleModal(true);
  };
  return (
    <View style={styles.container}>
      <StatusBar hidden />
      <RNCamera
        ref={camera}
        style={styles.preview}
        type={type} // back : sau - front : truoc
        flashMode={flash}
        androidCameraPermissionOptions={{
          title: 'Permission to use camera',
          message: 'We need your permission to use your camera',
          buttonPositive: 'Ok',
          buttonNegative: 'Cancel',
        }}
        androidRecordAudioPermissionOptions={{
          title: 'Permission to use audio recording',
          message: 'We need your permission to use your audio',
          buttonPositive: 'Ok',
          buttonNegative: 'Cancel',
        }}>
        <View style={styles.menuCamera}>
          <TouchableOpacity
            onPress={() => onChangeFlashMode(flash)}
            style={styles.btnFlashControl}>
            {flash === 0 ? (
              <Image
                style={styles.flashIcon}
                source={require('../src/assets/flashOff1.png')}
              />
            ) : flash === 1 ? (
              <Image
                style={styles.flashIcon}
                source={require('../src/assets/flashOn.png')}
              />
            ) : (
              <Image
                style={styles.flashIcon}
                source={require('../src/assets/flashAuto.png')}
              />
            )}
          </TouchableOpacity>
          <TouchableOpacity style={styles.btnFlip} onPress={changeType}>
            <Image
              style={styles.flashIcon}
              source={require('../src/assets/flipCamera.png')}
            />
          </TouchableOpacity>
        </View>

        <TouchableOpacity style={styles.btnCapture} onPress={() => capture()}>
          <Image
            style={styles.captureIcon}
            source={require('../src/assets/capture.png')}
          />
        </TouchableOpacity>
        <TouchableOpacity style={styles.btnCancel}>
          <Text style={styles.txtCancel}>Cancel</Text>
        </TouchableOpacity>
        <TouchableOpacity style={styles.btnDone}>
          <Text style={styles.txtCancel}>Done</Text>
        </TouchableOpacity>
      </RNCamera>

      <View style={styles.previewPhoto}>
        <ScrollView
          ref={scrollViewRef}
          onContentSizeChange={() =>
            scrollViewRef.current.scrollToEnd({animated: true})
          }
          showsHorizontalScrollIndicator={false}
          horizontal>
          {images.map((e, index) => (
            <View key={index}>
              <TouchableOpacity onPress={() => previewImgae(e)}>
                <Image style={styles.imgPreview} source={{uri: e}} />
              </TouchableOpacity>
              <TouchableOpacity
                style={styles.btnCleanImage}
                onPress={() => removeImage(e)}>
                <Image source={require('../src/assets/x.png')} />
              </TouchableOpacity>
            </View>
          ))}
        </ScrollView>
      </View>
      <ModalPreview
        isVisible={isVisibleModal}
        onBackdropPress={() => {
          setisVisibleModal(false);
        }}
        imagePreview={imagePreview}
      />
    </View>
  );
}
const styles = StyleSheet.create({
  container: {
    flex: 1,
  },
  preview: {
    flex: 4,
  },
  btnCapture: {position: 'absolute', bottom: 0, alignSelf: 'center'},
  btnFlashControl: {
    marginTop: 5,
    marginLeft: 15,
  },
  previewPhoto: {
    flex: 1,
    paddingVertical: 10,
    paddingHorizontal: 10,
  },
  btnCancel: {
    position: 'absolute',
    bottom: 15,
    left: 15,
    alignSelf: 'flex-start',
  },
  txtCancel: {
    fontSize: 18,
    color: '#FFFFFF',
  },
  btnDone: {
    position: 'absolute',
    bottom: 15,
    right: 15,
    alignSelf: 'flex-end',
  },
  btnFlip: {
    marginTop: 5,
    marginLeft: Dimensions.get('screen').width - 80,
  },
  flashIcon: {height: 25, width: 25, marginBottom: 5},
  captureIcon: {height: 40, width: 40, marginBottom: 5},
  imgPreview: {height: 100, width: 100, marginRight: 5, borderRadius: 5},
  menuCamera: {
    flexDirection: 'row',
    marginTop: 15,
  },
  btnCleanImage: {
    position: 'absolute',
    top: 5,
    left: 5,
  },
});
Chỉnh sửa file App.js:
import React from 'react';
import {View} from 'react-native';
import CaptureImage from './src/CaptureImages';
import {ModalPortal} from 'react-native-modals';
export default function App() {
  return (
    <View style={{flex: 1}}>
      <ModalPortal />
      <CaptureImage />
    </View>
  );
}
Giao diện sau khi hoàn thành:
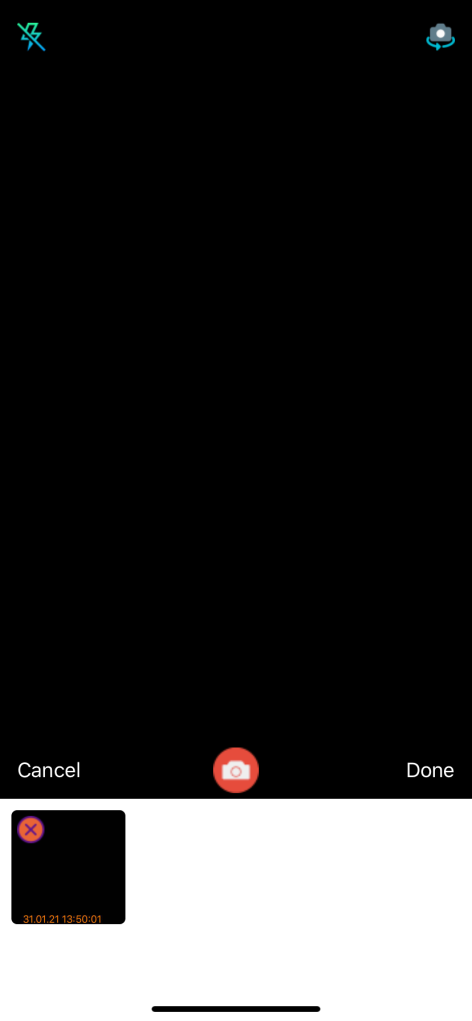
Các chức năng:
- Flash mode : On, Off, Auto
- Camera : front, back.
- Preview.
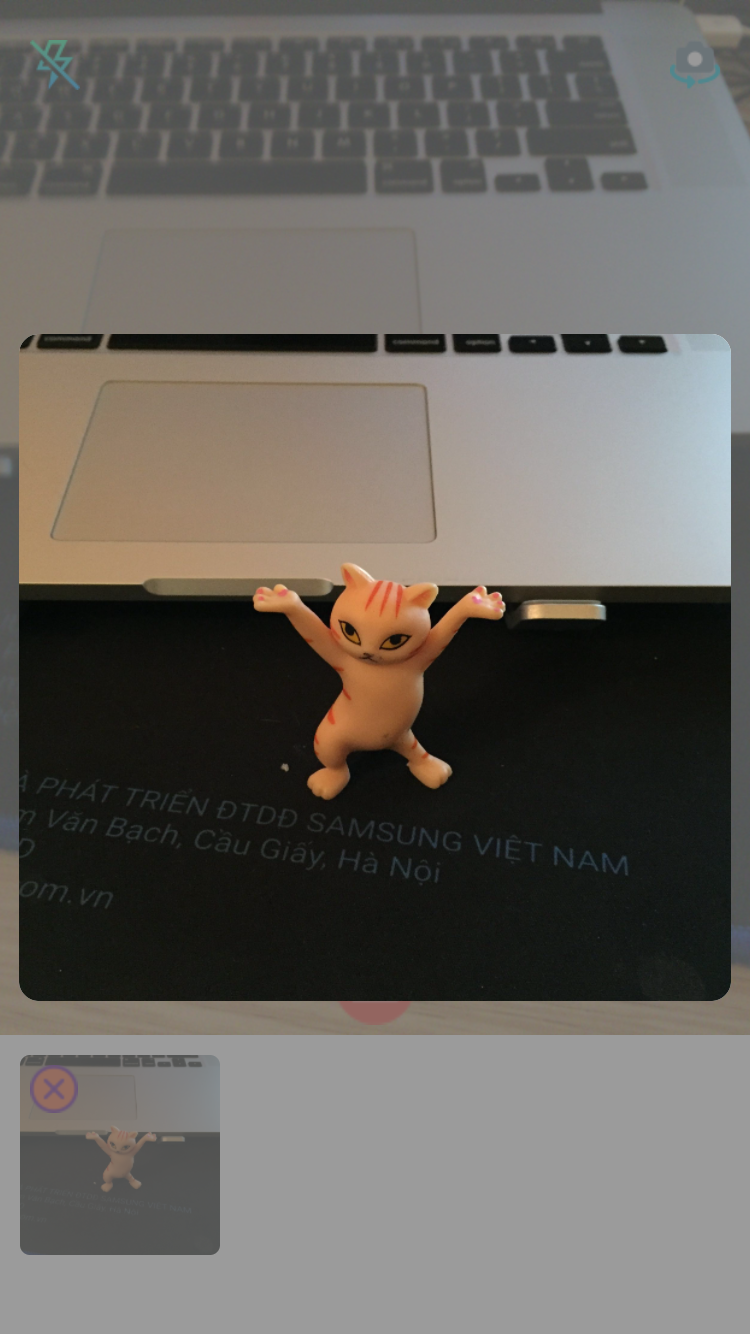
3.6. Kết quả triển khai trên thiết bị thật.
Ảnh thu được sẽ được lưu trong album do bạn tạo ra. Ở đây mình đặt là CameraApp
CameraRoll.save(data.uri, {
     type: 'photo',
     album: 'CameraApp', // Edit album
   })
     .then((res) => console.log(res))
     .catch((err) => console.log(err));
 }


4. Tài liệu tham khảo
- https://www.npmjs.com/package/@react-native-community/cameraroll
- https://github.com/zoontek/react-native-permissions
- https://react-native-camera.github.io/react-native-camera/
- https://github.com/react-native-modal/react-native-modal
Các bạn có thể tải mã nguồn và chạy thử tại : https://github.com/ducgiangtrankma/RN_Camera.git
All rights reserved
