Tự xây dựng ứng dụng Single Page Application đơn giản với Angular JS
Bài đăng này đã không được cập nhật trong 4 năm
Mở đầu
Trong bài viết này mình sẽ hướng dẫn các bạn tự tạo một Single Page Application (SPA) sử dụng AngularJS. Bài viết này hướng tới những bạn mới làm quen với AngularJS, những người đã biết đến, đã có những khái niệm cơ bản trong AngularJS như module, controller, service, directive, binding data, dependency injection, filter, v.v... nhưng lại chưa thể tự mình kết hợp các khái niệm trên để tự tạo nên một SPA hoàn chỉnh. Vì vậy chi tiết bài viết sau đây sẽ không nhắc lại các khái niệm cơ bản trong AngularJS mà chỉ tập trung cách phối kết hợp các thành phần đó và các bước để tạo nên ứng dụng.
Ứng SPA mà chúng ta sẽ xây dựng là một ứng dụng thời tiết đơn giản (link demo) cho phép người dùng nhập tên thành phố và trả về thông tin thời tiết của thành phố đó. Thông tin này được lấy từ API mà cụ thể là từ OpenWeatherMap.
Xây dựng ứng dụng
Mockup
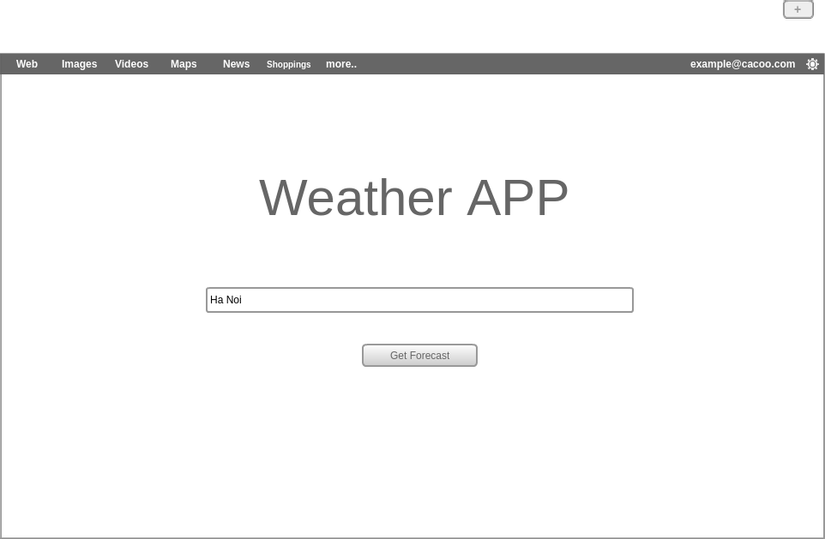
Để dễ dàng hình dung app thời tiết chúng ta đang cần xây dựng, mình đã tạo ra các mockup như sau:
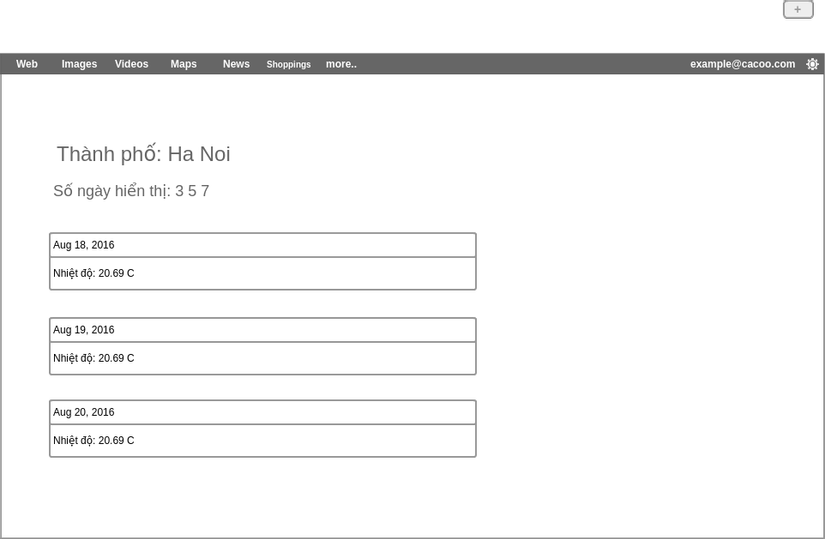
Khi nhập tên thành phố và click vào nút Get forecast, kết quả trả về như sau:
Setup khung xương của app
1 - Tạo cấu trúc thư mục như sau:
source/
  |  pages/
  |  |  forecast.html
  |  |  home.html
  |  directives/
  |  |  weatherReport.html
  |  app.js
  |  index.html
2 - Trong file index.html, include thư viện css, các thư viện angularjs và các file js cần thiết, ở đây ta sử dụng module angular-route phục vụ cho việc routing và module angular-resource phục vụ cho việc tương tác với API
<!DOCTYPE html>
<html lang="en" ng-app="weatherApp">

<head>
    <title>AngularJS - Dự báo thời tiết</title>
    <meta charset="utf-8">
    <!-- load bootstrap via CDN -->
    <link type="text/css" rel="stylesheet" href="https://maxcdn.bootstrapcdn.com/bootstrap/3.3.6/css/bootstrap.min.css">
    <!-- load angularjs via CDN -->
    <script type="text/javascript" src="https://code.angularjs.org/1.4.9/angular.min.js"></script>
    <script type="text/javascript" src="https://code.angularjs.org/1.4.9/angular-route.min.js"></script>
    <script type="text/javascript" src="https://code.angularjs.org/1.4.9/angular-resource.min.js"></script>
    <script type="text/javascript" src="app.js"></script>
    <style>
        * {
            font-size: 1.05em;
        }
    </style>
</head>
<body>
    <header>
        <nav class="navbar navbar-default">
            <div class="container">
                <div class="navbar-header">
                    <a class="navbar-brand" href="/">Dự báo thời tiết</a>
                </div>
                <ul class="nav navbar-nav navbar-right">
                    <li><a href="#/">Home</a></li>
                </ul>
            </div>
        </nav>
    </header>
    <div class="container">
    </div>
</body>
</html>
3 - Trong file app.js, khái báo ứng dụng angular với tên trùng với directive ng-app đã sử dụng trong index.html, 2 module phụ thuộc sẽ sử dụng là ngRoute và ngResource:
// app.js
var weatherApp = angular.module('weatherApp', ['ngRoute', 'ngResource']);
4 - Ứng dụng weatherApp này sẽ có 2 template ứng với 2 trang chính là trang chủ nơi nhập tên thành phố (pages/home.html) và trang hiển thị kết quả (pages/forecast.html). 2 template này sẽ được điều khiển bởi 2 controller:
<!-- home.html -->
<div class="row">
  <div class="col-md-6 col-md-offset-3">
    <h4>Weather app</h4>
    <div class="form-group">
      <input type="text" class="form-control"/>
    </div>
    <a href="#/forecast" class="btn btn-primary">Get Forecast</a>
  </div>
</div>
<!-- forecast.html -->
Thanh Pho: Ha noi
// app.js
weatherApp.controller('homeController', ['$scope', function($scope) {

}]);

weatherApp.controller('forecastController', ['$scope', function($scope) {

}]);
5 - Cấu hình định tuyến trong ứng dụng, sử dụng service $routeProvider của module ngRoute:
// app.js
weatherApp.config(function($routeProvider) {
  $routeProvider.when('/', {
    templateUrl: 'pages/home.html',
    controller: 'homeController'
  })

  .when('/forecast', {
    templateUrl: 'pages/forecast.html',
    controller: 'forecastController'
  })
});
Tạo custom service
Sau khi setup xong khung ứng dụng, việc tiếp theo cần làm là chia sẻ dữ liệu giữa 2 trang home và trang forecast. Trong phần này ta sẽ viết một custom service để chia sẻ dữ liệu (cụ thể là thông tin thành phố cần lấy thông tin thời tiết) giữa các controller với nhau:
// Định nghĩa cityService
weatherApp.service('cityService', function() {
  // set giá trị mặc định cho data sẽ chia sẻ
  this.city = 'Ha Noi';
});
Khi người dùng nhập tên thành phố, hay nói cách khác là làm thay đổi giá trị của biến city trong homeController, ta cần cập nhật lại giá trị này cho cityService:
<!-- home.html -->
...
<input type="text" class="form-control" ng-model="city"/>
...
// app.js
weatherApp.controller('homeController', ['$scope', 'cityService', function($scope, cityService) {
  // sử dụng dữ liệu chia sẻ từ cityService
  $scope.city = cityService.city;

  // theo dõi sử thay đổi trên view của city
  $scope.$watch('city', function() {
    cityService.city = $scope.city;
  });
}]);
Tương tự trên forecastController, cần định nghĩa 1 biến city nhận giá trị từ cityService để hiển thị tên thành phố
weatherApp.controller('forecastController', ['$scope', function($scope) {
 $scope.city = cityService.city;
}]);
<!-- forecast.html -->
...
Thanh Pho: {{ city }}
...
Dịch vụ OpenWeatherMap
Để ứng dụng có ý nghĩa thực tế thì ta cần lấy dữ liệu thời tiết thực của thành phố mà người dùng nhập vào. Ở đây tôi sử dụng dịch vụ của OpenWeatherMap. Các bước để đăng ký sử dụng dịch vụ OpenWeatherMap như sau:
- Đăng ký tài khoản miễn phí theo hướng dẫn tại đây: http://openweathermap.org/appid
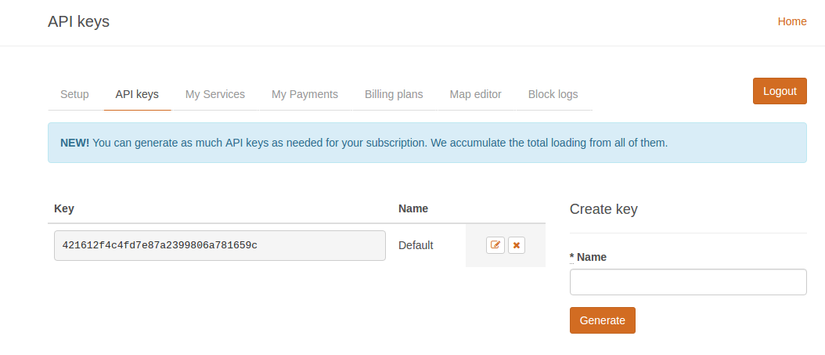
- Sau khi đăng ký thành công, vào mục API keys, nếu thành công, ta sẽ có một key như sau:
- Test thử API với key đã tạo ra trên trình duyệt: http://api.openweathermap.org/data/2.5/forecast/daily?q=Ha Noi&mode=json&units=metric&cnt=7&lang=vi&APPID=421612f4c4fd7e87a2399806a781659c
Get thông tin thời tiết từ API
Tiếp theo, thực hiện get data từ API sử dụng service $resource của module ngResource với param city là giá trị của biến city, APPID là key ta đã lưu khi signup trên trang openweathermap (các tham số khác các bạn có thể tham khảo trong doc) :
// app.js
weatherApp.controller('forecastController', ['$scope', '$resource', 'cityService', function($scope, $resource, cityService) {
  $scope.city = cityService.city;

  $scope.weatherAPI = $resource('http://api.openweathermap.org/data/2.5/forecast/daily', { callback: "JSON_CALLBACK" }, { get: { method: "JSONP" } })

  $scope.weatherResult = $scope.weatherAPI.get({ q: $scope.city, cnt: 3, lang: 'vi', units: 'metric', APPID: '421612f4c4fd7e87a2399806a781659c' });

  $scope.convertToDate = function(dt) {
    return new Date(dt * 1000);
  }
}]);
Hiển thị kết quả vừa thu được trong biến weatherResult trên trang forecast.html. Đồng thời sử dụng filter để format lại thời gian theo format "Sep 04, 1993"
...
<div ng-repeat="w in weatherResult.list">
  <div class="row">
    <div class="col-md-12">
      <div class="panel panel-default">
          <div class="panel-heading">
            <h3 class="panel-titlte">{{  convertToDate(w.dt) | date: 'MMM d, y' }}</h3>
          </div>
          <div class="panel-body">
            Nhiệt độ: {{ w.temp.day }} C
          </div>
        </div>
    </div>
  </div>
</div>
...
Tạo custom Directive
Tới đây thì ta đã có 1 giao diện cho phép nhập tên thành phố và hiển thị một list các kết quả dự báo thời tiết. Tuy nhiên trong ứng dụng này, ta có thể refactor lại phần hiển thị chi tiết kết quả dự báo thành custom directive để có thể tái sử dụng lại được:
- Tạo directive
weatherReporttrongapp.js. Directive này giới hạn chỉ được gọi tới bằng element của HTML, được điều khiển bởi forecastController, có template làdirectives/weatherReport.html, và sử dụng isolated scope để truyền tham số từ ngoài vào:
...
weatherApp.directive('weatherReport', function() {
  return {
    restrict: 'E',
    templateUrl: 'directives/weatherReport.html',
    replace: true,
    controller: 'forecastController',
    scope: {
      weatherDay: '=',
      convertToDate: '&',
      dateFormat: '@'
    }
  };
});
...
- Biến đoạn html trong
forecast.htmlthành template trong thư mụcdirectives/weatherReport.html
<div class="panel panel-default">
  <div class="panel-heading">
    <h3 class="panel-titlte">{{  convertToDate(weatherDay.dt) | date: dateFormat }}</h3>
  </div>
  <div class="panel-body">
    Nhiệt độ: {{ weatherDay.temp.day }} C
  </div>
</div>
- Gọi directive từ
pages/forecast.htmlvà truyền tham số từ controller vào directive này"
Thanh Pho: {{ city }}

<hr/>
<div ng-repeat="w in weatherResult.list">
  <div class="row">
    <div class="col-md-12">
      <weather-report weather-day="w" convert-to-date="convertToDate(dt)" date-format="MMM d, y"></weather-report>
    </div>
  </div>
</div>
TỔNG KẾT
Trên đây mình đã hướng dẫn các bạn tạo kết hợp các khái niệm cơ bản trong angular JS như module, controller, directive, service,v.v.. để tạo một ứng dụng SPA nho nhỏ. Mong rằng bài hướng dẫn này sẽ giúp các beginner như mình có cái nhìn tổng quan về SPA, cách xây dựng nó và có thêm động lực trong việc tìm hiểu AngularJS. (lay2) (yeah)
Nguồn tham khảo
- Source code: https://github.com/duyth1993/AngularWeatherApp
- Demo: http://weather-app.16mb.com/
All rights reserved
