Tự tạo thư viện trong Android chỉ với 2 bước đơn giản
Bài đăng này đã không được cập nhật trong 8 năm
Chào mọi người
Như tiêu đề có nói thì hôm nay mình sẽ hướng dẫn các bạn tự tạo ra một thư viện của riêng bạn và có thể xuất bản chúng để cho người khác cũng có thể dùng chúng ( bá đạo) .
Đơn giản là bạn vừa viết ra một thứ rất Awesome và bạn muốn lưu lại để lần sau có thể sử dụng lại chúng ( nhưng không phải là copy và paste từng đoạn code một ) . Không những thế bạn còn muốn cho cả thế giới cũng có thể sử dụng được thứ bạn vừa viết ra .
Oki bắt đầu nào !!!
Bước 1 : Tạo ra cái gì đó Awesome ( Android Library)
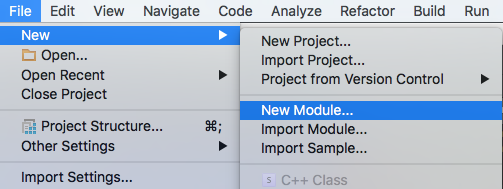
Đầu tiên tạo ra một New Module trong Project của bạn
Trong File chọn New > New Module
Như hình dưới :
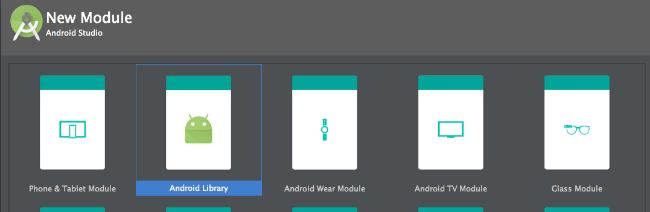
Sau đó chọn Android Library và đặt tên cho thư viện của bạn VD : awesomelibrary
Và sẽ ra được như này
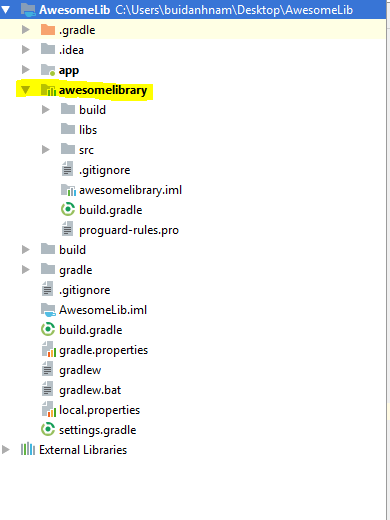
Trong awesomelibrary
Đầu tiên mình tạo một có một Edittext và một Textview .
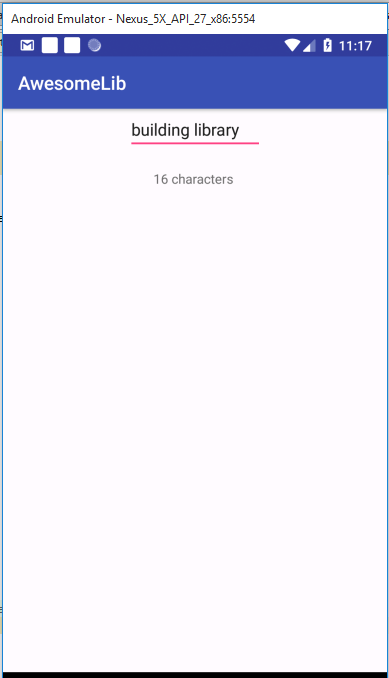
Đơn giản khi nhập vào Edittext sẽ hiển thị số ký tự bạn nhập
Tạo ra một file my_view.xml có một Edittext và một Textview như dưới
<?xml version="1.0" encoding="utf-8"?>
<android.support.constraint.ConstraintLayout xmlns:android="http://schemas.android.com/apk/res/android"
    xmlns:app="http://schemas.android.com/apk/res-auto"
    android:layout_width="match_parent"
    android:layout_height="match_parent">

    <EditText
        android:id="@+id/edt"
        android:layout_width="wrap_content"
        android:layout_height="wrap_content"
        android:layout_marginEnd="8dp"
        android:layout_marginStart="8dp"
        android:layout_marginTop="20dp"
        app:layout_constraintEnd_toEndOf="parent"
        app:layout_constraintStart_toStartOf="parent" />

    <TextView
        android:id="@+id/tv"
        android:layout_width="wrap_content"
        android:layout_height="wrap_content"
        android:layout_marginEnd="8dp"
        android:layout_marginStart="8dp"
        android:layout_marginTop="20dp"
        app:layout_constraintEnd_toEndOf="parent"
        app:layout_constraintStart_toStartOf="parent"
        app:layout_constraintTop_toBottomOf="@id/edt" />
</android.support.constraint.ConstraintLayout>
Tiếp theo là xử lý logic trong code Java
Mình sẽ tạo ra một class MyView như này
package com.example.awesomelibrary;

import android.content.Context;
import android.support.annotation.Nullable;
import android.support.constraint.ConstraintLayout;
import android.util.AttributeSet;
import android.widget.EditText;
import android.widget.TextView;

/**
 * Created by buidanhnam on 6/18/2018.
 */

public class MyView extends ConstraintLayout implements BaseAction {
    private TextView textView;
    private EditText editText;

    public MyView(Context context) {
        super(context);
        initView(context);
    }

    public MyView(Context context, @Nullable AttributeSet attrs) {
        super(context, attrs);
        initView(context);
    }

    public MyView(Context context, @Nullable AttributeSet attrs, int defStyleAttr) {
        super(context, attrs, defStyleAttr);
        initView(context);
    }

    private void initView(Context context) {
        inflate(context, R.layout.my_view, this);
        textView = findViewById(R.id.tv);
        editText = findViewById(R.id.edt);
        editText.addTextChangedListener(new ListenerOnTextChange() {
            @Override
            void getTextCount(int textCount) {
                textView.setText(textCount + " Characters !! ");
            }
        });
    }

    @Override
    public void setHintEditText(CharSequence hint) {
        editText.setHint(hint);
    }

    @Override
    public void setStyle(int style) {

    }

    public TextView getTextView() {
        return textView;
    }

    public EditText getEditText() {
        return editText;
    }

}
Để lắng nghe được sự kiện textChange trong EditText mình dùng addTextChangedListener()
Tiếp theo là abstract class ListenerOnTextChange implements TextWatcher
package com.example.awesomelibrary;

import android.text.Editable;
import android.text.TextWatcher;

/**
 * Created by buidanhnam on 6/18/2018.
 */

public abstract class ListenerOnTextChange implements TextWatcher {

    @Override
    public void onTextChanged(CharSequence charSequence, int i, int i1, int i2) {
        getTextCount(charSequence.length());
    }

    @Override
    public void beforeTextChanged(CharSequence charSequence, int i, int i1, int i2) {

    }

    @Override
    public void afterTextChanged(Editable editable) {

    }

    abstract void getTextCount(int textCount);
}
Mình có tạo thêm một interface BaseAction
package com.example.awesomelibrary;

/**
 * Created by buidanhnam on 6/18/2018.
 */

public interface BaseAction {

    void setHintEditText(CharSequence hint);

    void setStyle(int style);
}
Oki vậy là đã xong phần tạo Lib
Giờ bạn có thế test thử xem nó hoạt động ổn chưa .
Trong file buil.gradle của root project thêm thư viện trên vào trong dependencies như này
dependencies{
    implementation fileTree(include: ['*.jar'], dir: 'libs')
    implementation project(':awesomelibrary')  // tên của mdule
}
Hoặc cách khác chọn File chọn Project Structure chọn module app chọn Dependencies click vào dấu cộng bên phải và chọn vào Module Dependencies sau đó add Module mình vừa tạo vào
Giờ thì mình đã có thể sử dụng được Lib mình vừa tạo ra .
VD như này file activity_main.xml
<?xml version="1.0" encoding="utf-8"?>
<android.support.constraint.ConstraintLayout xmlns:android="http://schemas.android.com/apk/res/android"
    xmlns:tools="http://schemas.android.com/tools"
    android:layout_width="match_parent"
    android:layout_height="match_parent"
    tools:context="com.example.buidanhnam.awesomelib.MainActivity">

    <com.example.awesomelibrary.MyView
        android:id="@+id/mv"
        android:layout_width="wrap_content"
        android:layout_height="wrap_content" />
</android.support.constraint.ConstraintLayout>
Và trong file MainActivity
import com.example.awesomelibrary.MyView;

public class MainActivity extends AppCompatActivity {
    private MyView myView;
    @Override
    protected void onCreate(Bundle savedInstanceState) {
        super.onCreate(savedInstanceState);
        setContentView(R.layout.activity_main);
        myView = findViewById(R.id.mv);
        myView.setHintEditText("Enter anything ... ");
    }
}
Oki vậy là việc tạo ra Android Library đã xong Chạy thử app nó sẽ được như này :
Oki giờ sang bước 2 mình sẽ đẩy thư viện này lên chỗ nào đó cho thế giới dùng .
Bước 2 : Publish thư viện của bạn
2.1 Tạo một repo Git và đẩy code lên đó
Nếu chưa biết các bạn có thể tham khảo thêm
2.2 Chọn server để mình config Library
Các bạn có thể dùng cái nè : Bintray hoặc cái nè : JitPack
Ở đây mình sẽ config với Bintray
Đầu tiên thêm plugins trong Buildscript Dependencies
Trong file build.gradle của root Project thêm
buildscript {
    repositories {
        google()
        jcenter()
    }
    dependencies {
        classpath 'com.android.tools.build:gradle:3.0.1'
       classpath 'com.github.dcendents:android-maven-gradle-plugin:1.5'
       classpath 'com.jfrog.bintray.gradle:gradle-bintray-plugin:1.7'

    }
}
Trong file build.gradle của Module: library thêm
apply plugin: 'com.github.dcendents.android-maven'
apply plugin: 'com.jfrog.bintray'
Tiếp theo config Bintray trong file gradle
Trong file build.gradle của Module: library thêm
install {
    repositories.mavenInstaller {
        pom.project {
            group "com.nam.libraries"
            artifactId "awesomelib"
            version "1.0.1"
            // nó sẽ ra được như nè :  'com.nam.libraries:awesomelib:1.0.1'
        }
    }
}
bintray {
    user = UserName trong Bintray của bạn
    key =  API key trong  Bintray của bạn

    configurations = ['archives']
    pkg {
        repo = 'test'  // đây là repo bạn tạo trên Bintray . nếu k có sẽ báo lỗi HTTP 404
        name = 'Awesomelib'
        userOrg = user
        licenses = ['Apache-2.0']
        publish = true
        vcsUrl = 'https://github.com/BuiDanhNam-Framgia/AwesomeLib.git'  // đây là repo  trên git bạn đã tạo ở bước trên
        publicDownloadNumbers = true
        version {
            name = '0.1'
            desc = 'Gradle Bintray Plugin 1.0 final'
            vcsTag = '0.1'
        }
    }
}
Giờ thì chạy lệnh này trong terminal của Android Studio upload lên Bintray là xong .
./gradlew install bintrayUpload
Lưu ý : các bạn cần phải tạo repo trên Bintray trước nhé nếu không có sẽ báo lỗi HTTP 404 !
Kết quả
Trên Bintray đã xuất hiện thư viện của mình như nè :

Các bạn để ý chỗ mình tô màu vàng . Đây là hai thông tin quan trọng để có thể thêm thư viện của mình vào bất kỳ Project nào .
Để sử dụng được thư viện của mình chỉ cần thêm vào trong file gradle 2 thông tin sau :
Đầu tiên trong file build.gradle của root Project
thêm https://dl.bintray.com/buidanhnam-framgia/test
đây là url repo thư viện của mình
allprojects {
  repositories {
    // ...
    maven { url 'https://dl.bintray.com/buidanhnam-framgia/test' }
  }
}
Hoặc để đơn giản hơn ( không cần thêm url Repo như trên ) các bạn cũng có thể sử dụng Add to JCenter .
Việc này sẽ add package của bạn vào repo JCenter . Và phần lớn thứ viện của bên thứ 3 các bạn đang sử dụng đều được thêm vào trong repo JCenter .
Các bạn có thể thấy jcenter() tự động được thêm vào trong Android Studio .
Như bên dưới đây :
File build.gradle của root Project
allprojects {
    repositories {
        google()
        jcenter()
    }
}
Tiếp theo các bạn chỉ cần thêm thư viện của mình vào trong dependencies của build.gradle như bên dưới là xong .
dependencies {
  // ...
  implementation ''com.nam.libraries:awesomelib:1.0.1''
}
Build lại project và tận hưởng thành quả thôi
Tổng kết
Hi vọng bài hướng dẫn trên của mình có thể giúp ích được cho các bạn phần nào đó .
Cảm ơn các bạn rất nhiều ! Một số nguồn mình thao khảo : https://developer.android.com/studio/projects/android-library https://www.theguardian.com/technology/developer-blog/2016/dec/06/how-to-publish-an-android-library-a-mysterious-conversation
https://github.com/codepath/android_guides/wiki/Building-your-own-Android-library
All rights reserved
