Tự tạo Event LoadMore bên trong recycleView mà không dùng Lib (phần 1)
Bài đăng này đã không được cập nhật trong 6 năm
Tại sao chúng ta lại dùng load more và tại sao bạn phải xem bài viết này ?
Bởi vì việc load dữ liệu quá lớn , ta phải phân trang và load theo từng số lượng item nên khi đó ta dùng LoadMoreAdapter
Ở đây mình có dùng 1 tính năng đó là tính năng load mutil Item theo viewType của RecycleView
Bước 1 : Tạo các file layout :
MainActivity.xml
<?xml version="1.0" encoding="utf-8"?>
<android.support.constraint.ConstraintLayout xmlns:android="http://schemas.android.com/apk/res/android"
    xmlns:app="http://schemas.android.com/apk/res-auto"
    xmlns:tools="http://schemas.android.com/tools"
    android:layout_width="match_parent"
    android:layout_height="match_parent"
    tools:context=".MainActivity">

    <android.support.v7.widget.RecyclerView
        android:id="@+id/recyclerView"
        android:layout_width="match_parent"
        android:layout_height="wrap_content"
        app:layoutManager="android.support.v7.widget.LinearLayoutManager"
        app:layout_constraintBottom_toBottomOf="parent"
        app:layout_constraintLeft_toLeftOf="parent"
        app:layout_constraintRight_toRightOf="parent"
        app:layout_constraintTop_toTopOf="parent" />

</android.support.constraint.ConstraintLayout>
item_load_more
<?xml version="1.0" encoding="utf-8"?>
<LinearLayout xmlns:android="http://schemas.android.com/apk/res/android"
    android:layout_width="match_parent"
    android:layout_height="wrap_content"
    android:layout_margin="8dp"
    android:orientation="vertical">

    <ProgressBar
        android:id="@+id/progressBar"
        android:layout_width="wrap_content"
        android:layout_height="wrap_content"
        android:layout_gravity="center_horizontal"
        android:indeterminate="true"
        android:paddingLeft="8dp"
        android:paddingRight="8dp"
        />

</LinearLayout>
item_view
<?xml version="1.0" encoding="utf-8"?>
<android.support.v7.widget.CardView xmlns:android="http://schemas.android.com/apk/res/android"
    xmlns:app="http://schemas.android.com/apk/res-auto"
    android:layout_width="match_parent"
    android:layout_height="wrap_content"
    app:cardElevation="8dp"
    app:cardUseCompatPadding="true">


    <TextView
        android:id="@+id/tvItem"
        android:layout_width="match_parent"
        android:layout_height="wrap_content"
        android:padding="16dp"
        android:text="Item X" />

</android.support.v7.widget.CardView>
Bước 2 : Tạo Adapter và hoàn thành logic bên trong nó
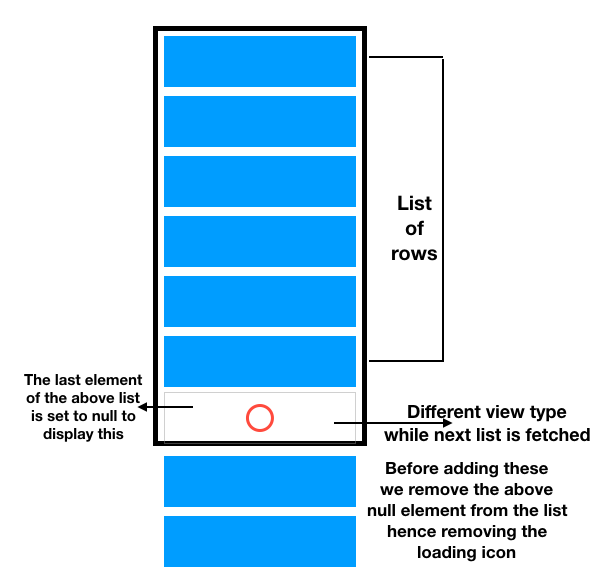
hàm onBindViewHolder và hàm onCreateViewHolder ở đây chúng ta sử dụng mutil item , Ta có hàm getItemCount , để trả lại giá trị đếm các phần tử của item trong adapter , hàm getItemViewType để trả lại type của item có position cụ thể , nếu item đó là null thì ta trả type là VIEW_TYPE_LOADING nếu ko thì trả VIEW_TYPE_ITEM
    private final int VIEW_TYPE_ITEM = 0;
    private final int VIEW_TYPE_LOADING = 1;

    @NonNull
    @Override
    public RecyclerView.ViewHolder onCreateViewHolder(@NonNull ViewGroup parent, int viewType) {
        if (viewType == VIEW_TYPE_ITEM) {
            View view = LayoutInflater.from(parent.getContext()).inflate(R.layout.item_view, parent, false);
            return new ItemViewHolder(view);
        } else {
            View view = LayoutInflater.from(parent.getContext()).inflate(R.layout.item_loading, parent, false);
            return new LoadingViewHolder(view);
        }
    }

    @Override
    public void onBindViewHolder(@NonNull RecyclerView.ViewHolder viewHolder, int position) {

        if (viewHolder instanceof ItemViewHolder) {

            populateItemRows((ItemViewHolder) viewHolder, position);
        } else if (viewHolder instanceof LoadingViewHolder) {
            showLoadingView((LoadingViewHolder) viewHolder, position);
        }

    }

       @Override
    public int getItemCount() {
        return mItemList == null ? 0 : mItemList.size();
    }

    /**
     * The following method decides the type of ViewHolder to display in the RecyclerView
     *
     * @param position
     * @return
     */
    @Override
    public int getItemViewType(int position) {
        return mItemList.get(position) == null ? VIEW_TYPE_LOADING : VIEW_TYPE_ITEM;
    }
Bạn có thắc mắc tại sao get(position) item lại bằng null . Chúng ta có 1 logic như sau , khi load hết danh sách thì hãy truyền vào list 1 giá trị null để khi đó adapter nhận giá trị null và biết list đã hết dữ liệu từ đó showLoading lên , đó là logic mà mình nhắc đến ở trên
Bước 3 : Sử dụng Adapter và handle sự kiện scroll cho recycleView
Ở đây chúng ta có một hàm quan trọng đó làm hàm onScrollListener - nó giúp chúng ta bắt sự kiện scroll cho recycleView , và sau đây là code của mình :
 @Override
    protected void onCreate(Bundle savedInstanceState) {
        super.onCreate(savedInstanceState);
        setContentView(R.layout.activity_main);

        recyclerView = findViewById(R.id.recyclerView);
        populateData();
        initAdapter();
        initScrollListener();


    }
// để fake data cho  recycleView
    private void populateData() {
        int i = 0;
        while (i < 10) {
            rowsArrayList.add("Item " + i);
            i++;
        }
    }

    private void initAdapter() {

        recyclerViewAdapter = new RecyclerViewAdapter(rowsArrayList);
        recyclerView.setAdapter(recyclerViewAdapter);
    }

    private void initScrollListener() {
        recyclerView.addOnScrollListener(new RecyclerView.OnScrollListener() {
            @Override
            public void onScrollStateChanged(@NonNull RecyclerView recyclerView, int newState) {
                super.onScrollStateChanged(recyclerView, newState);
            }

            @Override
            public void onScrolled(@NonNull RecyclerView recyclerView, int dx, int dy) {
                super.onScrolled(recyclerView, dx, dy);

                LinearLayoutManager linearLayoutManager = (LinearLayoutManager) recyclerView.getLayoutManager();

                if (!isLoading) {
                //Nếu item cuối cùng của layout = với giá trị cuối của recycleView thì ta gọi hàm LoadMore
                    if (linearLayoutManager != null && linearLayoutManager.findLastCompletelyVisibleItemPosition() == rowsArrayList.size() - 1) {
                        //bottom of list!
                        loadMore();
                        isLoading = true;
                    }
                }
            }
        });


    }

    private void loadMore() {
        rowsArrayList.add(null);
        recyclerViewAdapter.notifyItemInserted(rowsArrayList.size() - 1);


        Handler handler = new Handler();
        handler.postDelayed(new Runnable() {
            @Override
            public void run() {
                rowsArrayList.remove(rowsArrayList.size() - 1);
                int scrollPosition = rowsArrayList.size();
                recyclerViewAdapter.notifyItemRemoved(scrollPosition);
                int currentSize = scrollPosition;
                int nextLimit = currentSize + 10;

                while (currentSize - 1 < nextLimit) {
                    rowsArrayList.add("Item " + currentSize);
                    currentSize++;
                }

                recyclerViewAdapter.notifyDataSetChanged();
                isLoading = false;
            }
        }, 2000);


    }
}
Ở hàm onLoadMore mình gọi list và truyền vào trong đó 1 giá trị null để adapter load itemLoading lên. Và đây là thành quả mà chúng ta làm được

OK vậy là mình đã tổng quan cho các bạn biết thuật toán loadmore , và phần kế tiếp mình sẽ giới thiệu cho các bạn cách để loadmore 2 đầu của 1 recycleView . Chúc bạn thành công !! 
All rights reserved
