Truyền Dữ liệu giữa các component trong VueJS
Bài đăng này đã không được cập nhật trong 7 năm
Truyền dữ liệu từ cha xuống con
Sử dụng Props, Props là con đường mà các component có thể nhận dữ liệu từ các component mà chứa component đó ( gọi là component cha), chúng ta cùng tìm hiểu cách sử dụng props nhé.
1. Chỉ định một prop bên trong một component
-
Khi một component mong đợi một hoặc nhiều prop, component sẽ chỉ định các prop trong thuộc tính props của nó
Vue.component('user-name',  {
    props: ['name'],
    template: '<p>Hi {{ name }}</p>'
})
Đối với một Vue Single File Component thì viết như thế này
<template>
    <p>{{ name }}</p>
</template>

<script>
export default  {
    props: ['name']
}
</script>
2. Chỉ định nhiều props
- Có thể mong chờ nhiều props bằng cách chỉ định một mảng các props
Vue.component('user-name',  {
    props: ['firstName', 'lastName'],
    template: '<p>Hi {{ firstName }} {{ lastName }}</p>'
})
3. Truyền props tới component
-
Nếu bạn muốn truyền một giá trị tĩnh, sử dụng cú pháp
<ComponentName prop-name ="value"/>ví dụ
<user-name firstName = "Huong" lastName = "Vuong"/> -
Nếu muốn truyền dữ liệu động - thuộc tính data của vue, bạn có thể sử dụng
<template>
    <ChildComponentName :color=color />
</template>

<script>
...
export	default	{
    //...
    data: function() {
        return {
            color: 'white'
        }
    },
    //...
}
</script>
Props là cách mà truyền dữ liệu từ cha xuống con, bất kể lúc nào cha thay đổi props, giá trị mới sẽ được gửi cho con và hiển thi ra. Chiều ngược lại là không đúng và bạn không bao giờ nên thay đổi một prop bên trong một component con
4. Ví dụ thực hành truyền dữ liệu từ component cha xuống component con sử dụng props
-
Chúng ta sẽ xây dựng một component Message (có tiêu đề và nội dung message) với template như thế này

Chúng ta sẽ không đi xây dưng template mà sẽ sử dụng luôn template component đã xây dựng sẵn của Bulma
 (https://bulma.io/documentation/components/message/) Muốn vậy trước tiên chúng ta phải cài đặt Bulma, ở đây mình sử dụng luôn cdn
<link rel="stylesheet" type="text/css" href="https://cdnjs.cloudflare.com/ajax/libs/bulma/0.7.2/css/bulma.css"> -
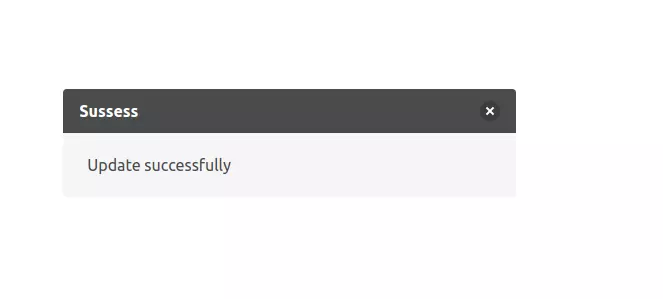
Trong HTML chúng ta muốn sử dụng một component tên là message với tiêu đề là "Success" nội dung là "Update successfully", chúng ta sẽ làm như thế này:
<!DOCTYPE html> <html lang="en"> <head> <meta charset="UTF-8"> <title></title> <link rel="stylesheet" type="text/css" href="https://cdnjs.cloudflare.com/ajax/libs/bulma/0.7.2/css/bulma.css"> <style type="text/css"> body { margin: 25% 25%; } </style> </head> <body> <div id="root"> <message title = 'Sussess' body = 'Update successfully'></message> </div> <script src="https://cdn.jsdelivr.net/npm/vue@2.5.21/dist/vue.js"></script> <script type="text/javascript" src="component-message.js"></script> </body> </html> -
Muốn sử dụng được component message như thế kia chúng ta phải đăng kí một component message với vue. Trước hết chúng ta tạo một file js component-message.js, đăng kí component Message đón nhận 2 prop title và body, và template copy từ Bulma vào

Vue.component('message', { props: ['title', 'body'], template:` <article class="message"> <div class="message-header"> <p>{{ title }}</p> <button class="delete" aria-label="delete"></button> </div> <div class="message-body"> {{ body }} </div> </article> `, }); new Vue({ el: '#root', }); -
Kết quả
-
Bây giờ muốn có message như thế nào ta chỉ cần khai báo message với title và body truyền vào tùy ý

-
Chúng ta sẽ làm cho nó hoàn chỉnh một chút nhé, khi ấn vào nút close, message sẽ tắt đi. Message ẩn hay hiện dựa vào thuộc tính visible trong data property của component (đối với component, data sẽ là function).
Chúng ta sẽ sử dụng direction "v-on: click" cho button close, viết một method "close" thay đổi giá trị visible của thuộc tính data thành false. Và cuối cùng sử dụng direction v-show ở template component và bind với visible của data.
Vue.component('message', {
    props: ['title', 'body'],
    template:`
        <article class="message" v-show = 'visible'>
          <div class="message-header">
            <p>{{ title }}</p>
            <button class="delete" aria-label="delete" @click='close'></button>
          </div>
          <div class="message-body">
            {{ body }}
          </div>
        </article>
    `,
    data() {
        return {
            visible: true
        };

    },
    methods: {
        close: function(){
            this.visible = false;
        }
    }
});
new Vue({
    el: '#root',
});
Truyền dữ liệu từ con lên cha
Sử dụng Events cho phép bạn giao tiếp từ con lên cha
-
Dùng $emit để phát một sự kiện bên trong component con
<script> export default { name: 'Car', methods: { handleClick: function() { this.$emit('clicked-something') } } } </script> -
Component cha khi include component con bên trong template của nó, có thể lắng nghe sự kiện từ component con sử dụng chỉ thị v-on
<template>
    <div>
        <Car v-on:clicked-something="handleClickInParent" />
        <!-- or -->
        <Car @clicked-something="handleClickInParent" />
    </div>
</template>

<script>
    export default {
        name: 'App',
            methods: {
                handleClickInParent: function() {
                //...
            }
        }
    }
</script>
Lưu ý: Tên của sự kiện phát ra nên để là kiểu kebab-case
-
Dĩ nhiên bạn cũng có thể truyền tham số vào cho events
<script>
export default {
    name: 'Car',
    methods: {
        handleClick: function() {
            this.$emit('clicked-something', param1, param2)
        }
    }
}
</script>
và truy xuất những biến ấy ra ở component cha:
<template>
    <div>
        <Car v-on:clicked-something="handleClickInParent" />
        <!-- or -->
        <Car @clicked-something="handleClickInParent" />
    </div>
</template>

<script>
    export default {
        name: 'App',
        methods: {
            handleClickInParent: function(param1, param2) {
            //...
            }
        }
    }
</script>
Ví dụ thực hành truyền dữ liệu từ component con lên component cha sử dụng events
-
Tương tự như ví dụ trước, chúng ta sử dụng component Modal của Bulma, ta đăng kí một global component tên là modal, với template lấy từ Bulma. File component-modal.js
Vue.component('modal', { template:` <div class="modal is-active"> <div class="modal-background"></div> <div class="modal-content"> <div class="box"> <slot></slot> </div> </div> <button class="modal-close is-large" aria-label="close"></button> </div> `, }); new Vue({ el: '#root', }); -
Bây giờ chúng ta không muốn Modal lúc nào cũng hiện ra như vậy, ta thiết kế một button, khi click thì modal hiện ra.Button này viết trong component cha, file component-modal.html.
Modal ẩn hiện dựa vào thuộc tính visible định nghĩa trong data property của component cha, sử dụng chỉ thị @click cho btn show modal, gọi đến method showModal khai báo trong component cha. Đến đây mọi thứ vẫn rất bình thường, như ví dụ trước ta đã từng làm:
file component-modal.html:
<div id="root">
    <modal v-if = 'visible'>Huong</modal>
    <button @click='showModal'>Show modal</button>
</div>
file component-modal.js:
Vue.component('modal', { template:` <div class="modal is-active"> <div class="modal-background"></div> <div class="modal-content"> <div class="box"> <slot></slot> </div> </div> <button class="modal-close is-large" aria-label="close"></button> </div> `, }); new Vue({ el: '#root', data: { visible: false, }, methods:{ showModal: function(){ this.visible = true; } }, }) -
Ta muốn khi ấn button close modal, modal sẽ đóng lại, tức là khi click vào btn của component con, ta phải giao tiếp với component cha rằng "visible của cha cho là false đi".
Như vậy ta sử dụng events, component con sử dụng $emit phát sự kiện "close", và component cha bắt sự kiện close sử dụng chỉ thị viết tắt @close.
file component-modal.js:
Vue.component('modal', {
    template:`
        <div class="modal is-active">
            <div class="modal-background"></div>
            <div class="modal-content">
                <div class="box">
                    <slot></slot>
                </div>
            </div>
            <button class="modal-close is-large" aria-label="close" @click="$emit('close')"></button>
        </div>
    `,

});

new Vue({
    el: '#root',
    data: {
        visible: false,
    },
    methods:{
        showModal: function(){
            this.visible = true;
        }
    },
});
file component-modal.html:
<div id="root">
    <modal v-if = 'visible' @close='visible = false'>Huong</modal>
    <button @click='showModal'>Show modal</button>
</div>
Lời kết:
Bài viết này mình chia sẻ cách giao tiếp giữa component cha và component con, còn giao tiếp giữa các component anh em mình xin chia sẻ trong bài viết sau.
Mình hi vọng qua bài viết này chúng ta đã hiểu được giao tiếp giữa các component là như thế nào (luồng đi), làm thế nào để giao tiếp, cũng như giao tiếp trong những tình huống nào . Mong bài viết sẽ có ích đối với các bạn.
Nguồn tham khảo: Vue Handbook
All rights reserved
