Tìm hiểu về Parse service
Bài đăng này đã không được cập nhật trong 4 năm
1. Giới thiệu
Parse service là dịch vụ đám mây đa nền tảng, được bắt đầu sử dụng từ năm 2012. Parse cung cấp các dịch vụ backend cho hầu hết các nền tảng phổ biến hiện nay: iOS, android, window phone, Mac OS,...
Về cơ bản, dịch vụ Parse cung cấp cho chúng ta các tác vụ chính sau:
-
Core: Đây là nơi chúng ta quản lý những dữ liệu đã được upload lên thông qua service của Parse: lưu trữ dữ liệu, chạy các tác vụ ngầm theo lịch, quản lý cấu hình ứng dụng với Config, sử dụng Webhooks để tương tác với server người dùng,
-
Push: gửi push notification tới các thiết bị đa nền tảng, lọc tin nhắn theo từng đối tượng khách hàng.
-
Analytics: Đây là nơi chúng ta quản lý và thống kê các thông tin về việc sử dụng service trong app: phân tích việc sử dụng dữ liệu của người dùng, phân tích việc hiệu quả của sử dụng các push notification, tìm và fix các lỗi của ứng dụng.
-
Settings: Đây là nơi lưu các keys của tất cả API. Ngoài ra, chúng ta có thể chỉnh setting cho ứng dụng của chúng ta tại đây, quản lý bảo mật, xuất dữ liệu,...
-
Docs: Đây là nơi cung cấp các tài liệu về API để chúng ta tham khảo và sử dụng trong ứng dụng
2. Demo App
Trong bài viết này, tôi xin hướng dẫn các bạn xây dựng một ứng dụng iOS đơn giản. Trong ứng dụng này, chúng ta sẽ sử dụng các API của Parse service để cho phép người dùng đăng ký tài khoản, và đăng nhập vào tài khoản đã đăng ký
2.1 Tạo Project trong xCode
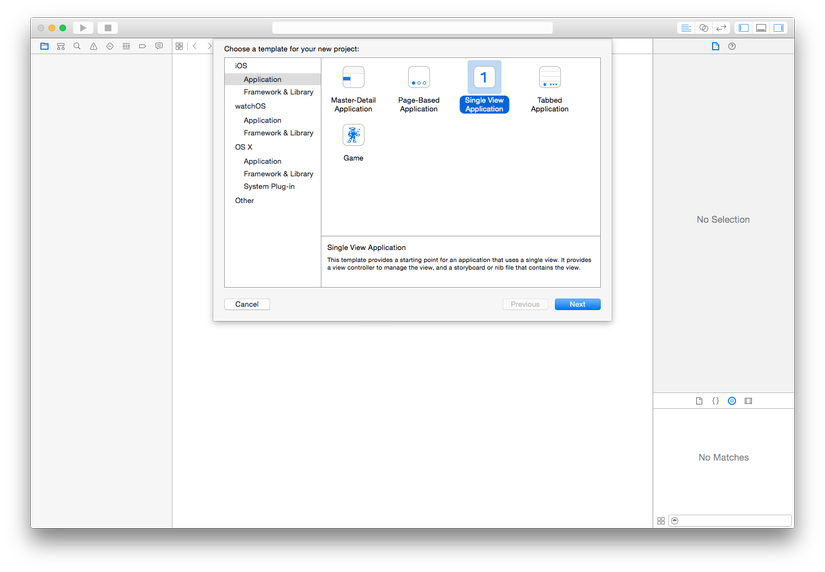
Mở xCode, chọn New project -> iOS -> Application -> Single View Application, bấm next
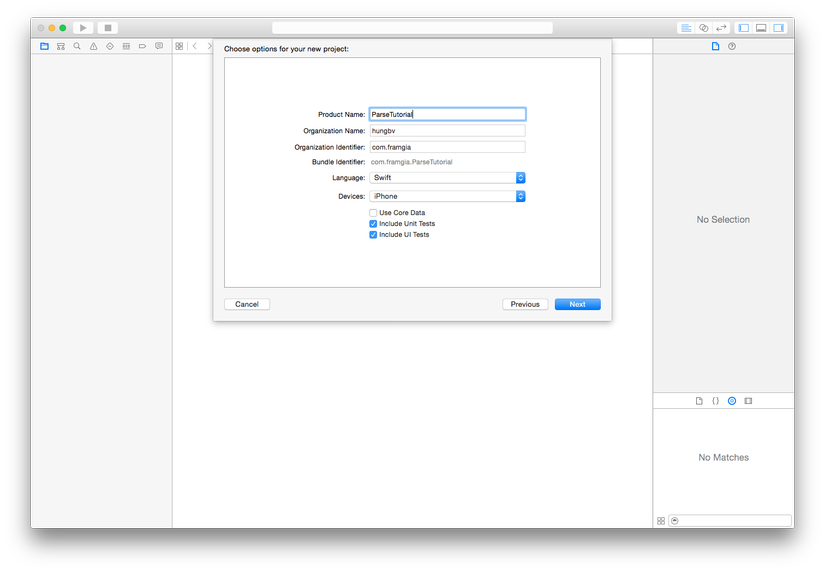
Đặt tên cho Project "ParseTutorial", chọn ngôn ngữ sử dụng là Swift, Devices là iPhone, bỏ chọn Core data, chọn vùng lưu project và tạo project
2.2 Đăng ký tài khoản Parse
Các bạn vào trang chủ của Parse theo link: https://parse.com/ và đăng ký tài khoản Parse
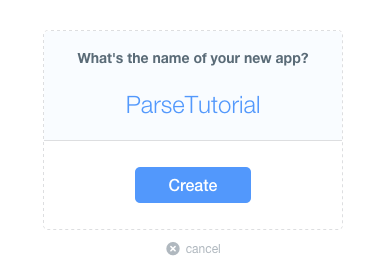
Tiếp theo, chúng ta sẽ tạo App trên Parse. Tại trang https://www.parse.com/apps, bấm vào nút "create a new App" và tạo App với tên "ParseTutorial"
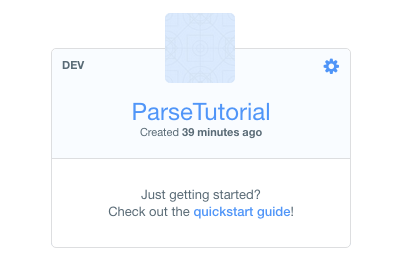
App sau khi tạo được sẽ hiển thị như sau:
2.3 Thêm Parse Framework vào ứng dụng
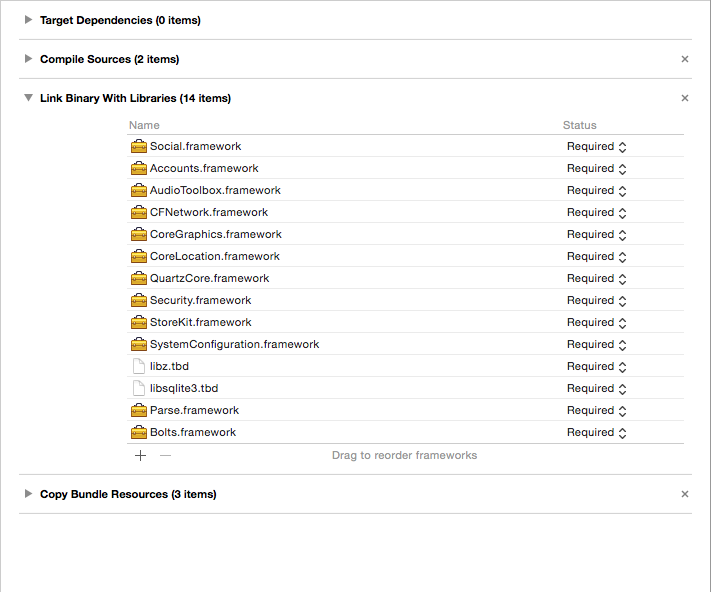
Tại App đã tạo hiển thị ở trên, bấm vào "quickStart quide" -> Data -> Mobile -> iOS -> Swift —> Existing Project. Lần lượt làm theo các bước hướng dẫn của Parse để download và tích hợp Parse Framework vào App của chúng ta
Sau khi làm theo hướng dẫn của Parse, project của chúng ta sẽ được thêm Parse Framework và các Framework như sau:
File AppDelegate.swift của chúng ta cũng có thêm đoạn code tương tự như sau:
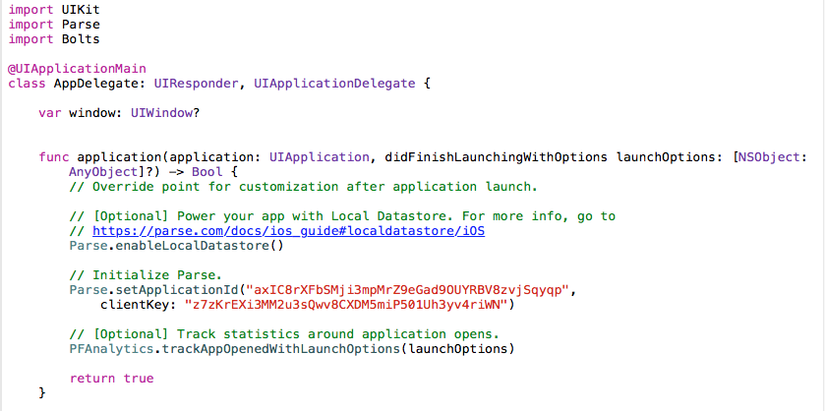
Lưu ý rằng ApplicationId và clientKey sử dụng trong appDelegate là 2 chuỗi ApplicationId và clientKey của App chúng ta. Để tìm ApplicationId và clientKey, các bạn vào setting->keys trong App của chúng ta trên Parse.com
2.4 Xây dựng giao diện cho app
Bước đầu, tạo 4 ViewController mới bằng swift: HomeViewController.swift, LoginViewController.swift, SignupViewController.swift, ResetPasswordViewController.swift
Tiếp theo, chúng ta lần lượt tạo các UIViewController cho 4 ViewController trong storyboard; rồi lần lượt tạo các views: label, textfield, button; chỉnh Layout và tạo Outlet cho các views đã tạo như sau:
- HomeViewController: đặt làm rootViewController, UIViewController gồm 1 UILabel để hiển thị tên người dùng đã login, và 1 UIButton để thực hiện việc logout khi click vào.
    @IBOutlet weak var helloUserLabel: UILabel!

    @IBAction func onLogoutButtonClicked(sender: AnyObject) {
    }
- LoginViewController: trong UIViewController gồm 2 UITextField để người dùng điền username và password, và 3 UIButton để người dùng sử dụng trong các trường hợp: đăng nhập, quên tài khoản, đăng ký. Với các UIButton quên tài khoản và đăng ký, chúng ta tạo các modal present tới các UIViewController SignupViewController và ResetPasswordViewController. Nối modal segue từ HomeViewController sang LoginViewController, đặt identifier cho Segue là HomeToLoginSegue
    @IBOutlet weak var usernameTextField: UITextField!
    @IBOutlet weak var passwordTextField: UITextField!

    @IBAction func onLoginButtonClicked(sender: AnyObject) {
    }
- SignupViewController: gồm 3 UITextField để người dùng nhập lần lượt email, username và password, 1 UIButton để người dùng thực hiện sign up và 1 UIButton để người dùng đóng trang signup để trở lại trang đăng nhập
    @IBOutlet weak var emailTextField: UITextField!
    @IBOutlet weak var usernameTextField: UITextField!
    @IBOutlet weak var passwordTextField: UITextField!

    @IBAction func onSignupButtonClicked(sender: AnyObject) {
    }

    @IBAction func onCloseButtonClicked(sender: AnyObject) {
    }
- ResetPasswordViewController: Gồm 1 UITextField để người dùng nhập email request đổi password, 1 UIButton để người dùng thực hiện gửi request đổi password, và 1 UIButton để người dùng trở lại màn login
    @IBOutlet weak var emailTextField: UITextField!

    @IBAction func onResetPasswordClicked(sender: AnyObject) {
    }

    @IBAction func onCloseButtonClicked(sender: AnyObject) {
    }
Storyboard cuối cùng sẽ giống như sau:
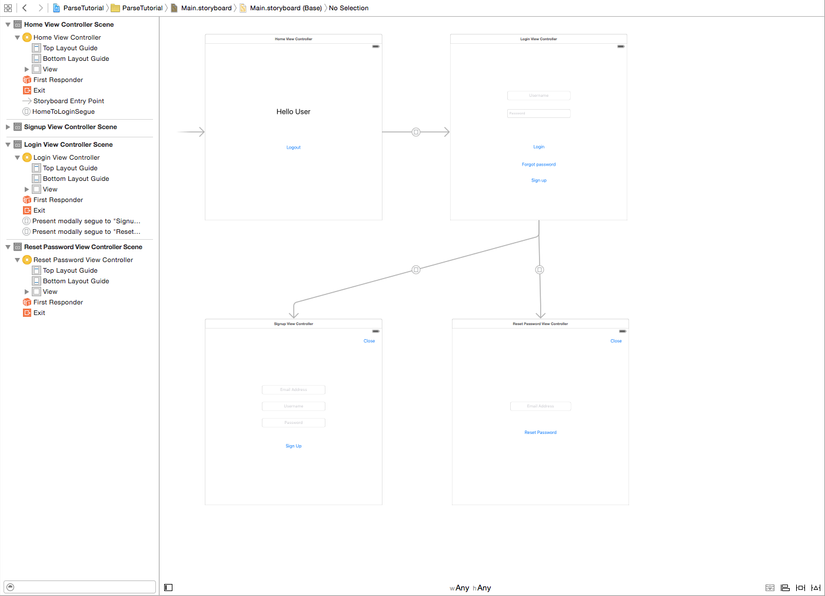
Sau khi tạo xong các ViewController, xây dựng các view, tạo Outlet và action cho các view, chúng ta chuyển sang bước tiếp theo: implement các tính năng
Lưu ý: Trong bài viết này, chúng ta tập chung vào việc tìm hiểu các tính năng của Parse service, vì vậy tôi chỉ tạo giao diện cho hết sức cơ bản
2.5 Implement các chức năng cho App
Đầu tiên, mở file HomeViewController.swift, import Parse:
import Parse
trong hàm viewWillAppear, thêm đoạn code sau để tự động chuyển sang màn login khi người dùng chưa đăng nhập hoặc hiện tên người đã đăng nhập
    override func viewWillAppear(animated: Bool) {
        super.viewWillAppear(animated)

        if (PFUser.currentUser() == nil) {
            dispatch_async(dispatch_get_main_queue(), { () -> Void in
                self.performSegueWithIdentifier("HomeToLoginSegue", sender: self)
            })
        } else if let pUserName = PFUser.currentUser()?["username"] as? String {
            self.helloUserLabel.text = "Hello " + pUserName
        }
    }
Thêm đoạn code sau trong hàm onLogoutButtonClicked để xử lý khi người dùng đăng xuất
    @IBAction func onLogoutButtonClicked(sender: AnyObject) {
        PFUser.logOut()
        dispatch_async(dispatch_get_main_queue(), { () -> Void in
            self.performSegueWithIdentifier("HomeToLoginSegue", sender: self)
        })
    }
Tiếp theo, chúng ta chuyển sang file LoginViewController.swift, import Parse:
import Parse
Do 2 nút "forgot password" và "sign up" đã được thêm segue, nên tại màn này chúng ta chỉ phải sử lý action khi người dùng đăng nhập. Thêm đoạn code sau để xử lý đăng nhập:
    @IBAction func onLoginButtonClicked(sender: AnyObject) {
        let username = usernameTextField.text!
        let password = passwordTextField.text!

        if (username.characters.count == 0 || password.characters.count == 0) {
            let alertView = UIAlertView(title: "Invalid", message: "Please fill all username and password", delegate: nil, cancelButtonTitle: "OK")
            alertView.show()
        } else {
            PFUser.logInWithUsernameInBackground(username, password: password, block: { (user, error) -> Void in
                if ((user) != nil ) {
                    self.dismissViewControllerAnimated(true, completion: nil)
                } else {
                    let alert = UIAlertView(title: "Error", message: "\(error)", delegate: nil, cancelButtonTitle: "OK")
                    alert.show()
                }
            })
        }
    }
Bây giờ, chúng ta chuyển sang file SignupViewController.swift để implement các chức năng của màn này. Trong màn này, chúng ta cần xử lý khi người dùng bấm vào nút "Sign up" để đăng ký và bấm vào nút "close" để trở về màn login.
Import Parse framework
import Parse
xử lý khi người dùng bấm vào nút close:
    @IBAction func onCloseButtonClicked(sender: AnyObject) {
        dismissViewControllerAnimated(true, completion: nil)
    }
xử lý khi người dùng đăng ký:
    @IBAction func onSignupButtonClicked(sender: AnyObject) {
        let email = emailTextField.text!
        let username = usernameTextField.text!
        let password = passwordTextField.text!

        let finalEmail = email.stringByTrimmingCharactersInSet(NSCharacterSet.whitespaceCharacterSet())

        if (email.characters.count == 0 || username.characters.count == 0 || password.characters.count == 0) {
            let alert = UIAlertView(title: "Invalid", message: "Please fill all fields to create account", delegate: nil, cancelButtonTitle: "OK")
            alert.show()
        } else {
            let newUser = PFUser()

            newUser.username = username
            newUser.password = password
            newUser.email = finalEmail

            newUser.signUpInBackgroundWithBlock({ (succeed, error) -> Void in
                if((error) != nil) {
                    let alert = UIAlertView(title: "Error", message: "\(error)", delegate: self, cancelButtonTitle: "OK")
                    alert.show()
                } else {
                    dispatch_async(dispatch_get_main_queue(), { () -> Void in
                        self.presentingViewController?.presentingViewController?.dismissViewControllerAnimated(true, completion: nil)
                    })
                }
            })
        }

    }
Cuối cùng, chúng ta mở file ResetPasswordViewController.swift, import Parse framework
import Parse
Xử lý khi người dùng bấm nút close
    @IBAction func onCloseButtonClicked(sender: AnyObject) {
        dismissViewControllerAnimated(true, completion: nil)
    }
Xử lý khi người dùng gửi request để reset password
    @IBAction func onResetPasswordClicked(sender: AnyObject) {
        let email = emailTextField.text
        let finalEmail = email!.stringByTrimmingCharactersInSet(NSCharacterSet.whitespaceCharacterSet())

        PFUser.requestPasswordResetForEmailInBackground(finalEmail)

        let alert = UIAlertView(title: "Password Reset", message: "An email containing information on how to reset your password has been sent to " + finalEmail + ".", delegate: self, cancelButtonTitle: "OK")
        alert.show()
    }
Build và chạy thử app, nếu không có vấn đề gì sảy ra thì app của chúng ta đã hoàn thành, người dùng có thể đăng nhập, đăng ký, đăng xuất và gửi request đổi password tới Parse service. Tất nhiên vì đây chỉ là app demo cho việc áp dụng Parse service, nên giao diện rất đơn giản và các trường hợp bắt lỗi cũng rất sơ sài, mong các bạn không quá để tâm đến vấn đề này
3. Kết luận
Qua bài viết này, tôi đã giới thiệu đến các bạn Parse service, một service rất tiện lợi cho các lập trình viên sử dụng với các ứng dụng yêu cầu request backend đơn giản. Với ứng dụng demo đơn giản bên trên, hi vọng bài viết sẽ giúp ích cho các bạn bước đầu tìm hiểu về Parse service. Các bạn có thể download source code của app demo bên trên tại đây
Cuối cùng, xin cảm ơn các bạn đã theo dõi bài viết này !!!
All rights reserved