Tìm hiểu về intent trong Android
Bài đăng này đã không được cập nhật trong 4 năm
TÌM HIỂU VỀ INTENT TRONG ANDROID
Intent là hạt nhân trong Android, nó rất quan trọng. Hầu như mọi hoạt động trong Android đều có dấu ấn của Intent. Sử dụng Intent để chuyển qua chuyển lại giữa các màn hình.
Sau đây mình làm 1 ví dụ đơn giản là từ 1 Activity khi mình click vào button KetQua thì sẽ chuyển qua 1 Activity khác, và tại Activity này khi click vào nút Back thì sẽ đóng Activity đó.
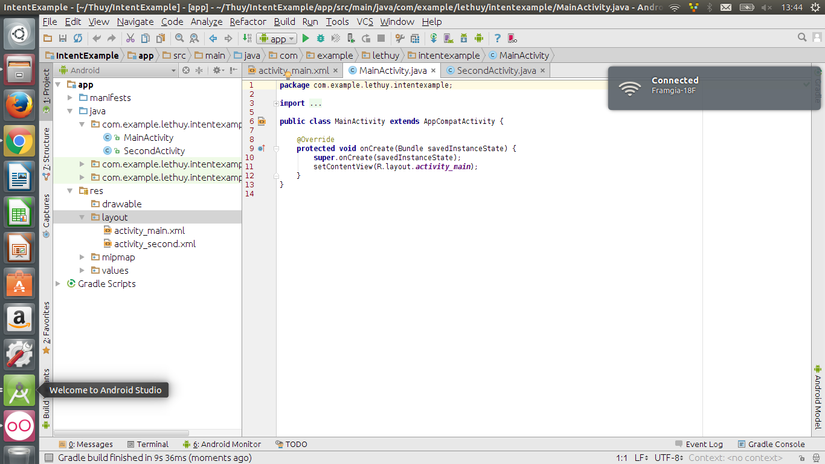
- Bước 1. Tạo Project có 2 Activity với cấu trúc như sau.

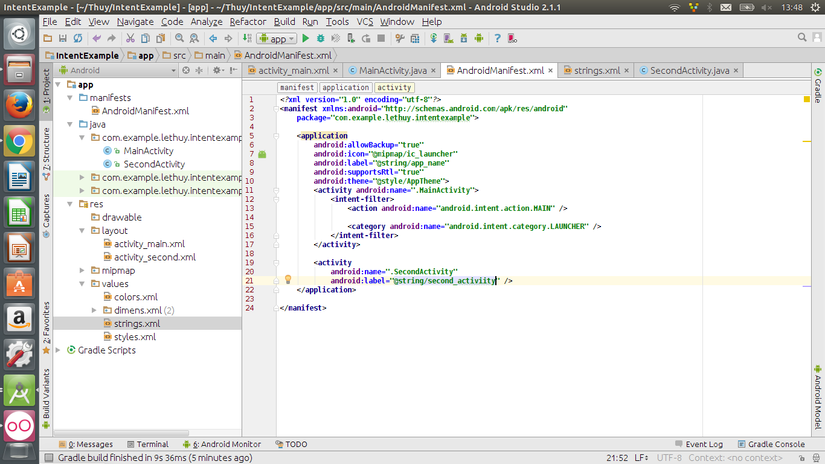
- Bước 2. Các bạn chú ý cấu hình trong AndroidManifest.xml như sau.

-
Bước 3. Xây dựng giao diện và xử lý code trong MainActivity.
Như đã nói ở trên, màn hình chính chỉ đơn giản có 1 dòng text và 1 nút Next để chuyển sang Activity mới.
<?xml version="1.0" encoding="utf-8"?>
<LinearLayout xmlns:android="http://schemas.android.com/apk/res/android"
    xmlns:tools="http://schemas.android.com/tools"
    android:id="@+id/LinearLayout1"
    android:layout_width="match_parent"
    android:layout_height="match_parent"
    android:orientation="vertical"
    tools:context=".MainActivity" >
    <TextView
        android:id="@+id/textView1"
        android:layout_width="wrap_content"
        android:layout_height="wrap_content"
        android:layout_gravity="center"
        android:background="#008040"
        android:gravity="center"
        android:text="Giải phương trình bậc 1"
        android:textSize="25sp"
        android:textColor="#FFFF00"
        android:layout_marginTop="10dp"
        />
    <TableLayout
        android:layout_width="match_parent"
        android:layout_height="wrap_content"
        android:stretchColumns="*"
        >
        <TableRow
            android:id="@+id/tableRow1"
            android:layout_width="wrap_content"
            android:layout_height="wrap_content" >
            <TextView
                android:id="@+id/textView2"
                android:layout_width="wrap_content"
                android:layout_height="wrap_content"
                android:background="#E5E5E5"
                android:text="Nhập a:" />
            <EditText
                android:id="@+id/txta"
                android:layout_width="wrap_content"
                android:layout_height="wrap_content"
                android:inputType="text"
                android:ems="10" >
                <requestFocus />
            </EditText>
        </TableRow>
        <TableRow
            android:id="@+id/tableRow2"
            android:layout_width="wrap_content"
            android:layout_height="wrap_content" >
            <TextView
                android:id="@+id/textView3"
                android:layout_width="wrap_content"
                android:layout_height="wrap_content"
                android:background="#E5E5E5"
                android:text="Nhập b:" />
            <EditText
                android:id="@+id/txtb"
                android:layout_width="wrap_content"
                android:layout_height="wrap_content"
                android:inputType="text"
                android:ems="10" />
        </TableRow>
        <TableRow
            android:id="@+id/tableRow3"
            android:layout_width="wrap_content"
            android:layout_height="wrap_content"
            >
            <Button
                android:id="@+id/btnketqua"
                android:layout_width="wrap_content"
                android:layout_height="wrap_content"
                android:layout_column="1"
                android:text="Kết quả" />
        </TableRow>
    </TableLayout>
</LinearLayout>
tiến hành xử lý code trong file java
public class MainActivity extends AppCompatActivity {

    EditText mEdtA, mEdtB;
    Button mBtnKetQua;

    protected void onCreate(Bundle savedInstanceState) {
        super.onCreate(savedInstanceState);
        setContentView(R.layout.activity_main);
        mEdtA = (EditText) findViewById(R.id.txta);
        mEdtB = (EditText) findViewById(R.id.txtb);
        mBtnKetQua = (Button) findViewById(R.id.btnketqua);
        mBtnKetQua.setOnClickListener(new View.OnClickListener() {
            public void onClick(View arg0) {
                //Tạo Intent để mở SecondAcitvity
                Intent myIntent = new Intent(MainActivity.this, SecondActivity.class);
                //Khai báo Bundle
                Bundle bundle = new Bundle();
                int a = Integer.parseInt(mEdtA.getText().toString());
                int b = Integer.parseInt(mEdtB.getText().toString());
                //đưa dữ liệu riêng lẻ vào Bundle
                bundle.putInt("soA", a);
                bundle.putInt("soB", b);
                //Đưa Bundle vào Intent
                myIntent.putExtra("MyPackage", bundle);
                //Mở Activity SecondAcitvity
                startActivity(myIntent);
            }
        });
    }
}
Các bạn quan sát hàm openSecondActivity() với 2 dòng lệnh trong hàm chúng ta sẽ chuyển từ Activity hiện tại sang SecondActivity.
- Bước 4. Xây dựng giao diện và xử lý code ở SecondActivity
<?xml version="1.0" encoding="utf-8"?>
<LinearLayout xmlns:android="http://schemas.android.com/apk/res/android"
    xmlns:tools="http://schemas.android.com/tools"
    android:id="@+id/LinearLayout1"
    android:layout_width="match_parent"
    android:layout_height="match_parent"
    android:orientation="vertical"
    tools:context=".SecondActivity">

    <TextView
        android:id="@+id/textView1"
        android:layout_width="wrap_content"
        android:layout_height="wrap_content"
        android:layout_gravity="center_horizontal"
        android:layout_marginTop="10dp"
        android:background="#008040"
        android:gravity="center"
        android:text="Kết quả giải phương trình bậc 1"
        android:textColor="#FFFF00"
        android:textSize="25sp" />

    <TextView
        android:id="@+id/txtketqua"
        android:layout_width="match_parent"
        android:layout_height="50sp"
        android:background="#CCFFD9"
        android:gravity="center" />

    <Button
        android:id="@+id/btnBack"
        android:layout_width="wrap_content"
        android:layout_height="wrap_content"
        android:layout_gravity="center"
        android:text="Back" />
</LinearLayout>
và đây là code của SecondActivity
public class SecondActivity extends Activity {
    TextView mTxtKetQua;
    Button mBtnBack;
    protected void onCreate(Bundle savedInstanceState) {
        super.onCreate(savedInstanceState);
        setContentView(R.layout.activity_second);
        mBtnBack=(Button) findViewById(R.id.btnBack);
        mTxtKetQua=(TextView) findViewById(R.id.txtketqua);
        //lấy intent gọi Activity này
        Intent callerIntent=getIntent();
        //có intent rồi thì lấy Bundle dựa vào MyPackage
        Bundle packageFromCaller=
                callerIntent.getBundleExtra("MyPackage");
        //Có Bundle rồi thì lấy các thông số dựa vào soa, sob
        int a=packageFromCaller.getInt("soa");
        int b=packageFromCaller.getInt("sob");
        //tiến hành xử lý
        giaipt(a, b);
        mBtnBack.setOnClickListener(new View.OnClickListener() {
            public void onClick(View v) {
                finish();
            }
        });
    }
    public void giaipt(int a,int b)
    {
        String kq="";
        if(a==0 && b==0)
        {
            kq="Vô số nghiệm";
        }
        else if(a==0 && b!=0)
        {
            kq="Vô nghiệm";
        }
        else
        {
            DecimalFormat dcf=new DecimalFormat("0.##");
            kq=dcf.format(-b*1.0/a);
        }
        mTxtKetQua.setText(kq);
    }
}
trong sự kiện click của button back chúng ta thực hiện đóng Activity hiện tại.
Như vậy, tôi đã giới thiệu đến các bạn một ví dụ đơn giản khi sử dụng Intent để truyền dữ liệu.
Chúc các bạn code vui vẻ!!! ^_^
All rights reserved