Tìm hiểu về FreeIPA
Bài đăng này đã không được cập nhật trong 4 năm
1. Trước tiên, chúng ta đi tìm hiểu thế nào là FreeIPA
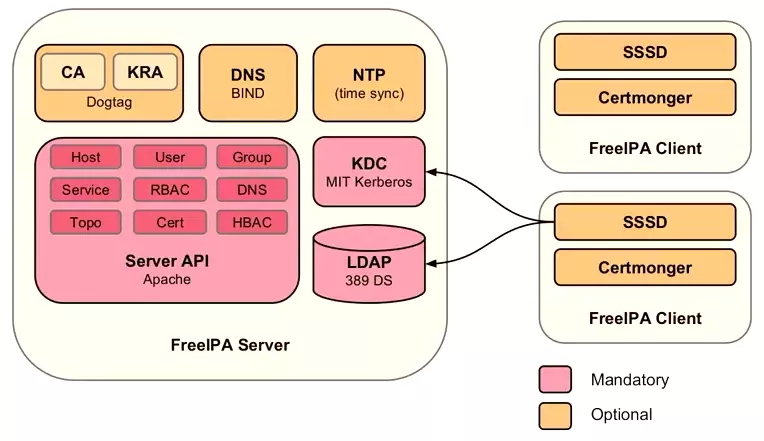
FreeIPA là giải pháp quản lý thông tin bảo mật tích hợp kết hợp với Linux (Fedora), 389 Directory Server, MIT Kerberos, NTP, DNS, Dogtag (Hệ thống Certificate). Nó bao gồm một giao diện web và các công cụ quản trị dòng lệnh.
FreeIPA là một giải pháp nhận dang (Identity) và xác thực (Authentication) tích hợp cho các môi trường mạng Linux / UNIX. Một máy chủ FreeIPA cung cấp thông tin xác thực, ủy quyền và thông tin tài khoản tập trung bằng cách lưu trữ dữ liệu về người dùng, nhóm, máy chủ và các đối tượng khác cần thiết để quản lý.
FreeIPA được xây dựng dựa trên top các thành phần mã nguồn mở nổi tiếng và các giao thức chuẩn với sự tập trung mạnh vào việc dễ dàng quản lý và tự động tác vụ cài đặt và cấu hình.
Nhiều máy chủ FreeIPA có thể dễ dàng được cấu hình trong một Domain FreeIPA để cung cấp sự dư thừa và khả năng mở rộng. 389 Directory Server là nơi lưu trữ chính và cung cấp cơ sở hạ tầng cho LDAPv3. Xác thực một lần đăng nhập được cung cấp qua MIT Kerberos KDC. Khả năng xác thực được tăng cường bởi một Certificate Authority dựa trên dự án Dogtag. Tên miền có thể được quản lý bằng cách sử dụng ISC Bind.
2. Tại sao sử dụng FreeIPA
Để tăng hiệu quả, và giảm thiểu rủi ro, các tổ chức cần quản lý tập trung và tương quan các thông tin bảo mật quan trọng bao gồm:
- Identity (máy, người sử dụng, máy ảo, nhóm, ủy nhiệm xác thực)
- Policy (kiểm soát truy cập dựa trên máy chủ lưu trữ)
- Audit
Vì tầm quan trọng sống còn của nó và cách nó có mối quan hệ với nhau nên thông tin nhận dạng (identity), chính sách (policy) và thông tin kiểm toán (audit) nên được mở, tương tác và dễ quản lý. Trọng tâm là làm cho bản sắc, chính sách và kiểm toán dễ dàng quản lý tập trung cho thế giới Linux và Unix. Tất nhiên sẽ cần phải hợp tác tốt với Windows và nhiều hơn nữa.
-
Tập trung vào việc giải quyết việc quản lý nhận dạng trên toàn doanh nghiệp cung cấp một giải pháp mã nguồn mở đáng tin cậy cho các giải pháp hiện có
-
Người bán hàng tập trung vào các vấn đề quản lý nhận dạng Web có nghĩa là các giải pháp phát triển kém hơn để quản lý trung tâm thông tin bảo mật quan trọng của thế giới Linux và Unix
-
Các sản phẩm bảo mật độc quyền không dễ dàng cung cấp truy cập vào các thông tin bảo mật quan trọng mà họ thu thập hoặc quản lý. Điều này làm cho việc đồng bộ hóa và phân tích có hiệu quả trở nên khó khăn.
-
Open có nghĩa là thông tin không được giữ lại như một giá trị gia tăng độc quyền nhưng thay vào đó có sẵn cho các nhà cung cấp và ứng dụng thông qua các tiêu chuẩn khi có thể, nhưng luôn luôn thông qua các giao thức có tài liệu và công khai có sẵn. Nó cũng có nghĩa là phát triển các giải pháp nguồn mở và một cộng đồng nguồn mở.
-
Interoperable có nghĩa là các hệ thống lưu trữ hoặc quản lý thông tin nhận dạng, chính sách và kiểm toán phải cung cấp tính tương thích ngược với các hệ thống và giao thức hiện tại, cho rằng cơ sở hạ tầng và hệ thống sẽ luôn luôn không đồng nhất và cung cấp các giải pháp giúp các hệ thống không đồng nhất làm việc cùng nhau hơn là buộc quá trình di chuyển sang một Nền tảng hoặc công nghệ.
-
Manageable có nghĩa là các hệ thống quản lý thông tin này phải dễ quản lý (nghĩa là không yêu cầu máy chủ trung tâm) và phải tuân theo nguyên tắc trợ giúp trao quyền cho các cá nhân bằng cách cho phép phân quyền hành chính đến các quyền ở mức thấp nhất có thể trong một tổ chức.
3. Cài đặt và sử dụng
3.1. Chuẩn bị:
- 1 server IPA admin
- 1 hoặc nhiều server IPA client
3.2. Cài đặt server IPA admin:
Bài viết này mình sẽ dựng IPA trên server Centos.
-
Set hostname for server /etc/hosts
192.168.13.209 ipa.cuongtv.cf ipa -
Install main package
# yum install -y ipa-server bind bind-dyndb-ldap -
Install ipa server
# ipa-server-install
Trick: if you have problem with DNS resolve, you can install ipa server with ipa-server-install --allow-zone-overlap. It can create new dns nameserver in local.
And you will asked to setup DNS, server host name, password Directory Manager, password IPA admin and DNS forwarder. Like this
The log file for this installation can be found in /var/log/ipaserver-install.log
==============================================================================
This program will set up the IPA Server.

This includes:
  * Configure a stand-alone CA (dogtag) for certificate management
  * Configure the Network Time Daemon (ntpd)
  * Create and configure an instance of Directory Server
  * Create and configure a Kerberos Key Distribution Center (KDC)
  * Configure Apache (httpd)

To accept the default shown in brackets, press the Enter key.

WARNING: conflicting time&date synchronization service 'chronyd' will be disabled
in favor of ntpd

Do you want to configure integrated DNS (BIND)? [no]: yes

Existing BIND configuration detected, overwrite? [no]: yes
Enter the fully qualified domain name of the computer
on which you're setting up server software. Using the form
<hostname>.<domainname>
Example: master.example.com.


Server host name [ipaserver.example.com]: ipa.cuongtv.cf

Warning: skipping DNS resolution of host ipaserver.example.com
The domain name has been determined based on the host name.

Please confirm the domain name [example.com]: cuongtv.cf

The kerberos protocol requires a Realm name to be defined.
This is typically the domain name converted to uppercase.

Please provide a realm name [EXAMPLE.COM]: CUONGTV.CF
Certain directory server operations require an administrative user.
This user is referred to as the Directory Manager and has full access
to the Directory for system management tasks and will be added to the
instance of directory server created for IPA.
The password must be at least 8 characters long.

Directory Manager password: xxxxx
Password (confirm): xxxxx

The IPA server requires an administrative user, named 'admin'.
This user is a regular system account used for IPA server administration.

IPA admin password: xxxx
Password (confirm): xxxx

Do you want to configure DNS forwarders? [yes]: yes
Enter the IP address of DNS forwarder to use, or press Enter to finish.
Enter IP address for a DNS forwarder: 8.8.8.8
DNS forwarder 8.8.8.8 added
Enter IP address for a DNS forwarder:
Do you want to configure the reverse zone? [yes]: yes
Please specify the reverse zone name [1.168.192.in-addr.arpa.]: 1.168.192.in-addr.arpa.
Using reverse zone 1.168.192.in-addr.arpa.

The IPA Master Server will be configured with:
Hostname:      ipa.cuongtv.cf
IP address:    192.168.13.209
Domain name:   cuongtv.cf
Realm name:    CUONGTV.CF

BIND DNS server will be configured to serve IPA domain with:
Forwarders:    8.8.8.8
Reverse zone:  1.168.192.in-addr.arpa.

Continue to configure the system with these values? [no]: yes

The following operations may take some minutes to complete.
Please wait until the prompt is returned.

Configuring NTP daemon (ntpd)
  [1/4]: stopping ntpd
  [2/4]: writing configuration
  [3/4]: configuring ntpd to start on boot
  [4/4]: starting ntpd
Done configuring NTP daemon (ntpd).
Configuring directory server (dirsrv): Estimated time 1 minute
  [1/38]: creating directory server user
  [2/38]: creating directory server instance
  [3/38]: adding default schema
  [4/38]: enabling memberof plugin
  [5/38]: enabling winsync plugin
  [6/38]: configuring replication version plugin
  [7/38]: enabling IPA enrollment plugin
  [8/38]: enabling ldapi
  [9/38]: configuring uniqueness plugin
  [10/38]: configuring uuid plugin
  [11/38]: configuring modrdn plugin
  [12/38]: configuring DNS plugin
  [13/38]: enabling entryUSN plugin
  [14/38]: configuring lockout plugin
  [15/38]: creating indices
  [16/38]: enabling referential integrity plugin
  [17/38]: configuring certmap.conf
  [18/38]: configure autobind for root
  [19/38]: configure new location for managed entries
  [20/38]: configure dirsrv ccache
  [21/38]: enable SASL mapping fallback
  [22/38]: restarting directory server
  [23/38]: adding default layout
  [24/38]: adding delegation layout
  [25/38]: creating container for managed entries
  [26/38]: configuring user private groups
  [27/38]: configuring netgroups from hostgroups
  [28/38]: creating default Sudo bind user
  [29/38]: creating default Auto Member layout
  [30/38]: adding range check plugin
  [31/38]: creating default HBAC rule allow_all
  [32/38]: initializing group membership
  [33/38]: adding master entry
  [34/38]: configuring Posix uid/gid generation
  [35/38]: adding replication acis
  [36/38]: enabling compatibility plugin
  [37/38]: tuning directory server
  [38/38]: configuring directory to start on boot
Done configuring directory server (dirsrv).
Configuring certificate server (pki-tomcatd): Estimated time 3 minutes 30 seconds
  [1/22]: creating certificate server user
  [2/22]: configuring certificate server instance
  [3/22]: stopping certificate server instance to update CS.cfg
  [4/22]: disabling nonces
  [5/22]: set up CRL publishing
  [6/22]: starting certificate server instance
  [7/22]: creating RA agent certificate database
  [8/22]: importing CA chain to RA certificate database
  [9/22]: fixing RA database permissions
  [10/22]: setting up signing cert profile
  [11/22]: set certificate subject base
  [12/22]: enabling Subject Key Identifier
  [13/22]: enabling CRL and OCSP extensions for certificates
  [14/22]: setting audit signing renewal to 2 years
  [15/22]: configuring certificate server to start on boot
  [16/22]: restarting certificate server
  [17/22]: requesting RA certificate from CA
  [18/22]: issuing RA agent certificate
  [19/22]: adding RA agent as a trusted user
  [20/22]: configure certificate renewals
  [21/22]: configure Server-Cert certificate renewal
  [22/22]: Configure HTTP to proxy connections
Done configuring certificate server (pki-tomcatd).
Configuring Kerberos KDC (krb5kdc): Estimated time 30 seconds
  [1/10]: adding sasl mappings to the directory
  [2/10]: adding kerberos container to the directory
  [3/10]: configuring KDC
  [4/10]: initialize kerberos container
  [5/10]: adding default ACIs
  [6/10]: creating a keytab for the directory
  [7/10]: creating a keytab for the machine
  [8/10]: adding the password extension to the directory
  [9/10]: starting the KDC
  [10/10]: configuring KDC to start on boot
Done configuring Kerberos KDC (krb5kdc).
Configuring kadmin
  [1/2]: starting kadmin
  [2/2]: configuring kadmin to start on boot
Done configuring kadmin.
Configuring ipa_memcached
  [1/2]: starting ipa_memcached
  [2/2]: configuring ipa_memcached to start on boot
Done configuring ipa_memcached.
Configuring ipa-otpd
  [1/2]: starting ipa-otpd
  [2/2]: configuring ipa-otpd to start on boot
Done configuring ipa-otpd.
Configuring the web interface (httpd): Estimated time 1 minute
  [1/14]: setting mod_nss port to 443
  [2/14]: setting mod_nss password file
  [3/14]: enabling mod_nss renegotiate
  [4/14]: adding URL rewriting rules
  [5/14]: configuring httpd
  [6/14]: setting up ssl
  [7/14]: setting up browser autoconfig
  [8/14]: publish CA cert
  [9/14]: creating a keytab for httpd
  [10/14]: clean up any existing httpd ccache
  [11/14]: configuring SELinux for httpd
  [12/14]: configure httpd ccache
  [13/14]: restarting httpd
  [14/14]: configuring httpd to start on boot
Done configuring the web interface (httpd).
Applying LDAP updates
Restarting the directory server
Restarting the KDC
Restarting the certificate server
Configuring DNS (named)
  [1/11]: adding DNS container
  [2/11]: setting up our zone
  [3/11]: setting up reverse zone
  [4/11]: setting up our own record
  [5/11]: setting up records for other masters
  [6/11]: setting up CA record
  [7/11]: setting up kerberos principal
  [8/11]: setting up named.conf
  [9/11]: restarting named
  [10/11]: configuring named to start on boot
  [11/11]: changing resolv.conf to point to ourselves
Done configuring DNS (named).

Global DNS configuration in LDAP server is empty
You can use 'dnsconfig-mod' command to set global DNS options that
would override settings in local named.conf files

Restarting the web server
==============================================================================
Setup complete

Next steps:
        1. You must make sure these network ports are open:
                TCP Ports:
                  * 80, 443: HTTP/HTTPS
                  * 389, 636: LDAP/LDAPS
                  * 88, 464: kerberos
                  * 53: bind
                UDP Ports:
                  * 88, 464: kerberos
                  * 53: bind
                  * 123: ntp

        2. You can now obtain a kerberos ticket using the command: 'kinit admin'
           This ticket will allow you to use the IPA tools (e.g., ipa user-add)
           and the web user interface.

Be sure to back up the CA certificate stored in /root/cacert.p12
This file is required to create replicas. The password for this
file is the Directory Manager password
- Cấu hình Firewall add những service cần thiết
# firewall-cmd --permanent --add-service={ntp,http,https,ldap,ldaps,kerberos,kpasswd,dns}
success
# firewall-cmd --reload
success
Và chúng ta có thể truy cập vào web GUI với link dưới đây https://192.168.13.209 và nó sẽ redirect tới https://ipa.cuongtv.cf/ipa/ui
FreeIPA sẽ tạo 1 account administrator. Để xác thực với admin, ta dùng lệnh
$ kinit admin
Password for admin@CUONGTV.CF:
Và sau đó, ta truy cập vào link trên để login với user admin.
3.3 Cài đặt IPA client trên server client
-
Đổi tên ipa-client.cuongtv.cf
# hostname ipa-client.cuongtv.cf -
Check Hostname
# vim /etc/hostname
ipa-client.cuongtv.cf

# vim /etc/ho
192.168.13.210 ipa-client.cuongtv.cf ipa-client
192.168.13.209 ipa.cuongtv.cf ipa
-
Install Bind
# yum install bind-utils -
Install package
# yum install freeipa-client -
Install client (tạo folder home cho usser)
# ipa-client-install --mkhomedir
DNS discovery failed to determine your DNS domain
Provide the domain name of your IPA server (ex: example.com): ipa.cuongtv.cf
Provide your IPA server name (ex: ipa.example.com): ipa.cuongtv.cf
The failure to use DNS to find your IPA server indicates that your resolv.conf file is not properly configured.
Autodiscovery of servers for failover cannot work with this configuration.
If you proceed with the installation, services will be configured to always access the discovered server for all operations and will not fail over to other servers in case of failure.
Proceed with fixed values and no DNS discovery? [no]: yes
Client hostname: ipa-client.cuongtv.cf
Realm: CUONGTV.CF
DNS Domain: ipa.cuongtv.cf
IPA Server: ipa.cuongtv.cf
BaseDN: dc=cuongtv,dc=cf
Continue to configure the system with these values? [no]: yes
Synchronizing time with KDC...
Attempting to sync time using ntpd.  Will timeout after 15 seconds
User authorized to enroll computers: admin
Password for admin@CUONGTV.CF:
Successfully retrieved CA cert
    Subject:     CN=Certificate Authority,O=CUONGTV.CF
    Issuer:      CN=Certificate Authority,O=CUONGTV.CF
    Valid From:  Tue Apr 25 17:48:11 2017 UTC
    Valid Until: Sat Apr 25 17:48:11 2037 UTC

Enrolled in IPA realm CUONGTV.CF
Created /etc/ipa/default.conf
New SSSD config will be created
Configured sudoers in /etc/nsswitch.conf
Configured /etc/sssd/sssd.conf
Configured /etc/krb5.conf for IPA realm CUONGTV.CF
trying https://ipa.cuongtv.cf/ipa/json
Forwarding 'schema' to json server 'https://ipa.cuongtv.cf/ipa/json'
trying https://ipa.cuongtv.cf/ipa/session/json
Forwarding 'ping' to json server 'https://ipa.cuongtv.cf/ipa/session/json'
Forwarding 'ca_is_enabled' to json server 'https://ipa.cuongtv.cf/ipa/session/json'
Systemwide CA database updated.
Hostname (ipa-client.cuongtv.cf) does not have A/AAAA record.
Failed to update DNS records.
Missing A/AAAA record(s) for host ipa-client.cuongtv.cf: 192.168.13.210.
Missing reverse record(s) for address(es): 192.168.13.210.
Adding SSH public key from /etc/ssh/ssh_host_rsa_key.pub
Adding SSH public key from /etc/ssh/ssh_host_ecdsa_key.pub
Forwarding 'host_mod' to json server 'https://ipa.cuongtv.cf/ipa/session/json'
Could not update DNS SSHFP records.
SSSD enabled
Configured /etc/openldap/ldap.conf
No SRV records of NTP servers found. IPA server address will be used
NTP enabled
Configured /etc/ssh/ssh_config
Configured /etc/ssh/sshd_config
Configuring ipa.cuongtv.cf as NIS domain.
Client configuration complete.
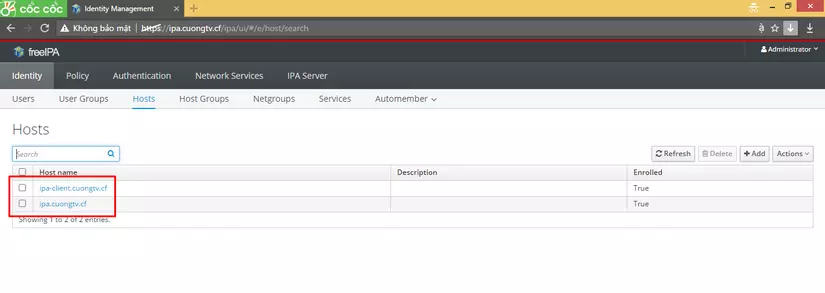
Trong quá trình insstall client IPA, Client sẽ phải confirm domain name và seriver name:
Provide the domain name of your IPA server (ex: example.com): ipa.cuongtv.cf
Provide your IPA server name (ex: ipa.example.com): ipa.example.com
và nhập pasword admin.
Vậy là xong. ta có thể lên web GUI để check thấy số lượng host đã có thêm thành viên mới
3.4 Phân quyền
Ta sẽ add thử 1 user và phân quyền sudo cho tất cả các lệnh trên cả 2 server.
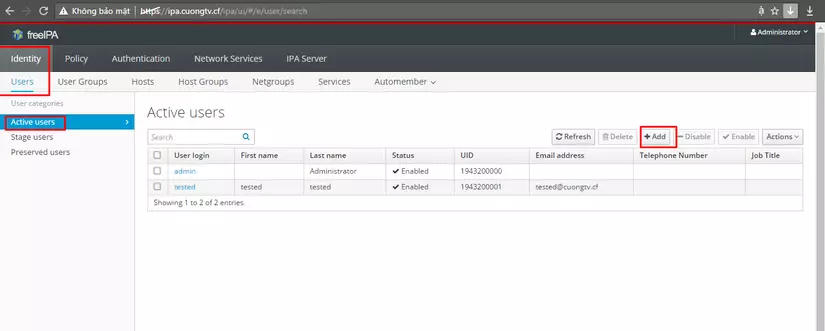
- Add usser tested bằng command line (trên server master)
# ipa user-add tested
[root@ipa ~]#
[root@ipa ~]# ipa user-add tested
First name: tested
Last name: tested
-------------------
Added user "tested"
-------------------
  User login: tested
  First name: tested
  Last name: tested
  Full name: tested tested
  Display name: tested tested
  Initials: tt
  Home directory: /home/tested
  GECOS: tested tested
  Login shell: /bin/bash
  Principal name: tested@CUONGTV.CF
  Principal alias: tested@CUONGTV.CF
  Email address: tested@cuongtv.cf
  UID: 1943200001
  GID: 1943200001
  Password: False
  Member of groups: ipausers
  Kerberos keys available: False
- Create pasword cho user
# ipa passwd tested
New Password:
Enter New Password again to verify:
----------------------------------------
Changed password for "tested@CUONGTV.CF"
----------------------------------------
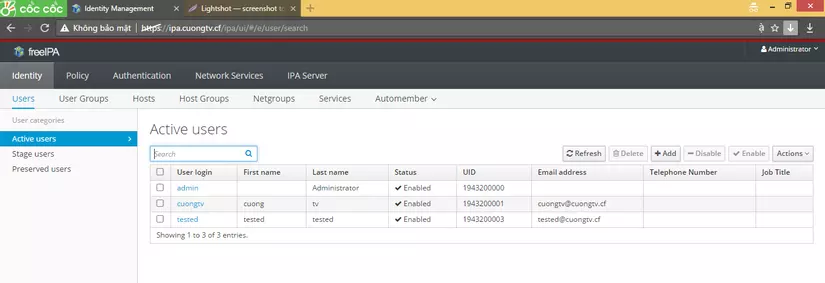
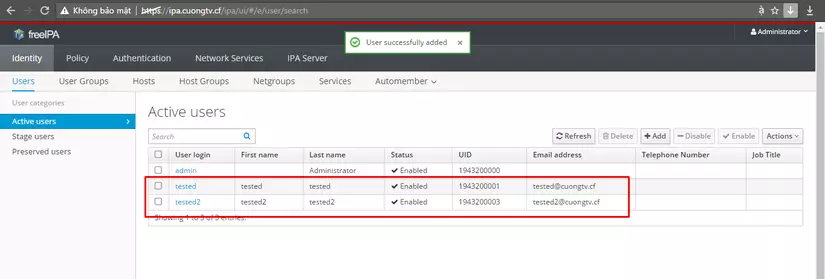
- Hoặc có thể add user bằng GUI.
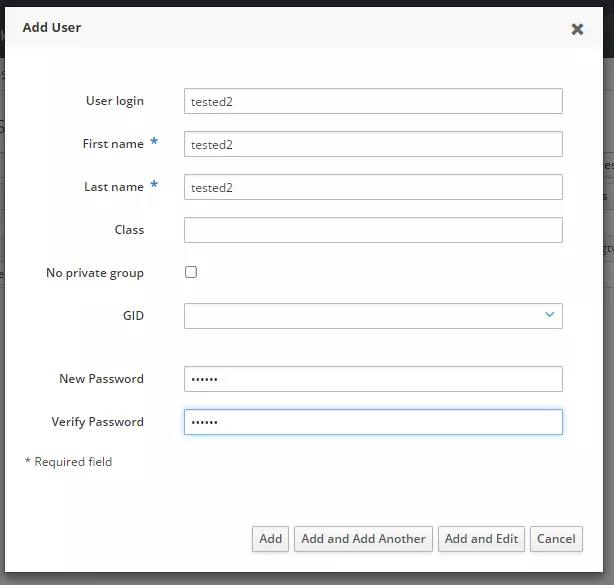
Và đây là kết quả sau 2 lượt tạo user vừa trên
Ta có thể ssh thử
[c:\~]$ ssh tested@192.168.13.209


Connecting to 192.168.13.209:22...
Connection established.
To escape to local shell, press 'Ctrl+Alt+]'.

Last login: Wed Apr 26 02:00:29 2017 from 10.0.1.11
[c:\~]$ ssh 192.168.13.210


Connecting to 192.168.13.210:22...
Connection established.
To escape to local shell, press 'Ctrl+Alt+]'.

Creating home directory for tested.
[tested@ipa-client ~]$
[c:\~]$ ssh tested2@192.168.13.210


Connecting to 192.168.13.210:22...
Connection established.
To escape to local shell, press 'Ctrl+Alt+]'.

Last login: Tue Apr 25 15:02:30 2017 from 10.0.1.11
[tested2@ipa-client ~]$
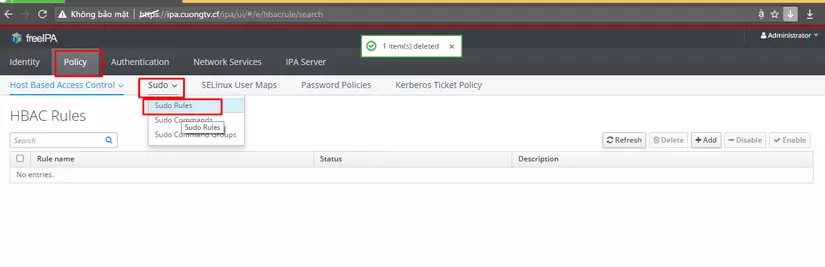
- Bước tiếp theo sẽ config cho user tested có quyền sudo
Click Policy -> Sudo > Sudo Rules
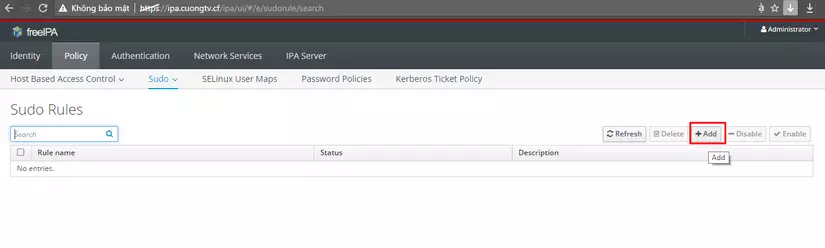
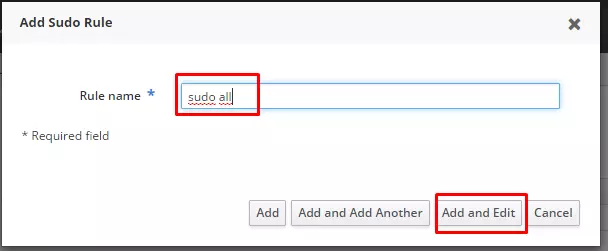
Click Add
Type name and Click Add and Edit
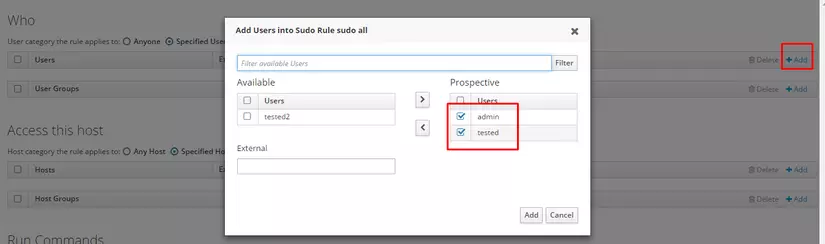
Click Add with form Who and select user with pemission sudo
In Access this host, pls check any hots and run any command
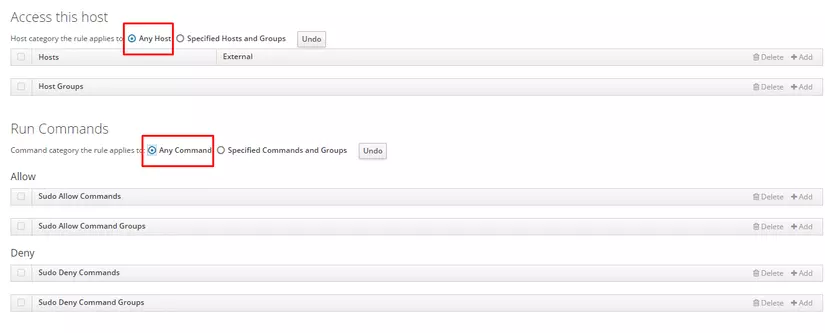
And check anyone and anygroup

Then click save.
Sau khi cấu hình xong, ta phải restart service ssh trên server client. # systemctl restart sshd.service
Ok. giờ connect lại server và test lại quyền sudo thôi!
All rights reserved
