[Android] Tìm hiểu về Custom View và xây dựng thư viện Circular Seekbar
Bài đăng này đã không được cập nhật trong 5 năm
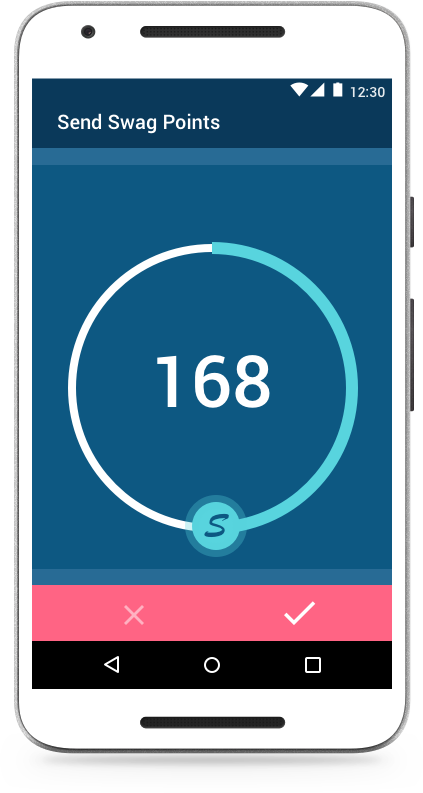
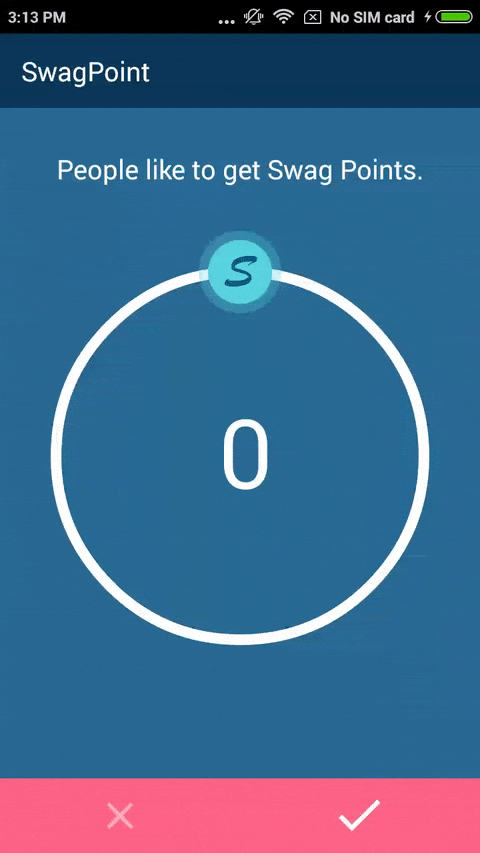
Hôm nay mình sẽ hướng dẫn các bạn tạo ra một custom view Seekbar dạng vòng như bên dưới, tạo thư viện và đẩy lên JCenter.
Trong bài viết này, mình sẽ nói một số khái niệm cơ bản về custom view trong android và làm thế nào để xuất bản thư viện.
Trước khi bắt đầu...
Hãy xem cách widget này hoạt động, người dùng có thể chạm vào biểu tượng chỉ thị quanh vòng cung để thiết lập giá trị. Biểu tượng sẽ ngừng kéo khi vượt quá giá trị min/max. Nó hoạt động như một phần mở rộng của Seekbar với khả năng tùy biến và sự kiện chuyển động.
Bắt đầu :
Như mọi người biết thì tất cả các view widget đều dựa trên View, để implement một custom view bạn cần hiểu vòng đời của view trước đã.

Để bắt đầu, đầu tiên ta phải tạo một class extends View và tạo 2 hàm tạo mặc định cho phép tạo view trong chương trình hoặc trong XML.
public class SwagPoints extends View {

    // used in view creation programmatically
    public SwagPoints(Context context) {
        super(context);
    }

    // used in XML layout file
    public SwagPoints(Context context, @Nullable AttributeSet attrs) {
        super(context, attrs);
    }
}
Tiếp đó, một số khái niệm ta phải quan tâm khi custom view :
1. Attributes : Xác định các thuộc tính cho phép các developer thay đổi diện mạo và hành vi trong tệp XML theo thiết kế của họ.
2. Size : Xác định kích thước của View và các thành phần của nó.
3. Drawing : Xác định cách mà view và các thành phần của nó được render trên màn hình.
4. Touch : Xác định cách mà người dùng tương tác với view bằng cách chạm.
1. Attributes
Ở đây ta sẽ cung cấp một số thuộc tính tùy chỉnh cho nhà phát triển. Ta tạo tệp attrs.xml theo đường dẫn res/values/attrs.xml và định nghĩa các thuộc tính cho view trong thẻ <declare-styleable> như sau :
<resources>
    <declare-styleable name="SwagPoints">
        <attr name="points" format="integer" />
        <attr name="max" format="integer" />
        <attr name="min" format="integer"/>
        <attr name="step" format="integer"/>

        <attr name="indicatorIcon" format="reference" />

        <attr name="progressWidth" format="dimension" />
        <attr name="progressColor" format="color" />

        <attr name="arcWidth" format="dimension" />
        <attr name="arcColor" format="color" />

        <attr name="textSize" format="dimension"/>
        <attr name="textColor" format="color"/>

        <attr name="clockwise" format="boolean" />
        <attr name="enabled" format="boolean" />

    </declare-styleable>

</resources>
Tiếp theo, sử dụng TypedArray để lấy các giá trị thuộc tính trong class và xác định các biến mẫu. Đẩy chúng vào hàm init() sau super() :
private void init(Context context, AttributeSet attrs) {

	float density = getResources().getDisplayMetrics().density;

	// Defaults, may need to link this into theme settings
	int arcColor = ContextCompat.getColor(context, R.color.color_arc);
	int progressColor = ContextCompat.getColor(context, R.color.color_progress);
	int textColor = ContextCompat.getColor(context, R.color.color_text);
	mProgressWidth = (int) (mProgressWidth * density);
	mArcWidth = (int) (mArcWidth * density);
	mTextSize = (int) (mTextSize * density);

	mIndicatorIcon = ContextCompat.getDrawable(context, R.drawable.indicator);

	if (attrs != null) {
		// Attribute initialization
		final TypedArray a = context.obtainStyledAttributes(attrs,
				R.styleable.SwagPoints, 0, 0);

		Drawable indicatorIcon = a.getDrawable(R.styleable.SwagPoints_indicatorIcon);
		if (indicatorIcon != null)
			mIndicatorIcon = indicatorIcon;

		int indicatorIconHalfWidth = mIndicatorIcon.getIntrinsicWidth() / 2;
		int indicatorIconHalfHeight = mIndicatorIcon.getIntrinsicHeight() / 2;
		mIndicatorIcon.setBounds(-indicatorIconHalfWidth, -indicatorIconHalfHeight, indicatorIconHalfWidth,
				indicatorIconHalfHeight);

		mPoints = a.getInteger(R.styleable.SwagPoints_points, mPoints);
		mMin = a.getInteger(R.styleable.SwagPoints_min, mMin);
		mMax = a.getInteger(R.styleable.SwagPoints_max, mMax);
		mStep = a.getInteger(R.styleable.SwagPoints_step, mStep);

		mProgressWidth = (int) a.getDimension(R.styleable.SwagPoints_progressWidth, mProgressWidth);
		progressColor = a.getColor(R.styleable.SwagPoints_progressColor, progressColor);

		mArcWidth = (int) a.getDimension(R.styleable.SwagPoints_arcWidth, mArcWidth);
		arcColor = a.getColor(R.styleable.SwagPoints_arcColor, arcColor);

		mTextSize = (int) a.getDimension(R.styleable.SwagPoints_textSize, mTextSize);
		mTextColor = a.getColor(R.styleable.SwagPoints_textColor, mTextColor);

		mClockwise = a.getBoolean(R.styleable.SwagPoints_clockwise,
				mClockwise);
		mEnabled = a.getBoolean(R.styleable.SwagPoints_enabled, mEnabled);
		a.recycle();
	}
}
2. Size
Để kiểm soát được kích thước của view, ta phải @override lại phương thức onMeasure() và tính toán kích thước của từng thành phần. Ở đây ta sẽ phải xác định bán kính cung theo chiều rộng, chiều cao của view.
@Override
protected void onMeasure(int widthMeasureSpec, int heightMeasureSpec) {

	final int width = getDefaultSize(getSuggestedMinimumWidth(), widthMeasureSpec);
	final int height = getDefaultSize(getSuggestedMinimumHeight(), heightMeasureSpec);
	final int min = Math.min(width, height);

	mTranslateX = (int) (width * 0.5f);
	mTranslateY = (int) (height * 0.5f);

	int arcDiameter = min - getPaddingLeft();
	mArcRadius = arcDiameter / 2;
	float top = height / 2 - (arcDiameter / 2);
	float left = width / 2 - (arcDiameter / 2);
	mArcRect.set(left, top, left + arcDiameter, top + arcDiameter);

	updateIndicatorIconPosition();
	super.onMeasure(widthMeasureSpec, heightMeasureSpec);
}
3. Drawing
Đây chính là nơi bạn thể hiện khả năng vẽ của mình  Để vẽ view, bạn phải @override lại phương thức
onDraw(Canvas canvas).
Trước đó, bạn cần phải biết dùng gì để vẽ và vẽ như thế nào chứ ?
Android cung cấp 2 lớp để làm việc này đó là Canvas và Paint.
Trước khi sử dụng canvas để vẽ, bạn cần phải tạo một đối tượng Paint. Để tối ưu hiệu năng, việc tạo ra đối tượng Paint trước là khá quan trọng, bởi vì phương thức onDraw() được gọi bất cứ khi nào cần vẽ lại. Vì vậy ta không tạo đối tượng Paint bên trong hàm onDraw().
Không nên khởi tạo các đối tượng bên trong
onDraw()
Ở đây chúng ta định nghĩa các đối tượng ( một cho arc, một cho progress và còn lại cho text) như các biến instance và được khởi tạo trong hàm init() :
private void init(Context context, AttributeSet attrs) {
	// ...

	mArcPaint = new Paint();
	mArcPaint.setColor(arcColor);
	mArcPaint.setAntiAlias(true);
	mArcPaint.setStyle(Paint.Style.STROKE);
	mArcPaint.setStrokeWidth(mArcWidth);

	mProgressPaint = new Paint();
	mProgressPaint.setColor(progressColor);
	mProgressPaint.setAntiAlias(true);
	mProgressPaint.setStyle(Paint.Style.STROKE);
	mProgressPaint.setStrokeWidth(mProgressWidth);

	mTextPaint = new Paint();
	mTextPaint.setColor(textColor);
	mTextPaint.setAntiAlias(true);
	mTextPaint.setStyle(Paint.Style.FILL);
	mTextPaint.setTextSize(mTextSize);
}
Khi đã xác định được đối tượng Paint, chúng ta có thể implement hàm onDraw(Canvas canvas) , ở đây ta sẽ vẽ ra text và vòng cung hiển thị giá trị hiện tại của seekbar :
@Override
protected void onDraw(Canvas canvas) {
	if (!mClockwise) {
		canvas.scale(-1, 1, mArcRect.centerX(), mArcRect.centerY());
	}

	// draw the text
	String textPoint = String.valueOf(mPoints);
	mTextPaint.getTextBounds(textPoint, 0, textPoint.length(), mTextRect);
	// center the text
	int xPos = canvas.getWidth() / 2 - mTextRect.width() / 2;
	int yPos = (int)((mArcRect.centerY()) - ((mTextPaint.descent() + mTextPaint.ascent()) / 2));
	canvas.drawText(String.valueOf(mPoints), xPos, yPos, mTextPaint);

	// draw the arc and progress
	canvas.drawArc(mArcRect, ANGLE_OFFSET, 360, false, mArcPaint);
	canvas.drawArc(mArcRect, ANGLE_OFFSET, mProgressSweep, false, mProgressPaint);

	if (mEnabled) {
		// draw the indicator icon
		canvas.translate(mTranslateX - mIndicatorIconX, mTranslateY - mIndicatorIconY);
		mIndicatorIcon.draw(canvas);
	}
}
Khá là ổn rồi nhỉ, sau khi @override onDraw(), có một phương thức quan trọng khác về vẽ đó là invalidate(). Phương thức này được sử dụng khi việc vẽ lại là cần thiết, ta không gọi làm onDraw() một cách trực tiếp mà chỉ gọi phương thức này thôi. Bạn có thể sử dụng phương thức này bất cứ đâu bên trong custom view, tuy nhiên để hiệu năng tốt nhất, hãy nhớ rằng chỉ gọi nó khi cần.
4. Touching
Khi người dùng chạm vào màn hình, phương thức onTouchEvent() sẽ được gọi, vì vậy ta cần phải @override View.onTouchEvent() để xử lý các cử chỉ của người dùng :
@Override
public boolean onTouchEvent(MotionEvent event) {
	if (mEnabled) {
		this.getParent().requestDisallowInterceptTouchEvent(true);

		switch (event.getAction()) {
			case MotionEvent.ACTION_DOWN:
				if (mOnSwagPointsChangeListener != null)
					mOnSwagPointsChangeListener.onStartTrackingTouch(this);
				updateOnTouch(event);
				break;
			case MotionEvent.ACTION_MOVE:
				updateOnTouch(event);
				break;
			case MotionEvent.ACTION_UP:
				if (mOnSwagPointsChangeListener != null)
					mOnSwagPointsChangeListener.onStopTrackingTouch(this);
				setPressed(false);
				this.getParent().requestDisallowInterceptTouchEvent(false);
				break;
			case MotionEvent.ACTION_CANCEL:
				if (mOnSwagPointsChangeListener != null)
					mOnSwagPointsChangeListener.onStopTrackingTouch(this);
				setPressed(false);
				this.getParent().requestDisallowInterceptTouchEvent(false);
				break;
		}
		return true;
	}
	return false;
}
Có một số vấn đề cần phải kiểm soát khi người dùng chạm vào biểu tượng chỉ thị (indicator) hay các vùng khác của view :
- Cập nhật lại vị trí indicator và progress text
- Vẽ progress hiện tại trên cung
- Dừng lại khi đạt max/min.
Để biết vị trí của indicator icon và progress hiện tại để vẽ, ta cần phải chuyển đổi tọa độ chạm trên màn hình thành góc cung.
Trong custom view này, ta sẽ chọn trung tâm của vòng cung làm gốc (0,0) và sử dụng các hàm lượng giác để biến tọa độ chạm thành góc của cung tròn trong khoảng (0,360), và map nó với giá trị hiện tại.

Về cơ bản là như sau :
private double convertTouchEventPointToAngle(float xPos, float yPos) {
	// transform touch coordinate into component coordinate
	float x = xPos - mTranslateX;
	float y = yPos - mTranslateY;

	x = (mClockwise) ? x : -x;
	double angle = Math.toDegrees(Math.atan2(y, x) + (Math.PI / 2));
	angle = (angle < 0) ? (angle + 360) : angle;
	return angle;
}
Demo
Đẩy mã nguồn lên Github
Sau khi hoàn thành dự án. Hãy đẩy nó lên Github để có nhiều developer hơn sử dụng thư viện của bạn. Tuy nhiên, trước khi share link Github tới người khác, hãy chắc chắn rằng bạn có tài liệu đọc tốt trước. Khi các developer nhìn vào dự án của bạn, có một số điểm mà họ quan tâm :
- Dự án này có phù hợp yêu cầu của tôi hay có giải quyết vấn đề của tôi được không ?
- Nếu câu trả lời là CÓ, tôi có thể bắt đầu như thế nào ?
README đóng vai trò quan trọng để tạo ấn tượng với với các developer, vì vậy cần cung cấp nó là cần thiết và tạo cơ hội tốt để quảng bá dự án của bạn. Dưới đây là một số tips :
- Cung cấp Screenshot và đoạn mô tả ngắn.
- Cung cấp hướng dẫn cài đặt, sử dụng dễ dàng.
Xuất bản thư viện của bạn
Sau khi hoàn thành xong project của mình, bạn có thể xuất bản nó để các developer chỉ cần thêm dependency đẻ sử dụng, nó tương tự như này :
dependencies {
    ...
    compile 'com.dualcores.swagpoints:swagpoints:1.0.2'
}
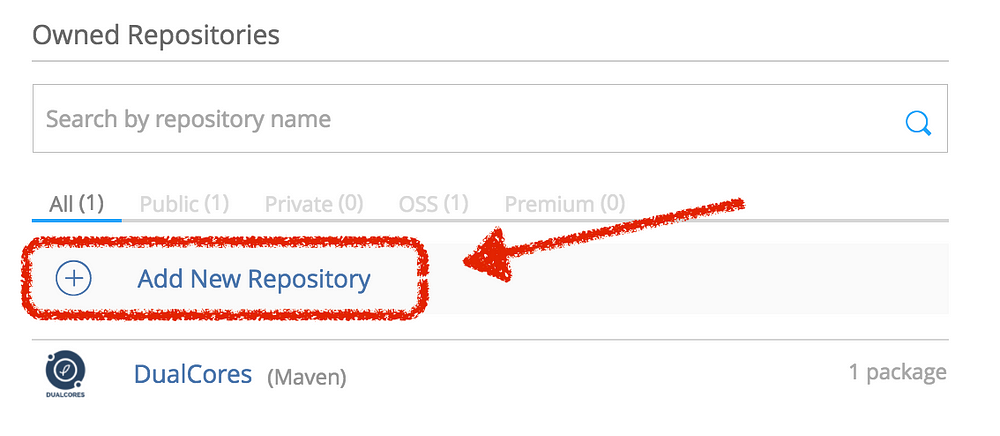
1. Đăng kí tài khoản hoặc đăng nhập JFrog Bintray

2. Chuyển sang trang cá nhân, tạo một repository, package và version
Repository là nơi lưu trữ một số dự án của bạn. Bạn có thể chọn bất cứ tên repos nào bạn muốn, nó không ảnh hướng đến các nhà phát triển khác.
 Bên trong repository mới, tạo ra một package, đó là nơi lưu trữ dự án của bạn. Bạn có thể import từ Github.
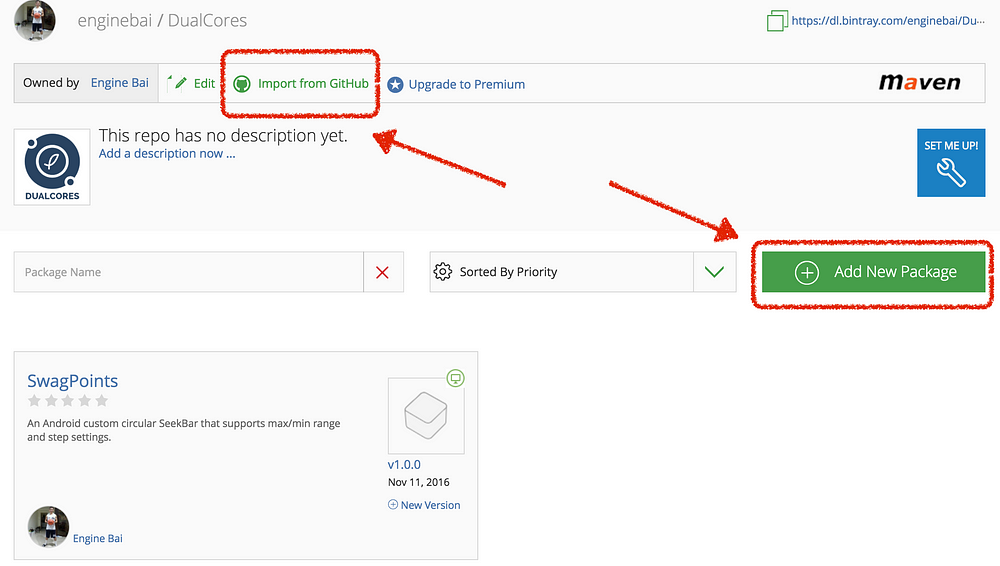 Đối với mỗi package, bạn có thể tạo một vài phiên bản :
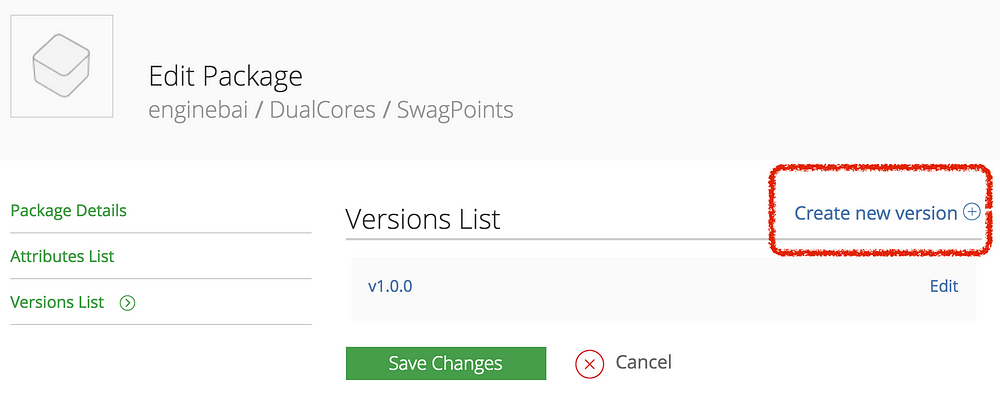
3. Tạo và tải lên các tệp aar
Ta sẽ sử dụng gradle để làm việc này, ở đây ta sử dụng thư viên sau để hỗ trợ :
https://github.com/blundell/release-android-library
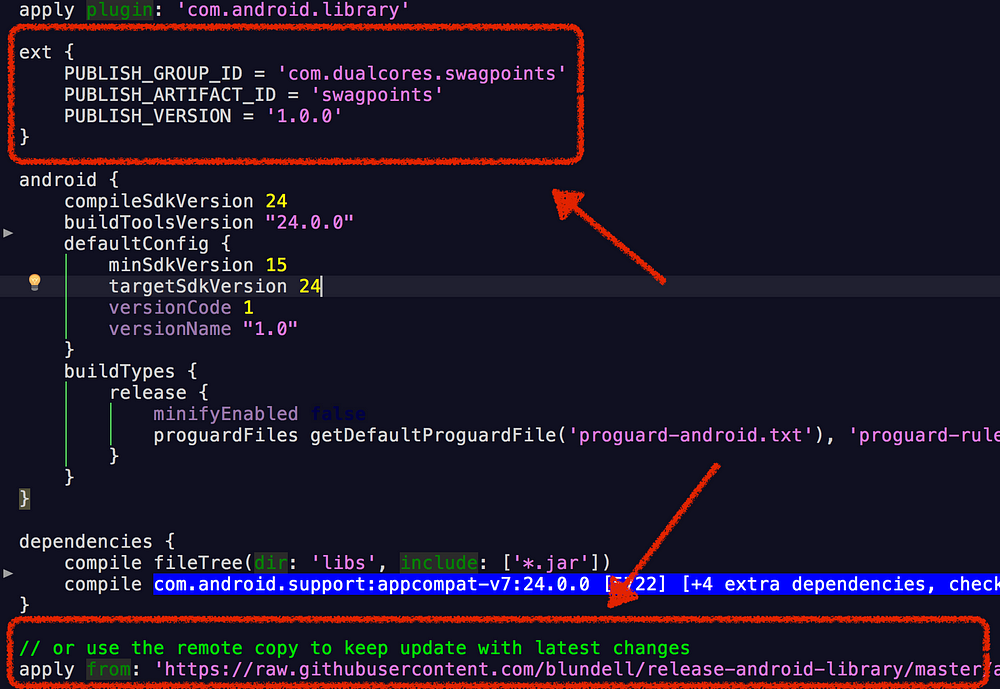
Mở tệp gradle (module library), thêm đoạn mã sau vào phần đuôi của tệp module build.gradle :
// or use the remote copy to keep update with latest changes
apply from: 'https://raw.githubusercontent.com/blundell/release-android-library/master/android-release-aar.gradle'
Và cấu hình JCenter :
ext {
    PUBLISH_GROUP_ID = 'com.dualcores.swagpoints'
    PUBLISH_ARTIFACT_ID = 'swagpoints'
    PUBLISH_VERSION = '1.0.0'
}
Tiếp đó, sync project và mở terminal lên, vào đường dẫn gốc của project và thực hiện lệnh :
./gradlew clean build generateRelease
Nếu thành công, bạn sẽ thấy kết quả hiện lên terminal và bạn có thể upload file .zip theo đường dẫn PROJECT_ROOT/library/build/release/1.0.0/

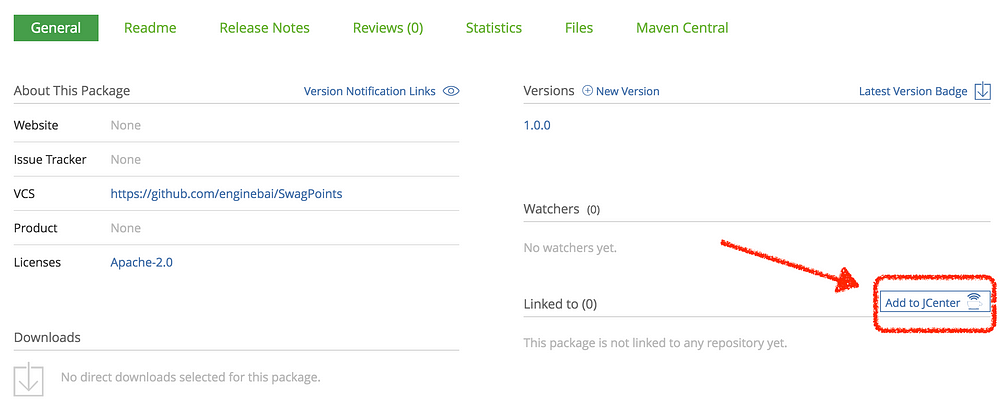
4. Thêm vào JCenter
Quay trở lại trang dự án của bạn trong bintray, sẽ có một nút Add to JCenter ở cột bên phải, chỉ cần click vào đó, điền một message và đợi được chấp nhận. Nó sẽ mất vài giờ thậm chí là vài ngày để được chấp nhận. Bước này là bắt buộc để để dự án của bạn có thể có thể tải xuống được được phát hiện bởi gradle dependencies.
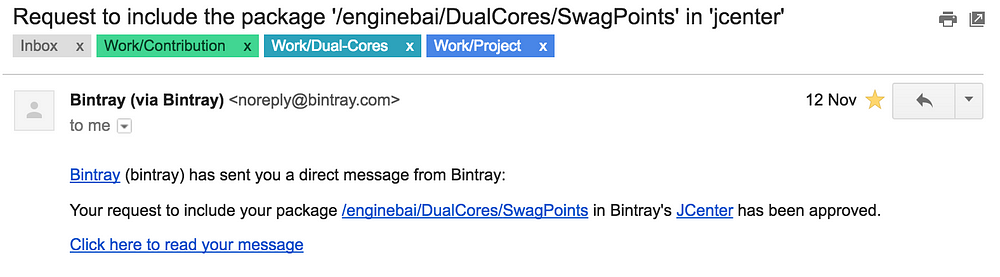
5. Dự án được chấp nhận
Bạn sẽ nhận được email thông báo cho biết yêu cầu thêm thư viện vào Jcenter đã được chấp nhận.
 Một khi đã được chấp nhận, hãy kiểm tra gradle dependency hoạt động tốt bằng cách thêm dependency vào một sample module và đồng bộ nó. Nếu build successfullly, thì xin chúc mừng !!! Bạn làm tốt lắm
compile 'com.dualcores.swagpoints:swagpoints:1.0.0'
Kết luận
Qua bài viết này, hi vọng mọi người có thể hiểu được những khái niệm cơ bản nhất về custom view và cách xây dựng nó. Cảm ơn các bạn đã theo dõi bài viết của mình 
Tài liệu tham khảo :
All rights reserved
