Thực hành Appium sử dụng Maven và TestNG
Bài đăng này đã không được cập nhật trong 6 năm
Trong 2 phần trước chúng ta đã biết cách cài đặt Appium và cách sử dụng UIAutomatorViewer, chúng ta cũng đã tạo được một dự án kiểm thử sử dụng Appium đơn giản. Nhưng khi ứng dụng có quá nhiều trường hợp cần kiểm thử và chúng cần được viết kiểm thử tự động, khi đó làm sao để chúng ta có thể quản lý mã nguồn một cách tốt nhất?
Câu trả lời ở đây là bạn có thể sử dụng Maven kết hợp với TestNG trong Java để tăng sức mạnh cho Appium và giúp chúng ta quản lý project dễ dàng hơn. Trong bài viết này chúng ta sẽ cùng tìm hiểu về cách kết hợp giữa Appium với Maven project và TestNG framework.
1. Tại sao lại là Maven và TestNG
- Maven:
- Maven giúp chúng ta quản lý các version, thư viện trọng dự án, quản lý build
- Maven tự động tải xuống các tệp cần thiết từ kho lưu trữ trong khi build dự án.
- TestNG:
- TestNG hỗ trợ chú thích, hỗ trợ tạo báo cáo dạng HTML
- Các trường hợp thử nghiệp có thể được nhóm và tạo độ ưu tiên
- Hỗ trợ kiểm tra dữ liệu bằng cách sử dụng Dataproviders
- Hỗ trợ tham số
Các bạn có thể tìm hiểu thêm về Maven và TestNG trong đây:
https://www.toolsqa.com/java/maven/maven-introduction/
https://www.toolsqa.com/testng-tutorial/
2. Thực hành với app đơn giản
Dưới đây chúng ta sẽ cùng thực hành tạo bộ thử nghiệm tự động cho ứng dụng Caculator trên máy ảo.
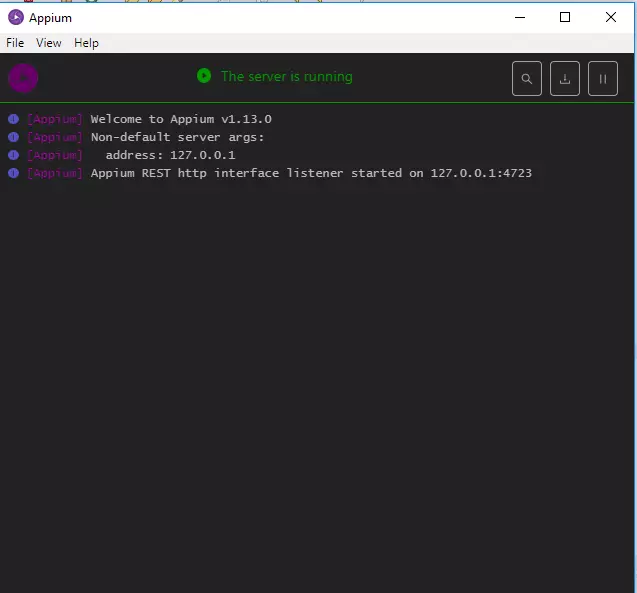
- Bật appium server
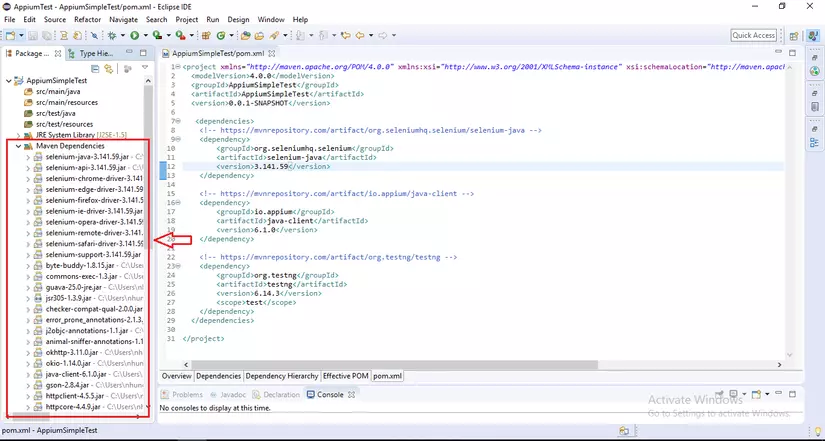
 2. Tạo maven project và thêm các thư viện vào file pom.xml
- Selenium java: https://mvnrepository.com/artifact/org.seleniumhq.selenium/selenium-java
- Appium java client: https://mvnrepository.com/artifact/io.appium/java-client
- TestNG: https://mvnrepository.com/artifact/org.testng/testng
<project xmlns="http://maven.apache.org/POM/4.0.0" xmlns:xsi="http://www.w3.org/2001/XMLSchema-instance" xsi:schemaLocation="http://maven.apache.org/POM/4.0.0 http://maven.apache.org/xsd/maven-4.0.0.xsd">
  <modelVersion>4.0.0</modelVersion>
  <groupId>AppiumSimpleTest</groupId>
  <artifactId>AppiumSimpleTest</artifactId>
  <version>0.0.1-SNAPSHOT</version>

   <dependencies>
  	<!-- https://mvnrepository.com/artifact/org.seleniumhq.selenium/selenium-java -->
	<dependency>
	    <groupId>org.seleniumhq.selenium</groupId>
	    <artifactId>selenium-java</artifactId>
	    <version>3.141.59</version>
	</dependency>

	<!-- https://mvnrepository.com/artifact/io.appium/java-client -->
	<dependency>
	    <groupId>io.appium</groupId>
	    <artifactId>java-client</artifactId>
	    <version>6.1.0</version>
	</dependency>

	<!-- https://mvnrepository.com/artifact/org.testng/testng -->
	<dependency>
	    <groupId>org.testng</groupId>
	    <artifactId>testng</artifactId>
	    <version>6.14.3</version>
	    <scope>test</scope>
	</dependency>
  </dependencies>

</project>
Sau khi thêm các thư viện, chọn Project -> Clear. Mở Maven Dependencies ta sẽ thấy các thư viện đã được thêm vào như sau
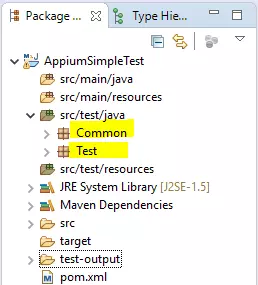
- Tạo 2 package Common và Test trong src/test/java
- Common package sẽ chứa những file dùng để khai báo các thuộc tính dùng chung
- Test package sẽ chứa những file dùng để chạy thử nghiệm các bộ test case.
- Trong Common tạo file BaseClass.java dùng để khai báo các hàm cài đặt môi trường như sau:
package Common;

import java.net.MalformedURLException;
import java.net.URL;

import org.openqa.selenium.remote.DesiredCapabilities;
import org.testng.annotations.AfterSuite;
import org.testng.annotations.BeforeTest;

import io.appium.java_client.AppiumDriver;
import io.appium.java_client.MobileElement;

public class BaseClass {
    protected AppiumDriver<MobileElement> driver;

	@BeforeTest
	public void setup() {
		try {
			DesiredCapabilities cap = new DesiredCapabilities();
			cap.setCapability("deviceName", "Nexus5");
			cap.setCapability("uid", "emulator-5554");
			cap.setCapability("platformName", "Android");
			cap.setCapability("platformVersion", "8.1.0");
			cap.setCapability("appPackage", "com.android.calculator2");
			cap.setCapability("appActivity", "com.android.calculator2.Calculator");

			URL url = new URL("http://127.0.0.1:4723/wd/hub");
			driver = new AppiumDriver<MobileElement>(url, cap);

		} catch (MalformedURLException e) {
			e.printStackTrace();
		}
	}

	@AfterSuite
	public void tearDown() {
		driver.closeApp();
	}
}
- Trong package Test tạo class: Calculation.java dùng để viết các bộ thử nghiệm cho các phép tính như sau:
package Test;

import org.openqa.selenium.By;
import org.testng.annotations.Test;

import Common.BaseClass;
import io.appium.java_client.MobileElement;

public class Calculation extends BaseClass {

	// Test phép cộng: 2 + 3 = 5
	@Test
	public void testOne() {
		MobileElement two = driver.findElement(By.id("com.android.calculator2:id/digit_2"));
		two.click();
		MobileElement plus = driver.findElementByAccessibilityId("plus");
		plus.click();
		MobileElement three = driver.findElement(By.id("com.android.calculator2:id/digit_3"));
		three.click();
		MobileElement equals = driver.findElement(By.id("com.android.calculator2:id/eq"));
		equals.click();
		MobileElement result = driver.findElement(By.id("com.android.calculator2:id/result"));
		System.out.println("Result testOne: " + result.getText());
	}

	// Test phép nhân: 5 * 2 = 10
	@Test
	public void testTwo() {
		MobileElement five = driver.findElement(By.id("com.android.calculator2:id/digit_5"));
		five.click();
		MobileElement multiply = driver.findElementByAccessibilityId("multiply");
		multiply.click();
		MobileElement two = driver.findElement(By.id("com.android.calculator2:id/digit_2"));
		two.click();
		MobileElement equals = driver.findElement(By.id("com.android.calculator2:id/eq"));
		equals.click();
		MobileElement result = driver.findElement(By.id("com.android.calculator2:id/result"));
		System.out.println("Result testTwo: " + result.getText());
	}
}
6 . Chuột phải vào project -> Run As -> TestNG Test. Sau khi chạy xong ta sẽ thấy kết quả trong Console log như sau:
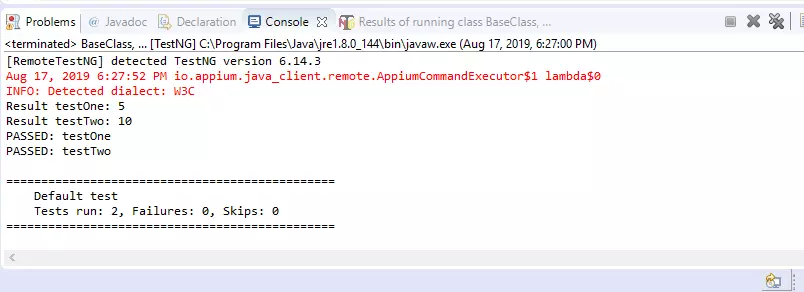
- Sau khi chạy xong, TestNG cũng đã tự động tạo cho chúng ta file report dạng HTML, để xem file ta vào thư mục test-output trong project, mở file index.html hoặc emailable-report.html ta sẽ thấy kết quả số case Pass, Failed đã được thống kê.

Mong rằng qua ví dụ này các bạn sẽ thấy được sự hữu ích khi sử dụng Maven và TestNG framework trong các dự án Appium, từ đó các bạn có thể áp dụng nó vào dự án của riêng mình để có thể dễ dàng quản lý mã code và kết quả báo cáo sau khi chạy, tăng khả năng sử dụng và tái sử dụng cho dự án.
All rights reserved
