Temporal workflow trong Quarkus
Bài đăng này đã không được cập nhật trong 3 năm
Giới Thiệu
Tiếp tục với series Java Practice, hôm nay chúng ta tiếp tục tìm hiểu về Temporal một thư viện workflow còn khá mới mẻ và triển khai nó trên Quarkus. Bắt đầu thôi.
Temporal là gì?
Đầu tiên chắc chắn bạn đã hiểu về workflow!
Workflow (luồng công việc) là một sơ đồ miêu tả thứ tự thực hiện từng công việc, từng sự kiện. Sơ đồ này giúp cho nhà quản trị thấy được chính xác công việc được thực hiện như thế nào hay có thể dùng nó để thiết kế một trình tự công việc khoa học và mang lại hiệu quả cao.
Theo Temporal.io đề cập định nghĩa như sau:
A Temporal Application is a set of Temporal Workflow Executions. Each Temporal Workflow Execution has exclusive access to its local state, executes concurrently to all other Workflow Executions, and communicates with other Workflow Executions and the environment via message passing
Một cách dễ hiểu thì Temporal là một luồng chứa các công việc cần thực hiện và yêu cầu bạn cần thực hiện tuần tự công việc của mình, Trong Temporal một luồng công việc có thể kéo dài nhiều ngày để xử lý và các khoảng GAP Time giữa các công việc trong luồng đôi khi kéo dài hàng giờ đồng hồ nhưng không tiêu tốn tài nguyên máy chủ.
Ví dụ:
Một luồng đơn hàng khi khách hàng đặt có thể kéo dài tới 10 ngày và trải qua nhiều công đoạn công việc khác nhau từ xác nhận đơn hàng -> đóng gói -> bàn giao vận chuyển -> giao hàng thành công.
Đây là một quy trình sẽ lập đi lập lại và nó yêu cầu thực hiện tuần tự từng bước (bỏ qua các ngoại lệ về tồn kho và giao hàng thất bại).
Trên thực tế một đơn hàng có rất nhiều trạng thái và trường hợp có thể xảy ra, và điều này là không hề dễ dàng để quản lý thì Temporal ra đời như một vị cứu tinh, giúp giải quyết các vấn đề về luồng công việc đơn giản hơn.
Temporal đã được đưa vô Hoàng Phúc giúp việc xử lý luồng đơn hàng bớt khó khăn hơn rất nhiều.
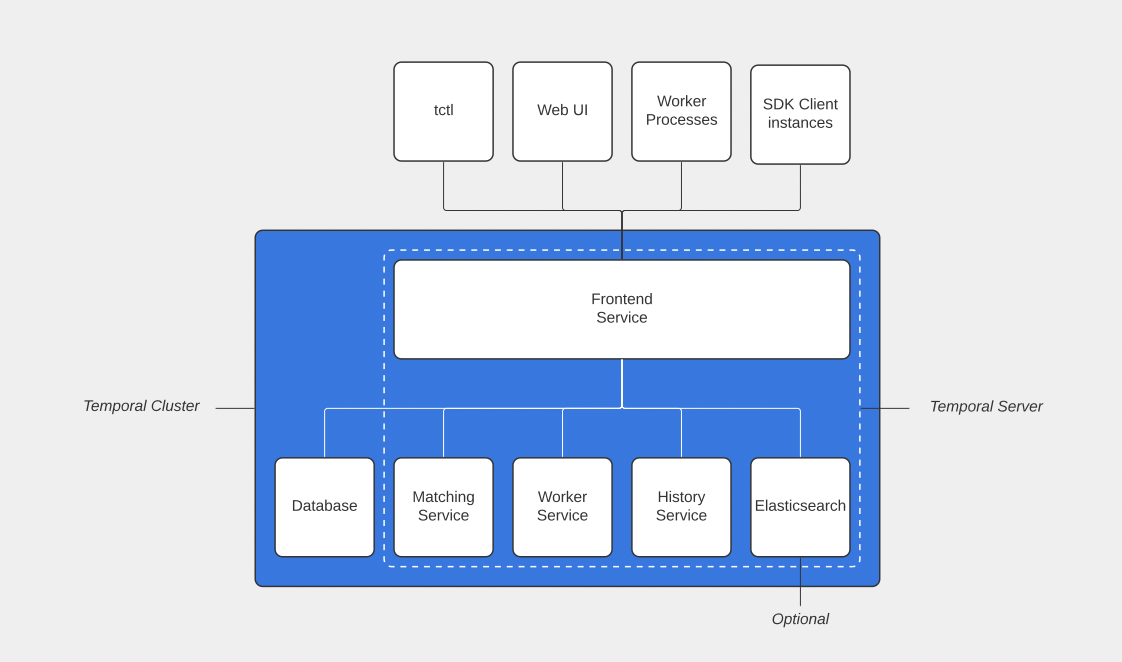
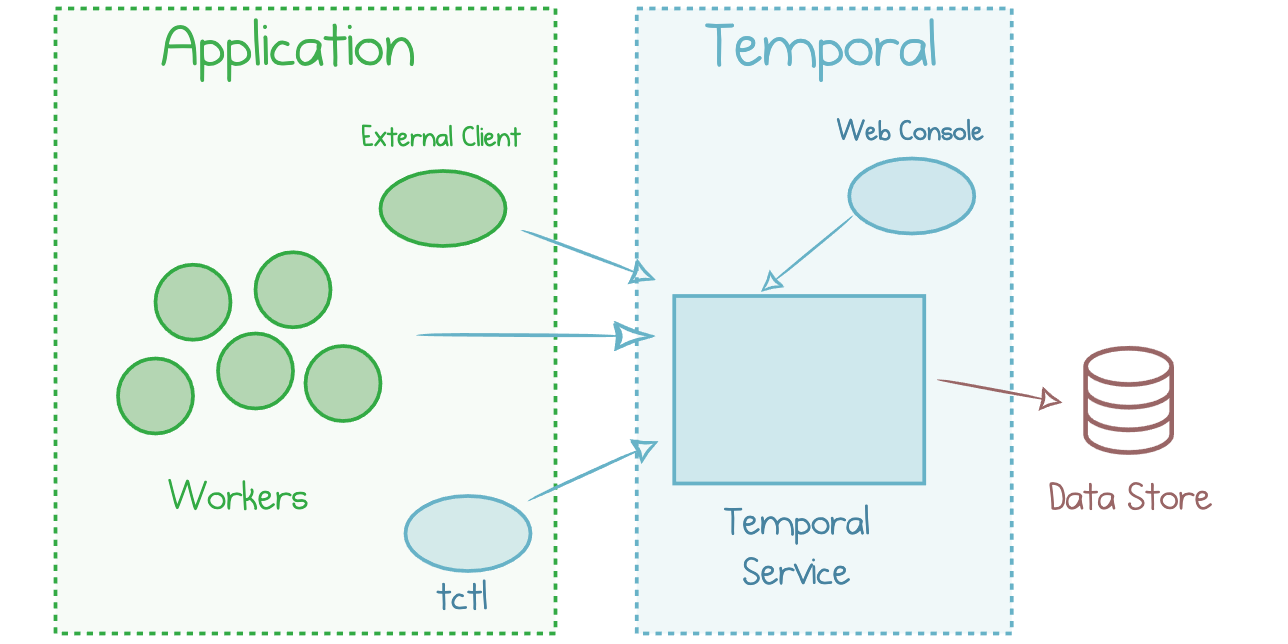
Temporal có 4 thành phần quan trọng để giúp nó vận hành:
- Macthing Service: Service này dùng để lưu trữ các Task Queues.
- Worker Service: Service này sẽ triển khai các quy trình làm việc(workflow).
- History Service: Nó ghi nhớ lại quá trình làm việc, lưu trữ các mutable state, queues.
- Frontend Service: hỗ trợ về rate limiting, routing và authorizing.
Trong bài viết này chúng ta sẽ không đi sâu về Temporal Cluster mà chỉ tập trung vào phần Worker Service thôi nhé 
Worker Service
Worker Service sẽ có 2 thành phần chính là workflow và activity
- workflow sẽ là các bước tiến trình của công việc, trong ví dụ trên thì mỗi trạng thái là một truy trình công việc.
- activity là các quy trình con của workflow.
Cài đặt Temporal
Trong bài viết này mình sẽ triển khai Temporal trên Docker.
Các bạn tạo file docker-compose.yml với nội dung bên dưới
version: "3.5"
services:
  elasticsearch:
    container_name: temporal-elasticsearch
    environment:
      - cluster.routing.allocation.disk.threshold_enabled=true
      - cluster.routing.allocation.disk.watermark.low=512mb
      - cluster.routing.allocation.disk.watermark.high=256mb
      - cluster.routing.allocation.disk.watermark.flood_stage=128mb
      - discovery.type=single-node
      - ES_JAVA_OPTS=-Xms100m -Xmx100m
    image: elasticsearch:7.16.2
    networks:
      - temporal-network
    ports:
      - 9200:9200
  postgresql:
    container_name: temporal-postgresql
    environment:
      POSTGRES_PASSWORD: temporal
      POSTGRES_USER: temporal
    image: postgres:13
    networks:
      - temporal-network
    ports:
      - 5432:5432
  temporal:
    container_name: temporal
    depends_on:
      - postgresql
      - elasticsearch
    environment:
      - DB=postgresql
      - DB_PORT=5432
      - POSTGRES_USER=temporal
      - POSTGRES_PWD=temporal
      - POSTGRES_SEEDS=postgresql
      - DYNAMIC_CONFIG_FILE_PATH=config/dynamicconfig/development_es.yaml
      - ENABLE_ES=true
      - ES_SEEDS=elasticsearch
      - ES_VERSION=v7
    image: temporalio/auto-setup:1.15.0
    networks:
      - temporal-network
    ports:
      - 7233:7233
    volumes:
      - ./dynamicconfig:/etc/temporal/config/dynamicconfig
  temporal-admin-tools:
    container_name: temporal-admin-tools
    depends_on:
      - temporal
    environment:
      - TEMPORAL_CLI_ADDRESS=temporal:7233
    image: temporalio/admin-tools:1.15.0
    networks:
      - temporal-network
    stdin_open: true
    tty: true
  temporal-web:
    container_name: temporal-web
    depends_on:
      - temporal
    environment:
      - TEMPORAL_GRPC_ENDPOINT=temporal:7233
      - TEMPORAL_PERMIT_WRITE_API=true
    image: temporalio/web:1.13.0
    networks:
      - temporal-network
    ports:
      - 8088:8088
networks:
  temporal-network:
    driver: bridge
    name: temporal-network
Link temporal docker: https://github.com/vanhanhhpi/temporal-docker-demo
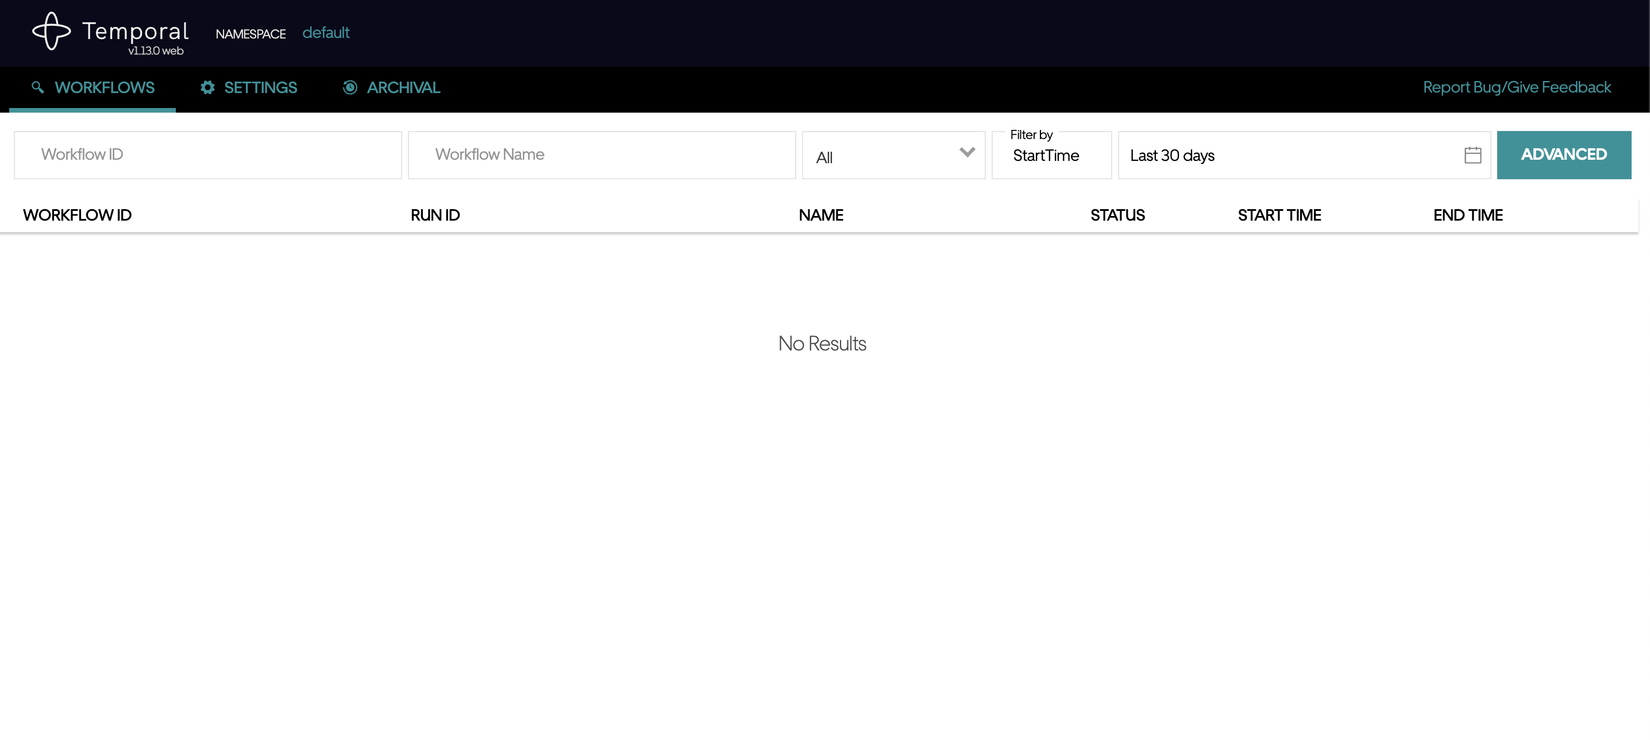
Đợi docker pull image về và setup xong, các bạn truy cập trình duyệt http://localhost:8088 và thấy giao diện như hình là ok rồi nhé.
Temporal với Quarkus
Trong bài viết này mình sẽ triển khai ví dụ trên Quarkus nhé, đối với các bạn sử dụng Spring Boot cũng sẽ triển khai tương tự như cấu trúc này.
Bạn có thể xem qua code mình đã dùng trong bài viết này tại: https://github.com/sackaboy/temporal-order-example
Thêm Dependency vô file POM:
<dependency>
  <groupId>io.temporal</groupId>
  <artifactId>temporal-sdk</artifactId>
  <version>1.5.0</version>
</dependency>
Tạo file WorkflowObservable.java để khởi tạo kết nối tới Temporal.
@ApplicationScoped
public class WorkflowObservable {

    private static final Logger LOG = Logger.getLogger(WorkflowObservable.class);

    private WorkflowClient client;
    private WorkerFactory factory;

    void onStart(@Observes StartupEvent event){
        LOG.info("****************** On start: Run workflow ****************");

        WorkflowServiceStubs service = WorkflowServiceStubs.newInstance();
        client = WorkflowClient.newInstance(service);
        factory = WorkerFactory.newInstance(client);
        Worker worker = factory.newWorker(OrderProduct.QUEUE_NAME);
        worker.registerWorkflowImplementationTypes(OrderProductImpl.class);
        worker.registerActivitiesImplementations(new ActivityOrderNewProductImpl());
        LOG.info("Start WorkflowService ");
        factory.start();
    }

    void onStop(@Observes ShutdownEvent event){
        factory.shutdown();
        LOG.info("****************** On stop: stop workflow ****************");
    }
    public WorkflowClient getClient(){
        return client;
    }
}
Đoạn code trên minh đăng ký với Temporal Workflow là class OrderProduct, Workflow Implement là OrderProductImpl và Activity Implement l class ActivityOrderNewProductImpl, Trong Workflow nó sẽ tiến hành tìm WorkflowMethod và các QueryMethod, SignalMethod nếu có.
Activity được coi là các quy trình con của Workflow nên Temporal sẽ import tất cả phương thức được khai báo trong Activity.
Trong file OrderProduct.java
@WorkflowInterface
public interface OrderProduct {
public static final String QUEUE_NAME = "Customer_Order";
@WorkflowMethod
Invoice orderNewProduct(Invoice invoice);
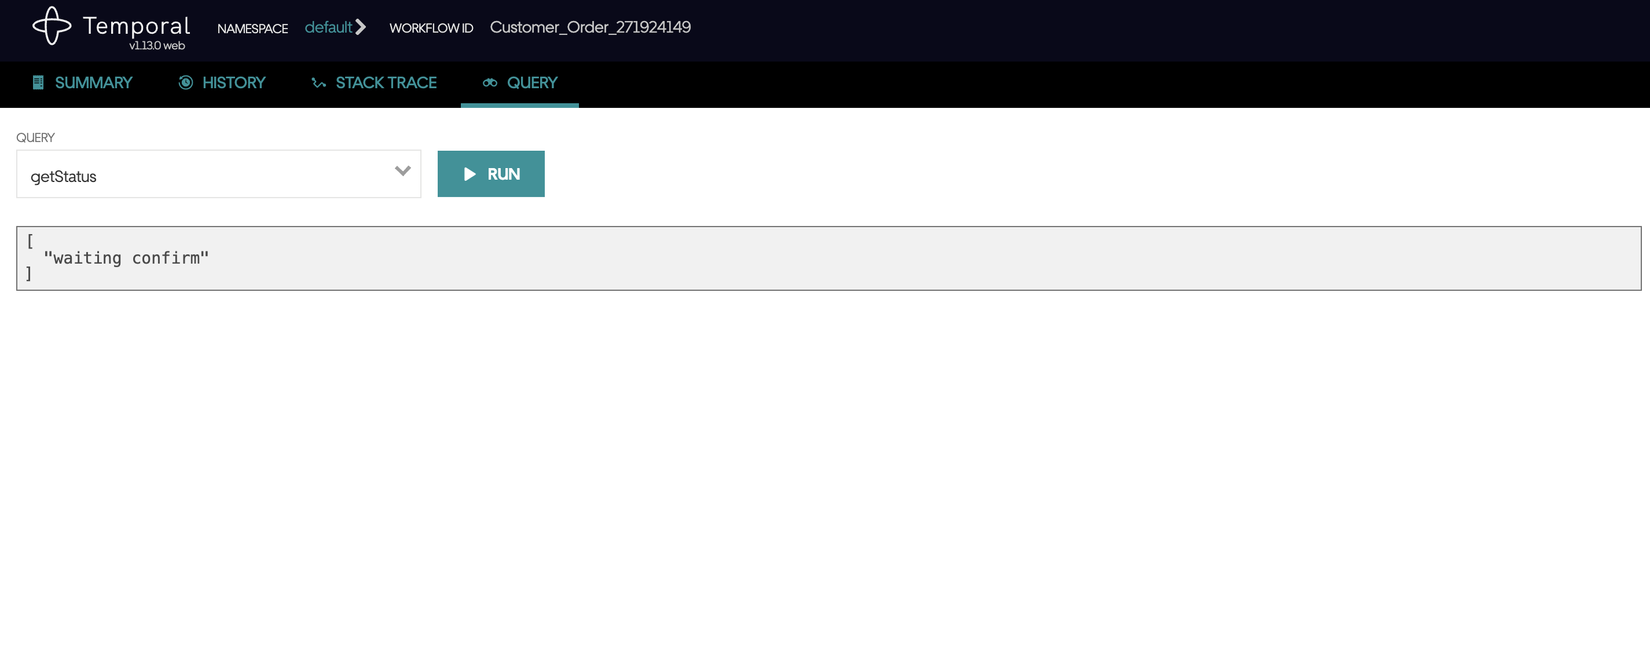
@QueryMethod
String getStatus();
@SignalMethod
void signalOrderAccepted();
@SignalMethod
void signalOrderPickedUp();
@SignalMethod
void signalDelivered();
}
Tiếp tới file ActivityOrderNewProductImpl sẽ implements class OrderProduct để triển khai các quy trình con(Activity).
public class OrderProductImpl implements OrderProduct {

    private final RetryOptions retryoptions = RetryOptions.newBuilder()
        .setInitialInterval(Duration.ofSeconds(1))
        .setMaximumInterval(Duration.ofSeconds(5))
        .setBackoffCoefficient(2)
        .setMaximumAttempts(10)
        .build();
    private final ActivityOptions defaultActivityOptions = ActivityOptions.newBuilder()
            // Timeout options specify when to automatically timeout Activities if the process is taking too long.
            .setStartToCloseTimeout(Duration.ofSeconds(60))
            // Optionally provide customized RetryOptions.
            // Temporal retries failures by default, this is simply an example.
            .setRetryOptions(retryoptions)
            .build();


    private final ActivityOrderNewProduct activityOrderNewProduct = Workflow.newActivityStub(ActivityOrderNewProduct.class,defaultActivityOptions);

    public boolean isOrderConfirmed = false;
    public boolean isOrderPickedUp = false;
    public boolean isOrderDelivered = false;
    private String status = "";

    private static final Logger LOG = Logger.getLogger(OrderProductImpl.class);

    @Override
    public Invoice orderNewProduct(Invoice invoice) {
        try{
            activityOrderNewProduct.placeOrder(invoice.getCustomer());
            status = "waiting confirm";
            if(activityOrderNewProduct.checkInventoryQuantity(
                    invoice.getInvoiceDetailList().get(0).getProduct(),
                    invoice.getInvoiceDetailList().get(0).getQuantity())
            ){
                LOG.info("***** Waiting for Hoang Phuc International to confirm your order");
                activityOrderNewProduct.assignEmpConfirm();

                Workflow.await(() -> isOrderConfirmed);
                LOG.info("isOrderConfirmed: "+isOrderConfirmed);
                invoice.setStatus("confirmed");
                status = invoice.getStatus();
                LOG.info("***** Please wait till we assign a delivery executive");

                Workflow.await(() -> isOrderPickedUp);
                invoice.setStatus( "picked up");
                status = invoice.getStatus();
                LOG.info("isOrderPickedUp: "+isOrderPickedUp);

                Workflow.await(() -> isOrderDelivered);
                invoice.setStatus( "delivered");
                status = invoice.getStatus();
            }else{
                LOG.info("***** Placed Order Not Successfully !");
                invoice.setStatus( "cancelled");
                status = invoice.getStatus();
                activityOrderNewProduct.notifyCustomer(invoice.getCustomer());
            }

            return invoice;
        }catch (Exception e){
            invoice.setStatus( "cancelled cause error");
            status = invoice.getStatus();
        }
        return invoice;
    }

    @Override
    public String getStatus() {
        return status;
    }

    @Override
    public void signalOrderAccepted() {
        activityOrderNewProduct.setOrderAccepted();
        this.isOrderConfirmed = false;
    }

    @Override
    public void signalOrderPickedUp() {
        activityOrderNewProduct.setOrderPickedUp();
        this.isOrderPickedUp = true;
    }

    @Override
    public void signalDelivered() {
        activityOrderNewProduct.setOrderDelivered();
        this.isOrderDelivered = true;
    }
}
Tiếp theo chúng ta sẽ khai báo với Temporal các Activity, Trước tiên mình sẽ khai báo 1 lớp Interface để khai báo Activity.
@ActivityInterface
public interface ActivityOrderNewProduct {
    void placeOrder(Customer customer);
    Boolean checkInventoryQuantity(Product product, int quantity);
    void assignEmpConfirm() throws IOException;
    void notifyEmployee() throws IOException;
    void notifyCustomer(Customer customer);
    void notifyDeliver(Employee employee);
    void setOrderAccepted();
    void setOrderPickedUp();
    void setOrderDelivered();
}
và tiếp tục là class ActivityOrderNewProductImpl để implements lại class ActivityOrderNewProduct.
public class ActivityOrderNewProductImpl implements ActivityOrderNewProduct {

    public ActivityOrderNewProductImpl(){

    }

    private static final Logger LOG = Logger.getLogger(ActivityOrderNewProductImpl.class);

    @Override
    public void placeOrder(Customer customer) {
        LOG.info("***** Customer order new");
    }

    @Override
    public Boolean checkInventoryQuantity(Product product, int quantity) {
        if(product.getQuantity() >= quantity){
            LOG.info("***** Inventory enough to provide");
            return true;
        }

        LOG.info("***** Inventory not enough to provide");
        return false;
    }

    @Override
    public void assignEmpConfirm() throws IOException {
        //Get Employee
        LOG.info("***** Order just assigned to: ");
        this.notifyEmployee();
    }

    @Override
    public void notifyEmployee() throws IOException {
        LOG.info("***** Notify ZNS to employee: " );
    }

    @Override
    public void notifyCustomer(Customer customer) {
        LOG.info("***** Notify  to customer : " + customer.getName());
    }

    @Override
    public void notifyDeliver(Employee employee) {
        LOG.info("***** Notify  to deliver : "+employee.getName());
    }

    @Override
    public void setOrderAccepted() {
        LOG.info("***** Employee has confirmed your order");
    }

    @Override
    public void setOrderPickedUp() {
        LOG.info("***** Order has been picked up");
    }

    @Override
    public void setOrderDelivered() {
        LOG.info("***** Order Delivered");
    }
}
Trong file WorkflowResource.java bạn mình tạo ra 1 hàm để thực thi đẩy 1 workflow lên Temporal.
@POST
    @Path("/placeOrder")
    @Produces(MediaType.APPLICATION_JSON)
    @Consumes(MediaType.APPLICATION_JSON)
    public Invoice placeNewOrder(PageLoadInvoice pageLoadInvoice) {
        int productOrderQuantity = 2;
        Invoice invoice = invoiceBusiness.createNew(pageLoadInvoice.cusID);
        InvoiceDetail invoiceDetail = invoiceDetailBusiness.createNew(invoice.getId(),pageLoadInvoice.prodID, productOrderQuantity);

        invoice.addInvoiceDetail(invoiceDetail);

        OrderProduct workflow =
                workflowObservable.getClient().newWorkflowStub(
                        OrderProduct.class, WorkflowOptions.newBuilder()
                                .setWorkflowId("Customer_Order_" + Math.abs(new Random().nextInt()))
                                .setTaskQueue(OrderProduct.QUEUE_NAME).build());
        WorkflowClient.start(workflow::orderNewProduct,invoice);
        return invoice;
    }
Trong hàm này các bạn có thể thấy Workflow được chỉ định sẽ start workflow này bằng hàm oderNewProduct nằm trong interface OrderProduct.
Lúc này oderProductImpl implements oderNewProduct sẽ được gọi ra và xử lý.
Bạn có thể thấy hàm orderNewProduct trong oderProductImpl có nhiệm vụ gọi đến các Activity và khi một Activity được thực hiện, Temporal sẽ ghi nhớ quá trình này là tiếp tục thực hiện các Activity khác sau 1 thời gian nghỉ.
Trong oderProductImpl bạn sẽ thấy có rất nhiều đoạn Workflow.await(Supplier<Boolean> unblockCondition), khi Temporal chạy đến hàm này nó sẽ đợi cho tới khi Condition = true. Trong Temporal cơ chế nghỉ này sẽ không tiêu tốn tài nguyên máy chủ.
Trong ví dụ trên của mình Workflow.await sẽ cần phải nhận được các SignalMethod từ bên ngoài gọi vô để tiếp tục thực hiện.
Sau đó các bạn thực hiện gọi hàm này
curl -X 'POST' \
  'http://localhost:8080/workflow/placeOrder' \
  -H 'accept: application/json' \
  -H 'Content-Type: application/json' \
  -d '{
  "prodID": 1,
  "cusID": 1
}'
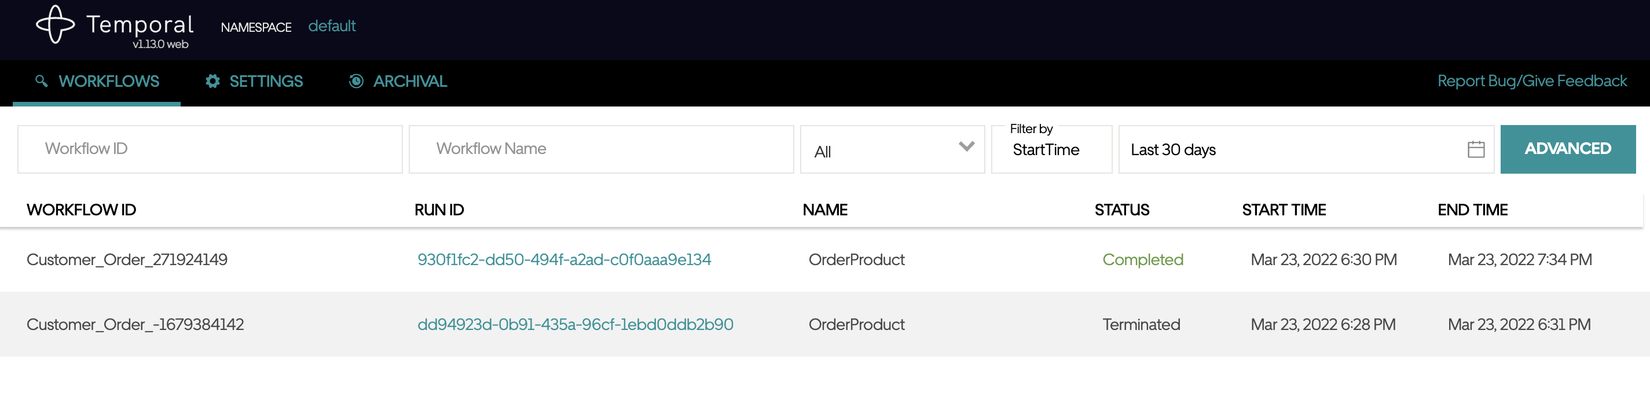
Lúc này 1 Workflow mới đã được khởi tạo với trạng thái Running.
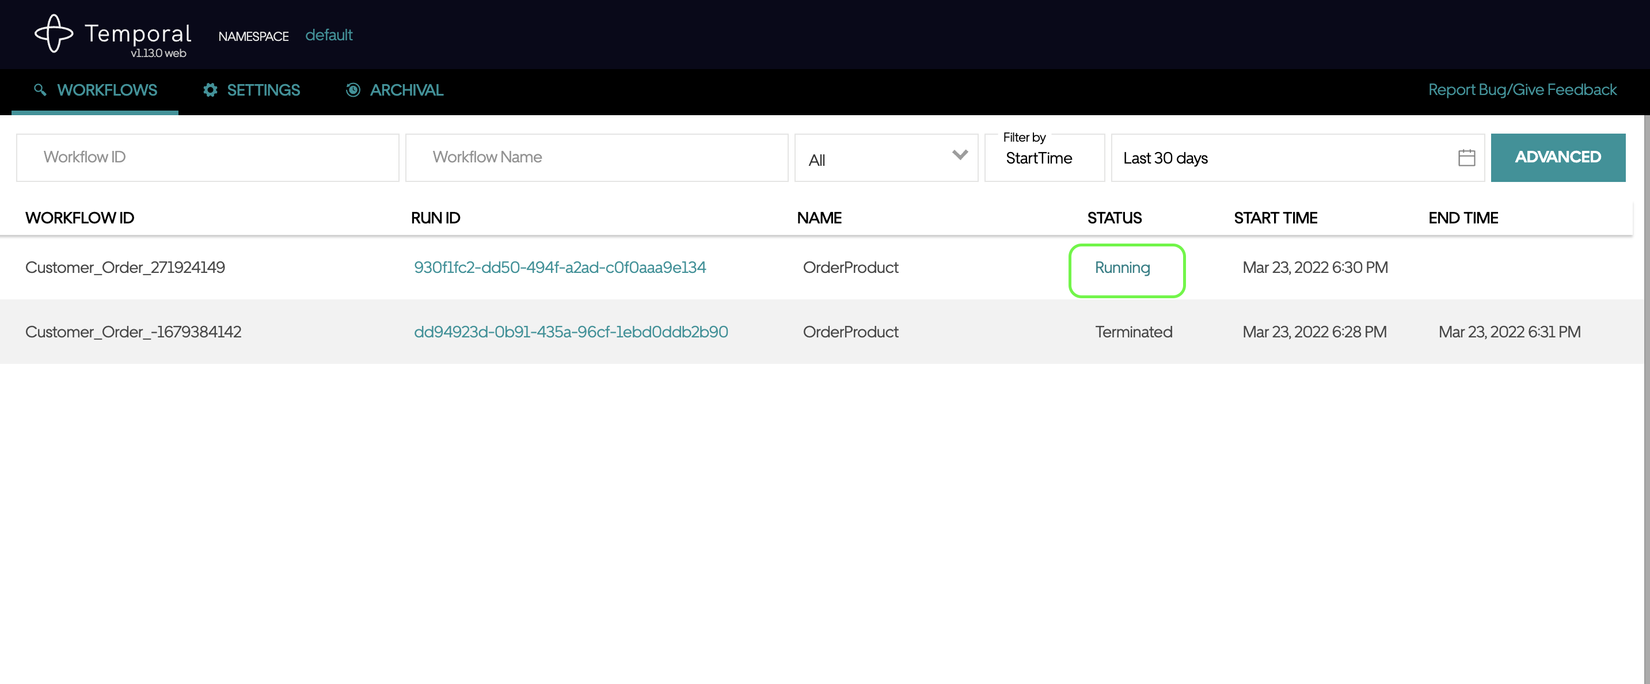
Khi một đơn hàng mới tạo ra mình sẽ gắn cho nó trạng thái bắt đầu là waiting confirm
Tiếp đó mình sẽ thực hiện gọi tiếp hàm sau:
curl -X 'GET' \
  'http://localhost:8080/workflow/confirmed/271924149' \
  -H 'accept: application/json'
Hàm này sẽ thực hiện các nhiệm vụ của nó là đưa trạng thái đơn hàng thành confirmed.
Tương tự với hàm pickedup, delivered cũng sẽ đưa trạng thái đơn hàng về đúng nhu cầu và kết thúc 1 workflow khi nhận được trạng thái delivered.
Ngoài việc triển khai các Workflow bằng code, bạn hoàn toàn có thể khai báo các workflow của mình trong file Json. Điều này là vô cùng tiện lợi khi nghiệm của của các ứng dụng phức tạp và có sự thay đổi nhiều. Nếu nhận được sự ủng hộ của mọi người về Temporal thì mình sẽ viết 1 bài khác hướng dẫn sau .
Kết thúc
Temporal là một kiến trúc rất hay, tuy nhiên trong 1 bài viết ngắn ngủi cũng tương đối khó để mình trình bài hết về Temporal cũng như giúp bạn hiểu rõ được nó.
Hẹn các bạn trong bài viết khác trong series Java practice.
Bạn có thể xem qua code mình đã dùng trong bài viết này tại: https://github.com/sackaboy/temporal-order-example.
All rights reserved
