
Tất tần tật về Airflow (P1)
Bài đăng này đã không được cập nhật trong 3 năm
Lời mở đầu
Chào các bạn,
Do dòng đời xô đẩy nên tôi lại viết tiếp đây. Chủ đề hôm này là Airflow, chi tiết sẽ có trong các mục phía dưới
Do lượng kiến thức về framework này khá lớn nên tôi sẽ cố gắng viết các phần nối tiếp nhau, bạn đọc chú ý.
Khái niệm về Airflow
Airflow là một công cụ lập lịch trình cho luồng công việc của bạn cũng như hỗ trợ quản lý, theo dõi từng phần trong quy trình giúp bạn sửa lỗi, bảo trì code thuận tiện và dễ dàng.
Airflow có thể tự động hóa quy trình công việc của bạn bằng DAGs ( Directed Acyclic Graphs ).
Airflow sẽ thực thi các phần công việc của bạn thông qua các worker mà vẫn đảm bảo các dependencies.
Nguyên tắc của Airflow:
- Tính năng động ( Dynamic ) : Airflow pipeline được config bằng code Python, cho phép bạn thay đổi code dễ dàng để tùy biến luồng làm việc của bạn.
- Tính tăng trưởng ( Scalable ) : Ví dụ đơn giản là bạn có thể mở rộng các task về xử lý dữ liệu để tiết kiệm thời gian
- Tính gọn gàng ( Elegant ) : code gọn gàng, ngăn nắp, rõ ràng giúp bạn đọc hiểu code nhanh chóng.
- Tính mở rộng ( Extensible ) : Bạn có thể thêm thắt thư viện, modules, packages, ... phù hợp với môi trường của bạn
P/S : Airflow không phải một giải pháp về stream dữ liệu như Spark Streaming, Apache Storm
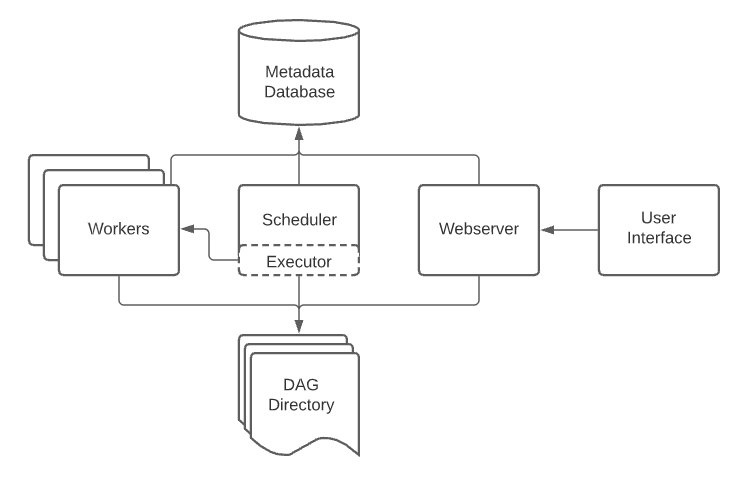
Kiến trúc
Airflow bao gồm các components sau:
- Scheduler: chạy workflow ( luồng công việc ) , gửi các tasks tới executor
- Executor: quản lý các workers, xử lý các tác vụ đang chạy
- Webserver: giao diện web cho phép kiểm tra, kích hoạt, sửa lỗi các tasks và DAGs
- Folder of DAG files: đọc bởi scheduler và executor ( với mọi worker mà executor có )
- Metadata database: nơi lưu trạng thái của scheduler, executor, webserver
Cài đặt
Airflow documentation đề cập tới khá nhiều phương pháp để cài đặt airflow, nhưng để tiện thử nghiệm, tôi sẽ dùng docker-compose, cài đặt airflow dưới dạng container. Còn trong môi trường sản phẩm, bạn có thể dùng Kubernetes và Helm charts để config sản phẩm theo ý mình.
Nếu không quen docker hay container, bạn vẫn có thể cài airflow bằng pip package.
Chuẩn bị trước
-
Python: 3.7, 3.8, 3.9, 3.10
-
Databases:
-
PostgreSQL: 10, 11, 12, 13, 14
-
MySQL: 5.7, 8
-
SQLite: 3.15.0+
-
MSSQL(Experimental): 2017, 2019
-
-
Kubernetes: 1.20.2, 1.21.1, 1.22.0, 1.23.0, 1.24.0
Minimum memory: 4 gb
Một số lưu ý:
-
Phiên bản MySQL 5.x hạn chế trong việc chạy nhiều schedulers
-
SQLite phục vụ cho môi trường test.
Cài đặt Airflow bằng PIP
Trước hết chúng ta cần cài đặt các dependencies của Linux
sudo apt-get install -y --no-install-recommends \
        freetds-bin \
        krb5-user \
        ldap-utils \
        libffi6 \
        libsasl2-2 \
        libsasl2-modules \
        libssl1.1 \
        locales  \
        lsb-release \
        sasl2-bin \
        sqlite3 \
        unixodbc
Setup nơi chứa Airflow, bạn có thể đổi đường dẫn theo nhu cầu
export AIRFLOW_HOME=~/airflow
Assign 3 biến environment: AIRFLOW_VERSION, PYTHON_VERSION và CONSTRAINT_URL ( file constraint này tương tự requirements.txt )
AIRFLOW_VERSION=2.3.3
PYTHON_VERSION="$(python --version | cut -d " " -f 2 | cut -d "." -f 1-2)"
CONSTRAINT_URL="https://raw.githubusercontent.com/apache/airflow/constraints-${AIRFLOW_VERSION}/constraints-${PYTHON_VERSION}.txt"
Cài đặt Airflow bằng pip package
pip install "apache-airflow==${AIRFLOW_VERSION}" --constraint "${CONSTRAINT_URL}"
Sau khi cài xong, khởi tạo database, user cũng như khởi chạy các components của airflow.
airflow standalone
Mở trình duyệt lên, paste localhost:8080 để xem thành quả.
Cài đặt Airflow bằng Docker
Vì là dùng docker-compose để cài đặt nên trước hết tôi cần cài docker compose plugin
sudo curl -L "https://github.com/docker/compose/releases/download/v2.9.0/docker-compose-$(uname -s)-$(uname -m)" -o /usr/local/bin/docker-compose
sudo chmod +x /usr/local/bin/docker-compose
Kiểm tra phiên bản
docker-compose --version
Sau khi cài đặt xong docker compose, tôi sẽ tải về file docker-compose yaml của airflow.
curl -LfO 'https://airflow.apache.org/docs/apache-airflow/2.3.3/docker-compose.yaml'
Trong file yaml này có chứa các services:
- airflow-scheduler: giám sát các tasks cũng như chạy tasks khi đã có đủ dependencies
- airflow-webserver: webserver có local domain
http://localhost:8080 - airflow-worker: các worker chạy các tasks theo lệnh của scheduler
- airflow-init: dịch vụ khởi tạo ban đầu ( tạo account, migrate database, ... )
- postgres: cơ sở dữ liệu
- redis: cầu nối truyền dẫn các lệnh từ scheduler tới worker.
P/S: Nếu bạn muốn cài thêm một số thư viện python hoặc nâng cấp airflow providers thì có thể điều chỉnh file docker-compose yaml mà bạn vừa tải về bên trên.
Giả dụ trong file docker-compose.yaml bên trên, tôi dùng image apache/airflow:latest nên thay đổi một line trong file như sau
image: ${AIRFLOW_IMAGE_NAME:-apache/airflow:|version|}
=>
image: ${AIRFLOW_IMAGE_NAME:-apache/airflow:latest}
Khởi tạo môi trường
Trước khi chạy Airflow lần đầu, bạn cần phải chuẩn bị môi trường chút: tạo files, folders cần thiết, khởi tạo cơ sở dữ liệu
mkdir -p ./dags ./logs ./plugins
echo -e "AIRFLOW_UID=$(id -u)" > .env
-
./dags : nơi chứa files DAG
-
./logs : nơi chứa log của executor và scheduler
-
./plugins : nơi chứa các plugin tùy chỉnh của bạn
P/S: Ở một số hệ điều hành, nếu không set biến AIRFLOW_UID sẽ hiện lên cảnh báo, bạn có thể phớt lờ chúng đi. Thay vào đó, bạn có thể tạo 1 file .env trong cùng folder file docker-compose.yaml với nội dung:
AIRFLOW_UID=50000
Với mọi hệ thống, bạn cần khởi tạo cơ sở dữ liệu và tài khoản trước
docker-compose up airflow-init
Kết quả trả về

Bạn có thể kiểm tra tình trạng container bằng lệnh docker ps -a

Chạy Airflow
Sau khi khởi tạo cơ sở dữ liệu cũng như tài khoản airflow, giờ là lúc tôi chạy framework này. Trong folder chứa file docker-compose.yaml của airflow, chạy lệnh
docker-compose up

Ok, Airflow container đã chạy và tôi có thể sử dụng các dịch vụ của framework này bằng 3 cách:
- CLI
- Web interface
- RestAPI
Các bạn cũng có thể xóa container và image nếu thử nghiệm xong cho tránh nặng máy
docker-compose down --volumes --rmi all
Hoặc chỉ xóa mỗi container
docker-compose down --volumes --remove-orphans
CLI
Bạn có thể kiểm tra thông tin của airflow thông qua dịch vụ airflow info bằng lệnh docker
docker-compose run airflow-worker airflow info
Nhưng với cách này, bạn sẽ lại tạo thêm instance docker nên tôi không khuyến khích dùng docker CLI
![]()
Ngoài docker CLI ra thì bạn cũng có thể dùng một file shell để chạy lệnh Airflow. Chú ý là file shell mà bạn tải về phải có cùng phiên bản với Airflow container mà bạn đang dùng.
curl -LfO 'https://airflow.apache.org/docs/apache-airflow/2.3.3/airflow.sh'
chmod +x airflow.sh
Bạn chạy câu lệnh trong folder có chứa file shell để kiểm tra xem nhé.
./airflow.sh info
Hoặc chọc thẳng vào Airflow container
./airflow.sh bash
Web Interface
Sau khi chạy Airflow container sẽ cung cấp một giao diện web. Well, trên trình duyệt bạn điền http://localhost:8080.
- Tài khoản mặc định:
airflow. - Mật khẩu mặc định:
airflow
Nếu bạn không tính dùng tài khoản mặc định thì có thể thêm 2 env này vào file docker-compose.yaml .
_AIRFLOW_WWW_USER_USERNAME
_AIRFLOW_WWW_USER_PASSWORD
RestAPI
Airflow cũng cung cấp API Endpoint. Bạn có thể dùng curl để thử hoặc dùng mấy framework như Postman
ENDPOINT_URL="http://localhost:8080/"
curl -X GET  \
    --user "airflow:airflow" \
    "${ENDPOINT_URL}/api/v1/pools"
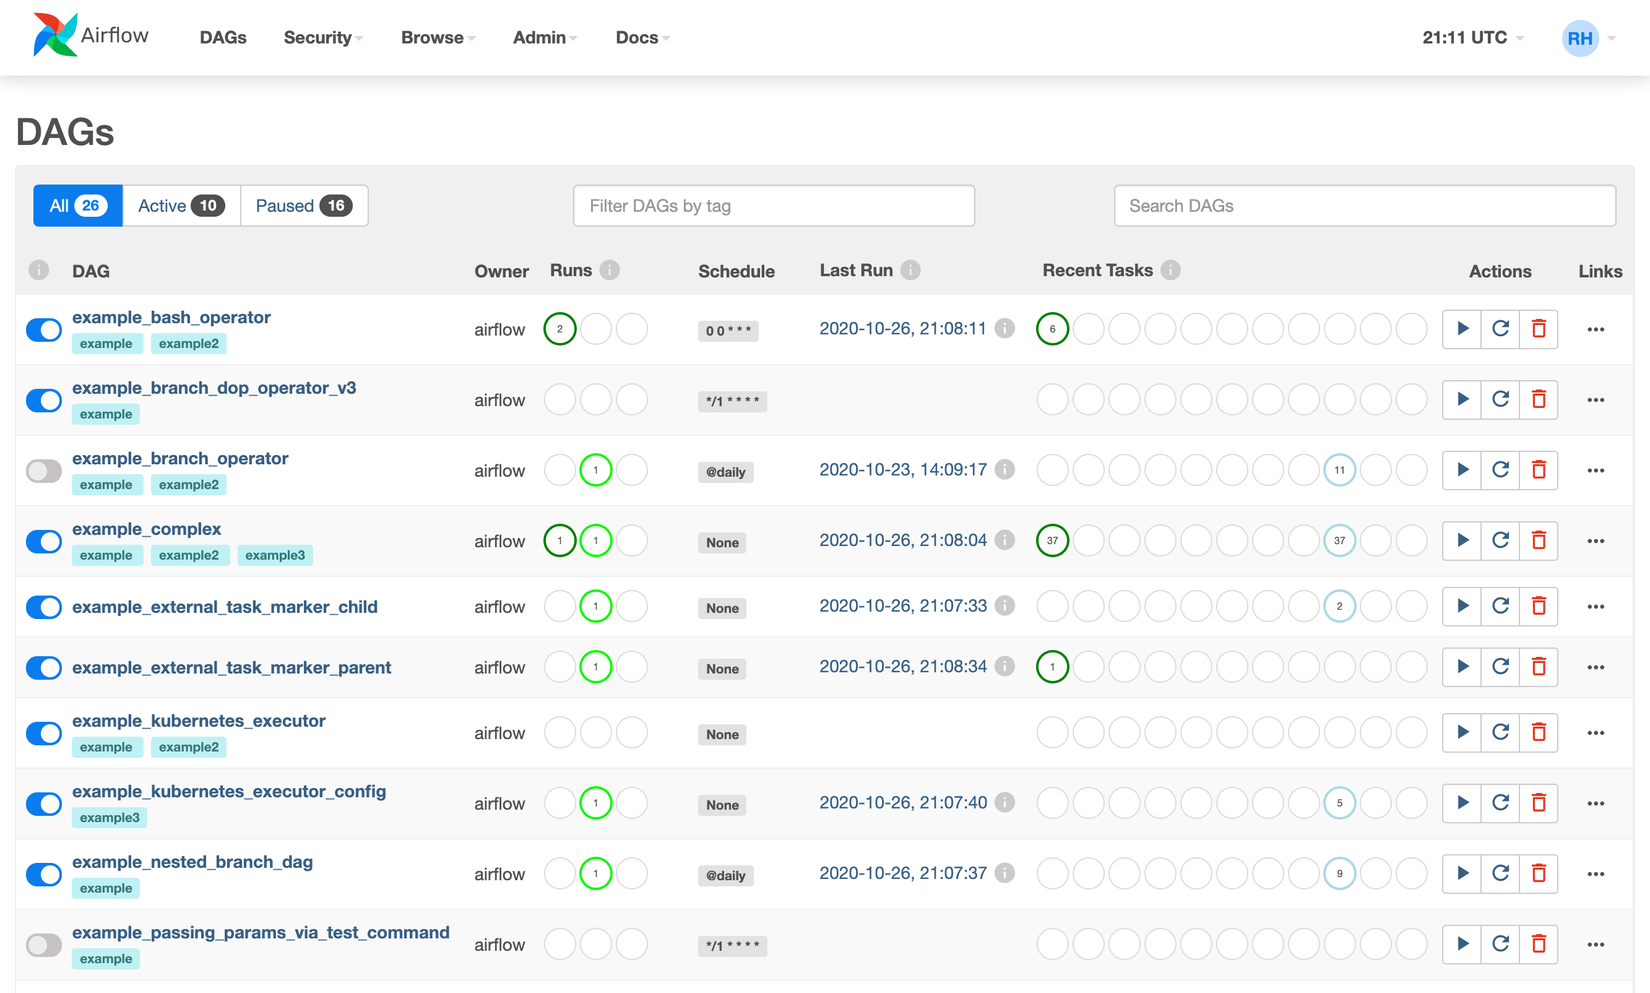
Sau khi bạn đăng nhập tài khoản airflow trên web http://localhost:8080 sẽ hiện ra một danh sách các DAG, chi tiết phần này mình sẽ nói bên dưới bởi DAG là khái niệm quan trọng của Airflow
P/s: Nếu bạn không muốn WebUI chứa các file DAG mẫu mà nhà phát triển cung cấp thì có thể thay đổi env AIRFLOW__CORE__LOAD_EXAMPLES: 'false' trong file docker-compose.yaml .
DAGs
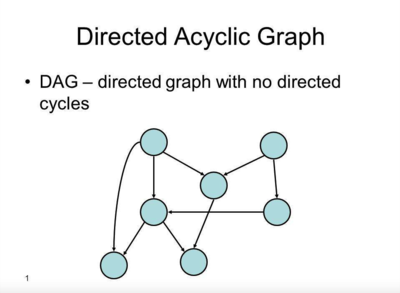
1 DAG (Directed Acyclic Graph) sẽ kết nối các tasks, xây dựng liên kết, tự động chạy task, ...
Dưới đây là 1 ví dụ về DAG:

Hình bên trên bao gồm 4 task: A, B, C, D có mối liên kết với nhau và chạy theo thứ tự mà người dùng quy định: a -> b, c -> d. Nếu task a oẳng thì sẽ dẫn đến task b, c, d oẳng theo. Bạn cũng có thể tùy chỉnh thời gian để các tasks này chạy vào thời điểm mong muốn. Bạn có thể yên tâm một điều là DAG sẽ không quan tâm đến code của bạn, mục tiêu của nó chỉ là workflow mà thôi.
Có 3 cách để khai báo DAG trong code của bạn:
- Context manager
- Standard constructor
- Decorator
Context manager
Với cách này bạn sẽ bọc code của mình trong DAG bằng with
with DAG(
    "my_dag_name", start_date=pendulum.datetime(2021, 1, 1, tz="UTC"),
    schedule_interval="@daily", catchup=False
) as dag:
    op = EmptyOperator(task_id="task")
Standard constructor
Với cách này, bạn sẽ khai báo một constructer gọi tới class DAG
my_dag = DAG("my_dag_name", start_date=pendulum.datetime(2021, 1, 1, tz="UTC"),
             schedule_interval="@daily", catchup=False)
op = EmptyOperator(task_id="task", dag=my_dag)
Decorator
Nếu bạn quen với Python decorator thì có lẽ sẽ quen với DAG decorator.
@dag(start_date=pendulum.datetime(2021, 1, 1, tz="UTC"),
     schedule_interval="@daily", catchup=False)
def generate_dag():
    op = EmptyOperator(task_id="task")

dag = generate_dag()
Sự khác biệt giữa Context manager và Decorator
Nếu để chọn cách nào trong 3 cách trên thì tôi sẽ chọn viết DAG bằng decorator. Tại sao ? Bởi vì cách viết của context manager và standard constructor phức tạp, dài dòng và mơ hồ. Chính vì thế các phiên bản của Airflow từ 2.x trở lên cung cấp thêm cách viết bằng decorator cho người dùng dễ dàng sử dụng. Tôi sẽ để 2 file ETL python ( Extract-Transform-Load ) được viết bởi 2 cách context manager và decorator bên dưới cho bạn dễ so sánh.
- Context manager
import json
from textwrap import dedent
import pendulum
from airflow import DAG
from airflow.operators.python import PythonOperator

with DAG(
    'tutorial_etl_dag',
    # These args will get passed on to each operator
    # You can override them on a per-task basis during operator initialization
    default_args={'retries': 2},
    description='ETL DAG tutorial',
    schedule_interval=None,
    start_date=pendulum.datetime(2021, 1, 1, tz="UTC"),
    catchup=False,
    tags=['example'],
) as dag:
    dag.doc_md = __doc__
    def extract(**kwargs):
        ti = kwargs['ti']
        data_string = '{"1001": 301.27, "1002": 433.21, "1003": 502.22}'
        ti.xcom_push('order_data', data_string)
    def transform(**kwargs):
        ti = kwargs['ti']
        extract_data_string = ti.xcom_pull(task_ids='extract', key='order_data')
        order_data = json.loads(extract_data_string)

        total_order_value = 0
        for value in order_data.values():
            total_order_value += value

        total_value = {"total_order_value": total_order_value}
        total_value_json_string = json.dumps(total_value)
        ti.xcom_push('total_order_value', total_value_json_string)
    def load(**kwargs):
        ti = kwargs['ti']
        total_value_string = ti.xcom_pull(task_ids='transform', key='total_order_value')
        total_order_value = json.loads(total_value_string)

        print(total_order_value)
    extract_task = PythonOperator(
        task_id='extract',
        python_callable=extract,
    )
    extract_task.doc_md = dedent(
        """\
    #### Extract task
    A simple Extract task to get data ready for the rest of the data pipeline.
    In this case, getting data is simulated by reading from a hardcoded JSON string.
    This data is then put into xcom, so that it can be processed by the next task.
    """
    )

    transform_task = PythonOperator(
        task_id='transform',
        python_callable=transform,
    )
    transform_task.doc_md = dedent(
        """\
    #### Transform task
    A simple Transform task which takes in the collection of order data from xcom
    and computes the total order value.
    This computed value is then put into xcom, so that it can be processed by the next task.
    """
    )

    load_task = PythonOperator(
        task_id='load',
        python_callable=load,
    )
    load_task.doc_md = dedent(
        """\
    #### Load task
    A simple Load task which takes in the result of the Transform task, by reading it
    from xcom and instead of saving it to end user review, just prints it out.
    """
    )

    extract_task >> transform_task >> load_task
- Decorator
import json
import pendulum
from airflow.decorators import dag, task

@dag(
    schedule_interval=None,
    start_date=pendulum.datetime(2021, 1, 1, tz="UTC"),
    catchup=False,
    tags=['example'],
)
def tutorial_taskflow_api_etl():
    """
    ### TaskFlow API Tutorial Documentation
    This is a simple ETL data pipeline example which demonstrates the use of
    the TaskFlow API using three simple tasks for Extract, Transform, and Load.
    Documentation that goes along with the Airflow TaskFlow API tutorial is
    located
    [here](https://airflow.apache.org/docs/apache-airflow/stable/tutorial_taskflow_api.html)
    """
    @task()
    def extract():
        """
        #### Extract task
        A simple Extract task to get data ready for the rest of the data
        pipeline. In this case, getting data is simulated by reading from a
        hardcoded JSON string.
        """
        data_string = '{"1001": 301.27, "1002": 433.21, "1003": 502.22}'

        order_data_dict = json.loads(data_string)
        return order_data_dict
    @task(multiple_outputs=True)
    def transform(order_data_dict: dict):
        """
        #### Transform task
        A simple Transform task which takes in the collection of order data and
        computes the total order value.
        """
        total_order_value = 0

        for value in order_data_dict.values():
            total_order_value += value

        return {"total_order_value": total_order_value}
    @task()
    def load(total_order_value: float):
        """
        #### Load task
        A simple Load task which takes in the result of the Transform task and
        instead of saving it to end user review, just prints it out.
        """

        print(f"Total order value is: {total_order_value:.2f}")
    order_data = extract()
    order_summary = transform(order_data)
    load(order_summary["total_order_value"])
tutorial_etl_dag = tutorial_taskflow_api_etl()
- Import modules: 2 cách viết khác nhau sẽ có 2 cách import thư viện khác nhau
- Context manager:
from airflow import DAG
from airflow.operators.python import PythonOperator
- Decorator
from airflow.decorators import dag, task
- Khởi tạo DAG:
- Context manager: bọc tất cả các tasks với DAG bằng keyword
with - Decorator: khởi tạo
@dagđầu file
Do các tham số của 2 cách viết giống nhau, nên tôi chỉ lấy ví dụ của 1 cách viết.
@dag(
    start_date=datetime.now(),
    schedule_interval=None,
    catchup=False,
    tags=['example'],
    ...
)
start_date: thời gian bắt đầu
schedule_interval: lịch trình chạy ( @once, @hourly, @daily, @weekly, @monthly, @yearly )
catchup: nếu bạn có start_date, end_date ( optional ) và schedule_interval thì khi bạn để giá trị của catchup là True thì schedule_interval sẽ không bị giới hạn và thực thi tasks tức thì.
- Khởi tạo tasks trong DAG: các tasks ở đây là extract, transform, loading.
- Context manager: truyền các function ETL vào PythonOperator ( Operator có trách nhiệm xử lý tasks trong phần kiến trúc đề cập bên trên ) và gán 1 biến bất kỳ
extract_task = PythonOperator(
    task_id='extract',
    python_callable=extract,
)
- Decorator: đơn giản dùng như python decorator
@task()
def extract():
    ...
- Viết doc cho function.
- Context manager: từ các biến tượng trưng cho các task gọi hàm
doc_md
extract_task.doc_md = dedent(
        """\
#### Extract task
A simple Extract task to get data ready for the rest of the data pipeline.
In this case, getting data is simulated by reading from a hardcoded JSON string.
This data is then put into xcom, so that it can be processed by the next task.
"""
)
- Decorator: không thay đổi gì, viết doc trong hàm như bình thường
- Xác định thứ tự xử lý của các tasks: Chi tiết phần này mình sẽ đề cập ở bên dưới
- Context manager:
extract_task >> transform_task >> load_task
- Decorator: cách viết này sẽ rõ ràng hơn cho người đọc
order_data = extract()
order_summary = transform(order_data)
load(order_summary["total_order_value"])
Xác định thứ tự xử lý của các tasks
Xác định thứ tự xử lý của các tasks ( Task Dependencies ): 1 task không phải lúc nào cũng hoạt động 1 mình, sẽ có các tasks phụ thuộc vào nó hoặc nó phụ thuộc vào. Vì vậy, một nhiệm vụ quan trọng của DAG là tạo mối quan hệ của các tasks.
- Cách 1: dùng toán tử
<<và>>
first_task >> [second_task, third_task]
third_task << fourth_task
- Cách 2: dùng hàm
set_downstreamvàset_upstream
first_task.set_downstream(second_task, third_task)
third_task.set_upstream(fourth_task)
Trường hợp các tasks giao nhau
from airflow.models.baseoperator import cross_downstream

# Replaces
# [op1, op2] >> op3
# [op1, op2] >> op4
cross_downstream([op1, op2], [op3, op4])
Trường hợp các tasks tạo thành dây chuyền
from airflow.models.baseoperator import chain

#1
# op1 >> op2 >> op3 >> op4
chain(op1, op2, op3, op4)

#2
# op1 >> op2 >> op3 >> op4 >> op5 >> op6
chain(*[EmptyOperator(task_id='op' + i) for i in range(1, 6)])

#3
# op1 >> op2 >> op4 >> op6
# op1 >> op3 >> op5 >> op6
chain(op1, [op2, op3], [op4, op5], op6)
Cách viết kết hợp Decorator và Context Manager
Nếu xảy ra trường hợp bạn dùng PythonOperator để chạy task A và dùng EmailOperator để chạy task B thì bạn cũng có thể kết hợp 2 cách viết. Ví dụ:
from airflow.decorators import dag, task
from airflow.operators.email_operator import EmailOperator

from datetime import datetime
from typing import Dict
import requests
import logging

API = "https://api.coingecko.com/api/v3/simple/price?ids=bitcoin&vs_currencies=usd&include_market_cap=true&include_24hr_vol=true&include_24hr_change=true&include_last_updated_at=true"

@dag(schedule_interval='@daily', start_date=datetime(2021, 12, 1), catchup=False)
def taskflow():

    @task(task_id='extract', retries=2)
    def extract_bitcoin_price() -> Dict[str, float]:
        return requests.get(API).json()['bitcoin']

    @task(multiple_outputs=True)
    def process_data(response: Dict[str, float]) -> Dict[str, float]:
        logging.info(response)
        return {'usd': response['usd'], 'change': response['usd_24h_change']}

    @task
    def store_data(data: Dict[str, float]):
        logging.info(f"Store: {data['usd']} with change {data['change']}")

    email_notification = EmailOperator(
        task_id='email_notification',
        to='noreply@xxx.com',
        subject='dag completed',
        html_content='the dag has finished'
    )

    store_data(process_data(extract_bitcoin_price())) >> email_notification

dag = taskflow()
Cài đặt PIP package cho task
Trong trường hợp task của bạn chạy cần một thư viện chỉ định. Chúng ta có thể dùng cách viết Decorator @task.virtualenv hoặc cách viết Context Manager PythonVirtualenvOperator. Cụ thể như sau:
- Decorator
@task.virtualenv(
        task_id="virtualenv_python", requirements=["numpy"], system_site_packages=False
    )
def mul_number(numbs: list):
        import numpy
        return int(numpy.prod(numpy.array(numbs)))
- Context Manager
def mul_number(numbs: list):
        import numpy
        return int(numpy.prod(numpy.array(numbs)))

virtualenv_task = PythonVirtualenvOperator(
    task_id="virtualenv_python",
    python_callable=mul_number(numbs),
    requirements=["numpy"],
    system_site_packages=False,
)
P/s: Nếu bạn có nhiều thư viện cần cài thì có thể thêm đường dẫn tới file requirements.txt: requirements="path\to\requirements.txt"
Chạy file DAG
Trong phần khởi tạo môi trường bên trên ( https://viblo.asia/p/quan-ly-workflow-voi-airflow-L4x5xqPwKBM#khoi-tao-moi-truong-7 ) , tôi có nhắc đến việc mount folder trong container ra bên ngoài. Một trong số đó rất quan trọng trong phần này dags/ bởi vì các file python mà tôi chạy sẽ nằm trong folder này. Khi tôi đặt file python bọc bởi DAG trong folder, file này sẽ được copy vào container ( /opt/airflow/dags/ ), Airflow sẽ kiểm tra và chạy các file này.
Tôi sẽ làm mẫu 1 file DAG và trình bày các bước để các bạn có thể rõ ràng hơn:
- Tạo 1 file DAG mẫu. Cách viết DAG tôi có hướng dẫn bên trên rồi
import random
from datetime import datetime

from airflow.decorators import dag, task

@dag(
    start_date=datetime.now(),
    schedule_interval=None,
    catchup=False,
    tags=['example'],
)
def test_operator():
    @task()
    def get_random_number():
        n1 = random.choice(range(100))
        n2 = random.choice(range(100))

        return [n1, n2]
    @task()
    def add_number(numbs: list):
        return sum(numbs)

    @task.virtualenv(
        task_id="virtualenv_python", requirements=["numpy"], system_site_packages=False
    )
    def mul_number(numbs: list):
        import numpy
        return int(numpy.prod(numpy.array(numbs)))

    @task()
    def display(add_res, mul_res):
        return (add_res, mul_res)
    task1 = get_random_number()
    task2 = add_number(task1)
    task3 = mul_number(task1)
    display(task2, task3)
test_dag = test_operator()
- Chuyển file DAG này vào thư mục
dags/mà Airflow container đã mount. Các bạn có thể tìm thấy câu lệnh mount trong file docker-compose.yaml
volumes:
    - ./dags:/opt/airflow/dags
![]()
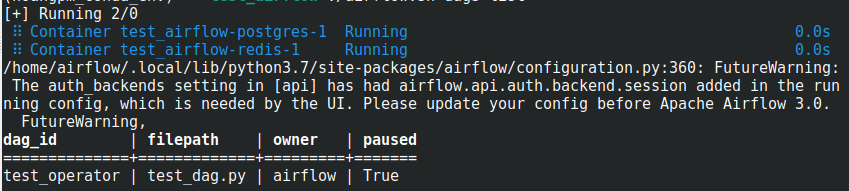
- Refresh lại WebUI để cập nhật trạng thái mới nhất. Nếu bạn kiểm tra airflow database sẽ thấy thông tin file DAG đã được lưu lại. Dùng airflow shell script để kiểm tra
./airflow.sh dags list
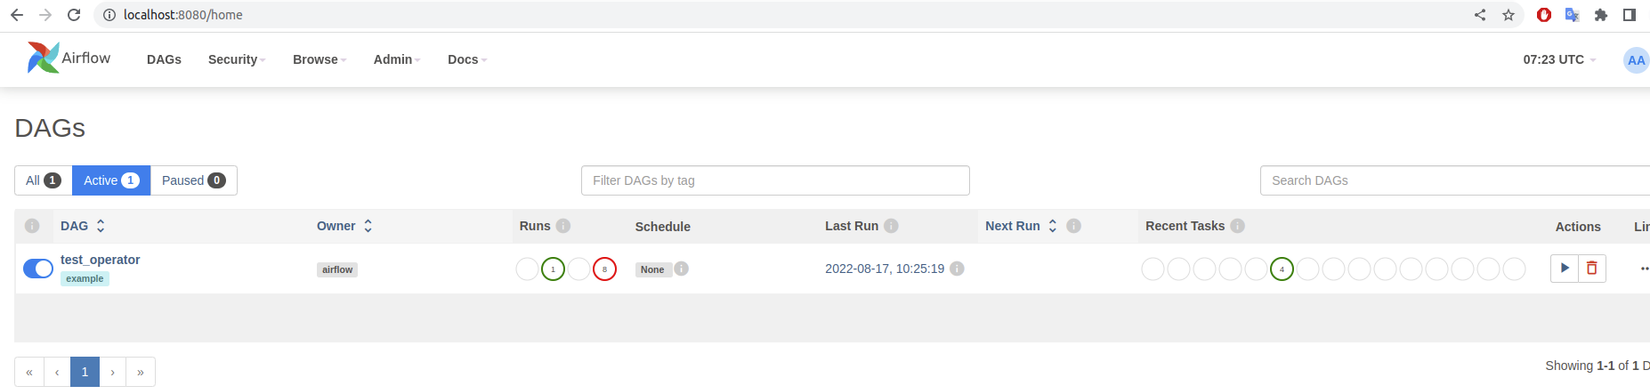
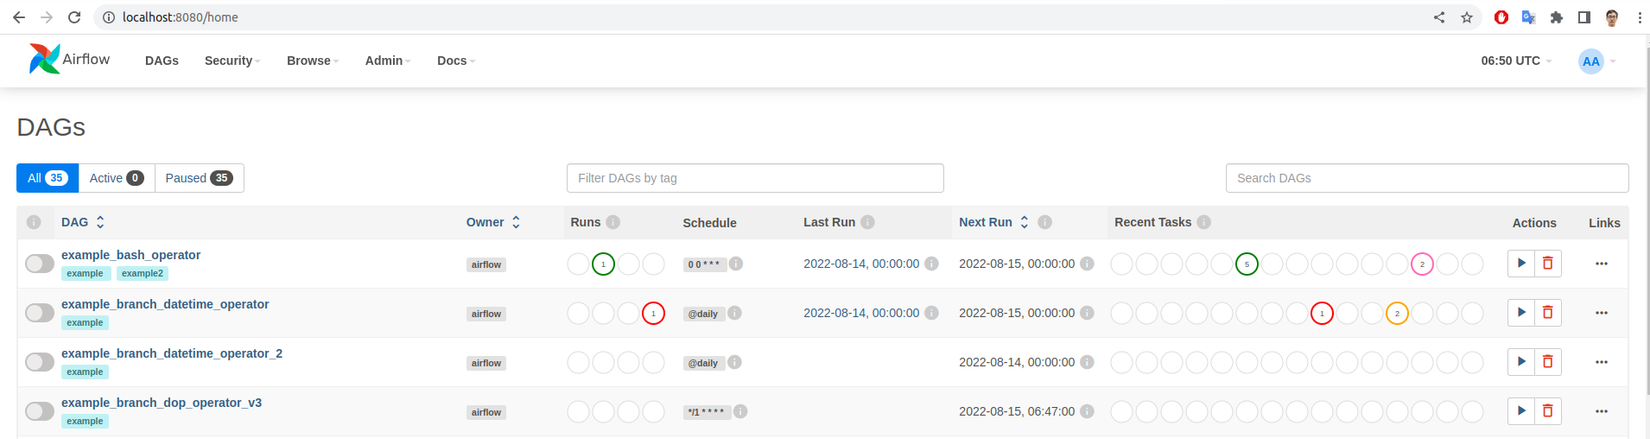
- Ban đầu DAG
test_operatortrong trạng thái tạm dừng, chúng ta cần kích hoạt nó, sau đó trigger DAG nằm trong mục Actions ở ảnh trên. Mục Runs sẽ thống kê trạng thái của các lần chạy DAG, như ở bên trên thì tôi có 1 lần thành công và 8 lần thất bại ( do chạy thử để sửa code ). Ngoài ra bạn có thể click vào tên file DAG để xem chi tiết ( kiến trúc, ngày giờ chạy, thời gian chạy của mỗi task, ... )
Vậy là xong, các bạn chỉ cần 4 bước để chạy 1 file DAG, sau khi chạy xong các bạn có thể dễ dàng quản lý, quan sát workflow thông qua WebUI
P/s: Nếu các bạn muốn xóa file DAG trên web thì làm theo các bước sau:
- Xóa file DAG trong thư mục
dags/ - Dùng câu lệnh
./airflow.sh dags delete DAG_ID- DAG_ID ở đây là tên file DAG, ví dụ "test_operator" để xóa bản ghi trong cơ sở dữ liệu hoặc dùng câu lệnh/airflow.sh db reset - Trên Web UI, ấn vào icon thùng rác @@ trong mục Actions
Lời kết
Airflow còn nhiều thứ vọc vạch lắm, cho nên tôi sẽ viết thêm bài nữa để giới thiệu các components của Airflow vào buổi sau. Để tổng kết thì buổi này đã hoàn thành các mục sau:
- Giới thiệu về Airflow
- Cách cài đặt Airflow
- Cách tạo file DAG
- Cách chạy file DAG
Buổi sau sẽ thiên về lý thuyết nhiều hơn, mong các bạn đọc mà cảm thấy ok thì cho mình xin upvote. Cám ơn các bạn rất nhiều 
References
All rights reserved
