Tập tành học làm Android (P5) - Fragment
Bài đăng này đã không được cập nhật trong 6 năm
Trong bài viết lần này mình cùng các bạn tìm hiểu về một thành phần cũng rất hay trong android đó là fragment. Trong bài viết mình có sử dụng ngôn ngữ Kotlin và các kiến thức trong các bài viết trước của mình để làm ví dụ về fragment các bạn có thể xem các kiến thức cơ bản về Kotlin và các bài viết trước của mình
Giới thiệu
- Fragment là một phần giao diện người dùng hoặc hành vi của một ứng dụng. Nó có thể đặt ở bên trong activity, và thiết kế activity với nhiều module. Nó được coi như là sub-activity (activity con)
- Fragment cũng có vòng đời riêng của nó.
- Có thể thêm, xóa, thay đổi fragment trong activity khi activity vẫn đang chạy.
- Có thể kết hợp nhiều Fragment trong một Activity để xây dựng giao diện người dùng multi-pane.
- Một Fragment có thể được sử dụng trong nhiều Activities.
- Vòng đời của Fragment có quan hệ chặt chẽ với vòng đời của Activity đang dùng, khi Activity bị tạm dừng thì các Fragment sẽ dừng lại.
- Fragment có thể thực hiện một hành vi mà không có trong thành phần giao diện người dùng.
- Bạn có thể tạo các Fragments bằng cách kế thừa lớp Fragment và Fragment được thêm vào layout bởi thẻ
<fragment>
Vòng đời fragment
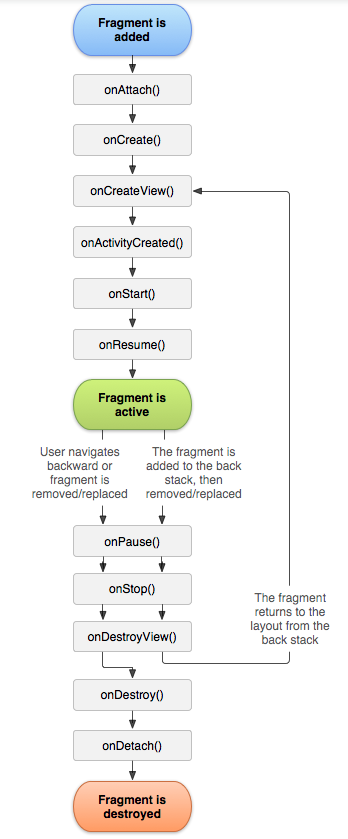
- onAttach(): instance của Fragment được gắn kết với một sự thể hiện của activity. Fragment và Activity không hoàn toàn được khởi tạo. Đặc biệt khi bạn lấy trong phương thức này một tham chiếu tới activity mà sử dụng Fragment cho công việc khởi tạo xa hơn.
- onCreate(): Hệ thống gọi phương thức này khi tạo Fragment. Bạn nên khởi tạo các thành phần cơ bản của Fragment mà bạn muốn duy trì khi Fragment bị dừng hoặc tạm dừng, sau đó được phục hồi lại.
- onCreateView(): Hệ thống gọi phương này khi cần Fragment đó để vẽ giao diện UI lần đầu tiên. Để vẽ một UI cho Fragment của bạn, bạn phải trả về một thành phần View từ phương thức này. Đó là root của layout. Bạn có thể trả về null nếu Fragment không cung cấp một giao diện UI.
- onActivityCreated(): Được gọi sau phương thức onCreateView() khi host activity được tạo. Sự thể hiện của Activity và Fragment đã được tạo cùng với cấu trúc view của activity đó. Tại điểm này, View có thể được truy cập với phương thức findViewById(). Ví dụ, trong phương thức này bạn có thể khởi tạo các đối tượng mà cần một đối tượng Context.
- onStart(): Được gọi khi Fragment hiển thị cho người dùng
- onResume(): kết nối lại tương tác của người dùng với fragment
- onPause(): Hệ thống gọi phương thức này khi có dấu hiệu chỉ rằng người dùng đang rời khỏi Fragment này.
- onStop(): Fragment đang bị dừng bằng cách gọi phương thức này.
- onDestroyView(): Fragment view sẽ hủy sau khi gọi phương thức này.
- onDestroy(): Được gọi để xóa trạng thái của Fragment.
Cách sử dụng fragment
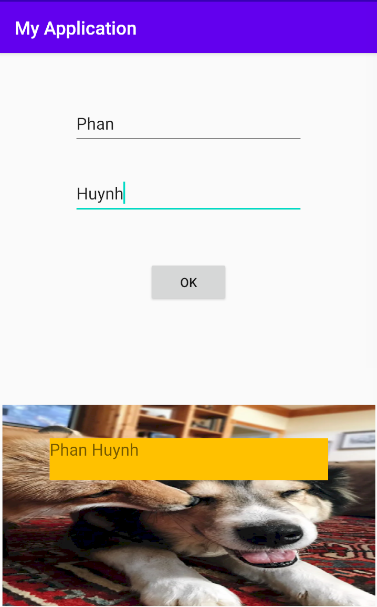
Đây là giao diện mình sẽ làm ví dụ về fragment trong bài viết này.
Tách fragment
Trong giao diện này các bạn có thể thấy có 2 phần là phần nhập dữ liệu và một button, phần còn lại phía dưới là phần hiển thị text sau khi chúng ta click vào button ở phần trên nên chúng ta sẽ tách giao diện này thành 2 phần là TopFragment và BottomFragment
Thiết kế giao diện cho fragment
Top Fragment
- Trong thực mục
res/layoutchúng ta tạo mớilayout resource filevới tên làactivity_top, ở đây mình sẽ sử dụngconstraintlayoutđể dựng giao diện cho layout này - Nội dung file
activity_top.xmlsẽ như sau:
<?xml version="1.0" encoding="utf-8"?>
<androidx.constraintlayout.widget.ConstraintLayout
    xmlns:android="http://schemas.android.com/apk/res/android"
    xmlns:app="http://schemas.android.com/apk/res-auto"
    xmlns:tools="http://schemas.android.com/tools"
    android:layout_width="match_parent"
    android:layout_height="match_parent">

    <EditText
        android:id="@+id/firstname"
        android:layout_width="252dp"
        android:layout_height="49dp"
        android:layout_marginTop="36dp"
        android:ems="10"
        android:inputType="textPersonName"
        android:text="First name"
        app:layout_constraintEnd_toEndOf="parent"
        app:layout_constraintHorizontal_bias="0.497"
        app:layout_constraintStart_toStartOf="parent"
        app:layout_constraintTop_toTopOf="parent" />

    <EditText
        android:id="@+id/lastname"
        android:layout_width="252dp"
        android:layout_height="49dp"
        android:layout_marginTop="112dp"
        android:ems="10"
        android:inputType="textPersonName"
        android:text="Last Name"
        app:layout_constraintEnd_toEndOf="parent"
        app:layout_constraintHorizontal_bias="0.496"
        app:layout_constraintStart_toStartOf="parent"
        app:layout_constraintTop_toTopOf="parent" />

    <Button
        android:id="@+id/button_ok"
        android:layout_width="wrap_content"
        android:layout_height="wrap_content"
        android:layout_marginTop="48dp"
        android:text="Ok"
        app:layout_constraintEnd_toEndOf="parent"
        app:layout_constraintHorizontal_bias="0.498"
        app:layout_constraintStart_toStartOf="parent"
        app:layout_constraintTop_toBottomOf="@+id/lastname" />
</androidx.constraintlayout.widget.ConstraintLayout>
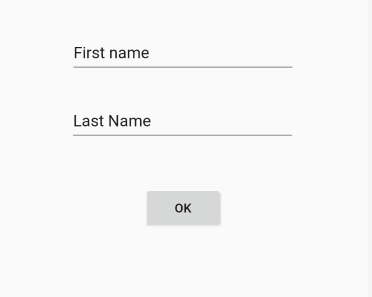
Và đây là giao diện của nó:
- Sau đó trong thư mục
java/com.example.myapplication.ui.mainchúng ta tạo thư mụcfragmentđể chứa các class xử lý fragment của chúng ta. Trong thư mục này chúng ta tạoKotlin classlàTopFragment
Nội dung file này sẽ như sau:
package com.example.myapplication.ui.main.fragment

import android.content.Context
import android.os.Bundle
import android.view.LayoutInflater
import android.view.View
import android.view.ViewGroup
import android.widget.Button
import android.widget.EditText
import androidx.fragment.app.Fragment
import com.example.myapplication.MainActivity
import com.example.myapplication.R

class TopFragment : Fragment {
    constructor()
    private lateinit var txtFirstName : EditText
    private lateinit var txtLastName : EditText
    private lateinit var btnOk : Button
    private lateinit var mainActivity: MainActivity

    override fun onCreateView(
        inflater: LayoutInflater,
        container: ViewGroup?,
        savedInstanceState: Bundle?
    ): View? {
        val view : View = inflater.inflate(R.layout.activity_top, container, false)
        txtFirstName = view.findViewById(R.id.firstname)
        txtLastName = view.findViewById(R.id.lastname)
        btnOk = view.findViewById(R.id.button_ok)
        btnOk.setOnClickListener(object : View.OnClickListener{
            override fun onClick(v: View?) {
                val firstName = txtFirstName.getText().toString();
                val lastName = txtLastName.getText().toString();

                mainActivity.showText(firstName, lastName)
            }
        })

        return view
    }

    override fun onAttach(context: Context) {
        super.onAttach(context)

        if (context is MainActivity) {
            mainActivity = context
        }
    }
}
Bottom Fragment
- Tương tự như
Top fragmentthì chúng ta sẽ tạo layout fragment trongres/layoutvới tên làactivity_bottom
Nội dung file sẽ như sau:
<?xml version="1.0" encoding="utf-8"?>
<androidx.constraintlayout.widget.ConstraintLayout
    xmlns:android="http://schemas.android.com/apk/res/android"
    xmlns:app="http://schemas.android.com/apk/res-auto"
    xmlns:tools="http://schemas.android.com/tools"
    android:layout_width="match_parent"
    android:layout_height="match_parent"
    android:background="@mipmap/dog" >

    <TextView
        android:id="@+id/fullname"
        android:layout_width="303dp"
        android:layout_height="46dp"
        android:layout_marginTop="36dp"
        android:textSize="18dp"
        android:text="Full name"
        app:layout_constraintEnd_toEndOf="parent"
        app:layout_constraintStart_toStartOf="parent"
        app:layout_constraintTop_toTopOf="parent"
        android:background="#FFC107"
    />

</androidx.constraintlayout.widget.ConstraintLayout>
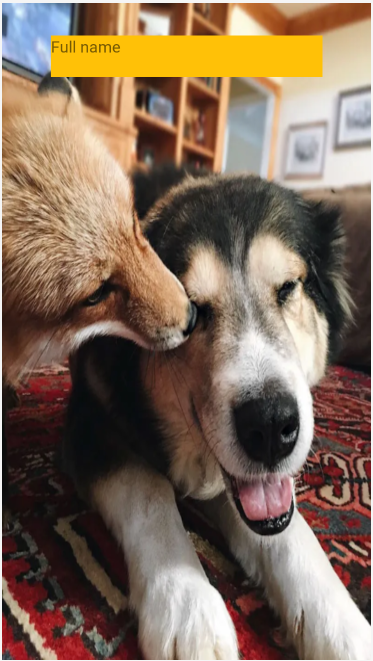
Giao diện sẽ như sau:
Sau đó trong thư mục java/com.example.myapplication.ui.main chúng ta tạo thư mục fragment để chứa các class xử lý fragment của chúng ta. Trong thư mục này chúng ta tạo Kotlin class là BottomFragment
Nội dung file này sẽ như sau:
package com.example.myapplication.ui.main.fragment

import android.os.Bundle
import android.view.LayoutInflater
import android.view.View
import android.view.ViewGroup
import android.widget.TextView
import androidx.fragment.app.Fragment
import com.example.myapplication.R

class BottomFragment : Fragment {
    constructor()
    private lateinit var txtFullName : TextView

    override fun onCreateView(
        inflater: LayoutInflater,
        container: ViewGroup?,
        savedInstanceState: Bundle?
    ): View? {
        val view : View = inflater.inflate(R.layout.activity_bottom, container, false)
        txtFullName = view.findViewById(R.id.fullname)
        return view
    }

    fun showText(firstName : String, lastName : String) {
        txtFullName.setText(firstName + " " + lastName)
    }
}
Trong file này chúng ta có hai function:
- onCreateView: hàm này chúng ta return về 1
viewđể tạo giao diện cho fragment, và find full name theo id - showText: hàm này set nội dung cho fullname
Main activity
- Chúng ta sửa lại file giao diện layout main activity như sau:
Nội dung file
main_activitynhư sau:
<?xml version="1.0" encoding="utf-8"?>
<androidx.constraintlayout.widget.ConstraintLayout
    xmlns:android="http://schemas.android.com/apk/res/android"
    xmlns:app="http://schemas.android.com/apk/res-auto"
    xmlns:tools="http://schemas.android.com/tools"
    android:layout_width="match_parent"
    android:layout_height="match_parent">

    <fragment
        android:id="@+id/fragment_top"
        android:name="com.example.myapplication.ui.main.fragment.TopFragment"
        android:layout_width="354dp"
        android:layout_height="296dp"
        android:layout_marginTop="16dp"
        app:layout_constraintEnd_toEndOf="parent"
        app:layout_constraintStart_toStartOf="parent"
        app:layout_constraintTop_toTopOf="parent" />

    <fragment
        android:id="@+id/fragment_bottom"
        android:name="com.example.myapplication.ui.main.fragment.BottomFragment"
        android:layout_width="406dp"
        android:layout_height="219dp"
        app:layout_constraintBottom_toBottomOf="parent"
        app:layout_constraintEnd_toEndOf="parent"
        app:layout_constraintStart_toStartOf="parent"
        app:layout_constraintTop_toBottomOf="@+id/fragment_top"
        app:layout_constraintVertical_bias="0.982" />
</androidx.constraintlayout.widget.ConstraintLayout>
- Sau đó chúng ta sửa lại file
MainActivitynhư sau:
package com.example.myapplication

import androidx.appcompat.app.AppCompatActivity
import android.os.Bundle
import com.example.myapplication.ui.main.fragment.BottomFragment

class MainActivity : AppCompatActivity() {

    override fun onCreate(savedInstanceState: Bundle?) {
        super.onCreate(savedInstanceState)
        setContentView(R.layout.main_activity)
    }

    fun showText(firstName : String, lastName : String) {
        val bottomFragment = supportFragmentManager.findFragmentById(R.id.fragment_bottom) as BottomFragment
        bottomFragment.showText(firstName, lastName)
    }
}
Trong file này chúng ta có hai function:
- onCreate: để tạo activity, set view là file layout
main_activitymà chúng ta đã tạo - showText: trong function này chúng ta get
Bottom Fragmentsau đó truyền các parameter vào functionshowTextmà đã được khởi tạo ở classBottomFragment
All rights reserved
