Tạo ứng dụng Calculator với ReactJS (Part 2)
Bài đăng này đã không được cập nhật trong 7 năm
Chào mọi người, ở trong bài viết trước Tạo ứng dụng Calculator với ReactJS (Part 1) (link: https://viblo.asia/p/tao-ung-dung-calculator-voi-reactjs-part-1-RQqKLABmZ7z) thì mình đã giới thiệu về ứng dụng Calculator, phân tích giao diện của ứng dụng, và đã tạo các component trong thư mục của ứng dụng. Mọi người cùng xem lại ứng dụng Calculator tí cho nhớ nó như thế nào nhỉ  :
:
Xây dựng ứng dụng
Cấu trúc thư mục ứng dụng của chúng ta:
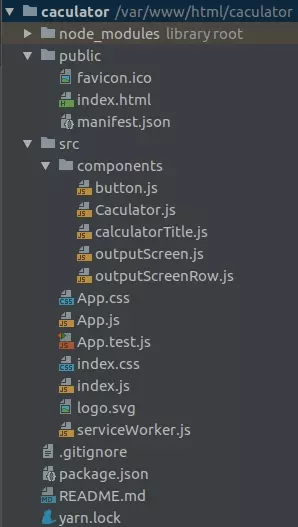
Note:
- Các component có chức năng gì trong ứng dụng
Calculatorcủa chúng ta thì các bạn có thể xem lại ở bài viết Tạo ứng dụng Calculator với ReactJS (Part 1) (link: https://viblo.asia/p/tao-ung-dung-calculator-voi-reactjs-part-1-RQqKLABmZ7z)
Nào, bây giờ chúng ta mở file calculatorTitle.js lên, đây chính là component CalculatorTilte của chúng ta và chúng ta viết code như sau:
import React from 'react';

const CalculatorTitle = (props) => {
    return (
        <div className="calculator-title">
            { props.title }
        </div>
    )
}

export default CalculatorTitle;
Ở trong file này chúng ta tạo ra một function component có tên là CalculatorTitle và truyền vào function component này một props.
return (
    <div className="calculator-title">
        { props.title }
    </div>
)
đây là đoạn code trả về cho component chúng ta phần hiển thị tiêu đề của ứng dụng, giá trị title được nhận từ props mà component cha truyền vào.
Tiếp theo, chúng ta mở file OutputScreenRow.js, và chúng ta viết code như sau:
import React from 'react';

const OutputScreenRow = (props) => {
    return (
        <div className="screen-row">
            <input type="text" readOnly value = {props.value}/>
        </div>
    )
}

export default OutputScreenRow;
Cũng như CalculatorTitle thì OutputScreenRow cũng là một function component, và truyền vào function này một props.
return (
    <div className="screen-row">
        <input type="text" readOnly value = {props.value}/>
    </div>
)
đây là đoạn code trả về cho component chúng ta phần hiển thị phần đầu vào người dùng nhập hay là phần hiển thị kết quả tính toàn mà người dùng đã nhập. value là chính là giá trị value được nhận từ props mà component cha truyền vào
Tiếp theo, chúng ta mở file outputScreen.js, chúng ta viết code cho phần này như sau:
import React from 'react';

import OutputScreenRow from './outputScreenRow.js';

const OutputScreen = (props) => {
    return (
        <div className="screen">
            <OutputScreenRow value = {props.question}/>
            <OutputScreenRow value = {props.answer}/>
        </div>
    )
}

export default OutputScreen;
đây cũng là một function component, truyền vào component này một props. value là chính là giá trị question hay answer được nhận từ props mà component cha truyền vào. Ở đây chúng ta sử dụng function component OutputScreenRow mà chúng ta đã khai báo ở file outputScreenRow.js:
import OutputScreenRow from './outputScreenRow.js';
Tiếp theo, chúng ta mở file `button.js` và viết code cho phần này như sau: import React from 'react';
const Button = (props) => {
    return (
        <input
            className={props.className}
            type="button"
            value={props.label}
            onClick = {props.handleClick}
        />
    );
}

export default Button;
function component Button này cũng truyền vào một props. className, value, sự kiện onClick đều được nhận từ props mà component cha truyền vào
Tiếp theo là Component chính của chúng ta Calcaulator, mở file Caculator.js và viết code như sau:
import React from 'react';
import CalculatorTitle from './calculatorTitle.js';
import OutputScreen from './outputScreen.js';
import Button from './button.js';

class Calculator extends React.Component {
    render()
    {
        return (
            <div className="frame">
                <CalculatorTitle title="Calculator"/> //tiêu đề của ứng dụng 'Calculator'
                <div className="mainCalc">
                    <OutputScreen /> //phần hiển thị đầu vào người dùng nhập và kết quả tính toán kết quả
                    // phần hiển các nút bấm để người dùng nhập đầu vào
                    <div className="button-row">
                        <Button className="btnaction" label={'Clear'}/>
                        <Button className="btnaction" label={'Delete'}/>
                        <Button className="btnaction" label={'/'}/>
                    </div>
                    <div className="button-row">
                        <Button label={'8'} />
                        <Button label={'9'} />
                        <Button className="btnaction" label={'+'} />
                    </div>
                    <div className="button-row">
                        <Button label={'6'} />
                        <Button label={'7'} />
                        <Button className="btnaction" label={'*'} />
                    </div>
                    <div className="button-row">
                        <Button label={'4'} />
                        <Button label={'5'} />
                        <Button className="btnaction" label={'-'} />
                    </div>
                    <div className="button-row">
                        <Button label={'2'} />
                        <Button label={'3'} />
                        <Button className="btnaction" label={'.'} />
                    </div>
                    <div className="button-row">
                        <Button label={'0'} />
                        <Button label={'1'} />
                        <Button className="btnaction" label={'='} />
                    </div>
                </div>
            </div>
        );
    }
}

export default Calculator;
Ở đây thì Calculator là một class component. Đầu tiên, chúng ta sử dụng các component khác mà chúng ta đã tạo để tạo ra phần giao diện cho ứng dụng của chúng ta. Như vậy chúng ta đã có cấu trúc của Calculator của chúng ta, để nó có thể hiển thị và tính toán chúng ta thêm các hàm xử lý logic
Để xử lý sự kiện click vào các button chúng ta sẽ tạo ra một function là handleClick và thêm function này vào Calculator component class. Tuy nhiên, điều tiếp theo cần chú ý là các nút từ 0-9 và các toán tử như +, -, * , / sẽ có các vai trò khác nhau và các nút khác như =, Clear và Delete có khác nhau vai trò. Vì vậy, chúng ta cần làm là bên trong hàm handleClick, chúng ta sẽ sử dụng câu lệnh switch..case để thực hiện các thao tác khác nhau khi click vào các button khác nhau.
Nhưng trước khi làm việc đó, chúng ta cần phải xác định state ứng dụng của chúng ta. Và ở đây chúng ta cần hai state là question và answer, và cần cập nhật nó theo đầu vào người dùng nhập
- question: Ban đầu, state này sẽ được khởi tạo với một chuỗi rỗng. State này sẽ được sử dụng để lưu trữ đầu vào của người dùng.
- answer: Ban đầu, state này sẽ được khởi tạo với một chuỗi rỗng. State này sẽ được sử dụng để lưu trữ kết quả tính toán theo đầu vào của người dùng được lưu trữ trong
question state.
Thêm đoạn code sau vào đầu củaClass Calculator:
constructor(props) {
        super(props);
        this.state = {
            question: '',
            answer: ''
        }
        this.handleClick = this.handleClick.bind(this);
    }
Và tiếp theo là function xử lý handleClick() xử lý sự kiện click vào các button:
handleClick(event){
        const value = event.target.value;
        switch (value) {
            case '=': {
                if (this.state.question!=='')
                {
                    var ans='';
                    try
                    {
                        ans = eval(this.state.question);
                    }
                    catch(err)
                    {
                        this.setState({answer: "Math Error"});
                    }
                    if (ans===undefined)
                        this.setState({answer: "Math Error"});
                    else
                        this.setState({ answer: ans , question: this.state.question});
                    break;
                }
            }
            case 'Clear': {
                this.setState({ question: '', answer: '' });
                break;
            }

            case 'Delete': {
                var str = this.state.question;
                str = str.substr(0,str.length-1);
                this.setState({question: str});
                break;
            }

            default: {
                this.setState({ question: this.state.question += value})
                break;
            }
        }
    }
Và bây giờ khi chúng ta chạy ứng dụng và click vào các button thì vẫn chưa có gì xảy ra cả. Lý do là vì các button này chưa nhận được sự kiện hanleClick vì vậy chúng ta cần liên kết giữa handleClick với onClick ở các button trong button.js. Để làm như vậy, chúng ta sẽ chuyển hàm handleClick() dưới dạng props cho Button component và gán hàm này cho sự kiện onClick của nút trong Button component.
Nhưng sau khi thêm hanleClick và chạy ứng dụng thì ứng dụng của chúng ta hiển thị cũng không có gì thay đổi. Vậy tại sao? Nguyên nhân là chúng ta chưa truyền các state vào OutputScreen component, nên không có gì để hiển thị lên màn hình. Vì vậy, chúng ta cần cập nhật OutputScreen Component, để OuputScreenRow component nhận props và truyền vào question state và answer state bằng props từ Calculator component tới OutputScreen component. Và code hoàn chỉnh của Calculator như sau:
import React from 'react';
import CalculatorTitle from './calculatorTitle.js';
import OutputScreen from './outputScreen.js';
import Button from './button.js';

class Calculator extends React.Component {
    constructor(props) {
        super(props);
        this.state = {
            question: '',
            answer: ''
        }
        this.handleClick = this.handleClick.bind(this);
    }

    handleClick(event){
        const value = event.target.value;
        switch (value) {
            case '=': {
                if (this.state.question!=='')
                {
                    var ans='';
                    try
                    {
                        ans = eval(this.state.question);
                    }
                    catch(err)
                    {
                        this.setState({answer: "Math Error"});
                    }
                    if (ans===undefined)
                        this.setState({answer: "Math Error"});
                    else
                        this.setState({ answer: ans , question: this.state.question});
                    break;
                }
            }
            case 'Clear': {
                this.setState({ question: '', answer: '' });
                break;
            }

            case 'Delete': {
                var str = this.state.question;
                str = str.substr(0,str.length-1);
                this.setState({question: str});
                break;
            }

            default: {
                this.setState({ question: this.state.question += value})
                break;
            }
        }
    }

    render()
    {
        return (
            <div className="frame">
                <CalculatorTitle title="Calculator"/>
                <div className="mainCalc">
                    <OutputScreen question={this.state.question} answer={this.state.answer}/>
                    <div className="button-row">
                        <Button className="btnaction" label={'Clear'} handleClick = {this.handleClick}/>
                        <Button className="btnaction" label={'Delete'} handleClick={this.handleClick}/>
                        <Button className="btnaction" label={'/'} handleClick={this.handleClick}/>
                    </div>
                    <div className="button-row">
                        <Button label={'8'} handleClick={this.handleClick}/>
                        <Button label={'9'} handleClick={this.handleClick}/>
                        <Button className="btnaction" label={'+'} handleClick={this.handleClick}/>
                    </div>
                    <div className="button-row">
                        <Button label={'6'} handleClick={this.handleClick}/>
                        <Button label={'7'} handleClick={this.handleClick}/>
                        <Button className="btnaction" label={'*'} handleClick={this.handleClick}/>
                    </div>
                    <div className="button-row">
                        <Button label={'4'} handleClick={this.handleClick}/>
                        <Button label={'5'} handleClick={this.handleClick}/>
                        <Button className="btnaction" label={'-'} handleClick={this.handleClick}/>
                    </div>
                    <div className="button-row">
                        <Button label={'2'} handleClick={this.handleClick}/>
                        <Button label={'3'} handleClick={this.handleClick}/>
                        <Button className="btnaction" label={'.'} handleClick={this.handleClick}/>
                    </div>
                    <div className="button-row">
                        <Button label={'0'} handleClick={this.handleClick}/>
                        <Button label={'1'} handleClick={this.handleClick}/>
                        <Button className="btnaction" label={'='} handleClick={this.handleClick}/>
                    </div>
                </div>
            </div>
        );
    }
}

export default Calculator;
Và tiếp đến để hiển thị thì chúng ta cần render Calculator component tới index.html và vào thẻ <div> có id là root, chúng ta mở file index.js và sửa lại như sau:
import React from 'react';
import ReactDOM from 'react-dom';
import './index.css';
import * as serviceWorker from './serviceWorker';
import Calculator from "./components/Caculator";

ReactDOM.render(<Calculator />, document.getElementById('root'));

// If you want your app to work offline and load faster, you can change
// unregister() to register() below. Note this comes with some pitfalls.
// Learn more about service workers: http://bit.ly/CRA-PWA
serviceWorker.unregister();
Và cuối cùng để ứng dụng của chúng ta thêm chút rực rỡ chúng ta nên thêm style để nhìn bắt mắt hơn, mở file index.css và sửa lại như sau:
*{
    margin:0px;
    padding:0px;
    border-radius: 0px;
    box-sizing: border-box;
    font-size: 110%;
}

#root{
    text-align:center;
}
.calculator-title{
    font-size:30px;
    background: radial-gradient(#5a68ff,#ff495a);
    width: 300px;
    padding: 10px 10px;
    margin: 0 auto;
    margin-top: 20px;
    border-radius: 2px;
    border: 2px solid ;
    color: #00ff1a;
}
.mainCalc{
    margin:0px;
    padding:0px;
    border-radius: 0px;
    box-sizing: border-box;
}
.screen-row input{
    width: 300px;
    background: #222222;
    border: 0px;
    color: #ffffff;
    padding: 10px;
    text-align: right;
}
input[type="button"]{
    width: 100px;
    background: #ffffff;
    border: 1px solid #222;
    padding: 10px 20px;
    color: black;
    text-align: center;
    text-decoration: none;
    display: inline-block;
    font-size: 16px;
}

input[type="button"]:active{
    background: #ccc;
}

.btnaction {
    background-color: #ffcc0e !important;
}
Và cuối cùng kết quả chúng ta được là:
Kết luận
Trong bài viết này thì mình cùng các bạn viết code tạo một ứng dụng Calculator. Các bạn có thêm tham khảo và tải source code tại đây: https://github.com/phanlyhuynh/caculator-reactjs/tree/caculator
Chúc các bạn thành công  . Nếu bài viết có ích hãy upvote giúp mình nhé
All rights reserved
