Tạo Một Ứng Dụng Android Theo Mô Hình MVVM
Bài đăng này đã không được cập nhật trong 4 năm
Trong bài viết này tôi sẽ đi vào thực hành là tạo một ứng dụng nho nhỏ trong Android. Ứng dụng được viết theo mô hình MVVM. Trước khi bắt đầu đi vào chi tiết hơn, để cho các bạn dễ hình dùng tôi có tạo 1 video demo
MVVM được biết tắt từ Model-View-ViewModel. Mô hình này hỗ trợ two-way data binding giữa view và viewmodel. Điều này cho phép một sự thay đổi linh động,
bên trong viewmodel tới view. Thường mô hình này sử dụng observer pattern để thông báo những thay đổi từ viewmodel vào trong view
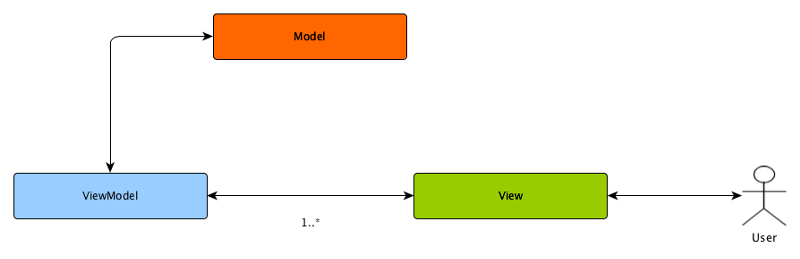
Những lơp chính trong mô hình MVVM
View Thông báo cho ViewModel về những action của người dùng
ViewModel phơi bày những luồng data liên quan tới View
DataModel trừu tượng của nguồn data. ViewModel làm việc trực tiếp với DataModel để nhận và lưu

Tôi sẽ không đi vào lý thuyết quá nhiều. Như trong video demo các bạn đã thấy trong project chúng ta sẽ lấy về 1 danh sách người dùng và hiển thị chi tiết của từng người dùng khi click vào một item trong list. Ở đây tôi sử dụng một API để lấy về list người dùng:
http://api.randomuser.me/?results=3&nat=en
Để cho các bạn dễ hình dung, định dạng data trả về sẽ như sau
{
    "results": [
        {
            "gender": "male",
            "name": {
                "title": "mr",
                "first": "محمد",
                "last": "جعفری"
            },
            "location": {
                "street": "4658 پاسداران",
                "city": "کرمانشاه",
                "state": "البرز",
                "postcode": 24174
            },
            "email": "محمد.جعفری@example.com",
            "login": {
                "username": "greencat281",
                "password": "1a2b3c",
                "salt": "Z2BZDBif",
                "md5": "4da3307eb0fcd85ddf67ac7e058a5a49",
                "sha1": "46957ac2c6c9c4289b3246b47220df6196facba6",
                "sha256": "7669b6e09d0e0afdd2b580c44132d9eb032d66bd328c070777f203c3352fbd39"
            },
            "dob": "1984-02-02 06:00:35",
            "registered": "2009-09-27 16:23:44",
            "phone": "029-95345035",
            "cell": "0912-733-8663",
            "id": {
                "name": "",
                "value": null
            },
            "picture": {
                "large": "https://randomuser.me/api/portraits/men/76.jpg",
                "medium": "https://randomuser.me/api/portraits/med/men/76.jpg",
                "thumbnail": "https://randomuser.me/api/portraits/thumb/men/76.jpg"
            },
            "nat": "IR"
        },
        {
            "gender": "male",
            "name": {
                "title": "mr",
                "first": "harry",
                "last": "cunningham"
            },
            "location": {
                "street": "9703 railroad st",
                "city": "pembroke pines",
                "state": "nevada",
                "postcode": 39030
            },
            "email": "harry.cunningham@example.com",
            "login": {
                "username": "bluegoose866",
                "password": "1024",
                "salt": "9sSbrNw7",
                "md5": "0644f4818faaa439234bb5389915d3d2",
                "sha1": "212ed1c3bd4f4f3ca95143f6b8bdab560a0bb714",
                "sha256": "1e4da62a3143c4f353c643fcfef4c76c8f99a0b158449b9bef2d26cd7e4242ba"
            },
            "dob": "1970-03-22 08:50:11",
            "registered": "2005-03-18 18:45:05",
            "phone": "(588)-912-0783",
            "cell": "(166)-809-1682",
            "id": {
                "name": "SSN",
                "value": "660-76-3042"
            },
            "picture": {
                "large": "https://randomuser.me/api/portraits/men/8.jpg",
                "medium": "https://randomuser.me/api/portraits/med/men/8.jpg",
                "thumbnail": "https://randomuser.me/api/portraits/thumb/men/8.jpg"
            },
            "nat": "US"
        },
        {
            "gender": "male",
            "name": {
                "title": "mr",
                "first": "george",
                "last": "edwards"
            },
            "location": {
                "street": "2441 fendalton road",
                "city": "invercargill",
                "state": "bay of plenty",
                "postcode": 15757
            },
            "email": "george.edwards@example.com",
            "login": {
                "username": "yellowpanda574",
                "password": "collins",
                "salt": "OoChnUhS",
                "md5": "077abd3d940dc3dd61b8594159a3f662",
                "sha1": "c33d15a8a4cace0610ab472475ab2cdcd5486ccb",
                "sha256": "6d8fe10d0d51a307f60256355a7e6daf6b4a60671ab12e7472c76e58b4877593"
            },
            "dob": "1954-08-06 10:30:50",
            "registered": "2009-04-06 07:28:32",
            "phone": "(189)-448-2642",
            "cell": "(922)-083-2348",
            "id": {
                "name": "",
                "value": null
            },
            "picture": {
                "large": "https://randomuser.me/api/portraits/men/94.jpg",
                "medium": "https://randomuser.me/api/portraits/med/men/94.jpg",
                "thumbnail": "https://randomuser.me/api/portraits/thumb/men/94.jpg"
            },
            "nat": "NZ"
        }
    ],
    "info": {
        "seed": "b4f95d030a7af9da",
        "results": 3,
        "page": 1,
        "version": "1.1"
    }
}
Việc đầu tiên chúng ta cần phải làm là định nghĩa Model. Để cho bài viết ngắn gọn ở đây tôi chỉ liệt kê những model chính Tôi tạo một class People như bên dưới.
public class People implements Serializable {

    @SerializedName("gender")
    public String gender;

    @SerializedName("name")
    public Name name;

    @SerializedName("location")
    public Location location;

    @SerializedName("email")
    public String email;

    @SerializedName("login")
    public Login username;

    @SerializedName("phone")
    public String phone;

    @SerializedName("cell")
    public String cell;

    @SerializedName("picture")
    public Picture picture;

    public String fullName;

    public boolean hasEmail() {
        return email != null && !email.isEmpty();
    }
}
API trả về một list people, tôi sẽ định nghĩa 1 class có tên là PeopleResponse như bên dưới:
public class PeopleResponse {

    @SerializedName("results")
    private List<People> mPeopleList;

    public List<People> getPeopleList() {
        return mPeopleList;
    }

    public void setPeopleList(List<People> peopleList) {
        mPeopleList = peopleList;
    }
}
Vậy là coi như là xong phần Model, tiếp theo chúng ta sẽ tạo phần ViewModel. Phần ViewModel này sẽ làm nhiệm vụ là lấy data và lắng nghe những action của người dùng trên view. Tôi tạo một class có tên là PeopleViewModel như bên dưới:
public class PeopleViewModel implements PeopleViewModelContract.ViewModel {

    public ObservableInt mPeopleProgress;
    public ObservableInt mPeopleList;
    public ObservableInt mPeopleLabel;
    public ObservableField<String> mMessageLabel;

    private PeopleViewModelContract.MainView mMainView;
    private Context mContext;
    private Subscription mSubscription;

    public PeopleViewModel(@NonNull PeopleViewModelContract.MainView mainView, @NonNull Context context) {
        this.mMainView = mainView;
        this.mContext = context;
        this.mPeopleProgress = new ObservableInt(View.GONE);
        this.mPeopleList = new ObservableInt(View.GONE);
        this.mPeopleLabel = new ObservableInt(View.VISIBLE);

        mMessageLabel = new ObservableField<>(mContext.getResources().getString(R.string.default_loading_people));
    }


    public void onClickFabLoad(View view) {
        initializeViews();
        fetchPeopleList();
    }

    public void initializeViews() {
        mPeopleProgress.set(View.VISIBLE);
        mPeopleList.set(View.GONE);
        mPeopleLabel.set(View.VISIBLE);
    }

    private void fetchPeopleList() {
        final String URL = "http://api.randomuser.me/?results=10&nat=en";
        unSubscribeFromObservable();
        PeopleApp app = PeopleApp.create(mContext);
        PeopleService peopleService = app.getPeopleService();
        mSubscription = peopleService.fetchPeople(10, "en")
                .observeOn(AndroidSchedulers.mainThread())
                .subscribeOn(app.subscribleScheduler())
                .subscribe(new Action1<PeopleResponse>() {
                    @Override
                    public void call(PeopleResponse peopleResponse) {
                        mPeopleProgress.set(View.GONE);
                        mPeopleLabel.set(View.GONE);
                        mPeopleList.set(View.VISIBLE);

                        if (mMainView != null) {
                            mMainView.loadData(peopleResponse.getPeopleList());
                        }
                    }
                }, new Action1<Throwable>() {
                    @Override
                    public void call(Throwable throwable) {
                        throwable.printStackTrace();
                        mMessageLabel.set(mContext.getString(R.string.error_loading_people));
                        mPeopleProgress.set(View.GONE);
                        mPeopleList.set(View.GONE);
                        mPeopleLabel.set(View.VISIBLE);
                    }
                });

    }

    @Override
    public void destroy() {
        reset();
    }

    private void reset() {
        unSubscribeFromObservable();
        mSubscription = null;
        mContext = null;
        mMainView = null;
    }

    private void unSubscribeFromObservable() {
        if (mSubscription != null && mSubscription.isUnsubscribed()) {
            mSubscription.unsubscribe();
        }
    }
}
Trong class trên bạn sẽ chú ý thấy một method tên là fetchPeopleList() dùng để lấy data từ Server. Tiếp theo chúng ta sẽ tạo phần View hiển thị data lấy từ Server. View ở đây có thể là một Activity, một Fragment hay một custom của một GroupView Tôi tạo một class có tên là PeopleActivity như bên dưới:
public class PeopleActivity extends AppCompatActivity implements PeopleViewModelContract.MainView {

    private ActivityPeopleBinding mActivityPeopleBinding;
    private PeopleViewModel mPeopleViewModel;
    private PeopleViewModelContract.MainView mMainView = this;

    @Override
    protected void onCreate(@Nullable Bundle savedInstanceState) {
        super.onCreate(savedInstanceState);

        initDataBinding();
        setSupportActionBar(mActivityPeopleBinding.toolbar);
        setupListPeopleView(mActivityPeopleBinding.listPeople);

    }

    private void initDataBinding() {
        mActivityPeopleBinding = DataBindingUtil.setContentView(this, R.layout.activity_people);
        mPeopleViewModel = new PeopleViewModel(mMainView, getContext());
        mActivityPeopleBinding.setMainViewModel(mPeopleViewModel);
    }

    private void setupListPeopleView(RecyclerView listPeople) {
        PeopleAdapter adapter = new PeopleAdapter();
        listPeople.setAdapter(adapter);
        listPeople.setLayoutManager(new LinearLayoutManager(this));
    }

    @Override
    public void loadData(List<People> peoples) {
        PeopleAdapter peopleAdapter = (PeopleAdapter) mActivityPeopleBinding.listPeople.getAdapter();
        peopleAdapter.setPeopleList(peoples);
    }

    @Override
    public Context getContext() {
        return PeopleActivity.this;
    }

    @Override
    protected void onDestroy() {
        super.onDestroy();
        mPeopleViewModel.destroy();
    }

    @Override
    public boolean onCreateOptionsMenu(Menu menu) {
        getMenuInflater().inflate(R.menu.menu_main, menu);
        return true;
    }

    @Override
    public boolean onOptionsItemSelected(MenuItem item) {
        if (item.getItemId() == R.id.action_github) {
            startActivityActionView();
            return true;
        }
        return super.onOptionsItemSelected(item);
    }

    private void startActivityActionView() {
        startActivity(new Intent(Intent.ACTION_VIEW, Uri.parse("https://github.com/LarryPham")));
    }
}
Để hiểu được rõ hơn, các bạn có thể tham khảo source code tại đây
All rights reserved
