Tạo Một LiBrary Calendar Cho Android và Sample Sử Dụng Library Calendar
Bài đăng này đã không được cập nhật trong 4 năm
Trong quá trình phát triển dự án cho khách hàng của công ty nơi tôi đang làm việc. Khách hàng yêu cầu chức năng hiển thị calendar với các chức năng như là cho người dùng có thể chọn một ngày, hoặc nhiều ngày,
đồng thời còn phải hiển thị icon trạng thái cho từng ngày tuỳ theo dữ liệu lấy về, vì lý do bảo mật nên tôi không thể up design của chức năng calendar lên đây.
Trong project lại có nhiều màn hình hiển thị calendar, nên tôi quyết định viết một library calendar để sử dụng trong cả project.
Để các bạn dễ hình dung và có cái nhìn chi tiết hơn, các bạn có thể xem video demo tại đây
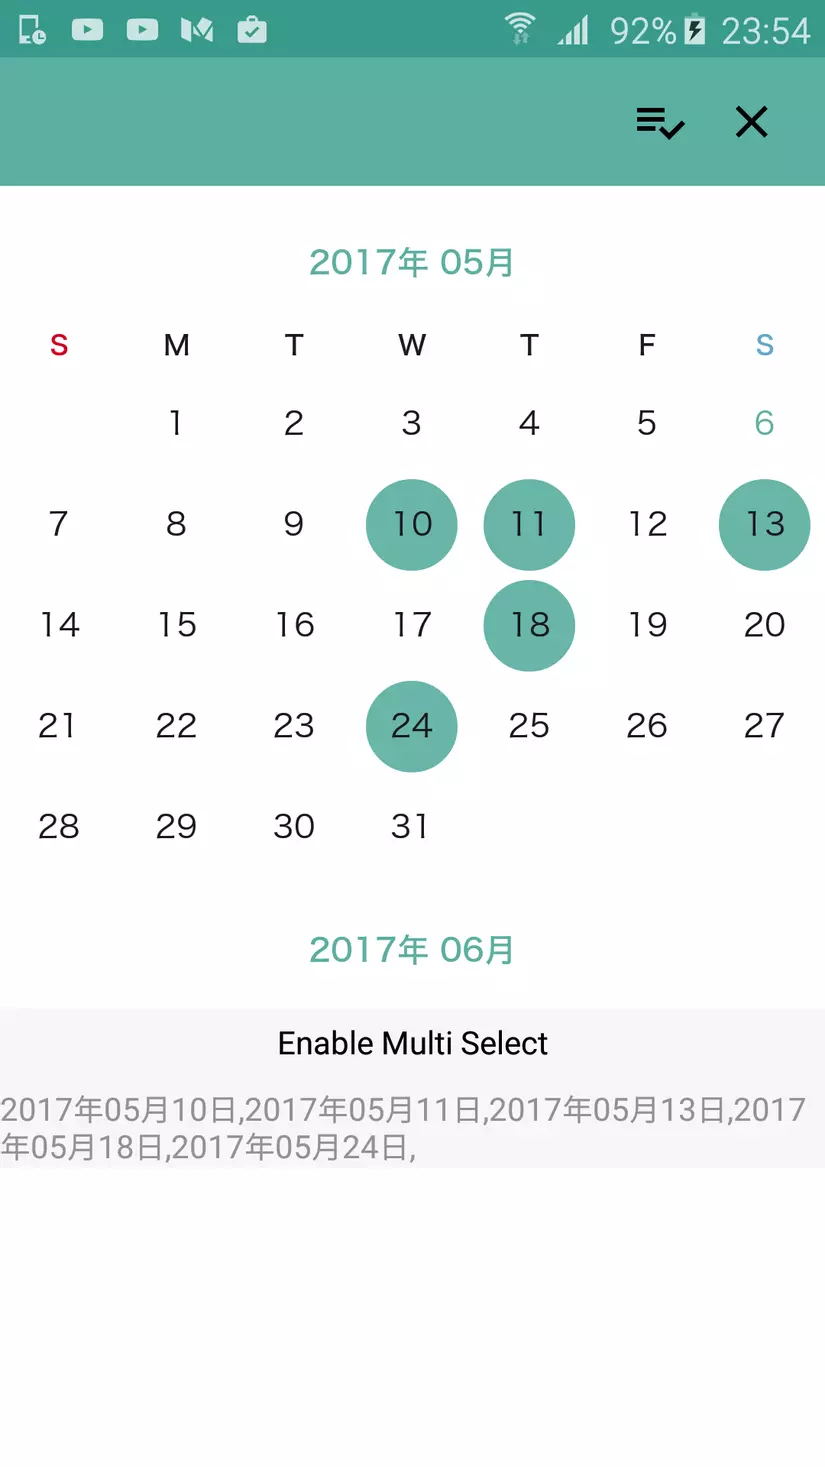
Đây là screenshoot màn hình:
 Tiếp theo đây tôi sẽ hướng dẫn các bạn sử dụng library calendar.
Trước tiên bạn cần add library calendar vào trong project của bạn như import kiểu module .
file build.gradle của tôi sẽ như này:
Tiếp theo đây tôi sẽ hướng dẫn các bạn sử dụng library calendar.
Trước tiên bạn cần add library calendar vào trong project của bạn như import kiểu module .
file build.gradle của tôi sẽ như này:
apply plugin: 'com.android.application'

android {
  compileSdkVersion 25
  buildToolsVersion "25.0.2"
  defaultConfig {
    applicationId "com.krkproduce.customcalendar"
    minSdkVersion 15
    targetSdkVersion 25
    versionCode 1
    versionName "1.0"
    testInstrumentationRunner "android.support.test.runner.AndroidJUnitRunner"
  }
  buildTypes {
    release {
      minifyEnabled false
      proguardFiles getDefaultProguardFile('proguard-android.txt'), 'proguard-rules.pro'
    }
  }

  dataBinding {
    enabled true
  }
}

dependencies {
  compile fileTree(include: ['*.jar'], dir: 'libs')
  androidTestCompile('com.android.support.test.espresso:espresso-core:2.2.2', {
    exclude group: 'com.android.support', module: 'support-annotations'
  })
  compile 'com.android.support:appcompat-v7:25.3.1'
  compile 'com.android.support.constraint:constraint-layout:1.0.2'
  testCompile 'junit:junit:4.12'
  compile project(':calendarlib')
}
Để hiển thị calendar trong file layout rất đơn giản, cũng giống như việc tạo các view khác trong layout,các bạn chỉ cần làm như sau:
      <com.krkproduce.calendarlib.DayPickerView
            android:id="@+id/day_picker_view"
            android:layout_width="match_parent"
            android:layout_height="match_parent"
            android:layout_below="@+id/header_layout"
            android:background="@android:color/white"
            app:enableDaySelect="true"
            />
Ở đây các bạn lưu ý thuộc tính app:enableDaySelect="true" khi set thuộc tính này là true thì cho phép người dùng được chọn được ngày trên calendar view.
Ngoài ra còn 1 số thuộc tính quan trọng khác như :
app:enableMultiSelect="true" thuộc tính này khi set là true sẽ cho phép người dùng chọn được nhiều ngày, mặc đinh là false
app:enablePreviousDay="true thuộc tính này khi sét là true sẽ hiển thị những ngày trước ngày hiện tại một màu khác, mặc định là false
Ngoài ra còn rất nhiều những thuộc tính khác, các có thể tìm hiểu thêm, khi xem trực tiếp trong code.
Để lấy được những ngày bạn đã chọn, ở đây tôi tạo ra một **interface ** được gọi là DatePickerController
public interface DatePickerController {

    void onDayOfMonthSelected(CalendarDay selectedDay);

    void onDaysSelected(ArrayList<CalendarDay> selectedDays);

    void onFirstDayOfMonthScrolled(CalendarDay firstDay);
}
Sâu đây tôi sẽ giải thích chức năng của từng phương thức trong đoạn code trên:
void onDayOfMonthSelected(CalendarDay selectedDay) :phương thức này trả về một ngày người dùng đã chọn void onDaysSelected(ArrayList<CalendarDay> selectedDays) :phương thức này trả về một List những này đã chọn khi thuộc tính enableMultiSelect được set là true void onFirstDayOfMonthScrolled(CalendarDay firstDay) :phương thức này trả về ngày đầu tiên của tháng khi người dùng scroll calendar
Để thao tác với library trong Activty hay Fragment thì rất đơn giản, các bạn chỉ cần implement interface DatePickerController như bên dưới:
public class MainActivity extends AppCompatActivity implements DatePickerController, MainContract.View {
    private ActivityMainBinding mMainBinding;
    private MainPresenter mPresenter;
    private DayPickerView mPickerView;
    private RelativeLayout mFooterLayout;

    @Override
    protected void onCreate(Bundle savedInstanceState) {
        super.onCreate(savedInstanceState);
        mMainBinding = DataBindingUtil.setContentView(this, R.layout.activity_main);

        mPickerView = mMainBinding.dayPickerView;
        mPickerView.setController(this);
        mFooterLayout = mMainBinding.footerLayout;

        mPresenter = new MainPresenter(this, this);
        mMainBinding.setPresenter(mPresenter);
    }

    @Override
    public void onDayOfMonthSelected(CalendarDay selectedDay) {

        mPresenter.handleDaySelected(selectedDay);
        if (!mFooterLayout.isShown()) {
            showFooterLayout();
        }
    }

    @Override
    public void onDaysSelected(ArrayList<CalendarDay> selectedDays) {
        mPresenter.handleMultiDaySelected(selectedDays);
        if (!mFooterLayout.isShown()) {
            showFooterLayout();
        }
    }

    @Override
    public void onFirstDayOfMonthScrolled(CalendarDay firstDay) {

    }

    @Override
    public void setPresenter(MainContract.Presenter presenter) {

    }

    @Override
    public void showFooterLayout() {
        Animation animation = AnimationUtils.loadAnimation(this, R.anim.move_in);
        animation.setAnimationListener(new Animation.AnimationListener() {
            @Override
            public void onAnimationStart(Animation animation) {
            }

            @Override
            public void onAnimationEnd(Animation animation) {
                mFooterLayout.setVisibility(View.VISIBLE);
            }

            @Override
            public void onAnimationRepeat(Animation animation) {

            }
        });
        mFooterLayout.startAnimation(animation);
    }

    @Override
    public void hideFooterLayout() {
        Animation animation = AnimationUtils.loadAnimation(this, R.anim.move_out);
        animation.setAnimationListener(new Animation.AnimationListener() {
            @Override
            public void onAnimationStart(Animation animation) {

            }

            @Override
            public void onAnimationEnd(Animation animation) {
                mFooterLayout.setVisibility(View.GONE);
            }

            @Override
            public void onAnimationRepeat(Animation animation) {

            }
        });
        mFooterLayout.startAnimation(animation);
    }

    @Override
    public void resetCalendar() {
        mPickerView.removeAllSelectedDays();
        if (mFooterLayout.isShown()) {
            hideFooterLayout();
        }
    }

    @Override
    public void enableMultiDateSelect(boolean enable) {
        final boolean multiDaySelect = mPresenter.getIsEnableMultiDateSelect().get();
        if (!multiDaySelect) {
            if (mFooterLayout.isShown()) {
                hideFooterLayout();
            }
        }
        mPickerView.setIsEnableMultiDaySelected(enable);
    }
}
Để remove tất cả các ngày trong calendar khi ngừoi dùng đã chọn, chỉ cần gọi hàm :
DayPickerView.removeAllSelectedDays();
Bài viết này tôi chỉ nói tóm tắt sơ qua về library calendar, để hiểu chi tiết hơn các bạn có thể download source và sample tại đây
All rights reserved
