Tạo FAB menu
Bài đăng này đã không được cập nhật trong 4 năm
Để có được 1 ứng dụng tốt, thu hút người dùng thì ngoài việc đảm bảo các chức năng thì cần phải có 1 giao diện thu hút, gây ấn tượng với người dùng. Vì vậy, Google đã đưa ra khái niệm Material Design. Đó là những hướng dẫn để thiết kế 1 ứng dụng sao cho hợp lí và gây ấn tượng tốt với người dùng. Trong các component của Material Design có Floating Action Button(FAB) - nó là nút tròn nhỏ được dùng với những action đặc biệt nào đó của app. Hôm nay mình xin được trình bày cách custom FAB để tạo 1 menu cơ bản.
- Tạo project mới.
- File ⇒ New ⇒ New Projects. để tạo project mới trong Android studio
- Điền tên project rồi chọn Blank Activity để Android studio tạo sẵn cho mình FAB.
<android.support.design.widget.FloatingActionButton
    android:id="@+id/fab"
    android:layout_width="wrap_content"
    android:layout_height="wrap_content"
    android:layout_gravity="bottom|end"
    android:layout_margin="@dimen/fab_margin"
    android:src="@android:drawable/ic_menu_help"
    />
- Tạo Menu Floating Action
- Đầu tiên ta sẽ tạo layout cho menu
fab_layout.xml
<FrameLayout xmlns:android="http://schemas.android.com/apk/res/android"
    xmlns:app="http://schemas.android.com/apk/res-auto"
    android:layout_width="match_parent"
    android:layout_height="match_parent">

    <android.support.design.widget.FloatingActionButton
        android:id="@+id/fab_1"
        android:layout_width="wrap_content"
        android:layout_height="wrap_content"
        android:layout_gravity="bottom|end"
        android:layout_margin="@dimen/fab_margin"
        android:src="@android:drawable/ic_menu_compass"
        android:visibility="invisible"
        app:backgroundTint="@color/colorFAB"
        app:fabSize="mini" />

    <android.support.design.widget.FloatingActionButton
        android:id="@+id/fab_2"
        android:layout_width="wrap_content"
        android:layout_height="wrap_content"
        android:layout_gravity="bottom|end"
        android:layout_margin="@dimen/fab_margin"
        android:src="@android:drawable/ic_menu_myplaces"
        android:visibility="invisible"
        app:backgroundTint="@color/colorFAB"
        app:fabSize="mini" />

    <android.support.design.widget.FloatingActionButton
        android:id="@+id/fab_3"
        android:layout_width="wrap_content"
        android:layout_height="wrap_content"
        android:layout_gravity="bottom|end"
        android:layout_margin="@dimen/fab_margin"
        android:src="@android:drawable/ic_menu_share"
        android:visibility="invisible"
        app:backgroundTint="@color/colorFAB"
        app:fabSize="mini" />
</FrameLayout>
trong MainActivity'layout ta thêm layout trên
activity_main.xml
<include layout="@layout/fab_layout" />
- Tạo animation cho menu
Hiển thị FAB menu
  FrameLayout.LayoutParams layoutParams = (FrameLayout.LayoutParams) fab1.getLayoutParams();
  layoutParams.rightMargin += (int) (fab1.getWidth() * 1.7);
  layoutParams.bottomMargin += (int) (fab1.getHeight() * 0.25);
  fab1.setLayoutParams(layoutParams);
  fab1.startAnimation(show_fab_1);
  fab1.setClickable(true);
Ẩn FAB menu
  FrameLayout.LayoutParams layoutParams = (FrameLayout.LayoutParams) fab1.getLayoutParams();
  layoutParams.rightMargin -= (int) (fab1.getWidth() * 1.7);
  layoutParams.bottomMargin -= (int) (fab1.getHeight() * 0.25);
  fab1.setLayoutParams(layoutParams);
  fab1.startAnimation(hide_fab_1);
  fab1.setClickable(false);
animation sử dụng
  //Animations
  Animation show_fab_1 = AnimationUtils.loadAnimation(getApplication(), R.anim.fab1_show);
  Animation hide_fab_1 = AnimationUtils.loadAnimation(getApplication(), R.anim.fab1_hide);
khai báo animation
fab1_show
<?xml version="1.0" encoding="utf-8"?>
<set xmlns:android="http://schemas.android.com/apk/res/android"
    android:fillAfter="true">

    <!-- Rotate -->
    <rotate
        android:duration="500"
        android:fromDegrees="30"
        android:interpolator="@android:anim/linear_interpolator"
        android:pivotX="50%"
        android:pivotY="50%"
        android:repeatCount="4"
        android:repeatMode="reverse"
        android:toDegrees="0"></rotate>

    <!--Move-->
    <translate
        android:duration="1000"
        android:fromXDelta="170%"
        android:fromYDelta="25%"
        android:interpolator="@android:anim/linear_interpolator"
        android:toXDelta="0%"
        android:toYDelta="0%"></translate>

    <!--Fade In-->
    <alpha
        android:duration="2000"
        android:fromAlpha="0.0"
        android:interpolator="@android:anim/decelerate_interpolator"
        android:toAlpha="1.0"></alpha>

</set>
fab1_hide
<?xml version="1.0" encoding="utf-8"?>
<set xmlns:android="http://schemas.android.com/apk/res/android"
    android:fillAfter="true">

    <!--Move-->
    <translate
        android:duration="1000"
        android:fromXDelta="-170%"
        android:fromYDelta="-25%"
        android:interpolator="@android:anim/linear_interpolator"
        android:toXDelta="0%"
        android:toYDelta="0%"></translate>

    <!--Fade Out-->
    <alpha
        android:duration="2000"
        android:fromAlpha="1.0"
        android:interpolator="@android:anim/accelerate_interpolator"
        android:toAlpha="0.0"></alpha>

</set>
tương tự, ta tạo animation cho fab2 và fab3 với fromXDelta và fromYDelta lần lượt như sau(150, 150), (25, 170)
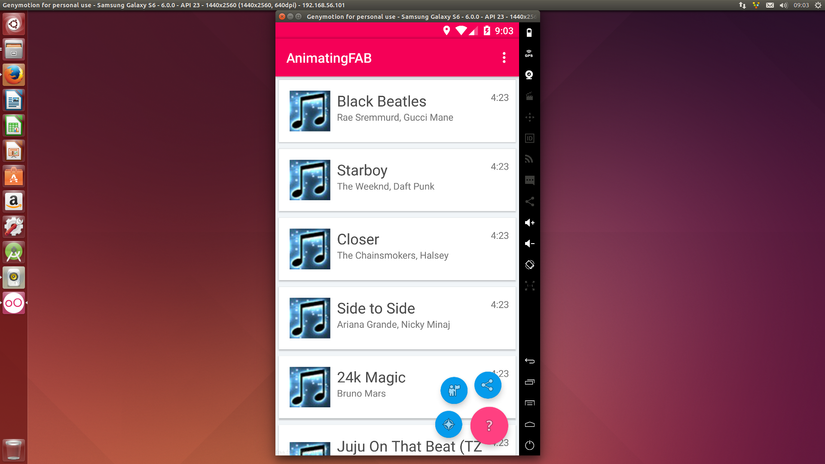
- Sử dụng FAB cùng RecyclerView
Floating Action Button có thể react khi sử dụng cùng với RecyclerView. Cụ thể khi cuộn list để xem các phần tử dưới màn hình, tôi muốn ẩn FAB để có thể theo dõi các phần tử mà không bị FAB che mất tầm nhìn ta có thể custom và add behaviour cho FAB.
public final class ScrollAwareFABBehavior extends FloatingActionButton.Behavior {

    public ScrollAwareFABBehavior(Context context, AttributeSet attrs) {
        super();
    }

    public boolean onStartNestedScroll(final CoordinatorLayout coordinatorLayout, final FloatingActionButton child,
                                       final View directTargetChild, final View target, final int nestedScrollAxes) {
        return nestedScrollAxes == ViewCompat.SCROLL_AXIS_VERTICAL
                || super.onStartNestedScroll(coordinatorLayout, child, directTargetChild, target, nestedScrollAxes);
    }

    public void onNestedScroll(final CoordinatorLayout coordinatorLayout, final FloatingActionButton child,
                               final View target, final int dxConsumed, final int dyConsumed,
                               final int dxUnconsumed, final int dyUnconsumed) {
        super.onNestedScroll(coordinatorLayout, child, target, dxConsumed, dyConsumed, dxUnconsumed, dyUnconsumed);
        if (dyConsumed > 0 && child.getVisibility() == View.VISIBLE) {
            child.hide();
        } else if (dyConsumed < 0 && child.getVisibility() != View.VISIBLE) {
            child.show();
        }
    }
}
Khi listview scroll thì phương thức onStartNestedScroll() sẽ trả về true nế scroll theo chiều dọc và ở phương thức onNestedScroll() ta sẽ thực hiện ẩn hoặc hiện FAB.
Để dùng behaviour thì ta sẽ khai báo theem thuộc tính layout_behaviour cho FAB trong file xml. thuộc tính này sẽ gồm package và tên file ở cuối. Ví dụ trong trường hợp này sẽ là com.example.framgiamaidaidien.animatingfab.ScrollAwareFABBehavior
src: Valdio Veliu
All rights reserved
