Tạo app CRUD đơn giản với ReactJs, NodeJs, MongoDB
Bài đăng này đã không được cập nhật trong 7 năm
Xin chào mọi người, nhận thấy ReactJs và NodeJs ngày càng phổ biến, nên mình cũng muốn chia sẻ lại cho mọi người những kiến thức căn bản mà mình đã tìm hiểu được bằng cách tạo 1 app CRUD đơn giản để ai đang muốn tìm hiểu có thể tham khảo và tạo được 1 app dễ dàng nhất.
Nào mình cùng bắt đầu nhé.
1: Cài đặt ứng dụng React
npx create-react-app reactcrud
cd reactcrud
npm start
Truy cập URL này: http://localhost:3000/
Bây giờ, cài đặt Bootstrap 4 Framework bằng lệnh sau.
yarn add bootstrap

 or

npm install bootstrap --save
Nhập Khung CSS Bootstrap trong dự án của chúng tôi.
Sửa đổi mã bên trong tệp src >> App.js.
// App.js

import React, { Component } from 'react';
import 'bootstrap/dist/css/bootstrap.min.css';

class App extends Component {
  render() {
    return (
      <div className="container">
        <h2>React CRUD Tutorial</h2>
      </div>
    );
  }
}

export default App;
Lưu file và vào trình duyệt và bạn có thể thấy bootstrap 4 đã được thêm thành công vào ứng dụng.
2: Thêm thư viện xử lý route cho react
Mở command của bạn lên và cài đặt mô-đun react-router-dom.
yarn add react-router-dom

# or

npm install react-router-dom --save
Tiếp theo mở file index.js và thêm đối tượng BrowserRouter.
// index.js

import React from 'react';
import ReactDOM from 'react-dom';
import { BrowserRouter } from 'react-router-dom';

import App from './App';
import * as serviceWorker from './serviceWorker';

ReactDOM.render(
  <BrowserRouter>
  <App />
  </BrowserRouter>, document.getElementById('root'));

serviceWorker.unregister();
Bây giờ, tạo ba thành phần.
Trong thư mục src, tạo một thư mục components và 3 file create, edit, index như ở dưới.
create.component.js edit.component.js index.component.js
// create.component.js

import React, { Component } from 'react';

export default class Create extends Component {
    render() {
        return (
            <div>
                <p>Welcome to Create Component!!</p>
            </div>
        )
    }
}
// edit.component.js

import React, { Component } from 'react';

export default class Edit extends Component {
    render() {
        return (
            <div>
                <p>Welcome to Edit Component!!</p>
            </div>
        )
    }
}
// index.component.js
import React, { Component } from 'react';

export default class Index extends Component {
    render() {
        return (
            <div>
                <p>Welcome to Index Component!!</p>
            </div>
        )
    }
}
Tiếp theo, mình sẽ thêm thanh menu để xử lý redirect giữa các page trong file App.js.
// App.js

import React, { Component } from 'react';
import 'bootstrap/dist/css/bootstrap.min.css';
import { BrowserRouter as Router, Switch, Route, Link } from 'react-router-dom';

import Create from './components/create.component';
import Edit from './components/edit.component';
import Index from './components/index.component';

class App extends Component {
  render() {
    return (
      <Router>
        <div className="container">
          <nav className="navbar navbar-expand-lg navbar-light bg-light">
            <Link to={'/'} className="navbar-brand">React CRUD Example</Link>
            <div className="collapse navbar-collapse" id="navbarSupportedContent">
              <ul className="navbar-nav mr-auto">
              <li className="nav-item">
                  <Link to={'/'} className="nav-link">Home</Link>
                </li>
                <li className="nav-item">
                  <Link to={'/create'} className="nav-link">Create</Link>
                </li>
                <li className="nav-item">
                  <Link to={'/index'} className="nav-link">Index</Link>
                </li>
              </ul>
            </div>
          </nav> <br/>
          <h2>Welcome to React CRUD Tutorial</h2> <br/>
          <Switch>
              <Route exact path='/create' component={ Create } />
              <Route path='/edit/:id' component={ Edit } />
              <Route path='/index' component={ Index } />
          </Switch>
        </div>
      </Router>
    );
  }
}

export default App;
Lưu file và mở trình duyệt để xem kết quả.

3: Tạo form bằng bootstrap
Tiếp theo mình sẽ tạo form bằng bootstrap trong file create.component.js.
// create.component.js

import React, { Component } from 'react';

export default class Create extends Component {
    render() {
        return (
            <div style={{marginTop: 10}}>
                <h3>Add New Business</h3>
                <form>
                    <div className="form-group">
                        <label>Add Person Name:  </label>
                        <input type="text" className="form-control"/>
                    </div>
                    <div className="form-group">
                        <label>Add Business Name: </label>
                        <input type="text" className="form-control"/>
                    </div>
                    <div className="form-group">
                        <label>Add GST Number: </label>
                        <input type="text" className="form-control"/>
                    </div>
                    <div className="form-group">
                        <input type="submit" value="Register Business" className="btn btn-primary"/>
                    </div>
                </form>
            </div>
        )
    }
}
4: Submit form
Okey, giả sử mình có 1 đối tượng gồm có 3 thông tin: name, comany, age.
Vì vậy, mình cần tạo 3 function onChange để lắng nghe khi user cập nhật giá trị trong ô input và 1 function để submit form.
Và dưới đây là code xử lý:
// App.js

import React, { Component } from 'react';
import 'bootstrap/dist/css/bootstrap.min.css';
import { BrowserRouter as Router, Switch, Route, Link } from 'react-router-dom';

import Create from './components/create.component';
import Edit from './components/edit.component';
import Index from './components/index.component';

class App extends Component {
    render() {
        return (
            <Router>
                <div className="container">
                    <nav className="navbar navbar-expand-lg navbar-light bg-light">
                        <div className="collapse navbar-collapse" id="navbarSupportedContent">
                            <ul className="navbar-nav mr-auto">
                                <li className="nav-item">
                                    <Link to={'/'} className="nav-link">Home</Link>
                                </li>
                                <li className="nav-item">
                                    <Link to={'/create'} className="nav-link">Create</Link>
                                </li>
                                <li className="nav-item">
                                    <Link to={'/index'} className="nav-link">Index</Link>
                                </li>
                            </ul>
                        </div>
                    </nav> <br/>
                    <h2>Create app CRUD with ReactJs, NodeJs, MongoDB</h2> <br/>
                    <Switch>
                        <Route exact path='/create' component={ Create } />
                        <Route path='/edit/:id' component={ Edit } />
                        <Route path='/index' component={ Index } />
                    </Switch>
                </div>
            </Router>
        );
    }
}

export default App;

5: Tạo API để xử lý dữ liệu bằng NodeJs
Bên trong gốc dự án Reaccrud, mình tạo thêm 1 folder api để tạo api, và vào thư mục api khởi tạo tệp pack.json bằng lệnh:
npm init -y
Tiếp theo mình sẽ cài thêm các package node.js sau đây:
yarn add express body-parser cors mongoose

 or

npm install express body-parser cors mongoose --save
Ngoài ra, để mỗi lần thay đổi source code mà không phải build lại api, mình sử dụng package nodemon:
npm install nodemon --save-dev
Bây giờ, bên trong thư mục api, tạo một file server.js và thêm code sau vào.
// server.js

const express = require('express');
const app = express();
const bodyParser = require('body-parser');
const PORT = 4000;
const cors = require('cors');

app.use(cors());
app.use(bodyParser.urlencoded({extended: true}));
app.use(bodyParser.json());

app.listen(PORT, function(){
  console.log('Server is running on Port:',PORT);
});
Mở command và chạy lệnh để start server
nodemon server
Và đây là kết quả:

6: Thiết lập cơ sở dữ liệu MongoDB
Nếu bạn chưa cài đặt MongoDB thì có thể xem cách cài đặt tại Install mongoDB for Ubuntu
Trong thư mục api , tạo một tệp có tên DB.js và thêm dòng mã sau đây.
// DB.js

module.exports = {
    DB: 'mongodb://localhost:27017/reactcrud'
}
Bây giờ, mình cần import file DB.js này vào file server.js để có thể thao tác với DB.
// server.js

const express = require('express');
const app = express();
const bodyParser = require('body-parser');
const PORT = 4000;
const cors = require('cors');
const mongoose = require('mongoose');
const config = require('./DB.js');

mongoose.Promise = global.Promise;
mongoose.connect(config.DB, { useNewUrlParser: true }).then(
  () => {console.log('Database is connected') },
  err => { console.log('Can not connect to the database'+ err)}
);

app.use(cors());
app.use(bodyParser.urlencoded({extended: true}));
app.use(bodyParser.json());

app.listen(PORT, function(){
  console.log('Server is running on Port:',PORT);
});
Lưu tệp và bạn có thể thấy trong terminal hiển thị kết nối thành công tới mongodb.

7: Tạo cấu trúc DB Mongoose
Bước tiếp theo là chúng ta cần tạo một cấu trúc cho cơ sở dữ liệu mongodb.
Mình sẽ tạo 1 file là business.model.js và thêm đoạn code sau sau đây.
// business.model.js

const mongoose = require('mongoose');
const Schema = mongoose.Schema;

// Define collection and schema for Business
let Persons = new Schema({
    name: {
        type: String
    },
    company: {
        type: String
    },
    age: {
        type: Number
    }
}, {
    collection: 'persons'
});

module.exports = mongoose.model('Persons', Persons);
Như vậy mình đã khai báo xong 1 collection với tên persons và có 3 giá trị là name, company và age.
8: Thêm route cho API Node.js Express
Để có thể xử lý được các thao tác CRUD, mình cần thêm code bên trong file persons.route.js .
// persons.route.js

const express = require('express');
const personRoutes = express.Router();

// Require Business model in our routes module
let Person = require('./persons.model');

// Defined store route
personRoutes.route('/add').post(function (req, res) {
    let person = new Person(req.body);
    person.save()
        .then(person => {
            res.status(200).json({'person': 'person in added successfully'});
        })
        .catch(err => {
            res.status(400).send("unable to save to database");
        });
});

// Defined get data(index or listing) route
personRoutes.route('/').get(function (req, res) {
    Person.find(function(err, persons){
        if(err){
            console.log(err);
        }
        else {
            res.json(persons);
        }
    });
});

// Defined edit route
personRoutes.route('/edit/:id').get(function (req, res) {
    let id = req.params.id;
    Person.findById(id, function (err, business){
        res.json(business);
    });
});

//  Defined update route
personRoutes.route('/update/:id').post(function (req, res) {
    Person.findById(req.params.id, function(err, person) {
        if (!person)
            res.status(404).send("data is not found");
        else {
            console.log(person);
            person.name = req.body.name;
            person.company = req.body.company;
            person.age = req.body.age;

            person.save().then(business => {
                res.json('Update complete');
            })
                .catch(err => {
                    res.status(400).send("unable to update the database");
                });
        }
    });
});

// Defined delete | remove | destroy route
personRoutes.route('/delete/:id').get(function (req, res) {
    Person.findByIdAndRemove({_id: req.params.id}, function(err, person){
        if(err) res.json(err);
        else res.json('Successfully removed');
    });
});

module.exports = personRoutes;
Ở đây, mình đã định nghĩa các hoạt động CRUD để có thể thao tác với MongoDB, với các chức năng tương ứng mình đã note ở từng function.
Trong đoạn code trên mình có sử dụng ORM Mongoose để lưu, cập nhật, xóa dữ liệu khỏi cơ sở dữ liệu. (Mongoose là một ORM được sử dụng trong cơ sở dữ liệu MongoDB). Tiếp đến, mình sẽ thêm các route này vào file server.js
Okey, như vậy file server.js cuối cùng sẽ như thế này:
// server.js
const express = require('express');
const app = express();
const bodyParser = require('body-parser');
const PORT = 4000;
const cors = require('cors');
const mongoose = require('mongoose');
const config = require('./DB.js');
const personsRoute = require('./persons.route');

mongoose.Promise = global.Promise;
mongoose.connect(config.DB, { useNewUrlParser: true }).then(
    () => {console.log('Database is connected') },
    err => { console.log('Can not connect to the database'+ err)}
);

app.use(cors());
app.use(bodyParser.urlencoded({extended: true}));
app.use(bodyParser.json());

app.use('/persons', personsRoute);

app.listen(PORT, function(){
    console.log('Server is running on Port:',PORT);
});
Lưu file và mở terminal lên kiểm tra xem có lỗi gì không?
9: Cài đặt thư viện Axios và send request POST.
Cài đặt thư viện Axios để gửi request đến API:
yarn add axios

 or

npm install axios --save
Sau đó mình sẽ sửa lại hàm submit trong file create.component.js để submit data lên route:
// create.component.js
import React, {Component} from 'react';
import axios from 'axios';
export default class Create extends Component {
constructor(props) {
super(props);
this.onChangeName = this.onChangeName.bind(this);
this.onChangeCompany = this.onChangeCompany.bind(this);
this.onChangeAge = this.onChangeAge.bind(this);
this.onSubmit = this.onSubmit.bind(this);
this.state = {
name: '',
company: '',
age:''
}
}
onChangeName(e) {
this.setState({
name: e.target.value
});
}
onChangeCompany(e) {
this.setState({
company: e.target.value
});
}
onChangeAge(e) {
this.setState({
age: e.target.value
});
}
onSubmit(e) {
e.preventDefault();
const obj = {
name: this.state.name,
company: this.state.company,
age: this.state.age
};
axios.post('http://localhost:4000/persons/add', obj)
.then(res => console.log(res.data));
this.setState({
name: '',
company: '',
age: ''
})
}
render() {
return (
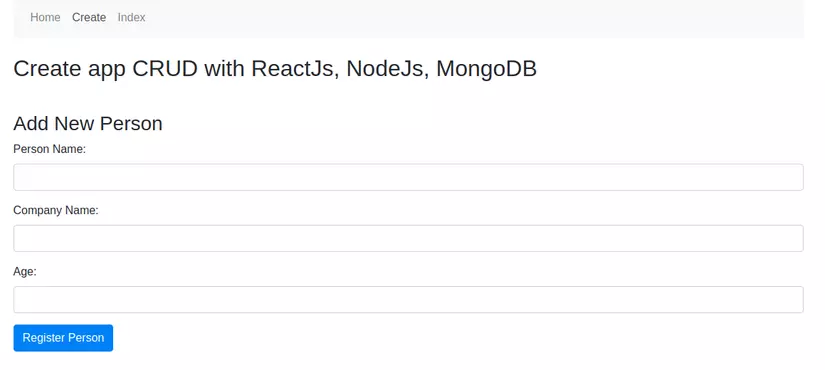
<div style={{marginTop: 10}}>
<h3>Add New Person</h3>
<form onSubmit={this.onSubmit}>
<div className="form-group">
<label>Person Name: </label>
<input type="text" className="form-control"
value={this.state.name}
onChange={this.onChangeName}
/>
</div>
<div className="form-group">
<label>Company Name: </label>
<input type="text" className="form-control" value={this.state.company}
onChange={this.onChangeCompany}/>
</div>
<div className="form-group">
<label>Age: </label>
<input type="text" className="form-control" value={this.state.age}
onChange={this.onChangeAge}/>
</div>
<div className="form-group">
<input type="submit" value="Register Person" className="btn btn-primary"/>
</div>
</form>
</div>
)
}
}
Okey, bây giờ bạn đã có thể test chức năng create data rồi đó.
Check data đã submit bằng cách vào db và check dữ liệu đã được insert thành công.
10: Hiển thị list dữ liệu
Để hiện thị list dữ liệu, mình sẽ tạo 1 table và hiển thị dữ liệu lên đó, trong file index.component.js mình sửa code như sau:.
// index.component.js
import React, {Component} from 'react';
import axios from 'axios';
import TableRow from './TableRow';
export default class Index extends Component {
constructor(props) {
super(props);
this.state = {persons: []};
}
componentDidMount() {
axios.get('http://localhost:4000/persons')
.then(response => {
console.log(response.data);
this.setState({persons: response.data});
})
.catch(function (error) {
console.log(error);
})
}
tabRow() {
return this.state.persons.map(function (object, i) {
return <TableRow obj={object} key={i}/>;
});
}
render() {
return (
<div>
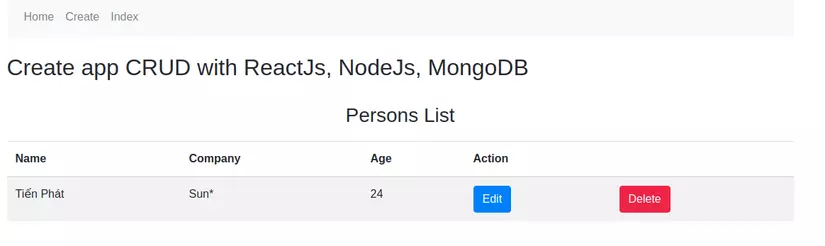
<h3 align="center">Persons List</h3>
<table className="table table-striped" style={{marginTop: 20}}>
<thead>
<tr>
<th>Name</th>
<th>Company</th>
<th>Age</th>
<th colSpan="2">Action</th>
</tr>
</thead>
<tbody>
{this.tabRow()}
</tbody>
</table>
</div>
);
}
}
Mình đã thêm hàm gọi API get list để lấy về list persons và đỏ vào list hiển thị.
Ở đây, mình tạo ra 1 thành phần table riêng cho dễ quản lý. Trong thư mục componenents mình thêm 1 file TableRow.js và thêm đoạn code sau vào đó:
// TableRow.js

import React, { Component } from 'react';

class TableRow extends Component {
  render() {
    return (
        <tr>
          <td>
            {this.props.obj.name}
          </td>
          <td>
            {this.props.obj.company}
          </td>
          <td>
            {this.props.obj.age}
          </td>
          <td>
            <button className="btn btn-primary">Edit</button>
          </td>
          <td>
            <button className="btn btn-danger">Delete</button>
          </td>
        </tr>
    );
  }
}

export default TableRow;
Component này sẽ chịu trách nhiệm in ra từng hàng 1 của table.
Okey, check lại thành quả qua link này nào: http://localhost:3000/index.
11: Update data
Đầu tiên, thêm link đến màn hình edit trong file TableRow.js.
// TableRow.js
import { Link } from 'react-router-dom';

<Link to={"/edit/"+this.props.obj._id} className="btn btn-primary">Edit</Link>
Sau đó sửa file edit.component.js để có thể submit được đến API.
// edit.component.js
import React, { Component } from 'react';
import axios from 'axios';
export default class Edit extends Component {
constructor(props) {
super(props);
this.onChangeName = this.onChangeName.bind(this);
this.onChangeCompany = this.onChangeCompany.bind(this);
this.onChangeAge = this.onChangeAge.bind(this);
this.onSubmit = this.onSubmit.bind(this);
this.state = {
name: '',
company: '',
age:''
}
}
componentDidMount() {
axios.get('http://localhost:4000/persons/edit/'+this.props.match.params.id)
.then(response => {
this.setState({
name: response.data.name,
company: response.data.company,
age: response.data.age });
})
.catch(function (error) {
console.log(error);
})
}
onChangeName(e) {
this.setState({
name: e.target.value
});
}
onChangeCompany(e) {
this.setState({
company: e.target.value
})
}
onChangeAge(e) {
this.setState({
age: e.target.value
})
}
onSubmit(e) {
e.preventDefault();
const obj = {
name: this.state.name,
company: this.state.company,
age: this.state.age
};
axios.post('http://localhost:4000/persons/update/'+this.props.match.params.id, obj)
.then(res => console.log(res.data));
this.props.history.push('/index');
}
render() {
return (
<div style={{ marginTop: 10 }}>
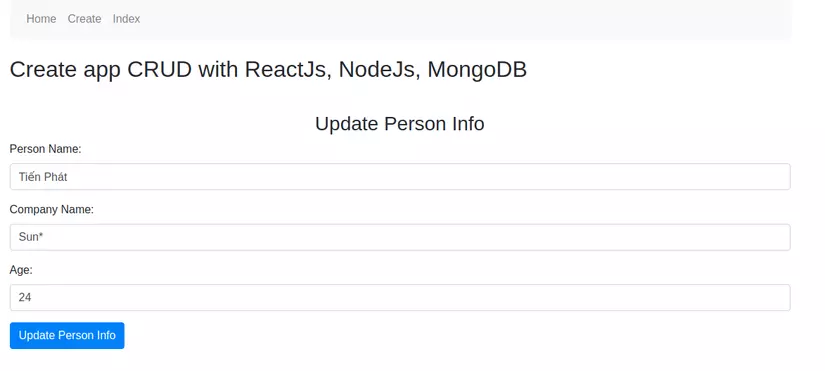
<h3 align="center">Update Person Info</h3>
<form onSubmit={this.onSubmit}>
<div className="form-group">
<label>Person Name: </label>
<input
type="text"
className="form-control"
value={this.state.name}
onChange={this.onChangeName}
/>
</div>
<div className="form-group">
<label>Company Name: </label>
<input type="text"
className="form-control"
value={this.state.company}
onChange={this.onChangeCompany}
/>
</div>
<div className="form-group">
<label>Age: </label>
<input type="text"
className="form-control"
value={this.state.age}
onChange={this.onChangeAge}
/>
</div>
<div className="form-group">
<input type="submit"
value="Update Person Info"
className="btn btn-primary"/>
</div>
</form>
</div>
)
}
}
Mình mới thêm function componentDidMount để thực hiện get data theo person_id khi vào page, và thêm xử lý post data lên route update để thực hiện chức năng update. Okey, giờ cùng check lại chức năng update trên màn hình nào.
 Check DB và xem kết quả.
12: Xóa dữ liệu
Như vậy đã xong 3 chức năng thêm, sửa, view và giờ còn lại chức năng xóa. Nút xóa mình để ở trên row vậy mình sẽ sửa trong file TableRow.js, thêm sự kiện gọi đến hàm delete và thêm hàm gọi api delete:
// TableRow.js

import React, { Component } from 'react';
import { Link } from 'react-router-dom';
import axios from 'axios';

class TableRow extends Component {
    constructor(props) {
        super(props);
        this.delete = this.delete.bind(this);
    }
    delete() {
        axios.get('http://localhost:4000/persons/delete/'+this.props.obj._id)
            .then(console.log('Deleted'))
            .catch(err => console.log(err))
    }

    render() {
        return (
            <tr>
                <td>
                    {this.props.obj.name}
                </td>
                <td>
                    {this.props.obj.company}
                </td>
                <td>
                    {this.props.obj.age}
                </td>
                <td>
                    <Link to={"/edit/"+this.props.obj._id} className="btn btn-primary">Edit</Link>
                </td>
                <td>
                    <button onClick={this.delete} className="btn btn-danger">Delete</button>
                </td>
            </tr>
        );
    }
}

export default TableRow;
Okey, Test lại kết quả nào.
Như vậy chức năng delete đã được xử lý thành công.
13: Kết luận
Như vậy mình đã hướng dẫn xong cách tạo app CRUD với ReactJs, NodeJs và DB là MongoDB. Hy vọng mọi người sẽ làm được và nếu có câu hỏi gì mọi người hãy đặt bên dưới comment nhé.
Thanks all.
Source code mình có để trên github các bạn tham khảo nhé: Github
Tài liệu tham khảo:
All rights reserved
